Capturing Repo Trades
A repo is a contract in which the seller of security products agrees to buy them back at a specified time and price, also called a repurchase agreement. Repos can have multiple securities, and their cashflows can be customized.
Coupon transfer is handled in the system as a corporate action. Coupons are not transferred as a result of an actual repo trade.
To configure repo trades, navigate to Trade > Security Finance > Repo (menu action trading.TradeWindow$Repo).
|
Repo Quick Reference
Entering Trade Details
Or you can enter the trade fields directly. They are described below. Once a security product is selected, you can specify the security’s details. To add another security, double-click + next to the Sec. Product field to show the Selected Security field, then choose New and select a product. When two or more securities have been added, a list of securities is shown.
Ⓘ [NOTE: For repo trades, the Details panel is not available. The Fees panel is disabled by default, but you can enable it by choosing View > Fees Tab] Saving a Trade
A description will appear in the title bar of the trade worksheet, a trade id will be assigned to the trade, and the status of the trade will be modified according to the workflow configuration. Ⓘ [NOTE: In a production environment, the Trade > Save As New function (or F3 key) is not recommended for repo trades] Pricing a Trade
If the product code “Special” on the security is set to true, the pricer will first look for a discount curve defined with usage COLLATERAL_SP to price the securities. Otherwise, the pricer will look for a discount curve defined with usage COLLATERAL_GC to price the securities. If multiple curves are mapped, the most restrictive will be used. The mapping of bond products and zero curves for this usage is done on the Repo panel of the Pricer Configuration window.
If none of these are defined, the pricer will look for the standard discount curve for the currency and index.
Trade Lifecycle
|


1. Static Data Filter Attributes
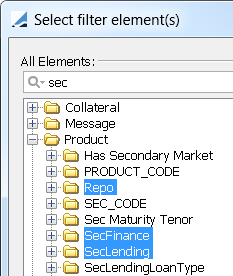
Add "SecFinance" to the domain sdFilterCriterion.Factory to create the Repo, SecFinance, and SecLending product static data filter attributes.

2. Trade Defaulting
Trade default values can be setup in the Security Finance Trade Defaulting window. From the Calypso Navigator, select Configuration > Legal Data > Security Finance Defaulting (menu action refdata.SecurityFinanceDefaultingWindow).
Most editable trade fields can be defaulted, and the defaulting can be driven by counterparty, product, or security and trade currency.
2.1 Counterparty Defaulting
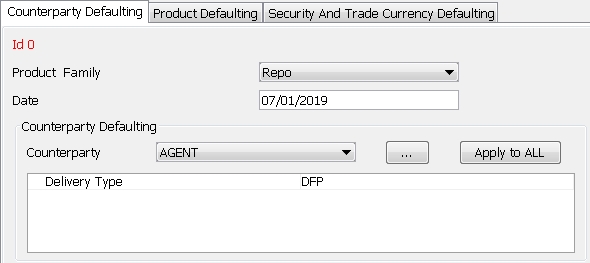
| » | Select the Counterparty Defaulting panel, then click New. |
| » | Select a product family, and enter the effective date of the trade defaulting. |
| » | In the Counterparty Defaulting area, click ... next to the Counterparty field and select the counterparty for whom you want to define default values. It is added to the adjacent drop down. |
Select the counterparty from the drop down, then right-click in the box below and select Configure columns. Select the trade fields to be defaulted for this particular counterparty and click OK. The fields are added to the box.
Enter the default values as needed for this counterparty. They will be used as default values when this counterparty is selected on security lending / repo trades, as defined in the product family.
Repeat as needed, adding more counterparties to the drop down and their corresponding default values to the box below.
You can click Apply to ALL to replicate one counterparty's defaulting configuration to all counterparties.
| » | Then click Save to save your changes. |
Note that if the Authorization mode is enabled, an authorized user must approve your entry. Note that it will show up in the Authorization window as a legal agreement.
2.2 Product Defaulting
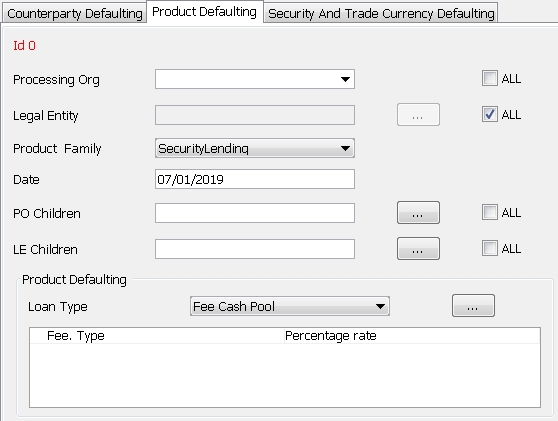
| » | Select the Product Defaulting panel, then click New. |
| » | Enter the common fields as needed. They are described in Trade Defaulting Common Fields below. |
| » | In the Product Defaulting area, click ... next to the Loan Type field and select the loan type for which you want to define default values. It is added to the adjacent drop down. |
Select the loan type from the drop down, then right-click in the box below and select Configure columns. Select the trade fields to be defaulted for this particular loan type and click OK. The fields are added to the box.
Enter the default values as needed for this loan type. They will be used as default values when this loan type is selected on security lending / repo trades, as defined in the product family.
Repeat as needed, adding more loan types to the drop down and their corresponding default values to the box below.
| » | Then click Save to save your changes. |
Note that if the Authorization mode is enabled, an authorized user must approve your entry. Note that it will show up in the Authorization window as a legal agreement.
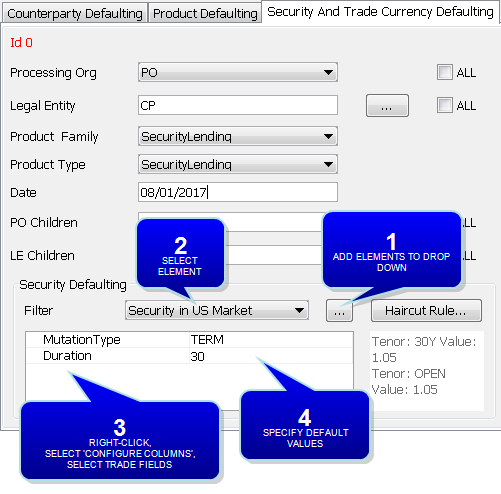
2.3 Security and Trade Currency Defaulting
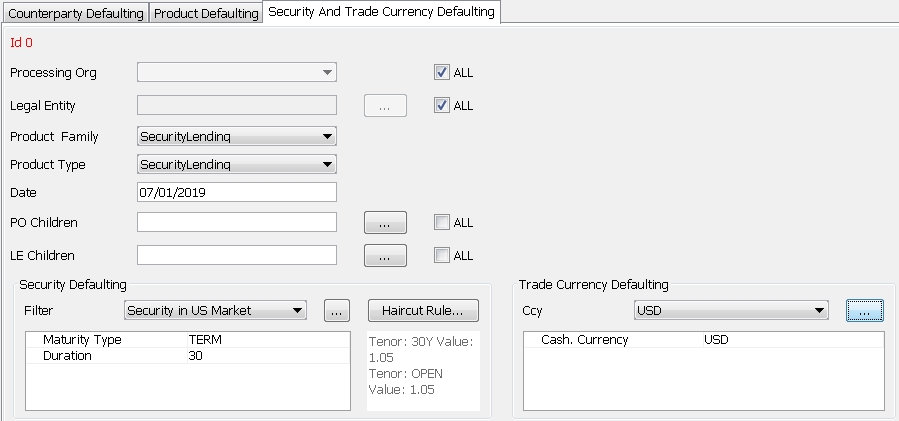
| » | Select the Security And Trade Currency Defaulting panel, then click New. |
| » | Enter the common fields as needed. They are described in Trade Defaulting Common Fields below. |
| » | In the Security Defaulting area, click ... next to the Filter field and select the haircut rule for which you want to define default values. It is added to the adjacent drop down. |
NOTE: For security defaulting, the static data filters used in haircut rule definitions should contain only securities-related criteria.
Select the haircut rule from the drop down, then right-click in the box below and select Configure columns. Select the trade fields to be defaulted for this particular haircut rule and click OK. The fields are added to the box.
Enter the default values as needed for this haircut rule. They will be used as default values when this haircut rule is selected on security lending / repo trades, as defined in the product family / product type.
Repeat as needed, adding more haircut rules to the drop down and their corresponding default values to the box below.
| » | In the Trade Currency Defaulting area, click ... next to the Ccy field and select the currency for which you want to define default values. It is added to the adjacent drop down. |
Select the currency from the drop down, then right-click in the box below and select Configure columns. Select the trade fields to be defaulted for this particular currency and click OK. The fields are added to the box.
Enter the default values as needed for this currency. They will be used as default values when this currency is selected on security lending / repo trades, as defined in the product family / product type.
Repeat as needed, adding more currencies to the drop down and their corresponding default values to the box below.
| » | Then click Save to save your changes. |
Note that if the Authorization mode is enabled, an authorized user must approve your entry. Note that it will show up in the Authorization window as a legal agreement.
2.4 Trade Defaulting Common Fields
|
Fields |
Description |
|
Processing Org ALL |
Select a processing organization for which the trade defaulting applies.
You can also check the "ALL" checkbox next to the Processing Org field to apply the trade defaulting to all processing orgs.
|
|
Legal Entity ALL |
Click ... next to the Legal Entity field to select the counterparty for which the trade defaulting applies.
You can also check the "ALL" checkbox next to the Legal Entity field to apply the trade defaulting to all counterparties.
|
|
Product Family |
Select a product family, SecurityLending or Repo. |
|
Product Type |
Only applies to Security and Trade Currency Defaulting. Select a product sub-type, or set this field to match the Product Family field to include all of its sub-types. |
|
Date |
Enter the effective date of the trade defaulting. |
|
PO Children ALL |
Click ... next to the PO Children field to select the children of the processing org for which the trade defaulting applies.
You can also check the "ALL" checkbox next to the PO Children field to apply the trade defaulting to all the children of the processing org.
|
|
LE Children ALL |
Click ... next to the LE Children field to select the children of the counterparty for which the trade defaulting applies.
You can also check the "ALL" checkbox next to the LE Children field to apply the trade defaulting to all the children of the counterparty.
|


2.5 Sample Trade Defaulting
2.6 Viewing Existing Trade Defaulting Definitions
You can browse trade defaulting definitions using Reports > Cross-Asset Reports > Legal Agreement Report.
Legal agreements are also displayed in this report. Either the 'Trade Defaulting' column or the 'Legal Agreement' column will be checked to indicate which it is.
NOTE: Currently, searching trade defaulting definitions on a counterparty will not return results where the legal entity falls into an "ALL" category.
2.7 Popup Query
If you would prefer to be asked before applying trade defaulting on new trades and when changing counterparties or books, this can be enabled by creating the domain QueryUserBeforeSecFinanceTradeDefaulting with the value "True".

A popup window will ask if you want to apply the trade defaulting, if there is any defined for a given combination of processing org and counterparty. To disable the popup, you can set the value to "False" or null. The default behavior is no popup.
3. Repo Trades
Multiple types of repos are supported in this window – Sample trades are shown later in this document.
Saving a repo creates a repo trade with product type = Repo and product sub-type = Standard, BSB, Pledge, Pool, Sweeping, or Triparty.
The trade screen is split into details sections which each represent a specific attribute of the trade.
To get the default view shown above, you may need to delete your default view. Then arrange the panels as desired and save the view.
 See "Repo Trade Panel Configuration" below for details on deleting a view and configuring the Trade panel.
3.1 Repo Trade Panel Configuration
The Trade panel of the Repo and SecLending trade windows is highly configurable. You can modify it as desired.
Step 1 – Display the configuration bar.
| » | If it is not already visible, select View > Configuration bar. |

Step 2 – Arrange the panels.
| » | In the configuration bar, select View > Show frame title bar. Title bars are added to each panel. They allow you to "grab" a panel to drag and drop it. |

| » | Arrange the Trade details, Collateral details, and Processing panels by dragging and dropping them to the desired locations. |
| » | You can de-select View > Show frame title bar to remove the title bars once you are done arranging the panels, if desired. |
Step 3 – Add additional panels as desired.
| » | You can select View > Add component > Property panel to create a new details panel. You will be prompted to name the panel. |
The panel is blank when added. Right-click within the panel and choose Select fields, then select the field to add. Repeat as needed until you have added all the desired fields. Some fields are only displayed when certain other criteria is met.
| » | You can select View > Add component > Securities panel to add a securities panel. You will be prompted to name the panel. |
| » | You can select View > Add component > Cashflows panel to add a cashflows panel. You will be prompted to name the panel. |
| » | To delete a panel, enable the title bars (View > Show frame title bar) and click X in the panel to be deleted. |
Step 4 – Add or remove fields, and configure field names and colors as desired.
| » | To add or remove fields, right-click within the desired panel and choose Select fields, then select the field to add or remove. Repeat as needed until you have added and removed all the desired fields. Some fields are only displayed when certain other criteria is met. |
| » | To configure field names and colors, right-click within the desired panel and choose Configure field names and color, then set a display name and/or field color as desired. For SecLending trades, the fields that are colored out-of-the-box indicate those which are necessary when manually entering a trade. |
Step 5 – Save the view.
| » | In the configuration bar, select View > Save to save your current view. |
| » | You can select View > Save As to save an alternative view. You will be prompted to name the view. |
Your saved views are displayed when you enable the configuration bar.

| » | You can delete a view by clicking on the view to delete and selecting View > Delete. You will be prompted to confirm the deletion. |
In the image above, "View2" is selected.
| » | If you do not wish to use multiple views, you can disable the configuration bar by de-selecting View > Configuration bar when you are done configuring the panel. |
3.2 Repo Trade Fields Details
The default fields are described below. Note that many fields are contextual and are only displayed when applicable and when certain criteria are met.
Settlement Details

|
Fields |
Description |
|---|---|
|
Role / Legal Entity |
The first two fields of the Settlement details identify the trade counterparty. The first field identifies the trade counterparty’s role. The default role is specified using Utilities > Set Default Role. However, you can change it as applicable. You can select a legal entity of specified role from the second field provided you have set up favorite counterparties. You can also type in a character to display the favorite counterparties that start with that character. Favorite counterparties are specified using Utilities > Configure Favorite Counterparties. Otherwise, click ... to select a legal entity of specified role from the Legal Entity Chooser. You can also directly enter a Legal Entity short name. |
|
Book |
Trading book to which the trade belongs. Defaults to the book selected in the User Defaults. You can modify as applicable. You can select a book provided you have set up favorite books. Favorite books are specified using Utilities > Configure Favorite Books. Otherwise, click ... to select a book. The owner of the book (a processing organization) identifies your side of the trade. |
|
Status |
Current status of the trade. The status is automatically assigned by the system based on the workflow configuration. The status changes over the lifetime of the trade according to the workflow configuration and the actions performed on the trade. |
|
Id Ext Ref Int Ref |
Unique identification number of the trade. The trade id is automatically assigned by the system when the trade is saved. You can load an existing trade by typing the trade id into this field, and pressing [Enter]. You can also display the internal reference or external reference. The default trade reference to be displayed can be selected in the User Defaults. The internal reference and external reference can be set in the Details panel of the trade worksheet. |
|
Broker |
Click ... to select a broker as needed. A broker is a legal entity of role Broker. |
|
Template |
You can select a template from the Template drop down to populate the worksheet with default values. Then modify the fields as applicable. Note: The template is automatically reset to NONE when NEW is clicked. This behavior is controlled by the SecFinanceKeepTradeTemplate domain which is set to false by default. |
Trade Details
|
Fields |
Description |
|||||||||||||||||||||||||||||||||||||||
|---|---|---|---|---|---|---|---|---|---|---|---|---|---|---|---|---|---|---|---|---|---|---|---|---|---|---|---|---|---|---|---|---|---|---|---|---|---|---|---|---|
|
Repo Type |
Select the type of repo. The following values are available.
Repo types are defined in the Repo.subtype domain. Samples of each repo type with additional details are shown later in this document. |
|||||||||||||||||||||||||||||||||||||||
|
Direction |
Direction of the trade from the book’s perspective. Select Repo or Reverse from the drop down.
|
|||||||||||||||||||||||||||||||||||||||
|
Trade Date Current Date Time |
If "Current Date Time" is checked, the trade date displays the current date and time and cannot be modified. Otherwise, you can modify it as applicable. Double-click +/- next to the Trade Date field to show/hide the Current Date Time field.
|
|||||||||||||||||||||||||||||||||||||||
|
Start Date |
The start date defaults to the spot date (number of spot days specified in the currency defaults are applied to the trade date). You can modify the start date as applicable. Double-click the Start label to adjust the start date if the trade date is modified. |
|||||||||||||||||||||||||||||||||||||||
|
Intraday. Start Time |
For INTRADAY repos only, the start time. Defaults to the booking time. |
|||||||||||||||||||||||||||||||||||||||
|
End Date |
Enter the end date, or tenor, of the contract. Leave this field blank for an open contract (Call Account). Bonds Maturing On or After Repo End Date The domain value CA.generateSecFinanceClaimIdXfer allows specifying whether or not to generate a position adjustment technical transfer when a repo trade’s end date is the same as or greater than its underlying bond’s maturity date. If set to true or not set, the technical transfer (having a ClaimId) is created to offset the security movement on repo return leg. If set to false, the technical transfer is not created. Note that it also applies if the matured bond is just one piece of a multi-collateral trade. Setting to false can be used if you prefer to handle the redemption as part of a corporate action. |
|||||||||||||||||||||||||||||||||||||||
|
Duration |
Calculated based on the end date. Or you can input the duration in number of days and the end date will be calculated. |
|||||||||||||||||||||||||||||||||||||||
|
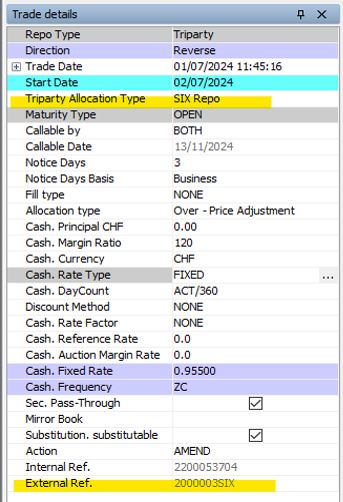
Triparty Allocation Type |
Select “SIX Repo” for repos handled by the SIX agent. |
|||||||||||||||||||||||||||||||||||||||
|
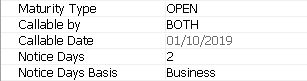
Maturity Type Callable by Callable Date Notice Days Notice Days Basis |
You can generate the transfers of an OPEN repo up to a certain date using Trade Lifecycle > Termination > Terminate with the Generate Transfers action.
To calculate one day of interest for INTRADAY repos, you need to add the corresponding trade currencies or ALL to the domain "SimpleMM.ApplyOneDayInterest".
Upon termination, Notice Days is reset to 0 and the original value is stored in the trade keyword OriginalNoticeDays.
Upon termination, Callable By is reset to NONE and the original Maturity Type is stored in the trade keyword OriginalMaturityType. The trade keyword CheapestToReturn is automatically populated upon saving based on the type of termination:
|
|||||||||||||||||||||||||||||||||||||||
|
Fill type |
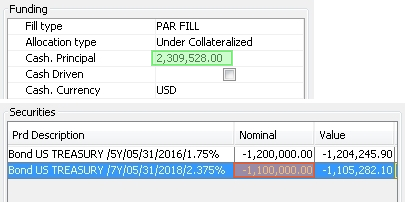
When booking a Standard repo, you can decide to follow a FILL process or not. Using a FILL process means that trade booking will be broken into two steps: 1. You first save a shell trade with cash details, a FILL type of MONEY FILL, and no allocated collateral. 2. Then you allocate collateral to the trade. If this two-step (FILL) booking process is not required, repo trades must be booked with FILL type set to NONE. For example, with Cash Principal = 200M:
Select the type of collateral allocation:
The trade must be saved without a collateral. The trade attribute MoneyFillAllocation will be set to PendingAllocation.
The collateral allocation can be performed after the trade is saved using the Money Fill allocation window, the Trade Allocation Manager, or the Collateral Bulk Entry window for Reverse repos. In both the Money Fill Allocation window and the Trade Allocation Manager, the required collateral amount will be set to the Repo Principal value. The MONEY FILL process will select collateral until the total Security Value(s) reaches this Principal target amount (taking into account the predefined allocation type rounding methodology). If you want the Repo Principal to be computed after collateral allocation, check the “Allow modif money” checkbox. You can set the collateral source into the product code "REPO_FILL_SOURCE_BOOK".
Fill Type Domain Values The domain SecFinance.FillType controls the values available for selection in the "Fill type" field of Repo and SecLending Sec Vs Cash trades. By default, the values are MONEY FILL and NONE. Note that these are the only possible values that can be used and no other values should be added. |
|||||||||||||||||||||||||||||||||||||||
|
Fill Source Book |
The field allows to select books with attribute REPO_FILL_SOURCE_BOOK = true. It is used by the constraint Fill-Source-Book in the Trade Allocation Manager to filter eligible books. |
|||||||||||||||||||||||||||||||||||||||
|
Allocation type |
Used when allocating the collateral to the repo. It drives the adjustment of the price or par of the repo collaterals when the repo money amount is not exactly equal to the Nominal * Dirty Price. For example, you have a 200M MONEY FILL repo, and 75M of CUSIP A and 300M of CUSIP B in your inventory. From the Money Fill allocation window, you can double-click on CUSIP A and the system will add 75M of CUSIP A at the market price to your repo, and you will then have roughly 125M left to allocate. You then double-click on CUSIP B, and since the position is large enough to fully allocate the repo, the system will calculate how much to allocate based on the allocation type. Assuming that the dirty price of CUSIP B is 101:
|
|||||||||||||||||||||||||||||||||||||||
|
Cash. Principal |
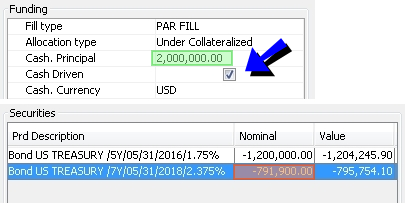
The repo principal. Click Cash Driven Trading When cash driven trading is enabled, the principal amount of the repo drives the nominal of the security.
Example: Two collaterals have a computed principal of 2M+. |
|||||||||||||||||||||||||||||||||||||||
|
Cash. Margin Ratio |
The initial margin on the funding leg. Enter a value in percentage. Example: To book a margin of 5%, enter either 105 or 95, depending on whether you want to increase or decrease the principal. |
|||||||||||||||||||||||||||||||||||||||
|
Cash. Currency |
Select the currency. |
|||||||||||||||||||||||||||||||||||||||
|
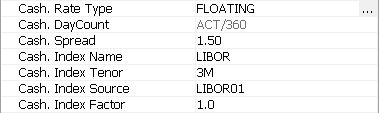
Cash. Rate Type Cash. DayCount Cash. Fixed Rate Cash. Spread Cash. Index Name Cash. Index Tenor Cash. Index Source Cash. Index Factor |
Select FIXED or FLOATING and enter the fields shown below, or you can click ... to open the Money Market Cash window and apply the values from there. Fixed or Floating must be selected prior to clicking .... FIXED
FLOATING
|
|||||||||||||||||||||||||||||||||||||||
|
Cash. Reset Lag Cash. Compounding Frequency Cash. Compounding Method Cash. Observation Shift |
These are non-default floating rate fields which can be added to the trade window using the right-click > Select fields functionality.
|
|||||||||||||||||||||||||||||||||||||||
|
Cash. Frequency |
Select a payment frequency. |
|||||||||||||||||||||||||||||||||||||||
|
Cash.Rate Factor Cash.Reference Rate Cash.Auction Margin |
These fields are used to support the Colombian (BANREP) Repo Rounding Convention with fixed and floating rate. (These fields only apply to Repo Standard sub-type. These are non-default floating rate fields which can be added to the trade window using the right-click > Select fields functionality.)
|
|||||||||||||||||||||||||||||||||||||||
|
Effective haircut |
This is a non-default field which can be added to the trade window using the right-click > Select fields functionality. Single security: [((Dirty Money Value * FX Rate) - Cash Principal) / Dirty Money Value * FX Rate] * 100 Multiple securities: [(Sum (Dirty Money Values * FX Rates) - Cash Principal) / (Sum (Dirty Money Values * FX Rates)] * 100 |
|||||||||||||||||||||||||||||||||||||||
|
This is a non-default field which can be added to the trade window using the right-click > Select fields functionality. You can select an eligibility filter to be used for security eligibility checking. If a Repo Legal Agreement with eligibility rules is present on the trade, the matching SD filters from the eligibility rules will be displayed in a list. If no Repo Legal Agreement is present, all SD filters of group "ANY" will be displayed in a list. Note that if Fill Category is used, the security must be eligible to both the selected eligibility filter AND to the Wrong Way Risk, if any is defined in the haircut rule on the Repo Legal Agreement.
|
||||||||||||||||||||||||||||||||||||||||
|
Discount Method |
This is a non-default field which can be added to the trade window using the right-click > Select fields functionality. Select the discount method:
Interest = Final Amount - Principal, where Final Amount = Principal * (1 + Rate) ^ Period The impacted calculations are cashflows and the pricer measures ACCRUAL, PRICE, and NPV. (Must set to EXP for Colombian repo rounding.)
|
|||||||||||||||||||||||||||||||||||||||
|
Cash. Payment Holidays |
This is a non-default field which can be added to the trade window using the right-click > Select fields functionality. For a repo settled in non-native currency, you can specify a holiday calendar to be used instead of the currency calendar. |


A rebate rate (the rate applied on the cash collateral) is paid to the borrower. The cash collateral can accept a 0 rate.
You can also use it to calculate interest only transfers without actual exchange of cash collateral. This will be an interest paid to the lender.
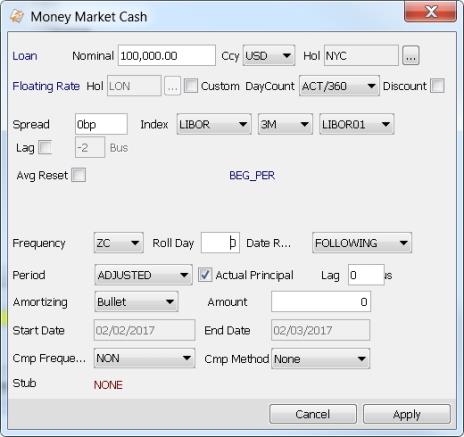
| » | Enter the fields described below, and click Apply. |
|
Fields |
Description |
|||||||||||||||||||||||||||||||||||||||
|
Loan / Deposit |
Direction of the cash from the book’s perspective. Double-click the Loan label to change to Deposit as applicable. |
|||||||||||||||||||||||||||||||||||||||
|
Nominal |
Enter the amount of cash. |
|||||||||||||||||||||||||||||||||||||||
|
Ccy |
Cash currency. Displays the loan currency by default. You can change the cash currency as applicable. |
|||||||||||||||||||||||||||||||||||||||
|
Hol |
The holiday calendar of the loan currency. You can modify the cash holiday calendar as applicable. |
|||||||||||||||||||||||||||||||||||||||
|
Fixed Rate / Floating Rate |
Fixed Rate or Floating Rate must be selected in the trade window. Fixed
Floating
The Bus label indicates that the payment lag is a number of business days. Double-click the Bus label to change to Cal as applicable for indicating that the payment lag is a number of calendar days. |
|||||||||||||||||||||||||||||||||||||||
|
Avg Reset |
Average reset only applies to floating rates. Check the "Avg Reset" checkbox to sample resets at a frequency different from the payment frequency. Otherwise, the resets are sampled at the payment frequency.
Double-click the Equal label to toggle between:
Double-click the Match label to toggle between:
Double-click the BEG_PER label to toggle between:
Double-click the FLW_PER label to toggle between:
If this flow contains some compound periods (coming from amortizing for example), they will use the same rate reset ranges. It is the existing and default Calypso behavior.
Each compound period will use its own resets. Others resets existing on the parent flow will not be used. |
|||||||||||||||||||||||||||||||||||||||
|
Daycount |
Select a daycount convention from the drop down. |
|||||||||||||||||||||||||||||||||||||||
|
Discount |
If checked, PRINCIPAL includes INTEREST. A discounted repo prevents partial returns because of unknown amortizing. |
|||||||||||||||||||||||||||||||||||||||
|
Frequency Roll Day Date Roll Period Actual Principal Amortizing Amount |
You can specify the billing parameters using these fields, or you can select from the Billing Period field. Select the payment frequency from the Frequency field. Defaults to ZC, zero coupon. Enter the number of days that the interest should be rolled in the Roll Day field, to force the interest date as applicable. Select the date roll convention if the coupon date is not a business day from the Date Roll field. See Calypso Navigator > Help > Date Roll Conventions for details. Select the payment rule from the Period field. The following payment rules are available:
Check the "Actual Principal" checkbox for all trades. When checked there is actually an exchange of principal against the security. Otherwise, only the interest is exchanged against the security (for security lending trades). Select the amortization type of the trade interest from the Amortizing field. Defaults to Bullet, no amortization. The Amount field only applies to step down amortization. Enter the step down amount. |
|||||||||||||||||||||||||||||||||||||||
|
Start Date |
The start date of the trade. |
|||||||||||||||||||||||||||||||||||||||
|
End Date |
The end date of the trade. |
|||||||||||||||||||||||||||||||||||||||
|
Cmp Frequency |
Select the compounding frequency. The compounding frequency must be more frequent than the payment frequency. |
|||||||||||||||||||||||||||||||||||||||
|
Cmp Method |
Select the compounding type if applicable, or None.
|
|||||||||||||||||||||||||||||||||||||||
|
Stub |
Double-click the red label next to the Stub field to open the Cash Detail window for specifying the details of the stub period. |

Collateral Details

|
Fields |
Description |
||||||||||||
|---|---|---|---|---|---|---|---|---|---|---|---|---|---|
|
Sec. Product |
You can select a security in several ways:
If you have specified a quick entry template, the search will look into the products of the quick entry template.
You can view or modify the details of the selected security by clicking Security eligibility rules can be defined in the Eligibility Rule window and added to legal agreements.
|
||||||||||||
|
Selected Security |
Double-click +/- next to the Sec. Product field to show/hide the Selected Security field. Displays the security currently selected and its details.
You can configure the columns of this panel by right-clicking in the column headings and selecting Configure > Configure Columns. |
||||||||||||
|
Sec. Code type Sec. Code |
The code and code format of the underlying security. The code type defaults to the Security Code specified in the User Defaults, but you can change the selection using the drop down. |
||||||||||||
|
Sec. Currency |
The currency of the underlying security. |
||||||||||||
|
Sec. Nominal Sec. Quantity |
Enter the amount of nominal / quantity that is traded. Field behavior depends on security type and quote type of security. For Nominal, this is the original nominal. The corresponding quantity is displayed.
Ⓘ [NOTE: You can enable the field "Quantity" for all quote types if the domain UseQuantity contains the value true. Setting to true will enable both fields. If UseQuantity is set to false, then Quantity field will be un-editable regardless of quote type] |
||||||||||||
|
Sec. Coupon Currency |
Displays the Bond Coupon Currency. |
||||||||||||
|
Sec.Coupon FX Rate |
This will convert the Bond Coupon flow into Bond Coupon currency. This FX rate value will be captured at trade inception. |
||||||||||||
|
Sec. Market Quote |
Displays the latest quote on the settlement date if any. |
||||||||||||
|
Sec. FX Rate |
This field is enabled when the security’s currency is different from the trade’s currency. Enter the FX rate between the security’s currency and the trade’s currency. If the trade is not cross currency, the value will default to 1 and the field will not be editable. |
||||||||||||
|
Sec. Clean Price Sec. Accrual Sec. Dirty Price Sec AllIn Price |
Enter the clean price, dirty price, allin price, or yield, and the other fields will be calculated accordingly. The dirty price is clean price + accrual. For bonds quoted using Price32, you can enter the trade’s price with 2, 3, or 4 digits after the dash. The first 2 digits represent the number of thirty-seconds (between 1 and 31). If the price contains 3 digits, the third digit represents the number of eighths of a thirty second (or 1/256, between 1 and 7). A bond price entered as "99-022" will be read as [99 + 2/32 + 2/8(1/32)], or 99.0703125. The third digit can also be +, indicating 4/8 of a thirty second. If the price contains 4 digits, the last 2 digits represent the number of sixteenths of a thirty second (or 1/512, between 1 and 15). Note that the 4-digit logic only applies to bonds with the tick size 512. For securities with tick size other than 100: You can convert clean price to decimal format when dirty price or yield are specified on trade screen. For this, you need to set the security product code SECFINANCE_QUOTE_BASE = 100. |
||||||||||||
|
Sec. Haircut Value |
Enter the haircut percentage, expressed in basis points (enter 0 for no haircut). Haircut rules and defaults can be specified in the Legal Agreement window – See Legal Agreement documentation for details. |
||||||||||||
|
Sec. All in money value |
Sec Dirty Price, including haircut, expressed in security currency. |
||||||||||||
|
Indemnity % |
Applies when the coupon is not passed through to the original bond holder at coupon date, but at repo maturity. The rate for calculating indemnity. It can be different from the repo rate. Indemnity = Indemnity Rate % * Coupon Amount * (Repo End Date - Coupon Payment Date) / Rate Basis |
||||||||||||
|
Sec. Pass-Through |
Check to pass the coupon / dividend through to the original owner at coupon / dividend date (repos). Or clear to keep the coupon / dividend until the end date, and return it to the original owner against an indemnity fee (buy sell backs / security lendings). In any case, the actual coupons and dividends are generated using the Corporate Action process. |
||||||||||||
|
Sec. Pool Factor Sec. Override Pool Factor |
Only applies to ABS bonds and sinking bonds. Pool Factor = Face Value (Val Date) / Face Value (Start Date) You can override the pool factor value by checking "Sec. Override Pool Factor", which makes "Sec. Pool Factor" editable so you can specify the new value. |
||||||||||||
|
Sec. Eligibility |
Only displayed when a legal agreement is selected. It appears as checked if the selected security is eligible to the selected legal agreement. |
||||||||||||
|
Sec. <Collateral Attribute> |
This is a non-default field which can be added to the trade window using the right-click > Select fields functionality. It will only be visible for MONEY FILL repos. Collateral attributes are similar to trade keywords but are stored at the collateral level, so multi-collateral trades can have a different value per collateral for the same attribute. You can define collateral attributes in the domain CollateralAttribute. You can define collateral attributes to be propagated to the transfer attributes in the domain PropagateCollateralAttribute. The PropagateCollateralAttribute transfer workflow rule is also required. The collateral attributes that you want to propagate must also be added to the domain XferAttributes. |
||||||||||||
|
BSB Specific Fields – These fields only appear when BSB is selected as the Repo Type |
|||||||||||||
|
BSB End Cash |
Sum of all BSB cashflows at maturity (principal and interest), excluding the coupon and indemnity (even if not passed through). BSB Start Cash * [1 + (Repo Rate % * Repo Number of Days / Basis)] |
||||||||||||
|
BSB Adjusted End Cash |
Sum of all BSB cashflows at maturity (principal, interest, coupon, and indemnity). Equivalent to BSB End Cash if the coupon is passed through. BSB Start Cash * [1 + (Repo Rate % * Repo Number of Days / Basis)] - Coupon * [1 + (Indemnity Rate % * Repo End Date - Coupon Payment Date) / Basis)] |
||||||||||||
|
Sec. Fwd Price |
(BSB Adjusted End Cash / Nominal) * 100 - (Bond Accrual at Repo End Date) |
||||||||||||
|
Sec. Fwd Dirty Price |
(BSB Adjusted End Cash / Nominal) * 100 |
||||||||||||

Processing Details
|
Fields |
Description |
||||||||||||||||||||||||||||||||||||||||||||||||
|---|---|---|---|---|---|---|---|---|---|---|---|---|---|---|---|---|---|---|---|---|---|---|---|---|---|---|---|---|---|---|---|---|---|---|---|---|---|---|---|---|---|---|---|---|---|---|---|---|---|
|
Action |
Select the Trade workflow action to be applied. |
||||||||||||||||||||||||||||||||||||||||||||||||
|
Delivery Type |
Select DFP, DAP, or Default.
|
||||||||||||||||||||||||||||||||||||||||||||||||
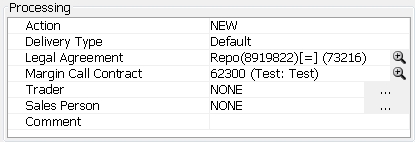
|
Legal Agreement |
Defaults to the applicable legal agreement if any. However, you can change it as applicable to any available legal agreement. Legal agreements are defined using Configuration > Legal Data > Agreements. Click the down arrow to bring up a selector window.
You can view or modify the details of the selected legal agreement by clicking The legal agreement attribute "CrystalizationDays" can be used to define the number of crystallization days for the EONIA rate index on security finance trades paying interest at maturity. |
||||||||||||||||||||||||||||||||||||||||||||||||
|
Select a Margin Call Contract from the selector window. Defaults to the applicable Margin Call Contract if only one is defined for the given combination of processing org and counterparty. You can view the details of the selected Margin Call Contract by clicking |
|||||||||||||||||||||||||||||||||||||||||||||||||
|
Trader |
Select a trader. You can click ... to add new traders. You will be prompted to enter a trader name. Trader names are defined in the trader domain. |
||||||||||||||||||||||||||||||||||||||||||||||||
|
Sales Person |
Select a sales person. You can click ... to add new sales persons. You will be prompted to enter a sales person name. Sales persons are defined in the salesPerson domain. |
||||||||||||||||||||||||||||||||||||||||||||||||
|
Comment |
Enter a free form comment as applicable. |
||||||||||||||||||||||||||||||||||||||||||||||||
|
This is a non-default field which can be added to the trade window using the right-click > Select fields functionality. Only applies to repos with multiple securities. Does not apply to Triparty repos. Select from the following:
The split will only occur if the delivery type is DAP.
Xfer Other Amount When the cash interest is dispatched across multiple DAP transfers for multi-collateral repo trades, the proportional calculation is driven by the ‘Sec. All in money value’ field. The dispatched interest amounts are populated in the ‘Xfer Other Amount’ field. You can base this calculation on the ‘Sec. Nominal’ field instead by setting the domain value SecFin_InterestDispatch_Nominal to true. Default is false. |
|||||||||||||||||||||||||||||||||||||||||||||||||
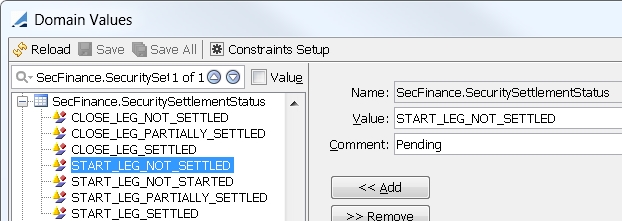
|
Sec. Settlement Status |
This is a non-default field which can be added to the trade window using the right-click > Select fields functionality. The settlement status of the trade. You can change the display names of the default values using domain values.
|

3.3 Sample Standard Repo
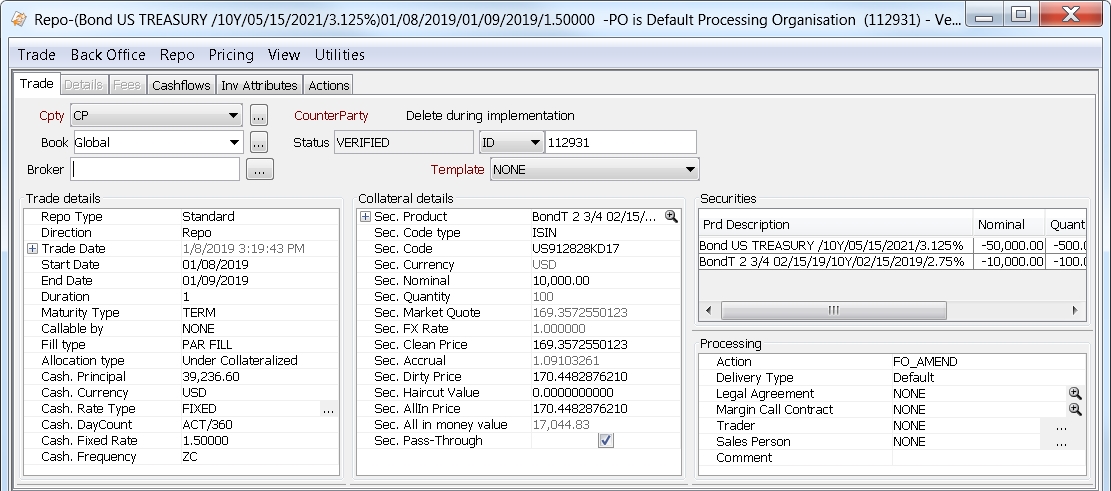
Standard repo that allows single or multiple securities.
3.4 Sample BSB Repo
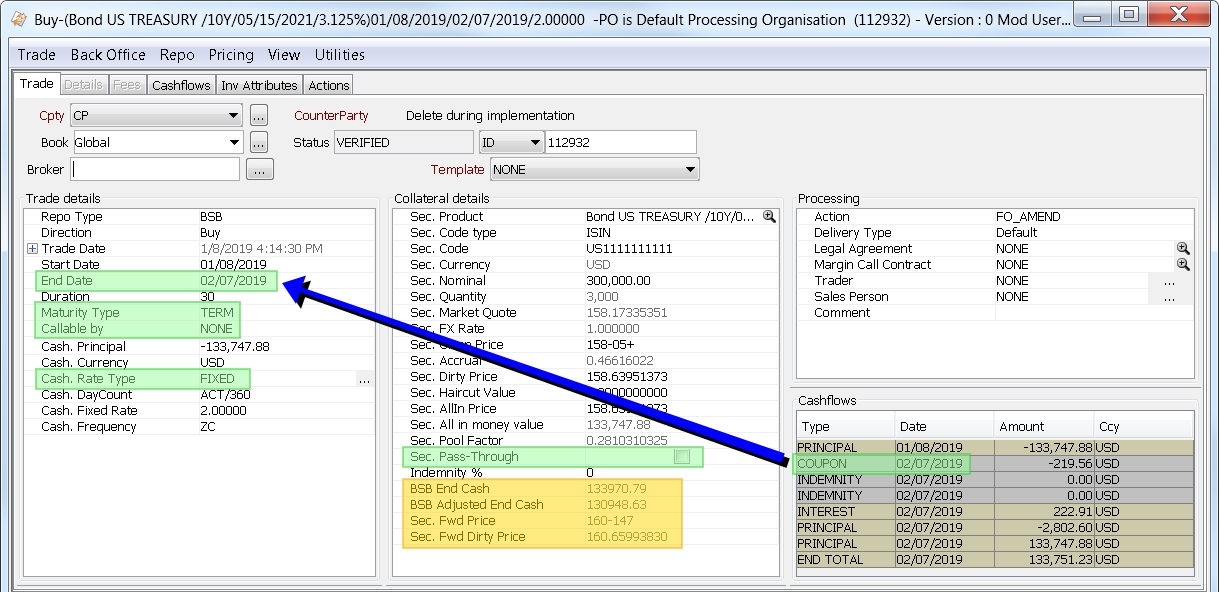
The fields highlighted in orange are specific to BSB (Buy Sell Back) trades only.
The rate must be fixed, not floating.
The maturity type must be TERM, and callable by NONE.
In the example above, the coupon is paid at the end of the repo term. This behavior is controlled by the "Sec. Pass-Through" checkbox - it is un-checked by default for BSB trades only.
3.5 Sample Pledge Repo
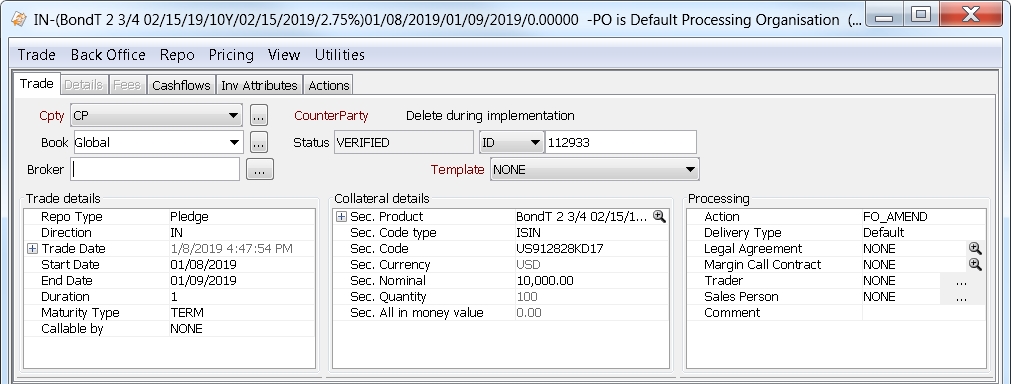
A Pledge repo allows single or multiple securities, and it also allows substitutions. It is the transfer of securities only, no cash. Because there is no price and no interest, the actions Reprice, Rerate, and Interest Cleanup are not supported. If you perform substitutions, the "Interest Cleanup on Substitution Date" checkbox is removed from the Substitution window.
3.6 Sample Pool Repo
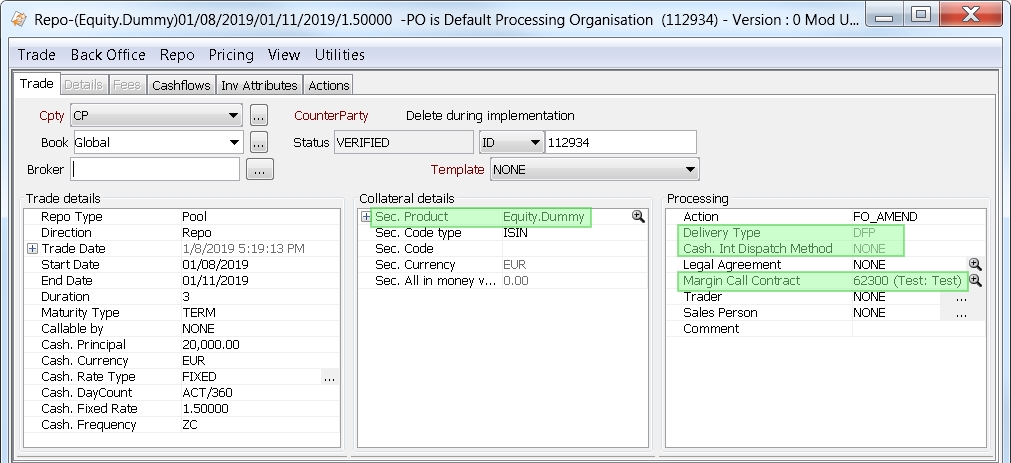
A Pool repo uses a "pool" approach and a "dummy" security. Pools are defined as Margin Call Contracts. Both the dummy security and Margin Call Contract are mandatory.
The dummy security is used for the Repo Curve selection process. It does not generate security transfers or corporate actions, or impact principal calculation. It is used to specify the collateral type that will later be allocated in the Margin Call Contract. The security collateral will be received or posted in the Collateral module with a "pool" approach - therefore the allocated securities are not displayed at the trade level.
The Delivery Type is always DFP, and the Interest Dispatch Method (non-default field) is always NONE as it is not applicable.
The actions Reprice, Return, and Substitution are not supported on Pool repos, however the Principal Change action is.
Dummy Security
The dummy security can be set up, for example, as an equity.
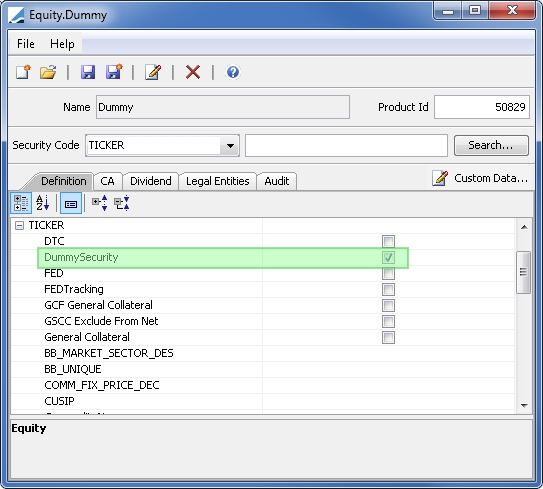
You can create a field to define a security as a "dummy" from Calypso Navigator > Configuration > Product > Code.

3.7 Sample Sweeping Repo
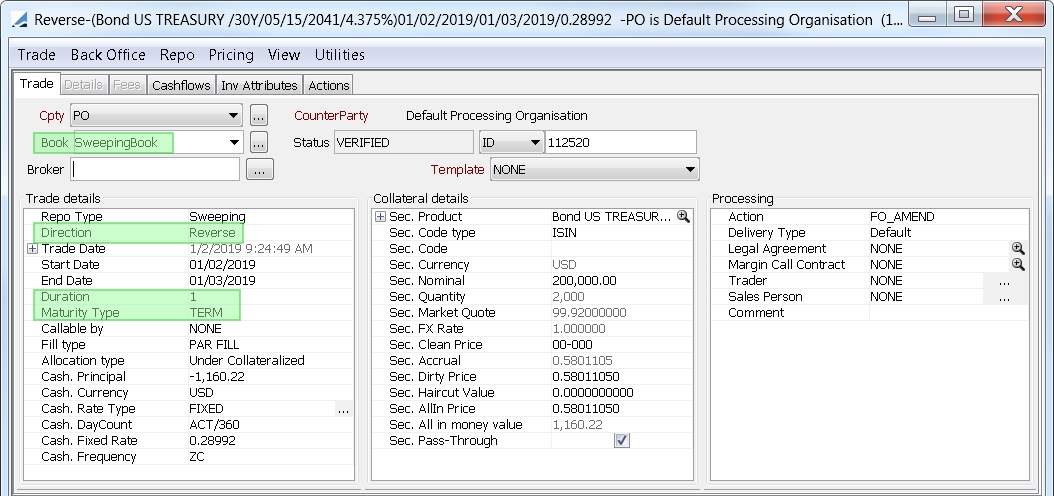
Sweeping trades are generated by the Security Finance Sweeping process and would not generally be booked manually by a user.
The book of the sweeping trade is the book that is specified to be swept to in the sweeping process.
Sweeping trades are in the Repo direction for long positions and in the Reverse direction for short positions.
Sweeping trades are always created as overnight repos, so the duration is always 1 day and the maturity type is always TERM.
 See Security Finance Sweeping for complete details.
3.8 Sample Triparty Repo
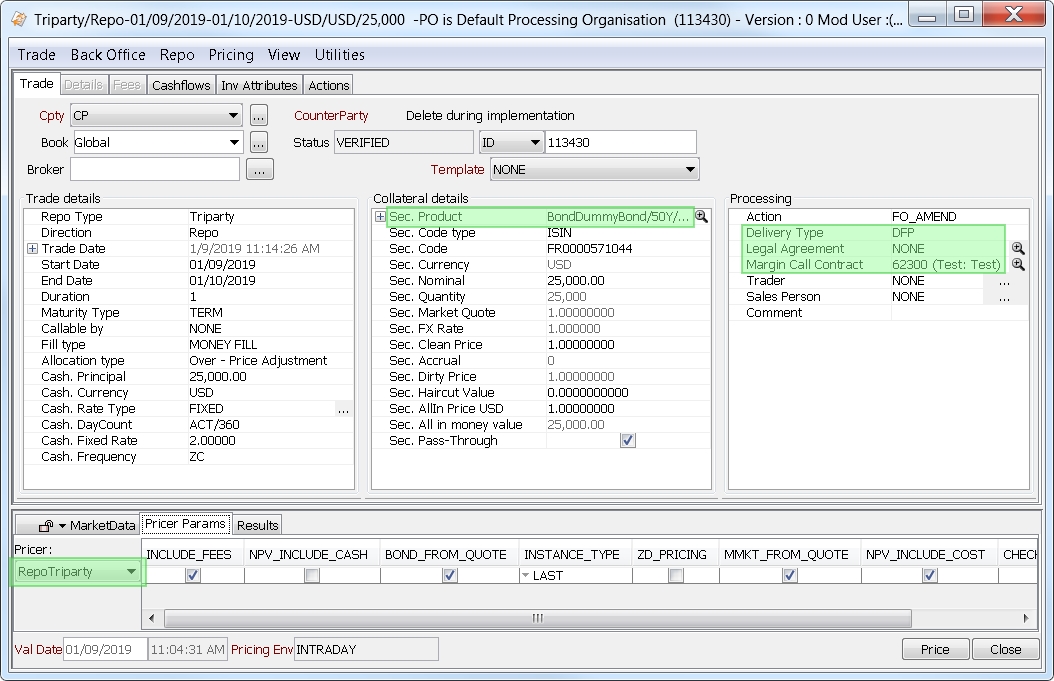
A Triparty repo uses a "dummy" security and involves an agreement between the receiver, the seller, and the triparty agent.
The dummy security is mandatory as it drives the SDI and the message.
The agreement can be a Triparty Repo Legal Agreement or a Margin Call Contract.
Ⓘ [NOTE: A TripartyRepo Legal Agreement is mandatory at trade creation if the legal entity attribute "RequireTripartyRepoAgreement = true" is set on the processing org]
Triparty repos should use the RepoTriparty pricer which, as part of the triparty process, loads allocations and creates dummy collaterals from Pledge trades, and assigns these dummy collaterals to the repo shell trade.
Please refer to Calypso Triparty Services for complete details on triparty setup and the triparty process.
The Delivery Type defaults to DFP, but you can modify it as needed.
You can view Triparty collateral details for a trade by choosing Repo > Display Triparty Collateral.
You can select Triparty Allocation Type with following values <empty>, 'Pool Allocation', 'EUREX GC Pooling' and Default is <empty>.
For Pool Allocation trades, the margin call contract / exposure group is selected based on Processing Org, Counterparty, Enable Triparty field, Direction field (Collateral Taker for reverse repos and Collateral Giver for repos).
For EUREX GC Pooling trades, the margin call contract / exposure group is selected based on Processing Org, Counterparty, Account Id. The Account Id must contain the collateral security currency and direction (PROV for repos and RECE for reverse repos). The Account Id must be defined as <security ISIN>-<security currency>-<PROV or RECE>.
Example: E1234567890-EUR-PROV.
These checks are only performed if domain “Repo.MCCMandatory” contains Value = true.
4. Generating the Cashflows
Select the Cashflows panel to view the cashflows associated with the repo trade.

| » | You can select an INTEREST flow and choose Repo > Adjust Interest Flow – You will be prompted to enter an interest amount and select an action. Click Apply when you are done. |
The interest amount will be modified, and the "Manual Amt" checkbox will appear checked.
5. Collateral Panel
For Standard and BSB repo trade sub-types, you can add an additional, optional Collateral panel by choosing View > Collateral Report Tab.
The Collateral panel is divided into two areas: Current and History.
The Current area is based on the Security Finance Collateral report and displays all the existing collateral balances at trade val date.
The History area is based on the Security Finance Collateral Flows report and displays all the past and future trade collateral flows. Future flows are displayed as gray rows.
6. Repo / Sec Lending Curve Allocation
Repo / sec lending curve allocation relies on general collateral categories, and the designation of "special" securities which are not handled as general collateral.
The general process for repo / sec lending curve allocation is the following:
Step 1 – Specify the "special" securities to differentiate them from the general collateral securities.
Step 2 – Group the general collateral (GC) securities into categories.
Step 3 – Define a zero yield curve, per trade currency, for each GC category and for each special security.
Step 4 – Map each GC category and each special security to its dedicated curve.
These steps are further described below.
Ⓘ [NOTE: Sec lending curve allocation is only supported for the following trade sub-types: Fee Cash Trade, Rebate, and Sec Vs Cash]
6.1 Specifying Special Securities
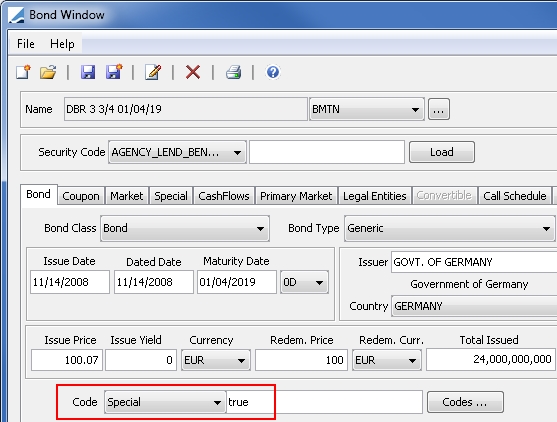
"Special" securities, as opposed to general collateral, are specified by setting the product code "Special" to true.
From the Calypso Navigator, navigate to Configuration > Product > Product Code and define the product code "Special".
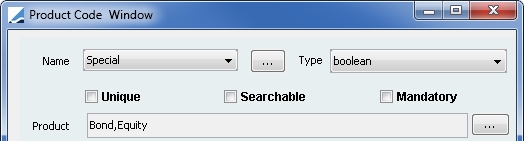
Please refer to Calypso Getting Started documentation for complete details on defining product codes.
Set the product code "Special" to true on each security you wish to designate as "special".
6.2 Creating General Collateral Categories
General collateral (GC) securities should be grouped into categories by defining static data filters that will be used for categorizing the GC repo curves. This will define a GC curve hierarchy per trade currency from the most restrictive static data filter to pure GC. For example:
| • | GC Euro |
| • | GC Euro Germany |
| • | GC Euro Germany + France |
| • | GC Euro Germany + France less than 10 years maturity |
From the Calypso Navigator, navigate to Configuration > Filters > Static Data Filter and define a static data filter for each GC category as needed.
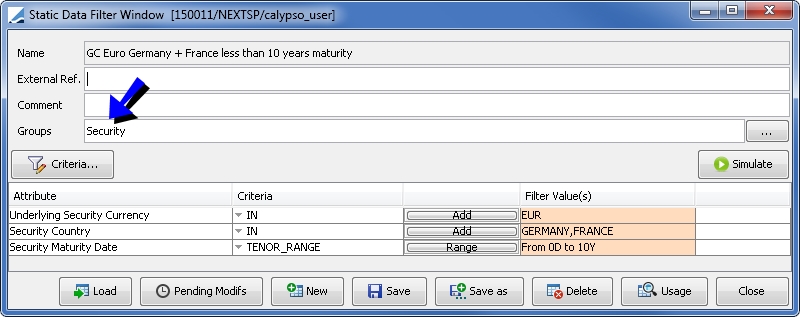
Only static data filters with the "Security" group will be available for selection when mapping the curves, so be sure that this is set.
6.3 Defining Zero Yield Curves
Define a zero yield curve, per trade currency, for each GC category and for each special security. These are in practice basis swap curves relying on OIS curves +/- a repo spread. For example, a repo GC for German bonds dealing with 12 bps spread below EONIA:
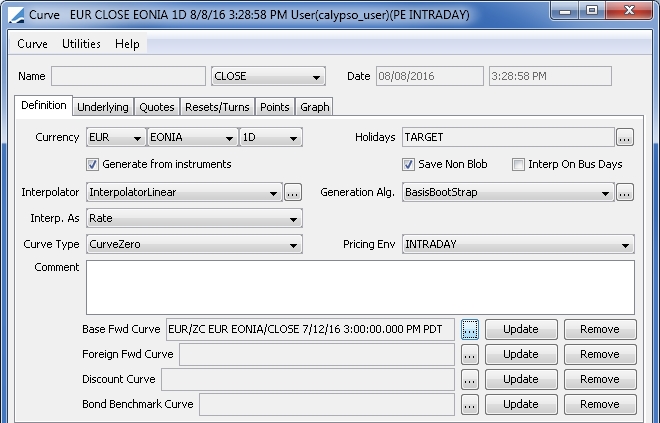
Please refer to Calypso Market Data documentation for complete details on defining zero yield curves.
6.4 Mapping Curves
Map each GC category and each special security to its dedicated curve so that each security has at least one curve associated with it.
If the product code “Special” on the security is set to true, the pricer will first look for a discount curve defined with usage COLLATERAL_SP (for repo) / SL_COLLATERAL_SP (for sec lending ) to price the securities. Otherwise, the pricer will look for a discount curve defined with usage COLLATERAL_GC (for repo) / SL_COLLATERAL_GC (for sec lending) to price the securities. If multiple curves are mapped, the most restrictive will be used.
From the Calypso Navigator, navigate to Market Data > Pricing Environment > Pricer Configuration.
Click Load, select the pricer configuration name, and click OK.
Click the Sec Finance tab.
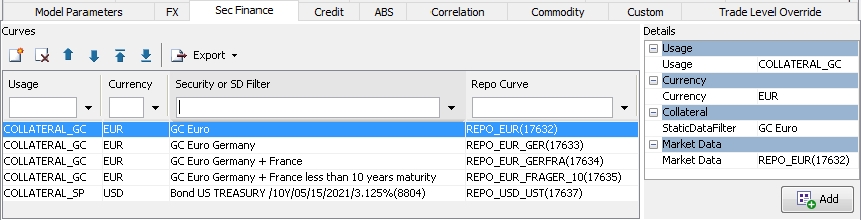
| » | Click |
| » | Select values in the Details area. |
| – | Select the COLLATERAL_GC / SL_COLLATERAL_GC usage for a GC category, or the COLLATERAL_SP / SL_COLLATERAL_SP usage for a special security. |
BOND_PRICING is used for pricing bonds with repo curves, and it is not part of this process.
CLOSING_TRADE is not used.
| – | Select a currency. |
| – | Select a GC category static data filter for the COLLATERAL_GC / SL_COLLATERAL_GC usage, or select a "special" security for the COLLATERAL_SP / SL_COLLATERAL_SP usage. |
Only static data filters with the "Security" group are available for selection.
| – | Select a repo / sec lending curve. |
| » | Click Add to add the curve to the list. |
| » | Click Save to save the pricer configuration. |
7. Collateral and Variation Margin Valuation
IFRS and most of the GAAP fair value oriented requires reclassifying ISIN lent/borrowed or collaterized (in and out) within the balance sheet. The scheduled task SECFINANCE_COLLATERAL_VALUATION is used to publish the fair value of those ISINs per type of holding (collateral, increased/decreased, or lent/borrowed) and rehypothecation.
SECFINANCE_COLLATERAL_VALUATION uses a SecFinanceCollateralBalance report template and publishes a PSEventCollateralValuation (TRADE_COLLATERAL_VALUATION) per row of the report in order to generate accounting events of type "VALU_<event property>”.
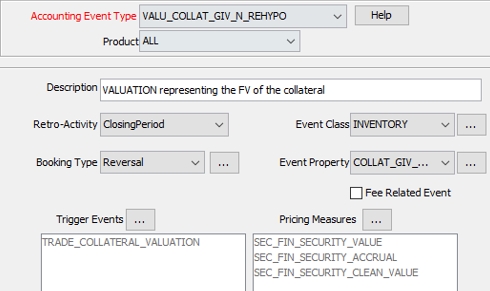
7.1 Accounting Events
Create the accounting events with TRADE_COLLATERAL_VALUATION trigger event and INVENTORY event class with measures SEC_FIN_SECURITY_VALUE, SEC_FIN_SECURITY_ACCRUAL, and SEC_FIN_SECURITY_CLEAN_VALUE. Only these measures can be used and at least one must be used.
The accounting events must be named "VALU_<event property>”, where <event property> is the concatenation of:
| • | IsSecurity (PRINCIPAL) or IsCollateral (COLLAT) or IsMargin (MC) |
| • | GIVE/REC (GIV/REC) |
| • | With Rehypothecation true/false (REHYPO/N_REHYPO) |
7.2 Engine Configuration
| » | Ensure that the Accounting Engine subscribes to PSEventCollateralValuation. |
| » | Ensure that the Cre Engine subscribes to PSEventCollateralValuation. |
| » | Ensure that the Accounting Engine and the Cre Engine are running before the scheduled task SECFINANCE_COLLATERAL_VALUATION is run. |
7.3 SECFINANCE_COLLATERAL_VALUATION Scheduled Task
Common Attributes
| • | Trade Filter – Note that it is not used by SECFINANCE_COLLATERAL_VALUATION. If you need to apply a trade filter, it must be saved on the report template. |
| • | Pricer Measures – Specify the measures SEC_FIN_SECURITY_VALUE, SEC_FIN_SECURITY_ACCRUAL, and SEC_FIN_SECURITY_CLEAN_VALUE. |
Task Attributes

| • | REPORT TEMPLATE NAME – Enter a SecFinanceCollateralBalance report template name. |
The template must include the columns "Sec. Eligibility", "Added as Margin Call", and "Norm.Collateral Flag", and the pricer measures SEC_FIN_SECURITY_VALUE, SEC_FIN_SECURITY_ACCRUAL, and SEC_FIN_SECURITY_CLEAN_VALUE.