Applying Repo Actions
The following actions can be carried out on repo trades:
| • | Displaying Actions |
| • | Multi Actions Input Panel |
| • | Repricing a Collateral |
| • | Partial Return of Collaterals |
| • | Rerating a Repo |
| • | Exercising a Call |
| • | Cleaning Up the Interest |
| • | Changing the Principal Amount |
| • | Processing a Security Margin |
| • | Substituting a Collateral |
You can also apply actions in bulk for rebate rerate, reprice, collateral return, call exercise, rollover, close and reopen, and termination.
 See Applying Repo Actions in Bulk.
See Bulk Rollover / Bulk Close And Reopen.
Before You Begin
You can add the actual workflow actions that can be applied to the domain repoAction. If these domain values are not defined, then the list of available actions is determined by the applicable Trade workflow.
In order for the Statement Id to be included on messages triggered by security lending actions, domain values must be set up.
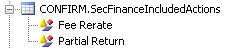
| » | Create the domain <MESSAGE_TYPE>.SecFinanceIncludedActions for the desired message type. |
| » | Add values for the desired actions for triggering this message type. The domain values need to match the action types as they appear in the Actions panel. |
| » | Repeat as needed for each message type. |
1. Displaying Actions
Select the Actions panel to display the actions carried out on the repo as shown below.

| » | You can select a substitution action, right-click it and select Action Event > Substitution Details to view its details. |
| » | You can cancel an action – Select an action, right-click it and select Action Event > Cancel to cancel the action. |
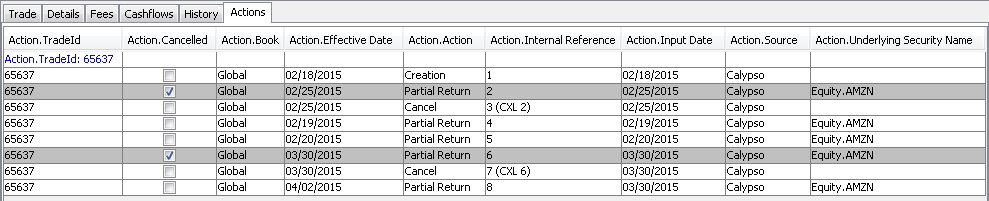
A canceling action will appear as shown below. In this example, action 2 has been canceled.

A cross-trade report of actions is also available.
See Security Finance Event Type Action Report for details.
Displaying Canceled Actions
By default, canceled actions are not displayed in the Actions panel, as shown above. To display canceled actions, you need to create and apply an Event Type Action report template.
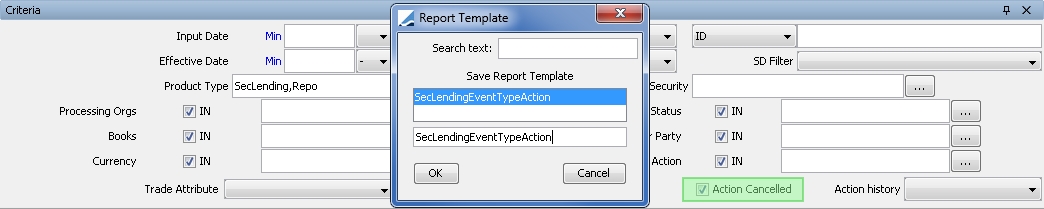
| » | From Calypso Navigator, select Reports > Cross-Asset Reports > Event Type Action Report. |
Please refer to Calypso Front Office Tools documentation for details on the Event Type Action report.
| » | Select the "Action Cancelled" checkbox, specify other criteria as needed, and save the template (Report > Save as Template). |
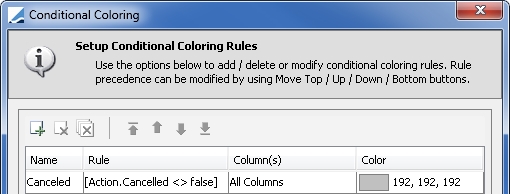
If desired, you can color the rows of the canceled actions by creating a conditional coloring rule (Data > Set Conditional Color) as shown below.
| » | In the Actions panel of the trade, right-click an action, select Template > Load Template and choose your template. You can then set it as the default template if desired (Template > Set Default Template). |
| » | Reload the trade window and the canceled actions will be displayed as shown below. |
2. Multi Actions Input Panel
The Multi Actions Input panel appears when a trade is saved or loaded, and allows performing trade management actions on the trade.
The Multi Actions Input panel only appears for the Standard repo sub-type, and only if you have set the domain Repo.MultiActions to true.
The collaterals associated with the current trade are displayed. You can apply the following actions from this panel, individually or by combining multiple actions.
| • | Reprice collaterals |
| • | Return collaterals |
| • | Rerate the repo rate |
| • | Exercise a call |
| • | Clean up the interest |
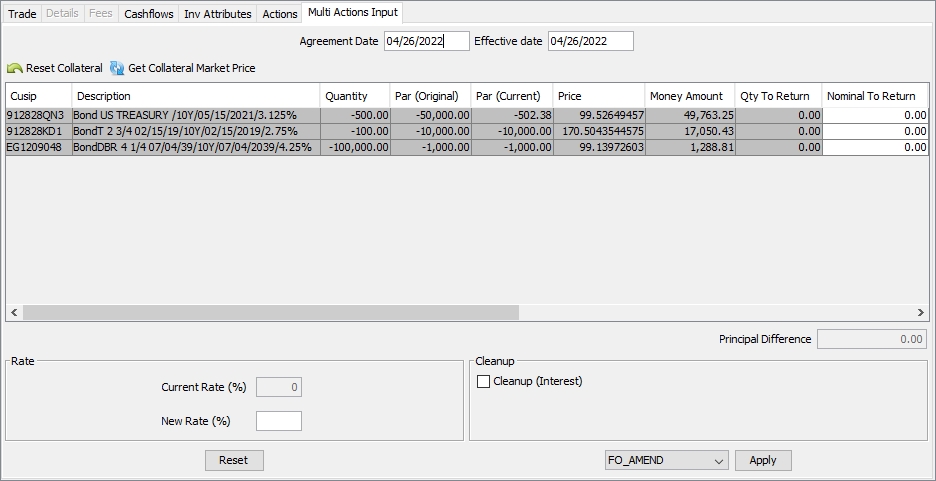
Multi Actions Input panel
| » | Enter the effective date of the action, and an agreement date if applicable. |
| » | Enter the fields as necessary for the actions you want to perform. |
| – | Reprice collaterals: Select a collateral, and click Get Collateral Market Price. The new price is displayed, along with the money to return. You can adjust the price as needed. |
| – | Return collaterals: Enter the field Nominal To Return or Qty To Return for the amount that you want to return. |
| – | Rerate the repo rate: Enter a new repo rate. |
| – | Exercise a call: Check "Call Exercise" and enter a new end date. |
| – | Clean up the interest: Check "Cleanup (Interest)" to pay the interest up to the effective date. |
| » | You can reset changes made only to a specific collateral by selecting it and clicking Reset Collateral, or you can reset all changes made on the Multi Actions Input panel by clicking Reset. |
| » | Select a trade action, then click Apply to carry out the action. |
3. Repricing a Collateral
Over the life of a repo, the value of the collateral may change. The repricing will result in a money-only payment being made to increase or decrease the repo principal.
The following repo sub-types allow the repricing action:
| • | Standard |
Repricing can be done in the Bulk Actions window. Choose Repo > Reprice.
See Bulk Reprice for details on performing a reprice in the Bulk Actions window.
Reprice History
You can view repricings in the Actions panel of the trade.

See Displaying Actions for details.
4. Partial Return of Collaterals
The following repo sub-types allow the partial return action:
| • | Standard |
You can perform a partial return of collateral in the Bulk Actions window. Choose Repo > Partial Return.
See Bulk Return for details on performing a partial return in the Bulk Actions window.
Returns History
You can view returns in the Actions panel of the trade.

See Displaying Actions for details.
5. Rerating a Repo
The following repo sub-types allow the rerate action:
| • | Standard |
| • | Pool |
| • | Triparty |
Rerate Setup
Prior to performing a rerate, make sure that the following transitions are set up in the workflow for the PSEventTrade using Configuration > Workflow > Workflow.

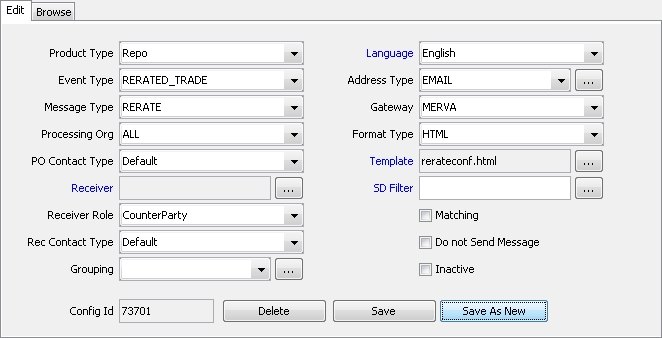
Also, a RERATE message type should be configured using Configuration > Messages & Matching > Message Set-up as shown below.
Rerate Action
Rerating can be done in the Bulk Actions window. Choose Repo > Rerate.
See Bulk Rerate for details on performing a rerate in the Bulk Actions window.
After the trade has been rerated, the RERATED label is added to the product description.

Rerate History
Choose Repo > Interest Rate History to view the rerate history as shown below.
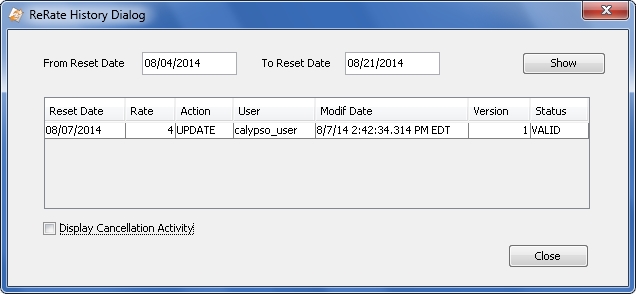
| » | Enter a From Reset Date and a To Reset Date as applicable, then click Show to display the rerates during that period. |
| » | You can clear the “Display Cancellation Activity” checkbox to remove canceling actions if any. |
You can also view repo rerates in the Actions panel of the repo trade.

See Displaying Actions for details.
6. Exercising a Call
The following repo sub-types allow the call exercise action:
| • | Standard |
| • | Pool |
Within the above sub-types, the call exercise action is further limited to the following maturity types:
| • | Callable TERM |
| • | Callable OPEN |
| • | EVERGREEN |
| • | EXTENDABLE |
| • | ROE |
| • | INTRADAY |
Exercising a call can be done in the Bulk Actions window. Choose Repo > Call Exercise.
See Bulk Call Exercise for details on exercising a call in the Bulk Actions window.
Call Exercise History
You can view call exercises in the Actions panel of the trade.

See Displaying Actions for details.
7. Cleaning Up the Interest
Over the life of a TERM repo trade, both parties may agree to clean up the interest on a user-defined basis. This means that the interest up to a specified date will be paid. An interest cleanup is usually associated with a collateral substitution, a collateral repricing, or a repo rerate.
Although interest cleanups do not usually apply to OPEN maturity repos (since they can be closed and re-opened at any time), Calypso allows entering interest cleanups on OPEN repos for simplifying the back office process.
The following repo sub-types allow the interest cleanup action:
| • | Standard |
| • | Pool |
Interest cleanup can be done as a separate action in the Bulk Actions window. Choose Repo > Interest Cleanup. The Bulk Actions window is opened with the Rerate action populated, as there is no "Interest Cleanup" action. If the "Cleanup" checkbox is checked and no rerate is entered, it is processed as a separate interest cleanup.
See Bulk Reprice for details on performing an interest cleanup in the Bulk Actions window.
Non-business Days
Interest cleanup is allowed on non-business days for Repo and Sec Vs Cash trades if the AuthorizeHolidaySecFinanceCleanup access permission function is granted.
Please refer to the Calypso Security User Guide for details on access permissions.
Default Values
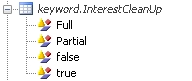
| » | To enable trade defaulting for the interest cleanup fields, add the domain keyword.InterestCleanUp with the values "Full", "Partial", false", and "true". |
| » | Then set up trade defaulting in the Security Finance Trade Defaulting window. |
See Trade Defaulting for complete details on configuring trade defaulting.
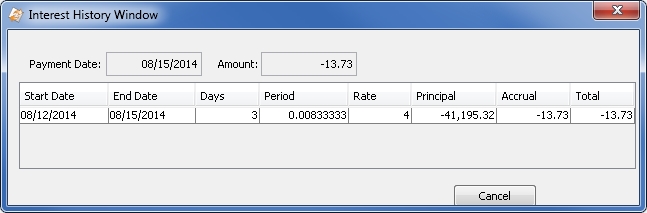
Interest History
Select an INTEREST cashflow from the Cashflows panel and choose Repo > Interest History to view the interest history as shown below.
You can also view interest cleanups in the Actions panel of the repo trade.

See Displaying Actions for details.
8. Changing the Principal Amount
The principal amount can be increased or decreased using the Principal Change action. The difference with the current principal will create a positive or negative cashflow and matching cash transfer.
The following repo sub-types allow the principal change action:
| • | Standard |
| • | Pool |
| • | Triparty |
To change the principal amount, choose Repo > Principal Change.
The Repo Principal Change window will appear as shown below.
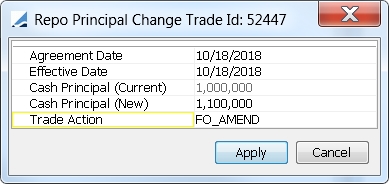
| » | Enter the effective date of the action, and an agreement date if applicable. |
You can modify the principal change date to a back-valued date.
| » | Enter the new principal amount. |
| » | Select a trade action, then click Apply to carry out the principal change. |
9. Processing a Security Margin
When there is a mismatch between the trade liability and the security collateral value, you can process the variation margin without changing the cash principal leg.
The following trades and sub-types allow the security margin action:
| • | Repo - Standard |
| • | SecLending - Sec Vs Sec |
To process a security margin, choose Repo > Security Margin / SecLending > Security Margin.
The Security Margin Dialog window will appear as shown below.
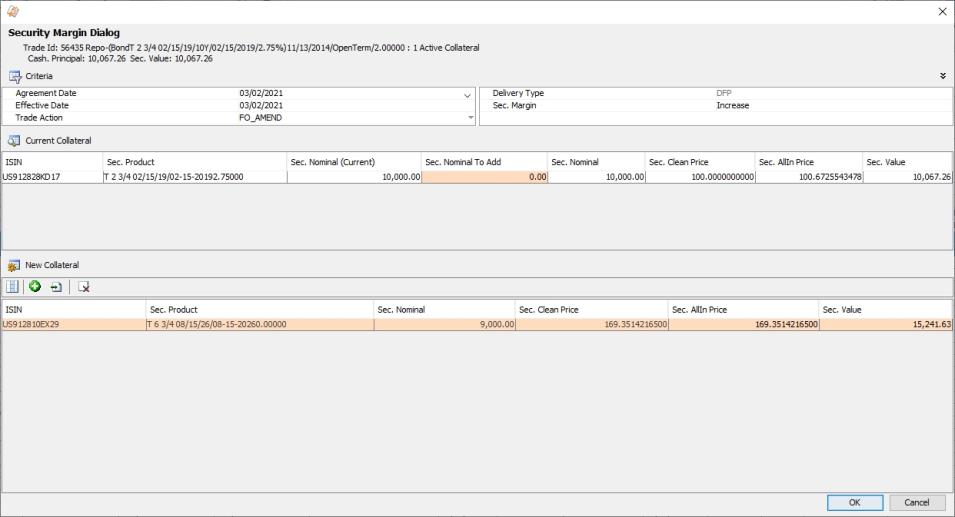
| » | Enter the effective date of the action, and an agreement date if applicable. |
| » | Select the trade action to be applied. |
| » | The Delivery Type of the event is always DFP, regardless of the trade's Delivery Type. |
| » | In the Sec. Margin field, select Increase to add new collateral, or Decrease to return collateral. |
If Increase is selected, both the Current Collateral and New Collateral areas are available. If Decrease is selected, only the Current Collateral area is available.
| » | To return collateral, in the Current Collateral area, for each collateral you want to return, either: |
| – | Select "Full Return" to return the full amount. |
| – | Enter the amount to be returned in the Sec. Nominal To Return column. |
| – | Enter the desired resultant amount in the Sec. Nominal column. The Sec. Nominal To Return amount is calculated. |
| » | To add collateral, in the New Collateral area, you can import securities from a csv file, or you can add them manually. |
You can right-click a row and select Configure > Configure Columns to add or remove columns as needed. Note that non-default columns are only editable if saved as part of the default template.
To add a security manually, click ![]() and either enter the security code or click ... in the Sec. Product column to use the Product Chooser. Then enter the Sec. Nominal amount.
and either enter the security code or click ... in the Sec. Product column to use the Product Chooser. Then enter the Sec. Nominal amount.
To import from csv:
| – | Click |
The order of the columns and their names in the csv file must match these fields exactly.
All of the securities in the csv must exist in Calypso before importing. The security must not have only CUSIP or BB_TICKER as its security code.
| – | Click |
| » | Click OK to carry out the action. |
Ⓘ [NOTE: Only the fields initialized when the Security Margin Dialog window is opened are editable. Therefore, if you have just added a field that should be editable, it will not be editable until you configure and save a template with that field, and then close and reopen the window. The Template menu is accessed by right-clicking a row in the Current Collateral or New Collateral area]
Security Margin Transfers Netting
The transfers created by security margin events can be generated in one of two ways:
| • | Each security margin event will be individually reversed at repo end date. |
| • | After each security margin event, a netted DFP transfer per security will be created / maintained. |
The netting of security margin DFP returns is determined by the domain value SecurityMarginNetting. When set to true or not set, the security margin DFP returns will be netted per security. When set to false, the security margin DFP returns will be un-netted.
You can also specify security margin netting at the legal agreement level. Set the legal entity attribute "SecurityMarginNetting" to true or false as needed.
For each trade, the following logic is applied:
| • | If the SecurityMarginNetting LE attribute is defined: |
| – | If set to true the netting is applied. |
| – | If set to false the non-netting is applied. |
| • | Else if the SecurityMarginNetting domain value is defined: |
| – | If set to true, the netting is applied. |
| – | If set to false the non-netting is applied. |
| • | Else the netting is applied. |
Security Margin Decrease Transfers Netting
The automatic netting of a security margin decrease DFP with an original piece of collateral DAP at repo end date is systematic. If desired, you can disable this automatic netting and use the Pair-off Manager instead.
The domain value DAPSecurityMarginNetting controls this behavior.
| • | If set to true, automatic netting is enabled. When a security margin decrease is performed on an original piece of collateral, the related DFP transfer at repo end date is netted with the matching DAP piece of collateral. |
| • | If set to false or not set, automatic netting is disabled. When a security margin decrease is performed on an original piece of collateral, the related DFP transfer at repo end date is not netted with the matching DAP piece of collateral. |
Security Margin History
You can view security margin events in the Actions panel of the trade.

See Displaying Actions for details.
Collateral Sufficiency Check
You can configure a collateral sufficiency check to be automatically performed before a security margin event is applied.
See Checking Collateral Sufficiency on Substitution and Security Margin Actions for details.
10. Substituting a Collateral
Over the life of a repo, the collateral may be substituted multiple times. A repo trade allows collateral substitution, provided that the "Substitutable" flag is checked.
The following trades and sub-types allow the substitution action:
| • | Repo - Standard |
| • | SecLending - Sec Vs Sec |
To substitute a collateral, choose Repo > Substitution / SecLending > Substitution.
The Substitution Dialog window will appear as shown below.
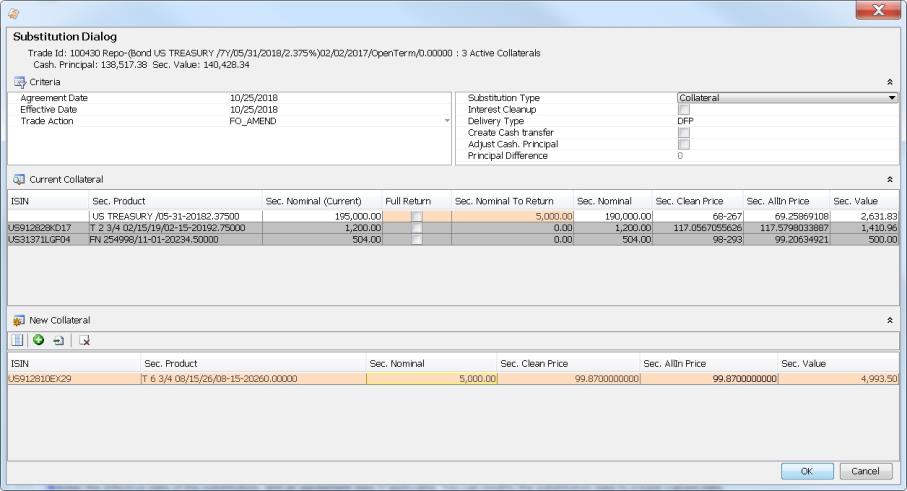
| » | Enter the effective date of the substitution, and an agreement date if applicable. You can modify the substitution date to a back-valued date. |
Note that the substitution date however cannot be before another substitution, a repricing, a rerate, or an interest cleanup.
| » | Select the trade action to be applied. |
| » | Select the substitution type: Collateral or Security Margin. If Collateral is selected, the collaterals added via the security margin process are grayed and un-editable. If Security Margin is selected, the collaterals added as part of the original allocation are grayed and un-editable. |
See Collateral vs Security Margin Substitution for more details.
| » | Check the "Interest Cleanup" checkbox to clean up the interest at substitution. |
| » | Select the Delivery Type of the substitution event, regardless of the trade's Delivery Type. |
| » | Check the "Create Cash transfer" checkbox to generate both security transfers and cash transfers, depending on the Delivery Type. If un-checked, only DFP security transfers will be generated. |
If the Delivery Type is DAP, the "Create Cash transfer" checkbox is checked and is not editable.
| » | Check the "Adjust Cash. Principal" checkbox to add the Principal Difference amount to the trade cash principal start and end legs. |
| » | The Principal Difference is the calculated difference between the money amounts. This is the change to the trade principal as a result of the substitution. |
Note that this amount does not include any interest payment. The interest remains with the trade, to be settled at maturity. However, it is possible to specify an interest cleanup.
| » | In the Current Collateral area, for each collateral you want to return, either: |
| – | Select "Full Return" to return the full amount. |
| – | Enter the amount to be returned in the Sec. Nominal To Return column. |
| » | In the New Collateral area, you can import securities from a csv file, or you can add them manually. |
You can right-click a row and select Configure > Configure Columns to add or remove columns as needed. Note that non-default columns are only editable if saved as part of the default template.
To add a security manually, click ![]() and either enter the security code or click ... in the Sec. Product column to use the Product Chooser. Then enter the Sec. Nominal amount.
and either enter the security code or click ... in the Sec. Product column to use the Product Chooser. Then enter the Sec. Nominal amount.
To import from csv:
| – | Click |
The order of the columns and their names in the csv file must match these fields exactly.
All of the securities in the csv must exist in Calypso before importing. The security must not have only CUSIP or BB_TICKER as its security code.
| – | Click |
| » | Click OK to carry out the substitution. |
Ⓘ [NOTE: Only the fields initialized when the Substitution Dialog window is opened are editable. Therefore, if you have just added a field that should be editable, it will not be editable until you configure and save a template with that field, and then close and reopen the window. The Template menu is accessed by right-clicking a row in the Current Collateral or New Collateral area]
Collateral vs Security Margin Substitution
Two types of substitution are possible: Collateral or Security Margin. To ensure proper downstream processing, the system makes a distinction in the origin of the collaterals and by default, only allows them to be substituted separately.
 See "Mixed Substitution" below for details on enabling Collateral and Security Margin substitutions together.
The Collateral substitution type allows substituting collaterals which were part of the original allocation, and their subsequent substitutions.
The Security Margin substitution type allows substituting collaterals which were added via the security margin process, and their subsequent substitutions.
See Processing a Security Margin for details on the security margin action.
The substitution type selected here will apply to these substituted collaterals for future substitutions.
Mixed Substitution
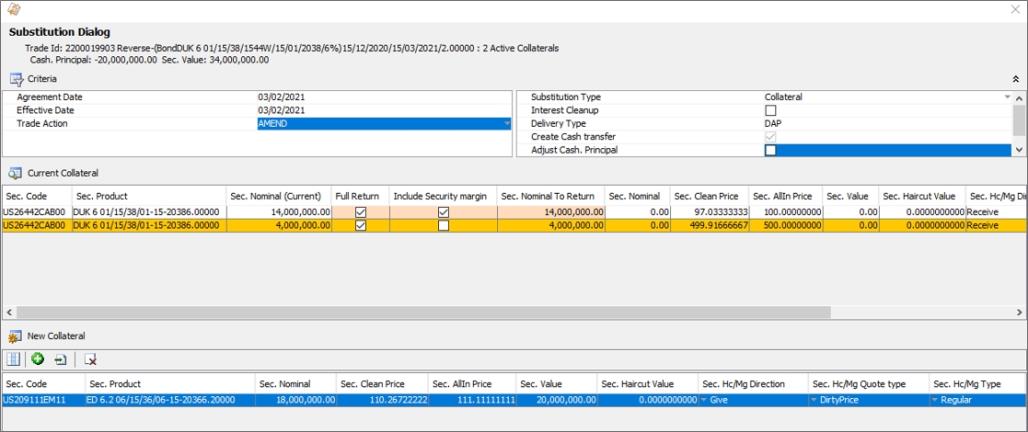
By default, mixed Collateral and Security Margin substitutions are not possible, as described above. To enable mixed substitutions, you need to add the "Include Security margin" column in the Current Collateral area. Then save a template with this field and close and reopen the window to make the field editable. The Template menu is accessed by right-clicking a row in the Current Collateral area.
In the example below, there are two rows of the same security, one for 14M and one for 4M. We proceed with a Full Substitution by selecting the Collateral substitution type and selecting both the "Full Return" and "Include Security margin" checkboxes on the 14M row. It activates the 4M row, which was previously grayed out, and automatically selects the "Full Return" checkbox on this row. Then we add a new piece of collateral in the New Collateral area and apply the substitution. The trade will now have the new piece of collateral.
Substitution History
You can view substitutions in the Actions panel of the trade. The Collateral substitution type is displayed as "Substitution", whereas the Security Margin substitution type is displayed as "Substitution.Security Margin".


See Displaying Actions for details.
Collateral Sufficiency Check
You can configure a collateral sufficiency check to be automatically performed before a substitution is applied.
See Checking Collateral Sufficiency on Substitution and Security Margin Actions for details.