Deal Station Trade Entry
1. Deal Station Title Bar

| • | The Title Bar shows the type of trade that is being displayed in the Deal Station window as well as the Trade Id and Status after a trade has been saved or amended, and the current time. |
| • | The Trade Id field is changeable and searchable. Select the identifier by which you wish to search: Trade Id, External Reference or Internal Reference. You may type the chosen identifier directly into this field and hit Enter to load the desired trade. |
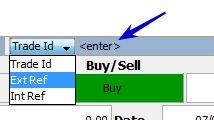
The default for this field is driven by the Trade Reference selection in the User Defaults window. Note that the Internal and External References are not unique. When one of them is chosen, the Trade Id is no longer shown in some form on the screen.
| • | The four icons on the title bar are status indicators for the Market Data Server  , Risk Routing , Risk Routing  , Position Keeping Failure Monitor , Position Keeping Failure Monitor  and Warnings & Error Messages and Warnings & Error Messages  . If there is a problem with any of the them, you will see a red line through them or in the case of the Warnings, it becomes red. . If there is a problem with any of the them, you will see a red line through them or in the case of the Warnings, it becomes red. |
| • | If there is a problem with routing, you can see where the problem lies in the Risk Tree portion of the routing details. |
| • | You may click on the Position Keeping Failure Monitor icon to display the monitor and proceed to resolve the problem. |
| • | Click on the red Warning & Error Messages symbol to view the message. |
| • | You can minimize, maximize and close the Deal Station window  . . |
| • | The Deal Station window can be re-sized by dragging along each of its borders (but not diagonally). The system remembers the last size, even when the user logs off. Updated sizes are stored for each user, role/persona and product type combination. |
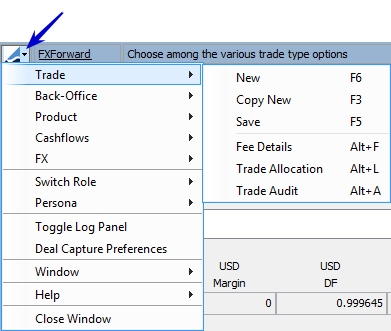
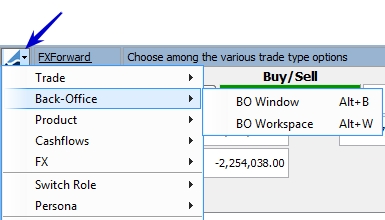
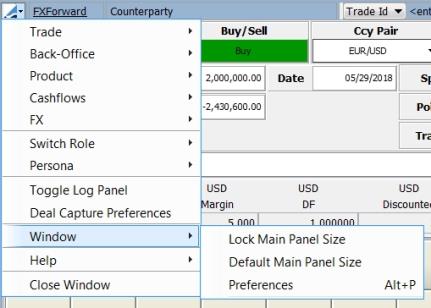
| • | The Deal Station Title Bar also contains a drop down menu  . The options contained in this menu are described below. . The options contained in this menu are described below. |
1.1 Trade Menu
| Menu Items | Description | |||||||||
|---|---|---|---|---|---|---|---|---|---|---|
|
New (F6) |
Clears the trade worksheet to allow entering a new trade. |
|||||||||
|
Copy New (F3) |
Clears the trade worksheet while copying designated fields to the new trade. See Preferences for information on this feature. |
|||||||||
|
Save (F5) |
Saves the trade with a unique id. |
|||||||||
|
Fee Details |
Displays the Trade Fee Details window. Refer to Capturing Trade Fees in the Trading Environment documentation for more information. |
|||||||||
|
Trade Allocation
|
Opens the Allocation window that allows allocating a block trade to multiple books or legal entities. When allocating a block trade, child trades are created for each book or legal entity to which the block trade is allocated. The allocation can be manual, or according to an allocation template. The allocation is performed based on a percentage of the notional amount of the block trade. Click Help in the Allocation window for details. |
|||||||||
|
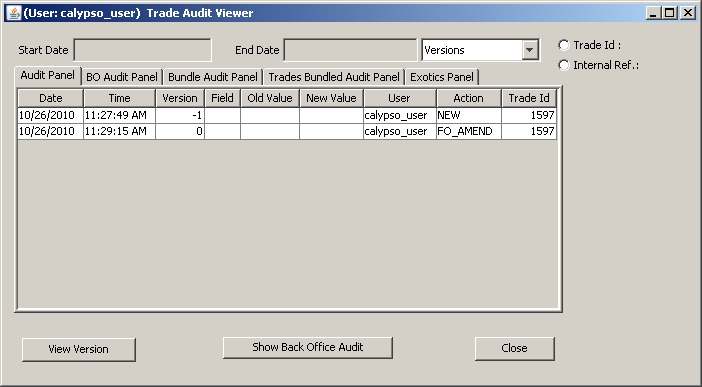
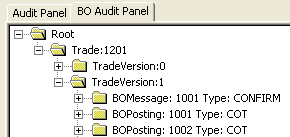
Trade Audit |
Opens the Trade Audit Viewer.
Note that the Audit mode must be enabled. Refer to the Calypso Security User Guide for details. |

1.2 Back Office menu
| Menu Items | Description |
|---|---|
|
BO Window |
Displays the back office window for the current trade. This window is deprecated, you should use the BO Workspace instead. |
|
BO Workspace |
Displays the back office workspace. Refer to Back Office Browser in the Trading Environment documentation for detailed information. |
1.3 Product Menu

| Menu Items | Description |
|---|---|
|
Price (F4) |
Select this menu option to price the current trade. You can also hit the F4 key. |
|
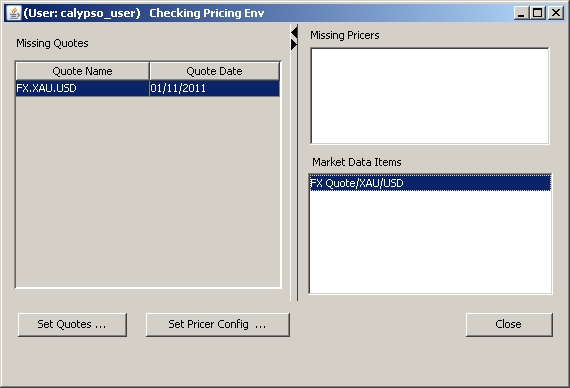
Check Market Data |
Select this option to check the market data for the trade. If there is any error with the market data, a market data window is displayed to indicate the problem and allow you to set quotes or the pricing configuration. If no window appears, then the market data for the trade is fine.
|
| Auto Price |
This is a toggle option that when checked, auto prices the current trade at a regular interval as the trade is being entered. |
1.4 Cashflows Menu
There is only one menu option in the Cashflows menu, Generate (F8). This option does not however, support FX Trades.
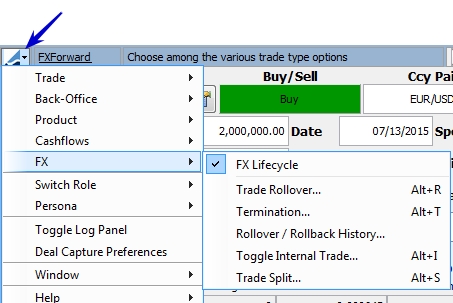
1.5 FX Menu
|
Menu Items |
Description |
||||||
|---|---|---|---|---|---|---|---|
|
FX Lifecycle |
This is a toggle to display the FX Lifecycle toolbar. When this is toggled on, the FX Lifecycle toolbar is displayed in the Plugin Panel (accessed by clicking |
||||||
|
Trade Rollover Alt+R
|
Opens the Trade Rollover window that allows extending the duration of a trade. Click the FX tab to bring the panel to the front of the window. You can process the following types of trade extensions on FX trades:
For the FX Swap, you can use the current market rate when processing the rollover. You can also use the exchange rate on the original trade as the base for the exchange rate on the forward leg; this is a Historical Rate Rollover (HRR).
|
||||||
|
Termination Alt+T
|
Opens the Termination window that allows terminating a trade. Click Help in the Termination window for details. |
||||||
|
Rollover / Rollback History |
Select this to display the rollover/rollback history for the trade.
|
||||||
|
Toggle Internal Trade Alt+I
|
Select this to create an internal trade. When you do, the Counterparty field changes to a Book field, allowing you to select an internal book for the trade.
|
||||||
|
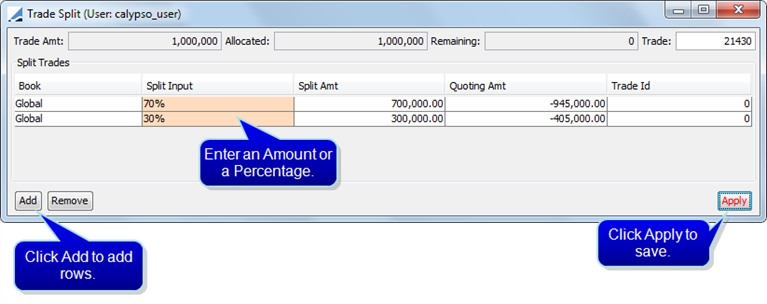
Trade Split Alt+S
|
Select to display the Trade Split window which allows you to split an existing trade into different trades by value dates and settlement regions. The split always results in 100% of the trade being split. Partial splits are not supported.
You need to add the CheckFXSplitTrade workflow rule to the following workflows: VERIFIED - AMEND - VERIFIED VERIFIED - CANCEL - CANCELED VERIFIED - FO_AMEND - PRICING |


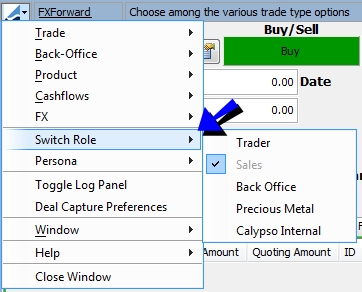
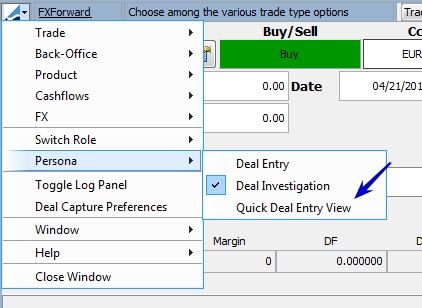
1.6 Switch Role / Persona
Through the Switch Role menu function, you are able to change between the various Roles available to you such as Trader, Sales, Back Office, and Precious Metal.
Note: The Calypso Internal role should not be used, it is for internal use only.
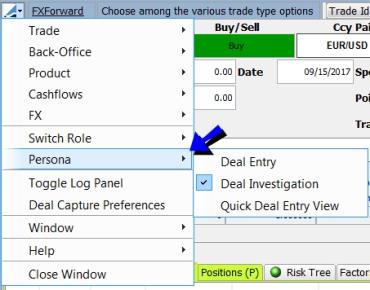
Different users have different needs for what they want to see on their screen to optimize their job performance. To accommodate these needs, Deal Station has different Personas for each Role. Each Persona displays the trade windows in varying detail. The various Personas are described in the table below.
|
Persona |
Description |
|---|---|
|
Deal Entry |
Minimal, basic trade entry. |
|
Deal Investigation |
This is a detailed view of the trade screen that lets you view much about the trade including, Margin, Routing, Interest Rates, etc, depending on which role you are using. |
|
Quick Deal Entry View |
The Quick Deal Entry persona is designed in the same manner as Front Office Workstation deal entry. This persona can be used to enter Spot, Forward, Swap, FXNDF and FXNDF Swap products with either straight or cross pairs. Using the Quick Deal Entry persona, it possible to enter margin breakdown into spot and forward points portions. See Quick Deal Entry for more details. |
Switch Role
Persona
1.7 Toggle Log Panel
This menu option allows you to toggle whether or not the log panel is displayed in the Plugin Panel (which is viewed by clicking  ).
).
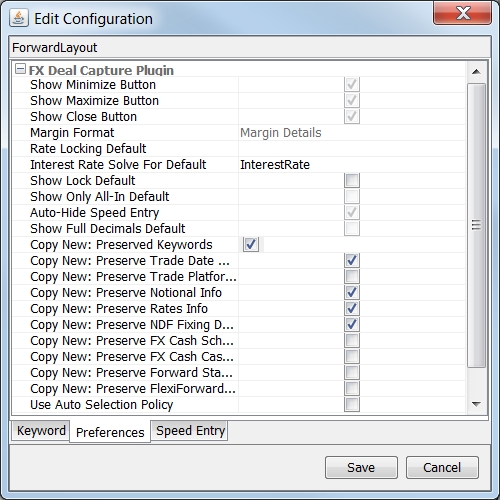
1.8 Deal Capture Preferences
This menu option displays the Deal Capture Configuration window which allows you to set different configurations for each deal type. The tabs in this window are described below.
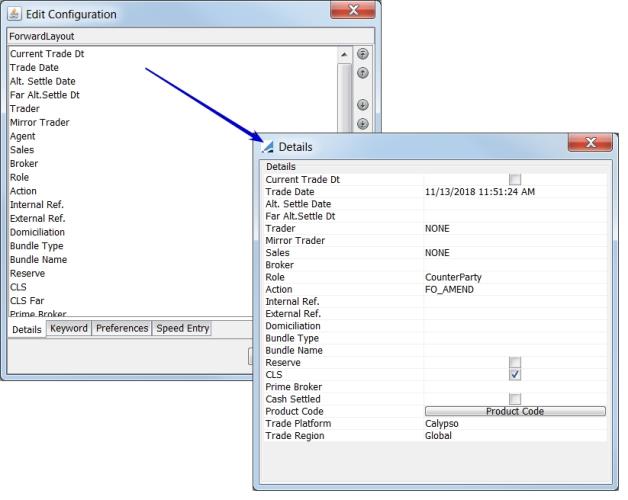
Details
The Details tab is used to designate the order in which the trade details appear in the Details panel. The arrows on the side are used to order trade attributes.
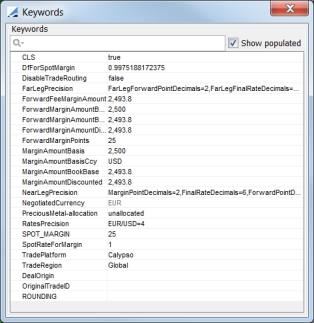
The Keyword tab lets you set default keywords to display on each layout.
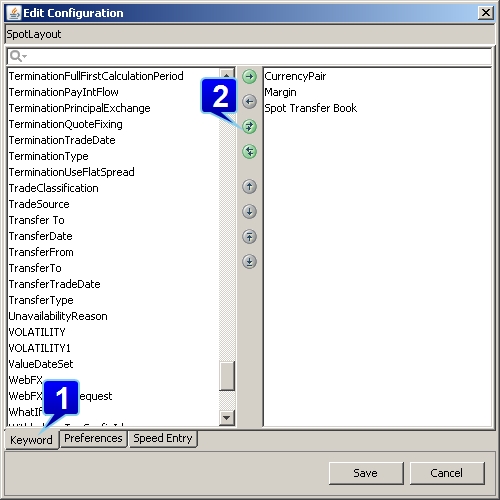
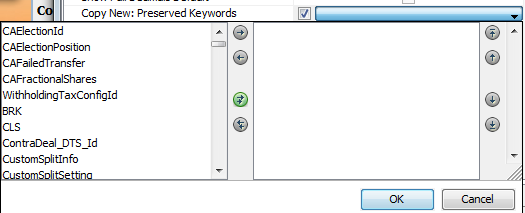
Step 1 - Select the Keyword tab at the bottom of the Edit Configuration Window.
Step 2 - Select the keywords you want from the left and add them and rearrange them with the buttons in the center of the window. Then click Save.
Step 3 - Click the Keywords drop-down to display the Keywords window for the trade. You will then see the keywords that you designated in step 2.
NOTE: In the Investigation personas, this is displayed on the window automatically.
From the Preferences tab, you are able to configure many different preferences for each type of trade layout. These preferences are detailed below:
|
Field |
Description |
|||||||||||||||||||||
|---|---|---|---|---|---|---|---|---|---|---|---|---|---|---|---|---|---|---|---|---|---|---|
|
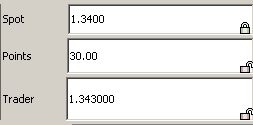
Rate Locking Default |
Available options are: Points, Spot or Trader Rate. When one of these is chosen, it is locked when the trade window is displayed. The locked field is the field being solved for. The other two fields will then be unlocked.
There is another set of locking triangulations that are dependent upon which of these fields is locked, the interest rate of the two currencies. If the default lock is set to Spot or Trader Rate, a lock appears on the negotiated IR currency. If the default lock is set to Points, it is the only field that is locked. |
|||||||||||||||||||||
|
Interest Rate Solve For Default |
This preference allows you to choose how you want to calculate the forward points and interest rate when rates are manually changed in Deal Station. When Deal Station is first loaded, the points and interest rate are calculated according to how FX Points was set up in the Pricing Parameter Set (Configuration > Market Data > Pricing Environment > Pricing Parameter Set). Choose either Points or Interest Rate. These fields are dependent upon what is set in Rate Locking Default. If Rate Locking Default is set to either Spot or Trader Rate, then this field can be set to either Points or InterestRate. If Rate Locking Default is set to Points, this field can ONLY be set to InterestRate.
|
|||||||||||||||||||||
|
Show Lock Default |
You can toggle this on or off depending on whether you want the locks displayed in the fields. If this is off, fields will still be locked, but the locks will not be visible on the screen. |
|||||||||||||||||||||
|
Copy New |
All of the Copy New functionality allows you to designate certain fields for which you would like to retain information from trade to trade.
Ⓘ Any data that is designated to be preserved, is only preserved for the current session. When Deal Station is closed, the preserved information is lost. |


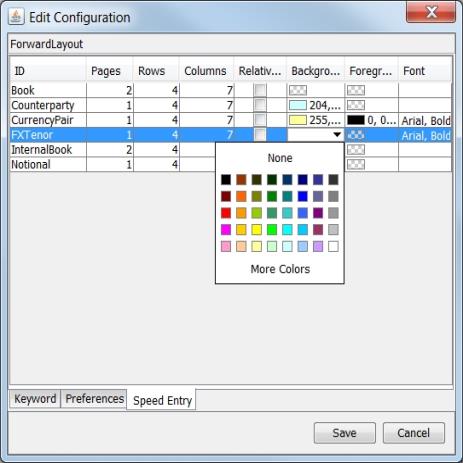
Speed Entry
In this tab, you are able to designate the font as well as the foreground and background color for the speed buttons. You can also control the number of rows and columns of buttons.
1.9 Window Menu
The Window menu contains options to lock the main panel size and restore to the default panel size. Additionally, in the Windows > Preferences option, there is a designation to display field tool tips.
2. Deal Station Trade Functions
These functions are common to all FX Deal Station trades, though some of the functions are available only in the Investigation persona.
The location and tab order of the features of the FX Deal Station windows vary based on which layout you are viewing.
| » | You are able to configure several default fields for FX Deal Station, which are displayed in the screenshot below. To do this, from Calypso Navigator, select Configuration > User Access Control > User Defaults and click the Attributes button. |
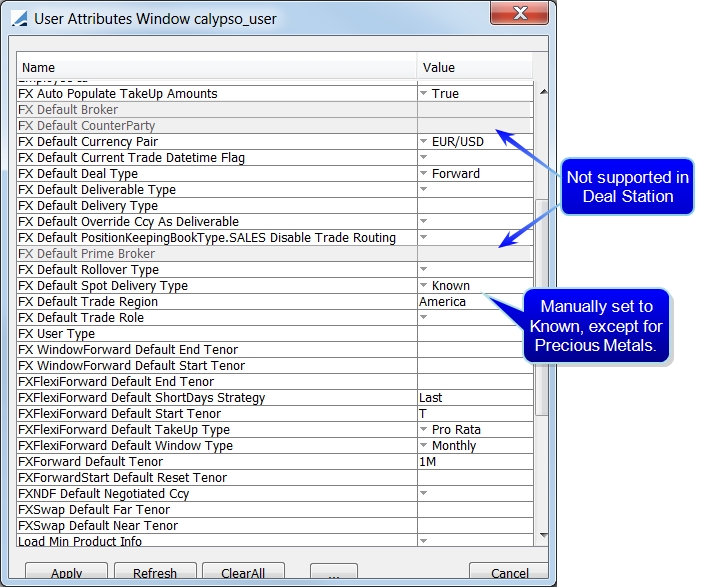
NOTE: The FX Default Broker, FX Default CounterParty and FX Default Prime Broker attributes are not supported in Deal Station although these attributes are used in other areas of Calypso.
| » | For the FX Default Deliverable Type, the setting in User Defaults takes precedence over the Non Deliverable setting in Currency Defaults. |
| » | When a currency is designated in the FX Default Override Ccy As Deliverable field, Deal Station treats the currency as a Deliverable currency, even if the Currency Defaults setting is Non-Deliverable. When using this setting, the Deal Station default trade type for currency pairs involving the currency set in this field should be NDF. |
Ⓘ The FX Default Spot Delivery Type field is by default blank, which means that if left blank, it will be interpreted as Unknown. With the exception of Precious Metal users, this field should be manually set to Known. If you are using Deal Station for Precious Metal trades, you can leave this field blank or manually set it to Unknown.
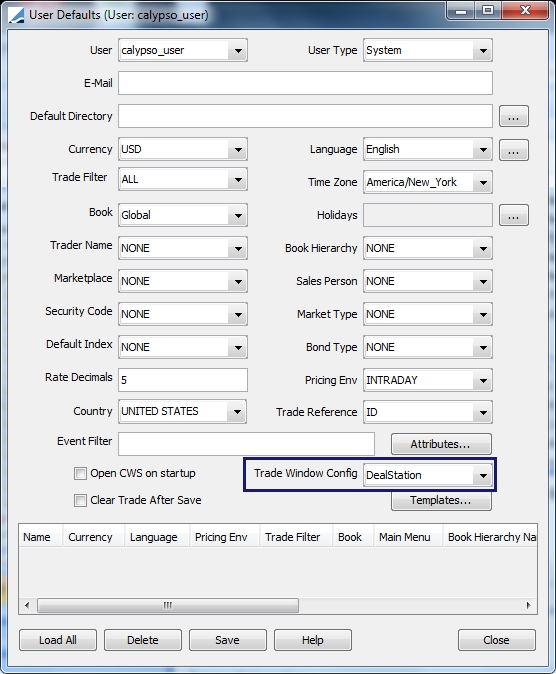
| » | In order to properly display a Deal Station trade window when opening a trade from the Trade Blotter or Trade Browser, you must set Trade Window Config to Deal Station in the User Defaults window. From Calypso Navigator, select Configuration > User Access Control > User Defaults. |
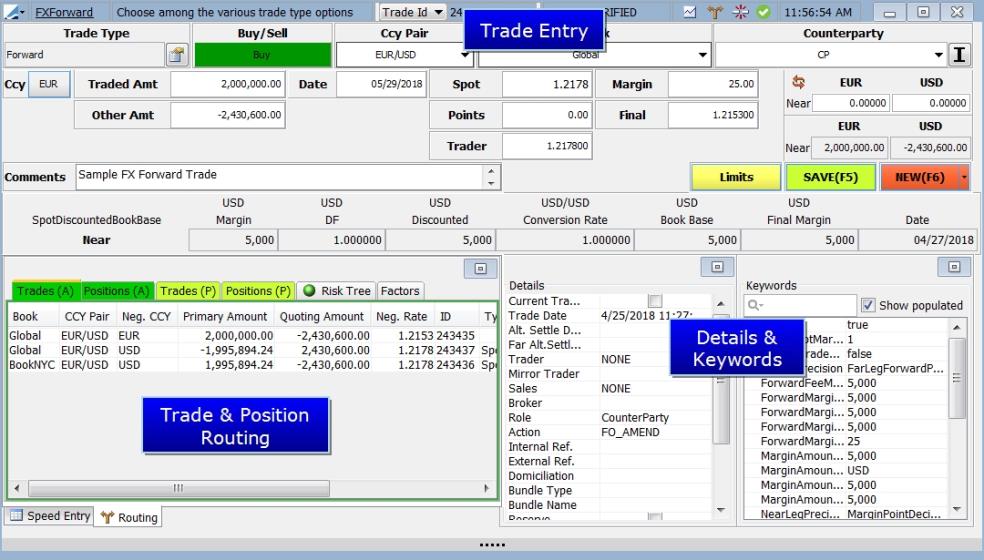
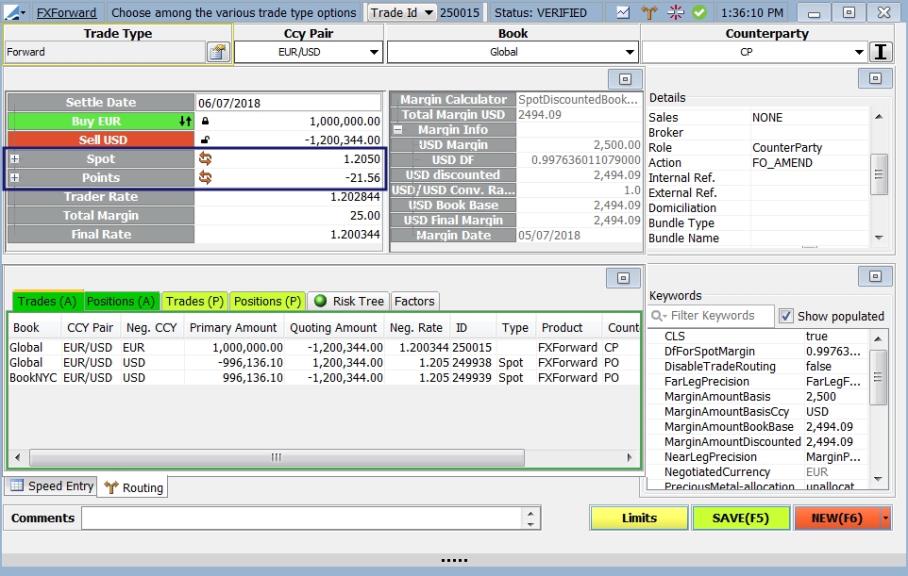
3. Deal Station Trade Entry
Below is where basic trade entry is completed.

For a description about basic deal entry, refer to Deal Station Spot/Forward Window. For trade type specific information, refer to:
| • | Capturing FX Swap Trades |
| • | Capturing FX Cross Currency Trades |
| • | Capturing FX NDF Trades |
| • | Capturing FX Forward Starting Trades |
| • | Capturing FX Flexible Forward Trades |
| • | Capturing Merchant FX Trades |
| • | Capturing FX Window Forward Trades |
3.1 Deal Station Field Descriptions
This area describes the basic trade entry fields in FX Deal Station. Some fields may or may not be displayed depending on which role and persona you are viewing. For additional trade functions, refer to Deal Station Trade Functions for more information.
|
Field |
Description |
||||||||||||
|---|---|---|---|---|---|---|---|---|---|---|---|---|---|
|
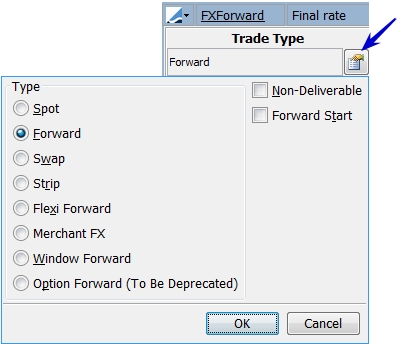
Trade Type |
This field displays the type of trade displayed in the Deal Station window. Click on the button to make your selection.
Deal Station allows for non-standard settlement of spot trades. You may select the product type manually, regardless of the Settlement Date that is entered. A validation is applied based on the setting in the Currency Defaults window, Currency Pairs panel Max Spot Days column. |
||||||||||||
|
Buy / Sell |
Depending on which persona you are viewing, this field appears in one of two ways.
Selling EUR / Buying USD - Negotiating EUR
Buying EUR / Selling USD - Negotiating EUR
Buying EUR / Selling USD - Negotiating USD
Selling EUR / Buying USD - Negotiating USD
|
||||||||||||
|
Ccy Pair |
Enter the Currency Pair for the trade in this field. The currency pair can be entered variety of ways and the system can automatically detect the correct pair, provided that the pair has been created under Configuration > Definitions >Currency Definitionswhich can be found in Calypso Navigator. The contents of the drop-down selection is derived from the Currency Pair Favorites list. (From Calypso Navigator, select Configuration > Favorites > Books). |
||||||||||||
|
Book |
Enter the book for the trade. This field auto completes based on your designated favorite books. (From Calypso Navigator, select Configuration > Favorites > Books). You may also hit CTRL F to search all books. |
||||||||||||
|
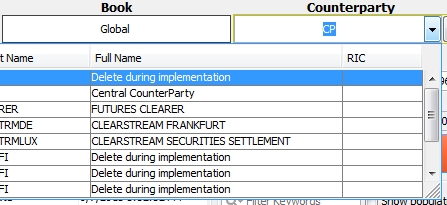
Counterparty |
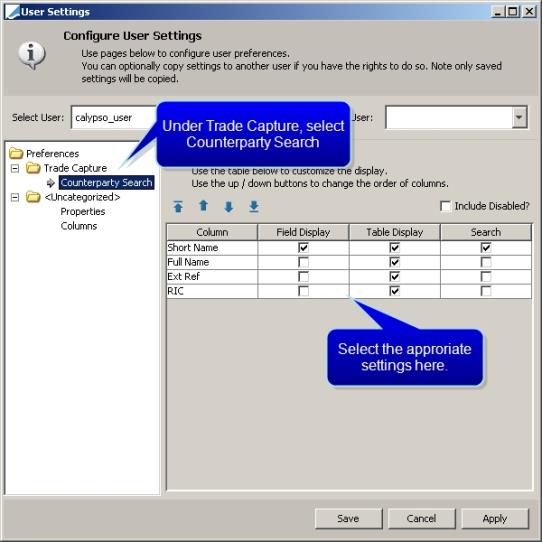
Select a counterparty. If you know the name of the counterparty you are searching for, start to type it in this field. The first counterparties that begin with the typed letters are displayed. To scan through the other counterparties, use the up and down arrows on your keyboard, or select the counterparty that you desire. . If you would like to see the Short Name, Full Name, External Reference and RIC of the selected counterparty, click the down arrow next to the field. You may also view this information by hovering over the field and viewing the tooltip.
You are able to search for and/or display the counterparty using the Short Name, Full Name, Ext Ref or RIC. To designate how you search and display, go to Configuration > User Access Control > User Settings.
Note: If you have tool tips enabled ( Deal Station uses the value set in the LEGAL_ENTITY_MAX_NAMES environment property to determine the maximum number of legal entities that will be shown when searching.
|
||||||||||||
|
Type |
Choose from Buy or Sell. You may also choose Buy/Sell or Sell/Buy in the Swap layout. |
||||||||||||
|
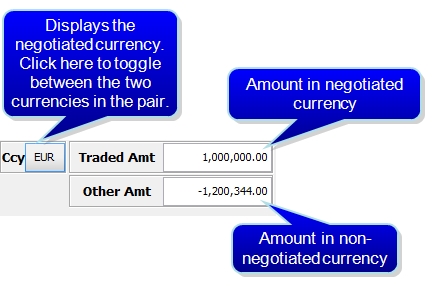
Ccy |
This area displays the negotiated currency and the amount for each currency in the pair.
|
||||||||||||
|
Traded Amt |
Enter the notional amount of the negotiated currency for the trade. |
||||||||||||
|
Other Amt |
The Notional Amount of the non-negotiated currency |
||||||||||||
|
Date |
Enter the settlement date. The date by default is spot. When a forward date is entered here, the screen will automatically switch to be an FX Forward entry screen. You can change it however to any date, and it will display the corresponding tenor accordingly next to the settlement date. If you enter a date that is a non-business day or holiday, the date will appear with a red background. You can also use the following shortcuts:
|
||||||||||||
|
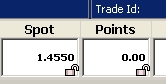
Spot |
This is the unadjusted spot rate for the currency pair which automatically comes from the feed. You may hit F10 in this field to display the Split Currency window. The Display Factor designated in the Currency Defaults is taken into account when calculating the Spot. The Display Factor is multiplied by the FX rate, to display what is shown in the Spot field. |
||||||||||||
|
Keywords |
Click here to view available keywords for the trade and enter information for them as desired. |
||||||||||||
|
Margin |
Enter the margin points. For Precious Metal trades, the Margin is in the unit of the Physical Form and in the quoting Currency. |
||||||||||||
| Details |
Click on the drop-down arrow to view the trade details area of the trade. |
||||||||||||
|
Points |
The forward points for the trade. This applies to Forward trades only. You may hit F10 in this field to display the Split Currency window. The functionality described below is available for FX Swap only. Forward Points are calculated as Forward Rate – Spot Rate. The Trader Rate = Spot Rate + Forward Points. For short-dated trades (trades wit the settle date before spot), it is possible to display the points in the opposite way. This gives the impression in the window that the Trader Rate = Spot Rate – Forward Points. Actual calculations do not change, the only thing that changes is how the points are displayed. To enable this function, set the DisplayFXShortDatePointsPositiveTime domain value to true. Note: When Deal Station receives forward points from the pricer, they are rounded using the NEAREST method. |
||||||||||||
|
Final |
This is the final rate, including the margin. (spot + points + margin) This applies to Forward trades only. You may hit F10 in this field to display the Split Currency window. The Final in a Precious Metal trade also includes any necessary conversion factors for the form of the metal. |
||||||||||||
|
Interest Rate |
Click here to view the interest rate for each currency in the currency.
|
||||||||||||
|
Limits |
Click here to check the limits for the trade, if limits have been established through Calypso ERS Limits. If limits are established, when this button is clicked, a window is displayed indicating how much limit is left. If the limit is exceeded, a violation window is displayed. A trade that exceeds the limits can still be saved. A trade in FX Deal Station is automatically reflected on the Limit portfolio in ERS. For more information, refer to Calypso ERS documentation. Note: The Limits button is only enabled when the following conditions are met:
If BOTH conditions are not fulfilled, the Limits button is not enabled. |
||||||||||||
|
Deal / Save (F5) |
Click here to save the trade. When the button looks like this Note: If ERS Limits is set up, limits are checked automatically when a trade is saved or amended. |
||||||||||||
|
New / Copy New (F6) |
You may click the arrow in this field to display either New or Copy New.
|
||||||||||||
|
Plugin Panel
|
Click this button to display the Plugin Panel. For the Trader, Sales and Precious Metal roles, the Result, Market Data and Pricing Parameter information is displayed in the Plugin Panel. For the Back Office role, Back Office information is additionally displayed. |
||||||||||||
|
Trader |
This is the Trader rate or Spot + Points. |
||||||||||||
|
Refresh button |
Click this button The Back Office role does not have the ability to use real-time market data rates. |
||||||||||||
|
Margin Amount / Final Margin |
This is the final margin amount that will be attached to the margin fee. Depending on the calculator defined, this amount will be either the initial margin amount (no discounting), the discounted margin amount (spot/today discounted) or margin amount in book base currency. For Precious Metal trades, the margin is always in the unit of the Physical Form and quoting currency. To view detailed Margin information, from this field, hit F10.
|
||||||||||||
|
Comments |
You may enter comments about the trade in this field. | ||||||||||||
|
Routing |
Click the Routing drop-down arrow to display the Trade and Position Routing information for the trade. |
||||||||||||
|
Loco-London Spot |
(Precious Metal) This is the unadjusted spot rate for a Precious Metal trade. |
||||||||||||
|
Loco Form Spread |
(Precious Metal) The premium over the Loco-London spot price of a specific Physical form of precious metal at a particular location. This spread is always quoted in USD/oz and is used to adjust the Loco-London spot rate. You may enter an absolute value or a percentage of the Loco-London Spot for the spread. The base location for each precious metal is designated in the PreciousMetalBaseLocation.currency domain value. For example, PreciousMetalBaseLocation.XAU. You may also designate the base location from the Currency Definition window for the metal. (Configuration > Definitions > Currency Definitions). |
||||||||||||
|
Location |
(Precious Metal)These are the available delivery locations of the precious metal. These choices are populated from the PreciousMetalLocations.currency domain value. For example, in the image above, they are populated from the PreciousMetalLocations.XAU domain value. You may also enter locations in the Currency Definition window for the metal. (Configuration > Definitions > Currency Definitions). |
||||||||||||
|
Physical Form |
Select the physical form of the metal you are trading. The choices in this drop-down are populated from the Precious Metal Information tab in the Currency Definition window. The physical forms for a given metal are associated with any currency pair containing that metal. |
||||||||||||
|
Allocated / Unallocated |
This is a toggle to indicate whether the precious metal being delivered or received is allocated or not. Allocated Metal refers to a specific bar or coin identified by refiner Weight, fineness and serial number. Unallocated Metal does not entitle the owner to specific bars and is considered part of the general pool of metal held by a dealer. Choosing Allocated or Unallocated on the trade flags the Precious Metal Allocation keyword on the trade, but will not directly impact pricing. |


 , the trade hasn't been saved yet. After the trade has been saved, the button looks like
  and you may click it to amend the trade.
  to clear out the trade screen to enter a new trade. You can also display a new trade by hitting the F6 key.
 to update the current rate from the real-time feed.
| » | For information on the Details and Keywords area of this window, refer to Details and Keywords. |
| » | At the bottom of the window you are able to toggle between either the Speed Entry tab and the Routing tab. For information on these areas, refer to Deal Station Trade Functions. |
| » |
|
| » | When Deal Station is first opened, the system will begin to request data for the currency pair favorites first. |
Note:
| • | Spot |
| • | Points |
| • | Trader |
| • | Margin |
| • | Final |
3.2 Speed Buttons & Speed Entry
Speed Buttons can be configured for Counterparty, Book, Currency Pair, Notional and FX Tenor. Internal Book replaces Counterparty when an internal trade is designated by clicking  .
.
Speed buttons are automatically displayed when your cursor is in one of these fields mentioned above.
Set up of speed buttons for Counterparty and Book are done through configuration of favorites (Configuration > Favorites). Whatever is selected as a favorite counterparty and book is automatically displayed as a speed button
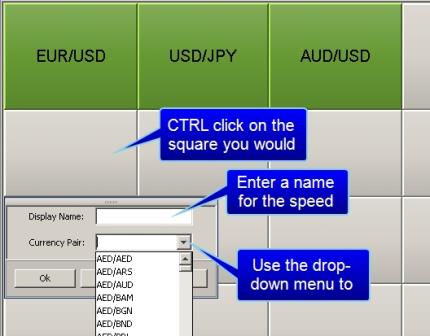
| » | Set up for Currency Pair, Notional and FX Tenor are set up manually in the FX Deal Station window by CTRL clicking on the square you would like to configure. |
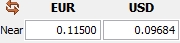
For Notional speed buttons, enter an amount and for FX Tenor speed buttons, enter a near tenor and a far tenor.
| » | Currency pairs that are available in the drop-down menu are configured via Configuration > Definitions > Currency Definitions in the Currency Default tab. Also, although all defined currency pairs are selectable in FX Deal Station, you should ensure that the pair you select has been properly defined in this setup window. |
| » | The currency pair USD/CNY requires special consideration. |
When the Speed Entry tab is selected, the Counterparty, Book, Currency Pair, Notional and FX Tenor tabs are in view as well. When you select one of these tabs, the associated set of speed buttons is displayed, allowing for speed entry. These speed buttons are also displayed when you click in the associated field.
The Counterparty tab changes to Internal Book when an internal trade is being configured.

3.3 Alternate Settle Date
This function allows you to settle the secondary currency in an FX trade on a different date from the trade date. The Alternative Settle Date is entered in the Details panel.
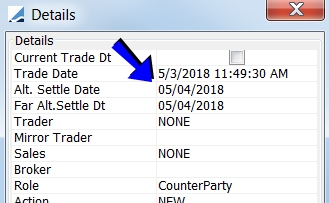
When a date is entered in this field, the secondary currency will be settled on the entered date and the primary currency is settled on the Trade Date. For a swap trade, there is an additional field applicable to this type of trade, Far Leg Alternate Settle Date. The Far Leg Alternate Settle Date should always be greater than or equal to the Alternate Settle Date (which is for the near leg). Also, the secondary currency cannot settle before the primary. Therefore the trade date can only be the same or before the split settle date.
Note: Cross currency and non-deliverable trades do not allow for the Alternate Settle Date functionality.
Trade Routing & Lifecycle
| • | For routed trades, the Alternate Settle Date information is carried over to the trades. |
| • | The Alternate Settle Date information is NOT carried over for Allocation & Split, Rollover & Rollback and Termination. |
Position Calculation / Forward Ladder Requirements
With this feature, you are able to view FX positions in the Forward Ladder by currency. If you would like to see the positions by each currency's settle date, the details for configuration are below.
If the positions for trades with an alternate settle date for the quoting currency are to be viewed by currency pair, the positions need to be viewed by the primary settle date. If these positions are to be viewed by currency, the primary currency positions should have the trade's settle date and the quoting currency positions should have the trade's alternate date.
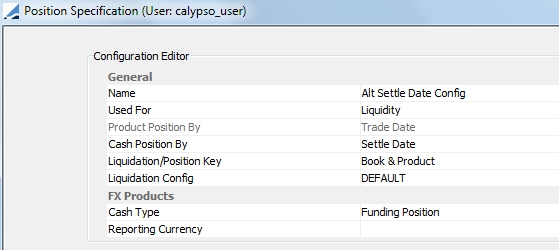
A specific position specification will need to be created, depending on which view you desire.
Configuration to view position by currencies
To view the Position Specification window, from Calypso Navigator, select Configuration > Filters > Position Specification.
To view the Forward Ladder Parameters window, from Calypso Navigator, select Position & Risk > Risk Config and click the ... next to the Analysis Param Set.

Select Currency Bucketing and do no select Currency pair. Aggregation type should be by Currency Pair.
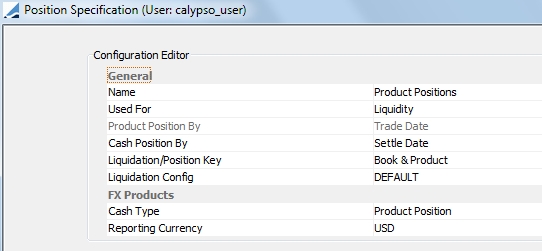
Configuration to view position by currency pair
Position Specification
Forward Ladder Parameters
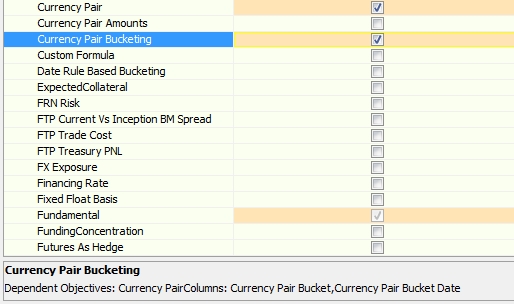
Select Currency Pair Bucketing. Aggregation type should be by Currency Pair.
See Forward Ladder for more information on Forward Ladder configuration.
3.4 CLS Settlement
The CLS trade keyword is set to true on FX trades, when there is a legal agreement of type CLS between the processing organization and the counterparty. This allows triggering the CLS settlement process.
CLSNow is like CLS but it is for trading and settling within the day. It also requires a legal agreement between the parties.
 Refer to the Calypso CLS Integration Guide for complete details.
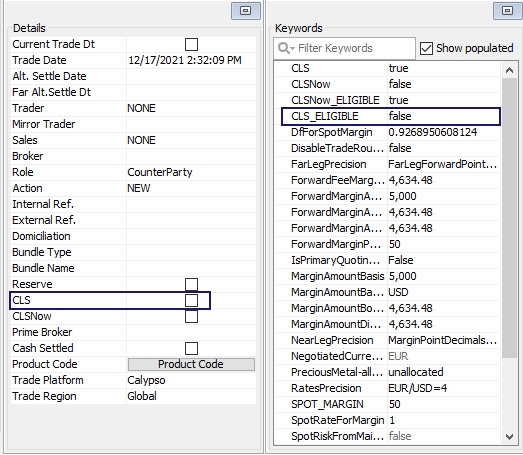
Below is what CLS looks like for spot and forward trades.
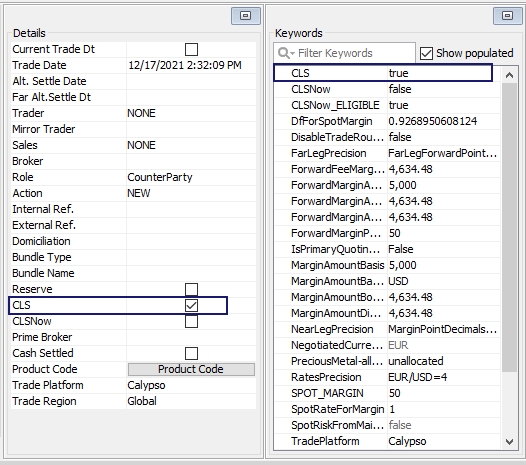
For a spot or forward trade, you can override the CLS settlement process for a given trade by un-checking the CLS checkbox in the Details area of the trade. This action sets the trade keyword CLS_ELIGIBLE to False.
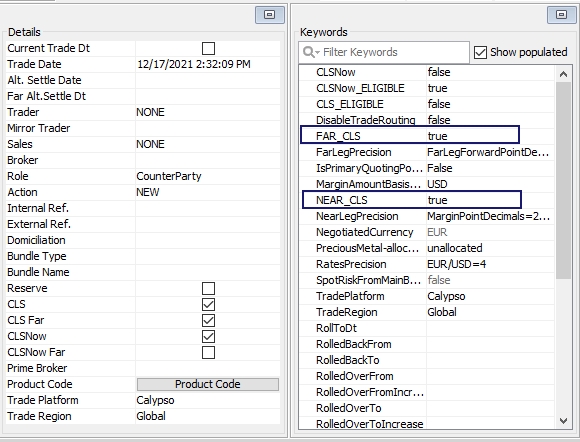
For a swap trade, when there is a legal agreement of type CLS between the processing organization and the counterparty, the details and keywords area looks like that below. Both the NEAR_CLS and FAR_CLS keywords are set to true.
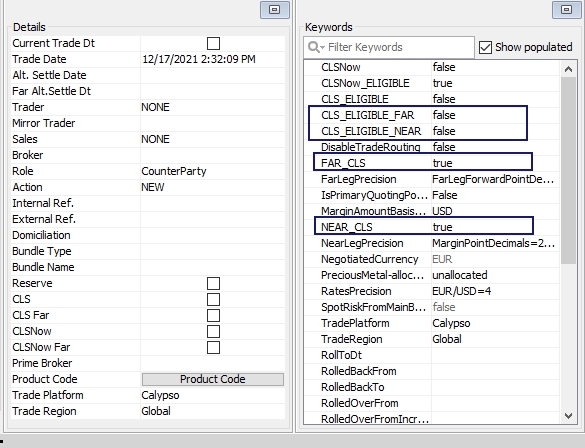
You can override the CLS settlement process for either leg of a given trade by un-checking the CLS or CLS Far checkbox in the Details area of the trade. This action sets the trade keywords CLS_ELIGIBLE_NEAR and CLS_ELIGIBLE_FAR to False, respectively.
3.5 Prime Broker
To enable the Prime Broker functionality in FX Deal Station, go through the following steps:
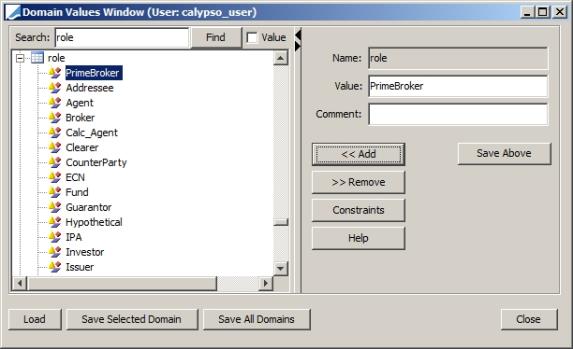
Step 1 - In the Domain Values window (Calypso Navigator > Configuration > System > Domain Values), set up the role of PrimeBroker, if it is not already established.
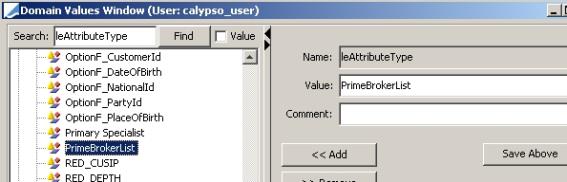
Step 2 - Set up the domain value of PrimeBrokerList in leAttributeType.
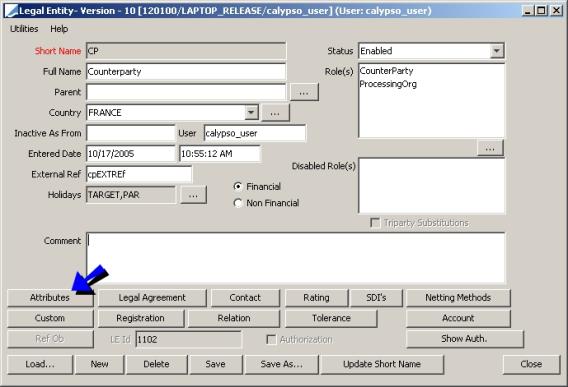
Step 3 - Load the counterparty that you would like to set up to be the prime broker and open the Attributes window (Calypso Navigator > Configuration > Legal Data > Entities).
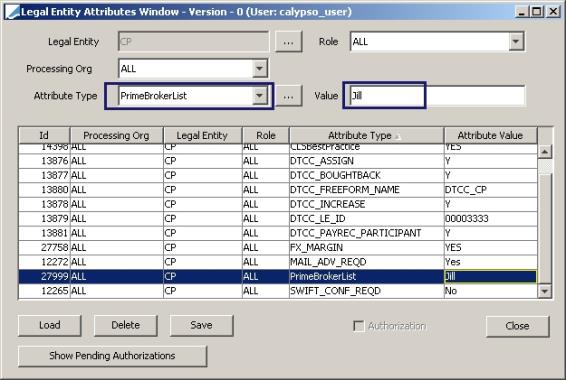
Step 4 - Look for the attribute that was created in step 2, add the value and Save.
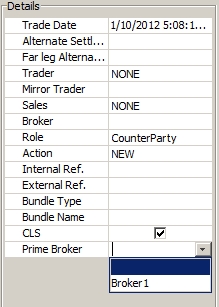
Step 5 - Once you select the Counterparty, you will see the Prime Broker in the drop down list.
The Details tab contains much of the information contained in the Trade.
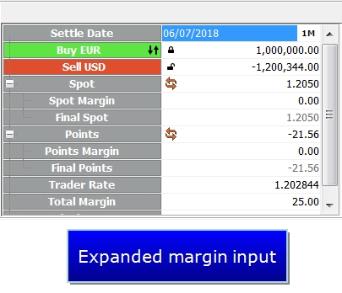
3.6 Quick Deal Entry
The Quick Deal Entry persona is designed in the same manner as Front Office Workstation deal entry. This persona can be used to enter Spot, Forward, Swap, FXNDF and FXNDF Swap products with either straight or cross pairs.
Using the Quick Deal Entry persona, it possible to enter margin breakdown into spot and forward points portions.
Note: In addition to Deal Station, Data Uploader also supports the breakdown of margin points into spot and forward.
From the FX menu in Deal Station, select Persona > Quick Deal Entry View.
Click on the plus sign next to Spot and Points to expand the entry .
| » | Click the refresh button  to refresh the rate. to refresh the rate. |
| » | Margin fees are created based on the total margin. The margin breakdown has no effect on how the fees are created. |
| » | If margin breakdown is used, FX Swap has a different behavior compared to when there is no margin breakdown. |
| » | Due to the possibility of having a negative margin, the Spot Margin field does not show absolute value. The only exception to this is in the case of the Far Spot Margin for an FX Swap, which will be shown in absolute value. |
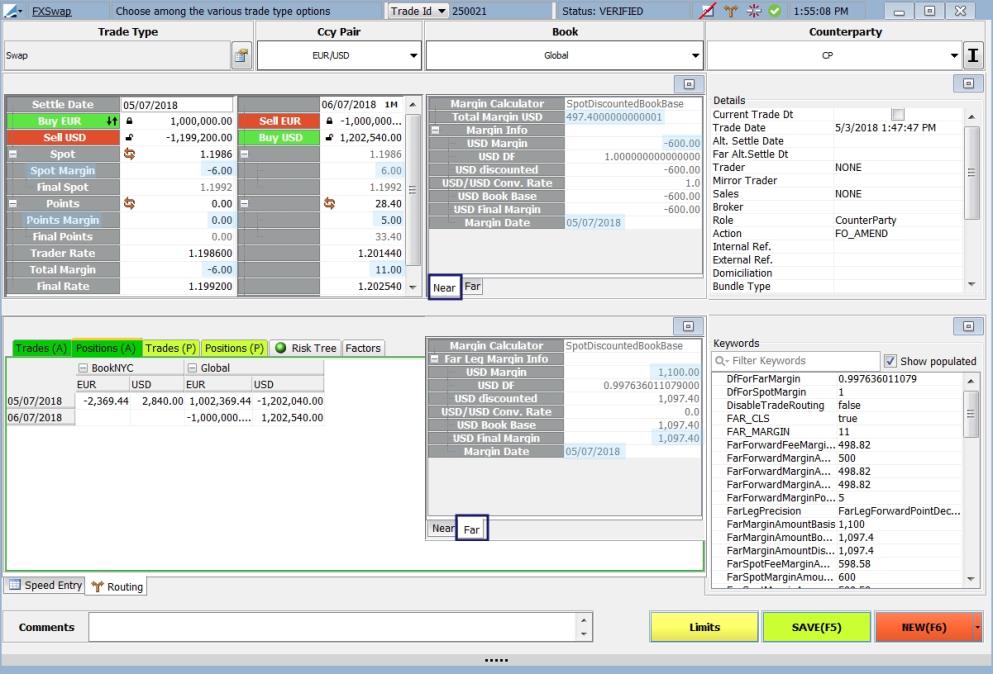
Swap Quick Deal Entry
The Spot Margin is calculated for both legs of an FX Swap when there is a margin breakdown. The fee is part of the total margin for the near and far legs.
4. Pricing & Results
4.1 Market Data Panel
In the Market Data panel, you can view the curves used to price the trade from the selected pricing environment. The pricing environment is selected at the bottom of the panel, next to the valuation date. The Market Data panel contains two tabs: Quote Set View and Registered Items. Some of the information contained in this area includes:
| » | A label which indicates the type of market data usage (for example DIS for discount curve, FOR for forecast curve and VOL for volatility curve). |
| » | When FX Points is set to false in the pricing parameter, forward points will use underlying discount curves for points and not FX curves. |
| » | The market data item name, currency, instance type and date time. |
| » | An indication if the market data item has been rolled to the current valuation date. |
Click at the bottom of the trade window to display the Market Data panel.
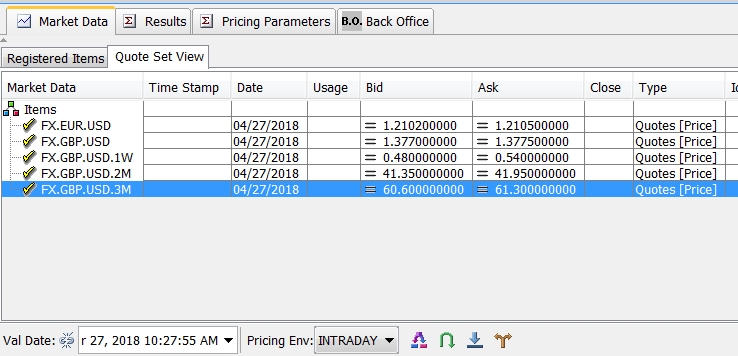

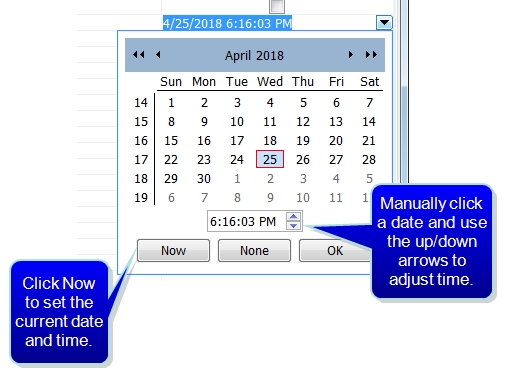
The Val Date can be manually set or it can automatically set to the current time and date when the trade is saved. Toggle the  and
and  buttons to control how the valuation date and time are calculated. When it is unlocked, you are able to manually select a date and time from the calendar drop down. When it is locked, the date and time will continue to update until the trade is saved.
Select the pricing environment from the drop-down menu. Pricing environments are created in the Pricing Environment window. From Calypso Navigator, select Market Data > Pricing Environment > Pricing Environment).

Note: Pricing is done through the Product menu by selecting Product > Price from the Deal Station Title Bar. You can also select Auto Price in the Product menu and the trade will automatically price periodically during trade entry.
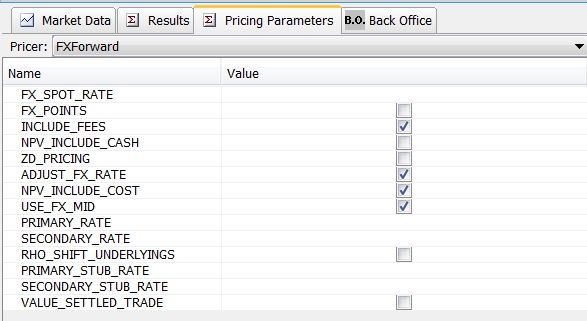
4.2 Pricing Parameters
The Pricing Parameters panel displays the Pricer and parameters the application uses in pricing the trade. The Pricer Configuration defines the pricers available for each product (choose Market Data > Pricer Configuration). Select a pricer from the drop-down menu if the one you want to use is not displayed. You can also change the values of the pricing parameters.
4.3 Results
The Results panel shows the pricing results. Press [F4] to update the results when you change rates such as the spot rate and forward points.
Below is a description of the features contained in this panel.
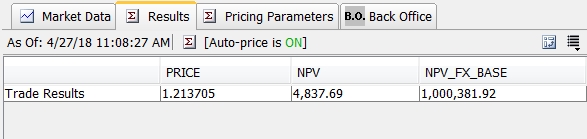
| » | The time and date stamp for when the pricing results were last calculated is displayed in the upper left of the panel. |
| » | Click  to manually price the trade. to manually price the trade. |
| » | Whether or not Auto-price is on or off is indicated in the panel. To set Auto-price, go to Product > Auto-price. |
| » | Click  to change the display of the results. This button pivots them either vertically or horizontally. to change the display of the results. This button pivots them either vertically or horizontally. |
| » | To add pricer measures in the Results panel, click the  in the upper right corner of the panel. The window displays pricer measures available for the selected
pricer. Select the pricer measures that you want to include and click OK. The application
saves the pricer measures configuration by product type. in the upper right corner of the panel. The window displays pricer measures available for the selected
pricer. Select the pricer measures that you want to include and click OK. The application
saves the pricer measures configuration by product type. |
Note: The FX spot rates come from the quote set attached to the pricing environment.
4.4 Back Office
The information contained in the Back Office panel is the same is what can be displayed through the Back Office > BO Workspace menu option at the top of the FX Deal Station window.
5. Trade Details and Keywords
The Details and Keywords panels allow for the entry and display of additional trade information.
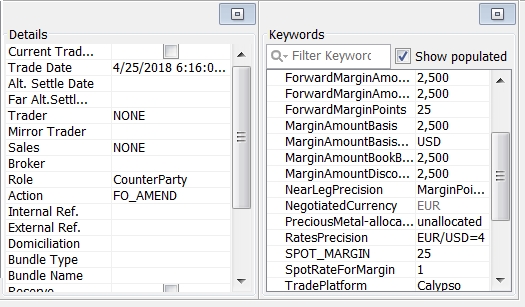
Both the Details and Keywords panels are able to be popped out into individual panels for clearer viewing by clicking  .
.
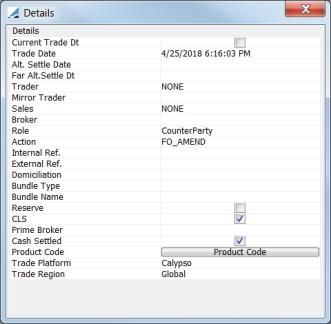
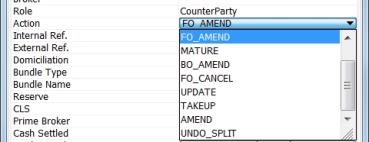
| » | Whatever appears in the Action field, is the 'preferred action'. If no action is set as preferred, then the system performs whatever action is first on the list. If a specific action is desired upon clicking Update in the Trade screen, it must be set here. |
| » | To designate a default Broker for the trades in the User Defaults window. Go to Configuration > User Access Control > User Defaults. Click the Attributes button and designate the FX Default Broker. |
| » | The Trade Date is easily edited in this area by clicking in the field to display a calendar. |
| » | The Current Trade Dt flag, when checked, sets the trade datetime to the current datetime at the moment the trade is saved. There is a setting in the User Defaults attributes to enable this flag to be set automatically. |
| » | In the Keywords tab of the Deal Capture Configuration window, designate which keywords appear in each trade window by default. |
| » | The Trade Region and Trade Platform keywords can be selected during trade entry from a list populated from keyword.TradeRegion and keyword.TradePlatform domain value. These keywords can also be populated from the Trade Region and Trade Platform book attributes. (The options for selection of these attributes in the Book window are also populated from the keyword.TradeRegion and keyword.TradePlatform domain values. |
The default population logic for these keywords is:
| – | Use the TradeRegion and TradePlatform attribute value specified on the Book for the trade |
| – | If the book does not have the attributes defined, then the values from the PositionKeeping.DefaultTradeRegion / PositionKeeping.DefaultTradePlatform domain values are used. |
| » | When the ASSET_MANAGEMENT environment properties flag is set to True, Deal Station shows an editable Agent choice field (saved as TradeRole.Agent). The values available are based on the SDI agents associated with the selected Book. Upon trade save, the Agent trade keyword (Trade_Keyword.Agent) will be in sync with the value of the selected Agent field in the Trade Details. |
| » | The Product Code field provides support for OTC product codes to be assigned to the trade. When the Product Code field button is clicked, a Product Code selection window is displayed. Only product codes that have been designated as OTC in the Product Code window are displayed. The Product Code window is displayed from Calypso Navigator by selecting Product > Code. For more details, refer to the Calypso Getting Started documentation. |
6. Trade Lifecycle
The Lifecycle bar is displayed on the screen by selecting FX > FX Lifecycle from the Deal Station Title Bar. Following is a description of the buttons on the Lifecycle button bar:
 - Trade Allocation button (described under Trade Menu)
 - Trade Rollover button (described under FX Menu)
 - Trade Termination button (described under FX Menu)
 - Trade Split button (described under FX Menu)
Canceling a Trade
If you wish to cancel a trade, select the Action CANCEL in the Details area and click SAVE. When a trade is booked with the LateTradeDatetime keyword, you may use the workflow action LATE_CANCEL.
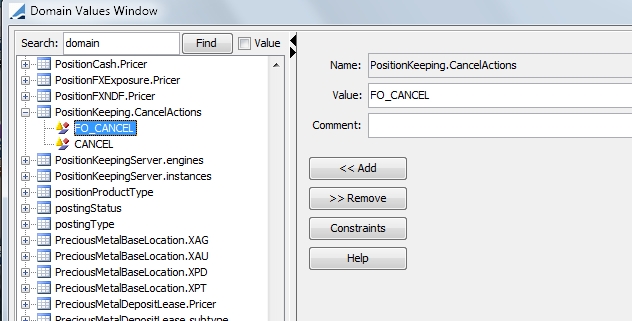
For the Position Keeping Server to understand the Action that is used to mark a trade as "CANCELED", the Action must be defined under the PositionKeeping domain. This is required to ensure that canceled trades do not appear, for example, in the FX Position Monitor.
Whereas the Position Engine would look at trades in CANCELED status to understand that the trade was canceled, the same is not true for the Position Keeping Server. The Position Keeping Server does not operate under a post-trade save operation, which means that positions are generated before the trade is actually saved. The domain PositionKeeping.CancelActions must be added in the Domain Values window and the relevant cancel action must be specified.
7. Trade & Position Routing
For detailed information about Trade and Position Routing, please refer to Trade & Position Routing.
Note: Cascading trades are supported, but each step can only have one routing rule associated with it.
8. Trade Browser
The Trade Browser can be used to display FX trades and include various details of those trades.
The following columns can be added to the Trade Browser report to view additional details pertaining to FX trades.
Please refer to the Trade Browser documentation for more information regarding the Trade Browser.
|
Column |
Description |
|---|---|
|
Pricer.FXDate |
Effective valuation date at the time of pricing the FX trade |
|
Pricer.SpotDate |
Effective spot date at the time of pricing the FX trade |
|
Pricer.Spot |
Market spot rate |
|
Pricer.Pts |
Market forward points |
|
Pricer.Fwd |
Market forward rate (spot + points) |
|
Pricer.SpotDf1 |
Primary currency DF from the spot date to today |
|
Pricer.SpotDf2 |
Quoting currency DF from the spot date to today |
|
Pricer.Df1 |
Primary currency DF from the trade settle date to today |
|
Pricer.Df2 |
Quoting currency DF from the trade settle date to today |
|
Pricer.NearDf1 |
Primary currency DF from the near leg settle date to today, only for FX Swap trades |
|
Pricer.FarDf1 |
Primary currency DF from the far leg settle date to today, only for FX Swap trades |
|
Pricer.FarPts |
Market forward points for the far leg, only for FX Swap trades |
|
Pricer.FarFwd |
Market forward rate for far leg (spot + far points), only for FX Swap trades |
|
Pricer.Df1Curve |
Primary currency discount curve (name + Id) used during valuation of the trade |
|
Pricer.Df2Curve |
Quoting currency discount curve (name + Id) used during valuation of the trade |
|
Pricer.FXCurve |
FX curve (name + Id) used during valuation of the trade, populated only when FX_POINTS = true |
Notes:
Pricer.FXCurve is only expected to be populated if FX_POINTS = true.
Some of the Discount Factors are only populated when FX_POINTS = false.
These columns will only be populated if the trades are priced. You can price the trade by selecting a pricer measure in the columns, for example Pricer.NPV.