Trade Blotter
The Trade Blotter allows working with trades using different criteria definitions for collecting trades. The trades that satisfy the criteria of a particular trade collection will be loaded into blotters where they share common market data updated in real-time, and where they can be analyzed on-the-fly.
From the Calypso Navigator, navigate to Deal Management > Trade Blotter (menu action trading.blotter.TradeViewerTree) to bring up the Trade Blotter.
Contents
1. Tour of the Trade Blotter
The Trade Blotter shows the followings panels (based on your selection under the Blotter menu):
| • | Blotter Selection panel - It allows defining different types of trade collections to load trades into blotters. |
| • | Market Data panel - It allows selecting the valuation date, pricing environment and market data server. |
| • | Ad Hoc Search panel - It allows defining search criteria on-the-fly and loading the corresponding trades into an Ad Hoc Search blotter. |
| • | A panel for each blotter that has been loaded - You can double-click a trade to bring up its pricing window. |
All these panels are described below in detail.
Trade Blotter
2. Market Data Panel
Choose Blotter > Show Market Data Panel to display the Market Data panel.

Market Data panel
| » | The valuation date defaults to the current date and time. You can clear the Val Date checkbox to enter another valuation date and time. |
| » | The pricing environment defaults to the pricing environment selected in the User Defaults. You can select another pricing environment as needed. |
You can click ![]() to modify the components of the pricing environment.
to modify the components of the pricing environment.
| » | In order to update market data in real-time for pricing purposes, you need a Market Data Server to be running. It will be displayed in this window only if pricing has been requested. |
A Market Data Server is part of a Risk Server.
 Please refer to the Calypso Installation Guide for details on defining and running Risk Servers.
3. Ad Hoc Search Panel
Choose Blotter > Show Ad Hoc Search Panel to display the Ad Hoc Search panel.
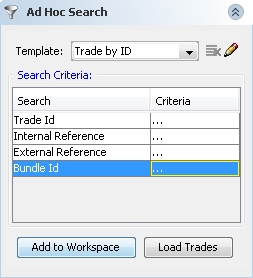
Ad Hoc Search panel
| » | Select a template and enter the criteria values as needed. |
The "Trade by ID" template is available by default. It allows searching trades by Trade ID, Internal Reference, External Reference, and Bundle ID.
You can then click Add to Workspace to add the trades to the workspace currently loaded - NOTE that this only applies to the out-of-the-box template "Trade by ID".
Or you can click Load Trades to load the trades that satisfy the criteria into an Ad Hoc Search blotter.
| » | You can also click |
Defining a Search Template
Click ![]() to create a new template.
to create a new template.
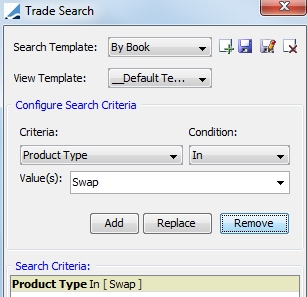
Ad Hoc Search Template window
| » | Click |
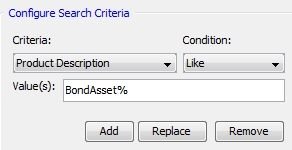
| » | Define the criteria (book, bundle, trade id, attribute, trade filter, etc.), conditions, and values, and click Add. |
For a "free form" value field, you can use the wildcard "%" to filter the values.
| » | Then click |
4. Blotter Selection Panel
The Blotter Selection Panel is always displayed. It allows defining different types of trade collections to load trades into blotters.
The following types of trade collections can be defined:
| • | Workspaces - A workspace blotter contains any trade created within the workspace blotter. |
When you first open the Trade Blotter, you will see a
default workspace labeled <your
login name>_ws. You can use this workspace, or create a new workspace.
You can right-click a workspace and add books, portfolios (trade filters), bundles, and other workspaces. They will appear in a sub-folder, and each item will be opened in its own blotter.
You can share a workspace by adding it to another workspace in a tree. Adding a workspace will load all of the trades in a sub-workspace into its parent workspace. Rick-click the desired workspace and choose "Add Workspaces" from the menu.

You can open a workspace in the Pricing Sheet. Right-click the desired workspace and choose "Open Workspace in Pricing Sheet" from the menu.
Please refer to Calypso Pricing Sheet documentation for details on using the Pricing Sheet.
| • | Books - A book blotter dynamically contains all the trades associated with the selected book. |
To add a book blotter, right-click the Books label and choose "Add Book" from the popup menu - You will be prompted to select a book.
| • | Trade Filters - A trade filter blotter dynamically contains all the trades that satisfy the criteria of the selected trade filter. |
To add a trade filter blotter, right-click the Trade Filters label and choose "Add Trade Filter" from the popup menu - You will be prompted to select a trade filter.
You can also create a new trade filter - It will bring up the Trade Filter window - Help is available from that window.
You can load trade filters defined by position spec, and it this case, the trade blotter will display the trades and positions defined in the trade filter. If you double-click a position, it will display the trades that make up the position.
PositionCash positions are automatically excluded from loading in the blotter.
| • | Bundles - A bundle blotter dynamically contains all the trades associated with the selected trade bundle. |
To add a bundle blotter, right-click the Bundles label and choose "Add Bundle" from the popup menu - You will be prompted to select a trade bundle.
You can also create a new trade bundle - It will bring up the Trade Bundle window - Help is available from that window.
| • | Counterparties - A counterparty blotter dynamically contains all the trades captured against the selected counterparty. |
To add a counterparty blotter, right-click the Counterparties label and choose "Add Counterparty" from the popup menu - You will be prompted to select a counterparty.
To bring up a blotter, double-click a blotter definition from the Blotter Selection panel. A new panel will be created with the trades corresponding to the selected blotter.
See Working with Blotters for details.
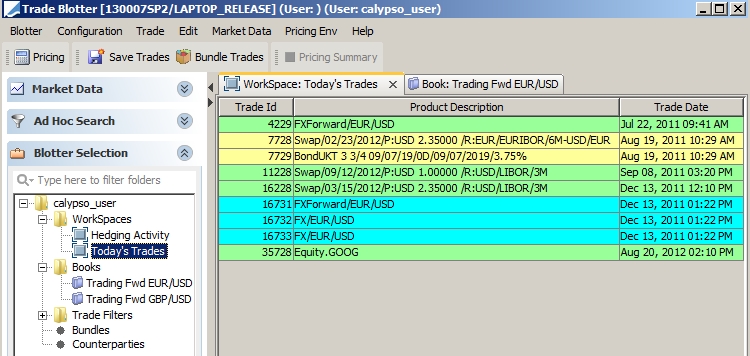
5. Working with Blotters
When you double-click a blotter definition from the Blotter Selection panel, a new panel is created with the trades corresponding to the selected blotter.
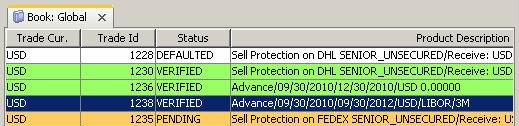
Sample blotter
If the environment property LARGE_LIST_WARNING is set to true, and the blotter is loading a number of trades superior to the maximum number of trades (user attribute "Max.Trade"), a warning message is displayed and the user is prompted to proceed with the load. If LARGE_LIST_WARNING is set to false, and the blotter is loading a number of trades superior to the maximum number of trades, an error message is displayed and the load is suspended.
5.1 Position Drilldown
You can load trade filters defined by position spec, and in this case, the trade blotter will display the trades and positions defined in the trade filter. If you double-click a position, it will display the trades that make up the position.
Ⓘ [NOTE: You can only drill-down from liquidated positions, not settled FX positions]
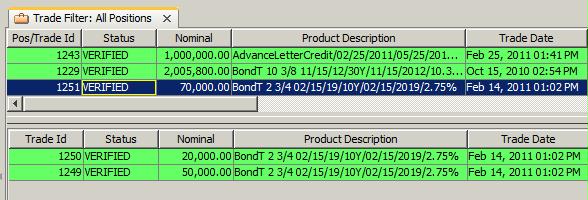
Sample position blotter
5.2 Configuring the Blotter View
A default view is displayed, you can configure the view using Configuration > Configure Blotter View. It brings up the Trade Blotter View Configuration window.
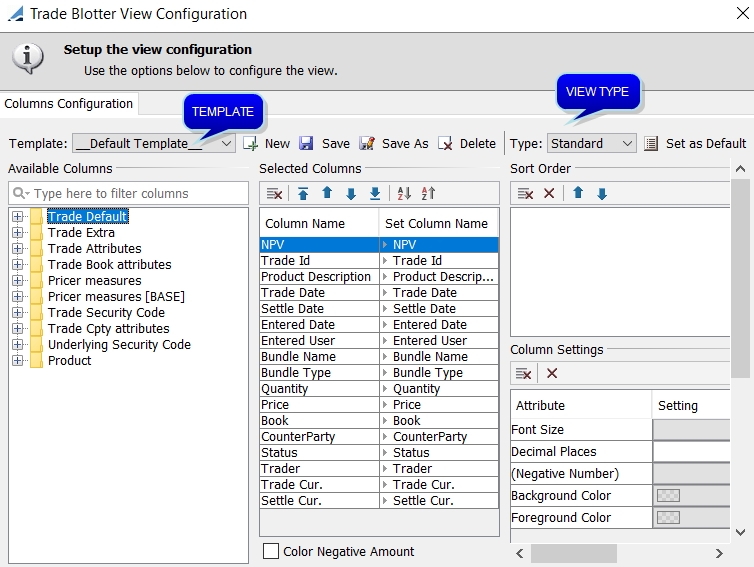
Trade Blotter view configuration
You can select columns, set column names, select sort columns, format columns and save the configurations as a template. The template can then be associated with a blotter.
| » | To select a column, check the column in the Available Columns area. |
Note that if you select pricer measure columns, you will have to price the trades in order to display them.
See Pricing Trades for details.
| » | In the Selected Columns area, you can: |
| – | Set column names. |
| – | Order columns. |
| – | Format columns: |
Font Size
Decimal Places
(Negative Number) - Select On to display a negative number in between parentheses, or with the "-" sign otherwise
Background Color - Select the background color as needed.
Foreground Color - Select the font color as needed.
| – | Check "Color Negative Amount" to display negative amounts in red. |
| – | Select a column, and click |
Note that if real-time updates are enabled, manual column sorting is not available. Trades will automatically be sorted by descending order in the "Updated Date" column, ensuring that the newest trades are always shown at the top. It is not possible to double-click on a column name heading to sort trades when real-time updates are enabled.
| » | You can click Set as Default to apply the default view to the selected template. |
| » | Click Save to save your changes. |
Please reload any open blotters in order for the changes to take effect.
View Type
By default the view type is set to Standard.
You can select Relationship to view trades that belong to hedge relationships and trades that do not belong to hedge relationships.
Please refer to Calypso Hedge Accounting documentation for details on Relationship views.
View Template
To define a new template, click New - You will be prompted to enter a template name.
Configure the template as needed then click Save.
To apply the template to a blotter, right-click the blotter name in the Blotter Selection panel, and choose "Set Default View Template" - You will be prompted to select a template.
5.3 Configuring Colors
You can define the color of the rows by status and by product type using Configuration > Status Color Configuration window.
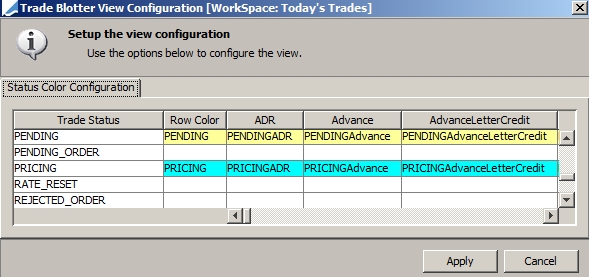
Trade Blotter color configuration
| » | For each status, you can select a color in "Row Color" that will apply to all products. You can also select a specific color for each product type. |
| » | Click Apply when you are done. |
5.4 Capturing Trades
You can capture trades using the Trade menu. The trade worksheet corresponding to the selected menu item will come up - Help is available from all trade worksheets.
If you are capturing a trade from a workspace blotter, the trade will be added to that workspace with an orange background until it is saved.

Sample unsaved trade
Hypothetical trades added from the Pricing Sheet will also be added to a workspace blotter with an orange background.
See Pricing Sheet Usage for more details.
You can also capture trades using speed buttons.
See Defining Trade Speed Buttons for details.
Saving Trades
You can select a trade or multiple trades, and click Save Trades to save them.
Internal Trades
Internal trades are trades with a counterparty that has the role ProcessingOrg, or whose parent is a ProcessingOrg.
You can mirror internal trades to the book of the counterparty using the Mirror Trade function.
See Mirror Trade Scenario for details.
Bundling Trades
You can select several trades and click Bundle Trades to save them into a bundle.
You will be prompted to specify the following information.
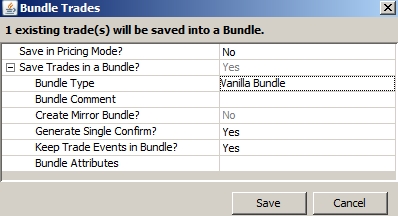
Saving trade bundles
| » | Enter the fields described below and click Save. |
| Fields | Description | ||||||||||||||||||
|---|---|---|---|---|---|---|---|---|---|---|---|---|---|---|---|---|---|---|---|
|
Save in Pricing Mode? |
If Yes, the trade keyword "ScratchPadTrade" is set to true - This keyword can be used in the workflow configuration to set a specific workflow status. Otherwise, the system assigns the trade status based on the default workflow. |
||||||||||||||||||
|
Save Trades in a Bundle? |
Set to Yes. Bundle Parameters
The bundle name will be created by the system as "<bundle type>-<bundle number>" - The bundle number is given by the system.
The name of the mirror bundle will be created by the system as "Mirror Bundle <bundle name>". [NOTE: This only applies if the trades are internal trades]
|
5.5 Defining Trade Speed Buttons
You can define trade speed buttons using Blotter > Customize Speed Button Tool Bar.
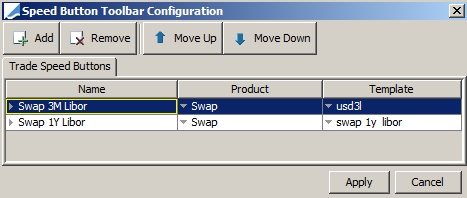
Speed Buttons configuration
| » | Click Add to add a trade speed button. |
Enter a button name, select a product type, and select a trade template. Trade templates can be created from the trade worksheets.
You can also select the product type "PricingSheet" to open a blank Pricing Sheet (You cannot select a template in that case but you will be able to select a template in the Pricing Sheet).
| » | Then click Apply. |
The button will appear in the toolbar as shown below.
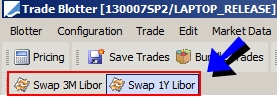
Sample speed buttons
To capture a trade using that template, just click the speed button, and the corresponding trade worksheet will come up, or a blank pricing sheet - Help is available from all trade worksheets, and from the Pricing Sheet.
5.6 Pricing Trades
All pricing requests are delegated to the default non-official Calculation Server specified in the User Defaults.
The Calculation Server is part of a Risk Server.
Please refer to the Calypso Installation Guide for details on defining adhoc Risk Servers.
Select a set of trades in a blotter and click Pricing.
You can also click Pricing to price all the trades of the active blotter (the active blotter is the blotter currently selected).
All pricer measure columns are computed.
5.7 Displaying Totals
Choose Configuration > Enable Total View to display totals by currency for the pricer measures.
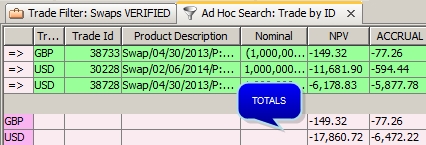
Sample totals
A total row is displayed at the bottom of the blotter for each currency.
You can select trades as needed, then right-click and choose "Calculate Totals" to recompute the totals for the selected trades only.
Selected rows appear with the ![]() arrow.
arrow.

Sample totals
5.8 Running Risk Analyses on-the-fly
You can run risk analyses on-the-fly on the trades, using one of the following methods:
| • | Choose Blotter > On Demand Analysis, and select the Ad Hoc panel - Select the input parameters and the analysis parameters, and click Run. |
| • | Choose Blotter > On Demand Analysis, and select the On Demand panel - Select the input parameters and click a predefined analysis, and click Run. |
| • | Click a risk speed button, provided you have defined risk speed buttons for the Trade Blotter - Risk speed buttons can be defined using Blotter > On Demand Analysis Speed Buttons. |
The results will be displayed in the Calypso Workstation or saved to a file, based on the selected parameters.
See On Demand Analysis for complete details on using the On Demand Analysis window and defining risk speed buttons.
5.9 Popup Menu
When you right-click a trade in a blotter, the following popup menu items are displayed.
|
Menu Items |
Description |
|---|---|
| Remove Selected Trades |
Only applies to a workspace blotter. To remove a trade from the workspace. |
|
Add Trades to Bundle |
Only applies to a workspace blotter. To add the trades currently selected to a trade bundle. You will be prompted to select a bundle type and name. |
|
Remove Trades from Bundles |
Only applies to a workspace blotter. To remove the trades currently selected from a trade bundle, if any. |
| Set Default View Template |
To associate a view template with the blotter. You will be prompted to select a view template.
|
|
Configure Status Color |
To configure the colors.
|
|
Select All |
To select all trades in the active blotter. |
|
Clear Selection |
To clear the current trade selection. |
| Calculate Totals |
To compute totals for the selected trades provided you have enabled the total view.
|
| Cut / Copy / Paste |
To copy and paste trades from any blotter to a workspace blotter. |
|
Market Data |
You can refresh the market data, display what market data are used for a given set of trades, check if market data are missing, and reload market data definitions as needed. |
|
Apply Action |
You can apply a workflow action to a trade or a set of trades, based on the workflow configuration.
|
|
Allocate |
To allocate a trade. The Allocation window is displayed - Help is available from the window.
|
|
Terminate / Novate |
To terminate a trade. The Termination window is displayed - Help is available from the window.
|
|
Option Exercise |
To exercise an option. The Option Exercise window is displayed - Help is available from the window. |
| Open Pricing Grid |
Only applies to a workspace blotter. To open the pricing grid. The trades captured in the pricing grid will be automatically added to the workspace.
|
| Display Relationships |
To display the hedge relationships associated with the trade if any.
|
| Hedge Relationship Details |
To associate the trade with a hedge relationship. You will be prompted to select a hedge enrichment context.
|
|
Export HTML Trades |
To export the trades currently selected to HTML format. |
|
Export Excel Trades |
To export the trades currently selected to Excel format. |
| Custom Menu |
To display custom menu items.
|
6. Trade Blotter Menus
Configure your blotter functions and menus.
6.1 Blotter Menu
The menu items of the Blotter menu are described below.
|
Menu Items |
Description |
|---|---|
|
Customize Speed Button Toolbar |
To define Trade Speed buttons and Risk Speed buttons.
|
| On Demand Risk Analysis |
To open the On Demand Analysis panel.
|
| On Demand Risk Analysis Speed Buttons |
To open the On Demand Analysis Speed Button panel.
|
|
Show Market Data Panel |
To display/hide the Market Data panel.
|
| Show Ad Hoc Search Panel |
To display/hide the Ad Hoc Search panel.
|
|
Export HTML Trades |
To export the trades currently selected to HTML format. |
|
Export Excel Trades |
To export the trades currently selected to Excel format. |
6.2 Configuration Menu
The menu item of the Configuration menu is described below.
|
Menu Items |
Description |
|---|---|
|
Configure Blotter View |
To configure the column display.
|
| Status Color Configuration |
To configure the column display.
|
| Enable Total View |
This menu item operates as a checkbox. Check to display totals by currency for the pricer measures.
|
| Real-Time Trade |
This menu item operates as a checkbox. Check to enable real-time trade and market data updates. Note that if real-time updates are enabled, manual column sorting is not available. Trades will automatically be sorted by descending order in the "Updated Date" column, ensuring that the newest trades are always shown at the top. It is not possible to double-click on a column name heading to sort trades when real-time updates are enabled. |
6.3 Trade Menu
The menu items of the Trade menu allow bringing up Trade worksheets to capture trade - Help is available from every Trade worksheet.
6.4 Edit Menu
The menu items of the Edit menu are described below.
|
Menu Items |
Description |
|---|---|
|
Select All |
To select all trades in the active blotter. |
|
Clear All |
To clear the current trade selection. |
| Cut / Copy / Paste |
To copy and paste trades from any blotter to a workspace blotter. |
|
Refresh |
To load trade updates. |
6.5 Market Data Menu
The menu items of the Market Data menu allow bringing up market Data windows to define / view market data - Help is available from every Market Data window.
6.6 Pricing Env Menu
The menu items of the Pricing Env menu are described below.
|
Menu Items |
Description |
||||||
|---|---|---|---|---|---|---|---|
|
Market Data Manager |
To bring up the Market Data Manager.
|
||||||
|
Refresh |
To reload the latest market data for the Pricing Env currently selected, as of the current valuation date and time. |
||||||
|
Display |
To bring up the Market Data Manager.
|
||||||
|
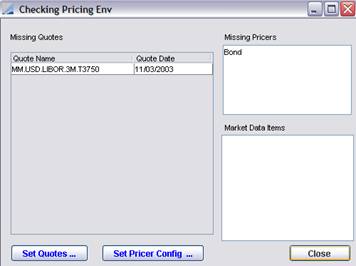
Check |
To bring up the Checking Pricing Env window that checks if all required pricing data are available in the Pricing Env. This window shows missing quotes, missing pricers, and missing market data items (curves and surfaces) as shown in the example below.
|
||||||
|
Generate |
To regenerate market data for the selected trades. |
||||||
|
Reload |
To reload the Pricing Env currently selected: definition and market data as of the current valuation date and time. |
||||||
|
Reload Quotes |
To reload the latest quotes, as of the current valuation date and time. |
See also
| • | Trade Lifecycle Scenarios |
| • | Mirror Trade Scenario |