On Demand Analysis
The On Demand Analysis window allows running risk analyses on-the-fly based on trade selections and/or trade filters, and allows creating speed buttons for various applications: Trade Blotter, Calypso Activity Browser, Trade Windows, Pricing Sheet, Calypso Workstation. The output can be viewed in the Calypso Workstation or can be saved to a file.
The On Demand Analysis window can be used in multiple ways:
| • | You can run "Ad Hoc" risk analyses on-the-fly - "Ad Hoc" indicating that you select the parameters of the risk analysis on-the-fly. |
| • | You can run "On Demand" risk analyses on-the-fly - "On Demand" indicating that you select pre-defined parameters. This requires the configuration of pre-defined parameters. |
| • | You can define speed buttons to be used in other applications. |
From the Calypso Navigator, navigate to Position & Risk > On Demand Analysis to access the On Demand Analysis window. It can also be invoked from the Trade Blotter, Calypso Activity Browser, Trade windows, Pricing Sheet, and Calypso Workstation.
Contents
- Running Ad Hoc Risk Analyses
- Running On Demand Risk Analyses
- Configuring Pre-Defined Parameters
- Distributing Shortcuts and Speed Buttons
1. Before you Begin
1.1 Adhoc Risk Server
The On Demand Analysis window requires an adhoc Risk Server to be running.
 Please refer to the Calypso Installation Guide for details on setting up adhoc Risk Servers.
1.2 Access Permissions
The following access permission functions are specific to the On Demand Analysis window.
ConfigureODAServers
Permission to modify the selection of default Calculation Server, Presentation Server, Market Data Server, Dispatcher.
ConfigureODAShortcuts
Permission to configure input shortcuts and analysis shortcuts.
DistributeODAShortcuts
Permission to distribute input shortcuts and analysis shortcuts to other users.
DistributeODASpeedButtons
Permission to distribute speed buttons to other users.
ODAAdhocAnalysis
Permission to run Ad Hoc analyses.
ODAAdhocTradeFilter
Permission to select a trade filter in the Ad Hoc and On Demand panels.
2. Running Ad Hoc Risk Analyses
Select the Ad Hoc panel.
2.1 Ad Hoc Request
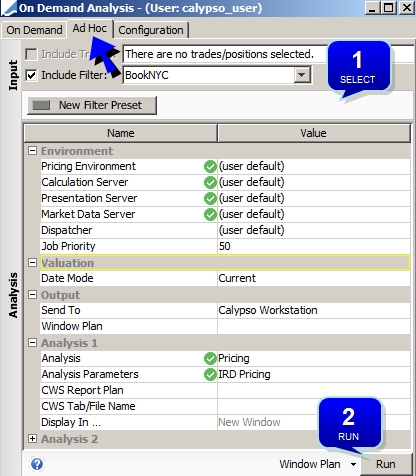
Sample Ad Hoc request
Step 1 - Select the input parameters and analysis parameters.
Input Parameters
Select the input parameters: You can run the analysis on selected trades and/or trade filters.
| • | Check "Include Trades" to include the trades currently selected in the application from which you have requested On Demand Analysis. |
| • | Check "Include Filter" to select a trade filter, or click an input shortcut to select the corresponding input parameters - Input shortcuts are created in the Configuration panel. |
See Configuring Pre-Defined Parameters for details.
Select the analysis parameters - They are described below.
| Parameters | Description | |||||||||||||||||||||
|---|---|---|---|---|---|---|---|---|---|---|---|---|---|---|---|---|---|---|---|---|---|---|
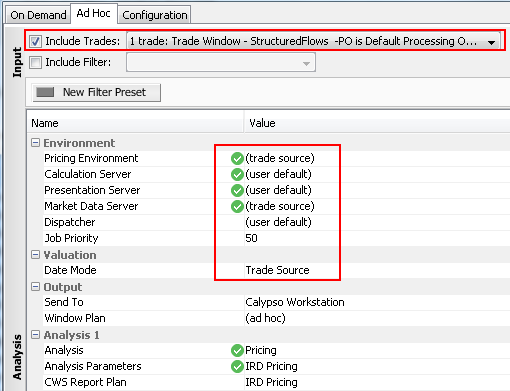
| Pricing Environment |
The pricing environment specified in the User Defaults is used by default. You can select "(trade source)" to use the pricing environment specified in the application from which you have requested On Demand Analysis. Only applies when the input parameters include selected trades. When using "(trade source)", you should also use Date Mode = Trade Source. You can also select a specific pricing environment as applicable. |
|||||||||||||||||||||
| Calculation Server |
The Calculation Server specified in the User Defaults is used by default. You can select another Calculation Server as applicable. |
|||||||||||||||||||||
| Presentation Server |
The Presentation Server specified in the User Defaults is used by default. You can select another Presentation Server as applicable. |
|||||||||||||||||||||
| Market Data Server |
The Market Data Server specified in the User Defaults is used by default. You can select "(trade source)" to use the Market Data Server specified in the application from which you have requested On Demand Analysis. Only applies when the input parameters include selected trades. You can select another Market Data Server as applicable. |
|||||||||||||||||||||
| Dispatcher |
The Dispatcher specified in the User Defaults is used by default. You can select another Dispatcher as applicable, or none. |
|||||||||||||||||||||
| Job Priority |
You can change the job priority to bypass jobs currently running with a lower priority. The highest priority is 1. Default is 50. |
|||||||||||||||||||||
| Date Mode |
The valuation date defaults to "Current", the current date and time. You can also select "Trade Source", "Offset", or "Specific". Trade Source Select "Trade Source" to use the valuation date and time specified in the application from which you have requested On Demand Analysis. Offset Select "Offset" to run on a number of business days in the past.
If you are running the risk analysis on a trade-based trade filter, the system performs trade undo. If you are running the risk analysis on a position-based trade filter, the risk analysis is based on the position snapshot at the selected date and time. Position snapshots are created using the scheduled task CREATE_POSITION_SNAPSHOT. Snapshot times are set in the VALUATION_TIMES engine parameter for the Position engine.
If you are running the risk analysis on selected trades, there is no trade undo on the selected trades. Specific Select "Specific" to run on a specific date.
|
|||||||||||||||||||||
| Send To |
By default, the results are displayed in a Calypso Workstation window, or you can save the results to a file. Calypso Workstation You can select a Calypso Workstation window plan. You can create a window plan using Window Plan > New at the bottom of the window. File You can also select "File" to save the results to a file. You can enter the file name in the Analysis section. You can enter an email address to which the file will be sent. |
|||||||||||||||||||||
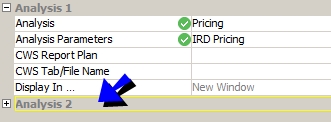
| Analysis |
Select the analysis you want to run. The On Demand Analysis window supports the risk reports defined in the domain "riskPresenter". You can run multiple analyses. An "Analysis #" area is added each time you add a new analysis.
|
|||||||||||||||||||||
| Analysis Parameters |
Select the corresponding analysis parameters. Analysis parameters can be created from the Risk Config window, or from the Calculation Server Configuration window.
|
|||||||||||||||||||||
| CWS Report Plan |
You can select a CWS report plan if any exists, otherwise you will be prompted to configure a report plan when the report is displayed the Calypso Workstation. For the output file, the selection of a CWS report plan is mandatory. |
|||||||||||||||||||||
| File Format |
Only applies if the results are sent to a file. Select the file format. |
|||||||||||||||||||||
| CWS Tab/File Name |
You can enter a name for the Calypso workstation window. For the output file, enter a file name. By default it is stored in the Default Directory defined in the User Defaults. |
|||||||||||||||||||||
| Display In |
Only applies if the results are sent to the Calypso Workstation. It is "New Window" by default for all analyses. For the Multi-Sensitivity analysis, you can select "Hedging Window" if the Multi-Sensitivity is associated with hedge parameters to display the results in the Hedge Recommendation window directly. |
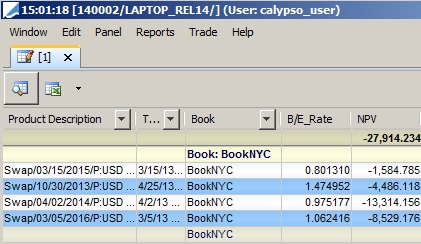
Step 2 - Click Run to run the report.
The results are displayed in a Calypso Workstation window, or saved to a file, based on the selected parameters.
Sample results:
When saving to a file, the On Demand Analysis Job Status dialog appears.
See On Demand Analysis Job Status for details.
2.2 Ad-Hoc Request with Market Data Modified Locally
Ⓘ [NOTE: This only applies if a Market Data Server is running - If you do not have a Market Data Server running, and you modify the market data for the trade, the local modifications will not be propagated to any On Demand Analysis request with (trade source) parameters]
Step 1 - In the Trade window: Lock the Market Data Server.

Step 2 - Double-click the market data you want to modify or choose Pricing > Market Data Manager, and modify as needed. Click Apply (or F8 in the Market Data Manager) to apply the modifications to the trade.
Step 3 - Run an Ad Hoc analysis with the following parameters:
Pricing Environment = (trade source)
Market Data Server = (trade source)
Date Mode = Trade Source
In this case, the analysis will run with the locally modified market data.
2.3 On Demand Analysis Job Status
When saving to a file, the On Demand Analysis Job Status dialog appears as shown below.
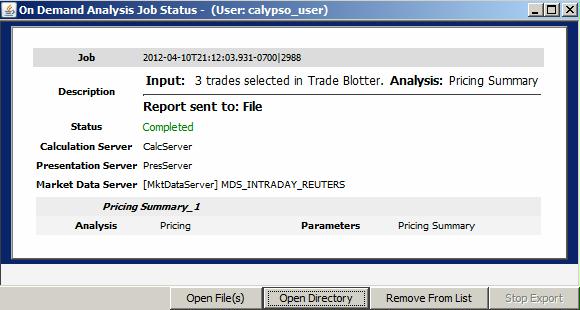
| » | You can click Open File(s) to open the created file. |
| » | You can click Open Directory to open the directory where the file has been saved. By default, it is the Default Directory defined in the User Defaults. |
3. Running On Demand Risk Analyses
Select the On Demand panel.
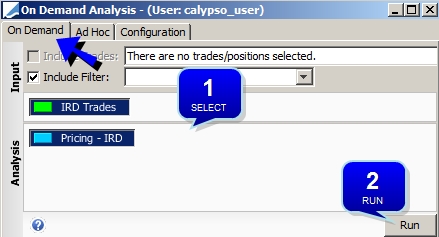
Sample On Demand request
Step 1 - Select the input parameters: You can run the analysis on selected trades and/or trade filters.
| • | Check "IncludeTrades" to include the trades currently selected in the application from which you have requested On Demand Analysis. |
| • | Check "Include Filter" to select a trade filter, or click an input shortcut to select the corresponding input parameters - Input shortcuts are created in the Configuration panel. |
See Configuring Pre-Defined Parameters for details.
Click an analysis shortcut to select the corresponding analysis parameters - Analysis shortcuts are created in the Configuration panel.
See Configuring Pre-Defined Parameters for details.
Step 2 - Click Run to run the report.
The results are displayed in a Calypso Workstation window, or saved to a file, based on the selected parameters.
When saving to a file, the On Demand Analysis Job Status dialog appears as shown below.
See On Demand Analysis Job Status for details.
4. Configuring Pre-Defined Parameters
Select the Configuration panel.
Creating an Input Shortcut
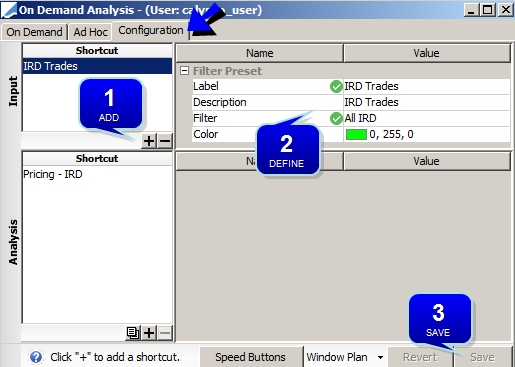
Sample Input Shortcuts configuration
Step 1 - Click + in the Input Shortcut area to add an input shortcut.
Step 2 - Define its parameters:
| • | Enter a label to identify the shortcut throughout the system. |
| • | Enter a description as needed. |
| • | Select a trade filter. |
| • | Select a color as needed. |
Step 3 - Click Save to save the shortcut.
It can be used to run ad-hoc analyses and on demand analyses, and to define risk speed buttons.
Creating an Analysis Shortcut
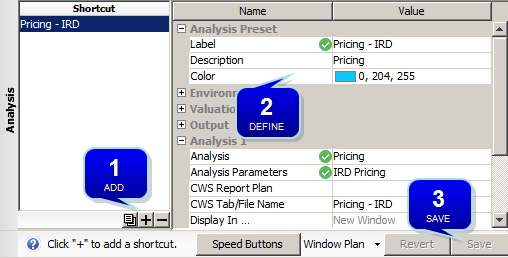
Sample Analysis Shortcuts configuration
Step 1 - Click + in the Analysis Shortcut area to add an analysis shortcut.
You can also select an existing analysis shortcut, and click ![]() to duplicate it.
to duplicate it.
Step 2 - Define its parameters:
| • | Enter a label to identify the shortcut throughout the system. |
| • | Enter a description as needed. |
| • | Select a color as needed. |
| • | Then select the analysis parameters as described in "Running Ad Hoc Risk Analyses". |
See Analysis Parameters for details.
Step 3 - Click Save to save the shortcut.
It can be used to run on demand analyses, and to define risk speed buttons.
5. Defining Speed Buttons
You can click Speed Buttons in the Configuration panel, or bring up the Speed Buttons application independently from the following menu items:
| • | Trade Blotter - Blotter > On Demand Analysis Speed Buttons |
| • | Calypso Workstation - Reports > On Demand Analysis Speed Buttons |
| • | Trade Window - Analytics > On Demand Analysis Speed Buttons |
| • | Pricing Sheet - Analysis > On Demand Analysis Speed Buttons |
| • | Front Office - Right-click on a Security Position > On Demand Analysis Speed Buttons |
Ⓘ [NOTE: Make sure that the search criteria are empty when you add speed buttons, otherwise, you will not be able to see them]
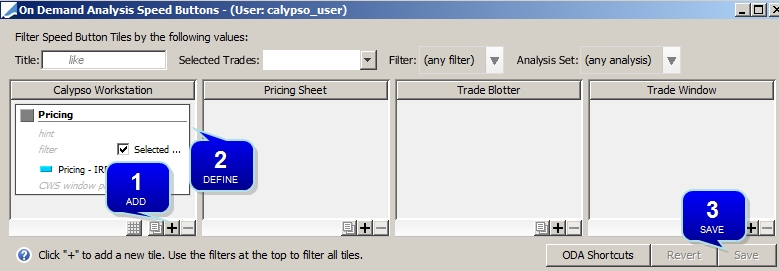
Sample Speed Buttons definition
Step 1 - Click + in the application where you want to add a speed button.
You can also select an existing speed button, and click ![]() to duplicate it.
to duplicate it.
Step 2 - Define its parameters:
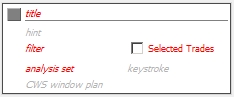
| • | You can click the gray square to select a color for speed button. |
| • | Enter a title to identify the speed button. |
| • | You can enter a screen tip in the "hint" field. |
| • | Check "Selected Trades" to run the risk analysis on the trades currently selected in the corresponding application, and / or click an input shortcut from the "filter" field to select the corresponding input parameters - Input shortcuts are created in the Configuration panel of On Demand Analysis. |
You can click ODA Shortcuts to bring up the Configuration panel.
See Configuring Pre-Defined Parameters for details.
| • | Click an analysis shortcut from the "analysis set" field to select the corresponding analysis parameters - Analysis shortcuts are created in the Configuration panel of On Demand Analysis. |
You can click ODA Shortcuts to bring up the Configuration panel.
See Configuring Pre-Defined Parameters for details.
| • | You can enter a keystroke sequence in the "keystroke" field, for example "Ctrl+Shift+F6". You can then use "Ctrl+Shift+F6" in the application to invoke the corresponding risk speed button. |
| • | You can select a Calypso Workstation window plan from the "CWS window plan" field. |
Step 3 - Click Save to save the speed button.
Once a speed button is defined, you can drag it and drop it in another application as needed.
It can be used to run risk analyses on-the-fly, from the following menu items, or using the specified keystroke sequence, if any.
| • | Trade Blotter - Click a risk speed button. |
| • | Calypso Workstation - Click a risk speed button in the "On Demand Analysis" window. |
| • | Trade Window - Analytics > On Demand Analysis Shortcuts |
| • | Pricing Sheet - Analysis > On Demand Analysis Shortcuts |
The results are displayed in a Calypso Workstation window, or saved to a file, based on the selected parameters.
6. Distributing Shortcuts and Speed Buttons
In order to distribute shortcuts and / or speed buttons to other users, from the Calypso Navigator, navigate to Configuration > Reporting & Risk > On Demand Analysis Distribution (menu action risk.oda.LaunchODADistribution).
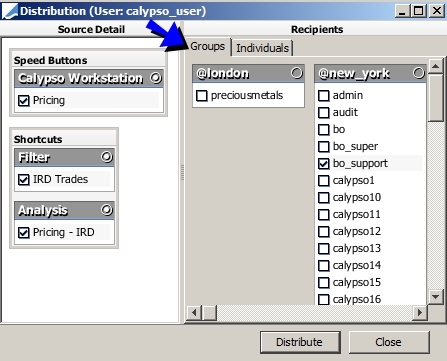
Shortcuts and speed buttons distribution
Select the speed buttons and / or shortcuts you want to distribute. Then select user groups and / or individual users, and click Distribute.
The selected speed buttons and shortcuts will be made available to the corresponding users.
Ⓘ [NOTE: If Calypso Workstation report plans are configured in the analysis shortcuts, they need to be distributed from the Calypso Workstation]