Trade Lifecycle Scenarios
The following sections outline standard lifecycle actions that can be applied to trades, once they have been saved, based on the trade workflow, and based on predictable and unpredictable events.
Sample Trade Workflow
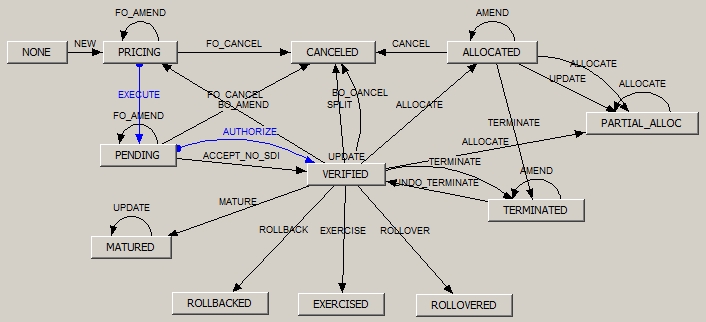
Sample trade workflow
According to this workflow, when a trade is first created it is in status PRICING. It automatically moves to status PENDING because the EXECUTE actions is STP (Straight-Through Processing), and does not have any rule. It may also automatically move to status VERIFIED because the action AUTHORIZE is STP, if the rule CheckSDI is satisfied.
All other actions are applied manually.
1. Amending a Trade
In this example, the user amends a trade in status PENDING.
Double-click a PENDING trade from a blotter to open it, and amend a field as needed.
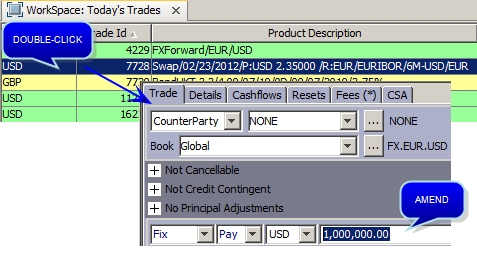
In the Details panel, you can see the current status of the trade, and the action that will be applied to the trade upon saving - You can modify the action as needed.
Ⓘ [NOTE: The action marked as "Preferred Action" in the workflow appears by default]
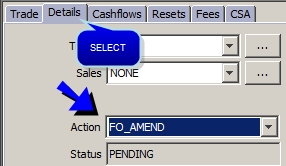
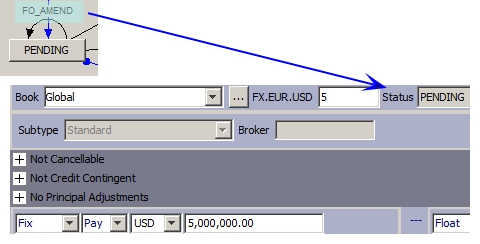
Save the trade to confirm the amendment.
According to the trade workflow, the trade remains in status PENDING.
2. Updating a Trade
The UPDATE action is a reserved action that allows modifying a trade without sending an event.
It should be used in combination with the CheckNoChange workflow rule, or with the AllowChanges workflow rule that only allows the changes specified in the domain "DefaultChangeList".
3. Allocating a Trade
In this example, the user allocates a trade to multiple books.
To allocate a trade to multiple legal entities or to multiple books, right-click a VERIFIED trade from a blotter, and choose Allocate.
It brings up the Allocation window.
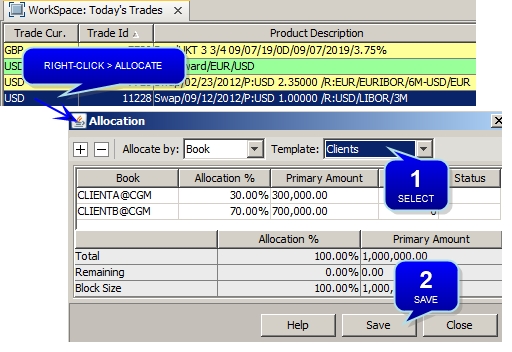
Step 1 - Select the allocation type and an allocation template.
Step 2 - Click Save to save the trades.
The new trades are in status VERIFIED.

 You may refer to Calypso Allocation documentation for complete details.
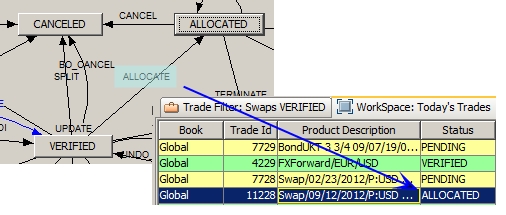
According to the trade workflow, the original trade moves to status ALLOCATED.
4. Terminating a Trade
In this example, the user terminates a trade.
To terminate a trade, right-click a VERIFIED trade from a blotter, and choose Terminate/Novate.
It brings up the Termination Action report.
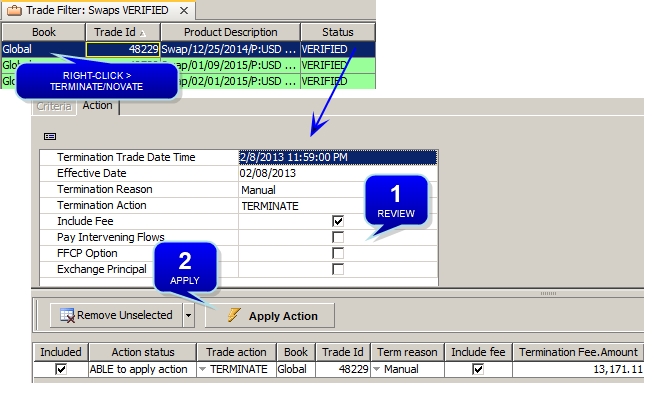
Step 1 - Review the settings of the termination.
Step 2 - Click Apply Action to terminate the trade.
You may refer to Calypso Termination documentation for complete details.
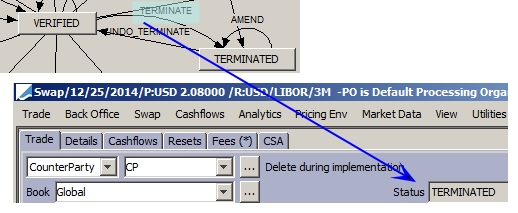
According to the trade workflow, the original trade moves to status TERMINATED.
FX Trade Termination and Rollover
For termination of an FX trade, double-click on the trade to open the FX Deal Station window and select FX > Termination to open the FX Termination window.
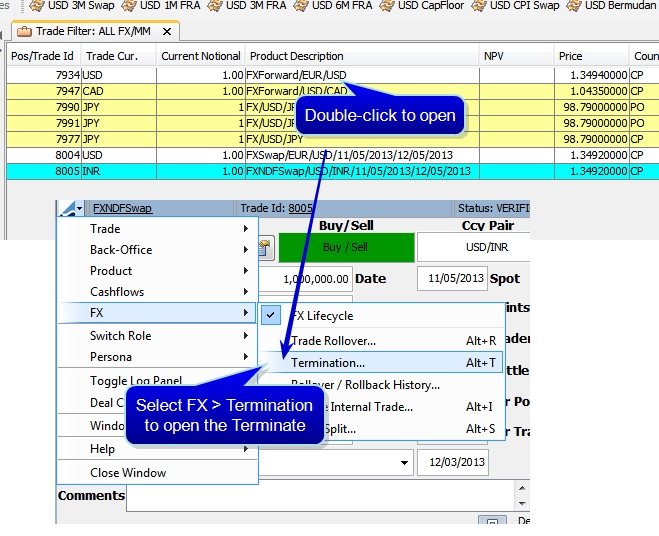
Similarly, for a rollover or rollback, select Trade Rollover from the FX menu.
5. Setting Rates and Prices
5.1 Interest Rate Reset
In this example, the user sets a floating rate manually.
Floating rates are set using the RATE_RESET scheduled task which is run daily.
You can check if any remaining rate needs to be set from the Calypso Navigator using Reports > Reset Reports > Rate Reset Overdue.
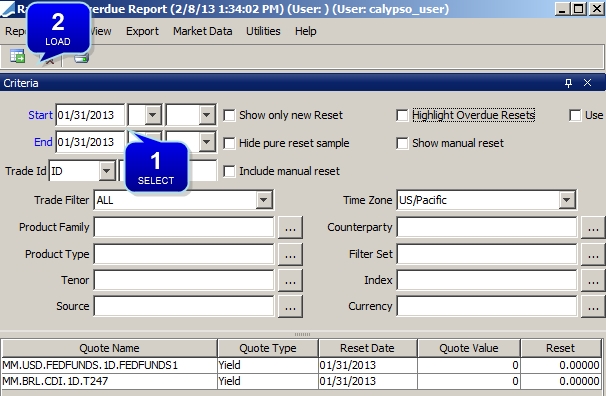
Step 1 - Select search criteria as needed.
Step 2 - Click ![]() to load the corresponding rates that are not set.
to load the corresponding rates that are not set.
You can also set the rates manually using Trade Lifecycle > Reset > Rate Reset from the Calypso Navigator.
You first need to set the missing rates in the Trade Resets panel.
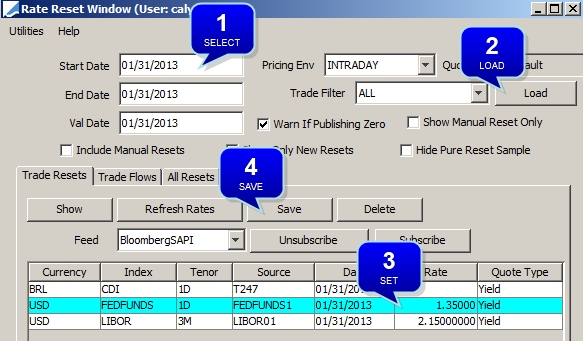
Step 1 - Select search criteria as needed.
Step 2 - Click Load to load the rates that are not set.
Step 3 - Set the missing rates.
Step 4 - Click Save to save the rates.
The rates appear in the trade's cashflows but the corresponding payments are not yet updated.
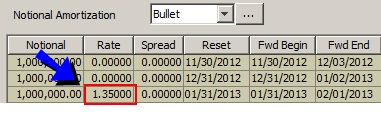
You can then apply the rates to the corresponding payments in the Trade Flows panel.
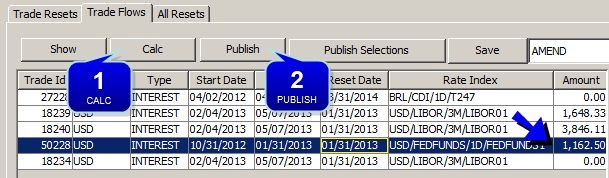
Step 1 - Click Calc to compute the interest amounts.
Step 2 - Then click Publish. The Transfer engine subscribes to the events and updates the corresponding payments.
You may refer to Calypso Rate Reset documentation for complete details.
5.2 FX Rate Reset
In this example, the user sets an FX rate manually.
From the Calypso Navigator, navigate to Trade Lifecycle > Reset > FX Rate Reset to reset today’s FX rates.
You first need to set the missing rates in the FX Rate Fixings panel.
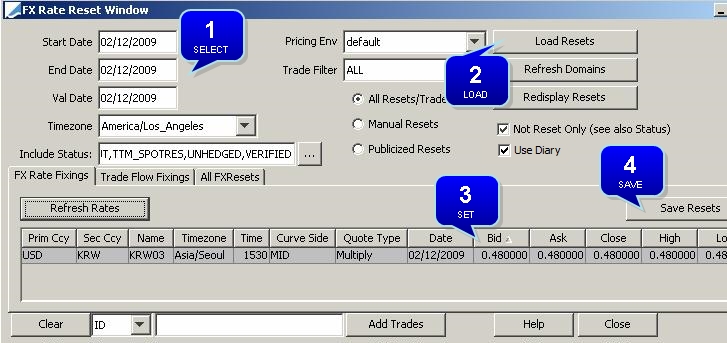
Step 1 - Select search criteria as needed.
Step 2 - Click Load Resets to load the rates that are not set.
Step 3 - Set the missing rates.
Step 4 - Click Save Resets to save the rates.
The rates appear in the trade's cashflows but the corresponding payments are not yet updated.

You can then apply the rates to the corresponding payments in the Trade Flow Fixings panel.
Select the Trade Flow Fixings panel.

Step 1 - Click Calculate to compute the interest amounts.
Step 2 - Then click Publish. The Transfer engine subscribes to the events and updates the corresponding payments.
You may refer to Calypso FX Rate Reset documentation for complete details.
5.3 Price Fixing
The process is similar to fix prices for commodity resets and equity derivatives trades.
From the Calypso Navigator, navigate to Trade Lifecycle > Reset > Price Fixing.
You may refer to Calypso Price Fixing documentation for complete details.
See also
| • | Trade Blotter |
| • | Mirror Trade Scenario |