Capturing IRD & Cash Trades
To capture an IRD trade in the Pricing Sheet, select an IRD strategy and set the properties as needed. You can also select a strategy template to populate default values.
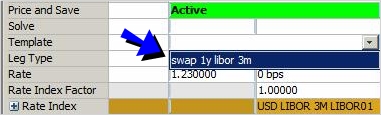
Sample Strategy and Template selection
The following categories of properties are common to all types of strategies:
| • | Trade properties |
| • | Product Amount properties |
| • | Market Data properties |
| • | Solver properties |
| • | Dealt Data properties |
| • | Keyword properties |
| • | Pricer properties |
 See Strategy Properties for details.
Properties specific to IRD trades are described below.
Contents
- Setting an Amortization Schedule
- Applying Reconvention Actions
1. Cap Floor Trades
This also applies to Collar trades and Corridor trades.
Key Properties
Buy/Sell - Option Type - Leg Type - Strike - Rate properties - Payment properties - Start Date - End Date

Sample Cap trade
"Product: Style" Properties
| Properties | Description |
|---|---|
|
Product Type |
Displays the product type based on the selected strategy. |
|
Notional Ccy |
Select the currency of the notional. |
|
Buy/Sell |
Select the direction of the trade: Buy or Sell. |
| Amortization |
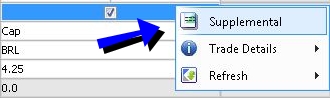
The amortization of the notional defaults to Bullet. You can also right-click the trade and choose "Supplemental" to specify an amortization schedule.
|
| Option Type |
Select the option type: Cap, Floor, Collar, Corridor. If Leg Type is set to Float, Compounding Type is set to SimpleSpr, and Cmp Frequency is set to DLY, then two additional options appear: Daily Floor, and Daily Cap. These two options apply the cap or the floor to each day's rate prior to compounding. |
| Leg Type | Displays "Cap", "Floor", "Collar", or "Corridor" based on the selected strategy and Option Type. |
| Custom Cashflows | Displays "true" if the cashflows have been customized, or "false" otherwise. |
"Product: Rate" Properties
| Properties | Description | |||||||||||||||||||||||||||||||||
|---|---|---|---|---|---|---|---|---|---|---|---|---|---|---|---|---|---|---|---|---|---|---|---|---|---|---|---|---|---|---|---|---|---|---|
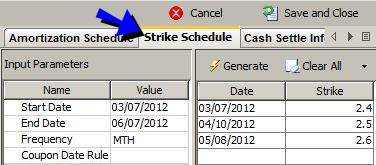
| Strike |
Enter the strike. You can also right-click the trade and choose "Supplemental" to specify a Strike Schedule.
Sample Strike Schedule
You can click the "Clear All" menu to add / remove strike dates.
|
|||||||||||||||||||||||||||||||||
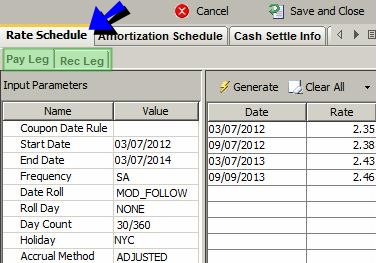
| Rate |
Enter the fixed rate for fixed rates, or the spread over the rate value for floating rates as needed. You can also right-click the trade and choose "Supplemental" to specify a Rate Schedule. You can specify a schedule for the Pay Leg and another schedule for the Rec Leg. For a fixed rate, it is a fixed rate schedule, and for a floating leg, it is a spread schedule.
Sample Rate Schedule
You can click the "Clear All" menu to add / remove rate dates.
|
|||||||||||||||||||||||||||||||||
| Rate Index Factor | Enter the index factor as needed for floating rates to multiply the rate value. | |||||||||||||||||||||||||||||||||
| Rate Index |
Select the rate index for floating rates. You can set additional properties:
The Reset Lag will persist is terms of days. Entering "30D" and saving will be displayed as "1M" on retrieval. Entering "d" for days, "w" for weeks, "m" for months and "y" for years as a tenor (EX: 1m b = -1M Business) will be saved as days. If not tenor is entered, the system will use days by default.
|
|||||||||||||||||||||||||||||||||
| Reset Frequency |
Select the reset frequency to sample resets at a frequency different from the payment frequency. Otherwise, the resets are sampled at the payment frequency.
When the sampling frequency is more frequent that the payment frequency, you can define the weight of the resets, and the duration of the sampling period. Reset Weighting You can select:
Reset Duration You can select:
|
"Product: Payment" Properties
| Properties | Description | |||||||||||||||||||||||||||||||||||||||||||||||||||||||||
|---|---|---|---|---|---|---|---|---|---|---|---|---|---|---|---|---|---|---|---|---|---|---|---|---|---|---|---|---|---|---|---|---|---|---|---|---|---|---|---|---|---|---|---|---|---|---|---|---|---|---|---|---|---|---|---|---|---|---|
| Compounding Type |
Select the compounding type, if applicable, or none.
You can also set the following properties:
When you select a DLY compounding frequency for a rate index that is not setup for daily compounding, the DailyCompound calculator is used.
|
|||||||||||||||||||||||||||||||||||||||||||||||||||||||||
| Payment Frequency | Select the payment frequency. | |||||||||||||||||||||||||||||||||||||||||||||||||||||||||
| Payment Day Count | Select the payment daycount. | |||||||||||||||||||||||||||||||||||||||||||||||||||||||||
| Payment Date Roll |
Select the payment date roll, when the payment date falls on a non business day. You can also set the following properties:
The Payment Lag will persist is terms of days. Entering "30D" and saving will be displayed as "1M" on retrieval. Entering "d" for days, "w" for weeks, "m" for months and "y" for years as a tenor (EX: 1m b = -1M Business) will be saved as days.
|
|||||||||||||||||||||||||||||||||||||||||||||||||||||||||
| Exclude First |
Check the “Exclude First” checkbox to exclude the first caplet from the cashflows. |
|||||||||||||||||||||||||||||||||||||||||||||||||||||||||
| Stub Type |
Select the stub period, if applicable, or none. You can also set the following properties:
|
"Date" Properties
| Properties | Description |
|---|---|
| Trade Date |
Displays the valuation date set in the Pricing window of the pricing sheet by default. You can modify as needed.
|
| Trade Time |
Displays the valuation time set in the Pricing window of the pricing sheet. You can modify as needed.
|
| Settlement Date | Enter the settlement date. |
| Settlement Holiday | Enter the settlement holiday calendar. |
| Start Date |
Enter the start date. |
| End Date |
Enter the end date. |
| Start Tenor | Enter the start tenor. |
| Maturity Tenor | Enter the maturity tenor. |
"Price" Properties
| Properties | Description |
|---|---|
|
Pricing Model |
Select the pricer used to price the trade. It defaults to the pricer set in the pricer configuration. You can also specify pricing parameters associated with the selected pricing model.
|
| Pricer Override |
The Pricer Override allows overriding the default pricer coming from the pricer configuration in a persistent fashion. This trade will always be priced using the new pricer. You can select a pricer-override key provided you have created override keys in the Pricer Configuration. |
| Market Data Item Override |
The Market Data Item Override allows overriding the default market data coming from the pricer configuration in a persistent fashion. This trade will always be priced using the new market data. You can select a market data-override key provided you have created override keys in the Pricer Configuration. |
| Sales Price |
Enter the sales price as needed. |
| Sales Location |
You can select the location of the sales representative. The sales location is a legal entity of role SalesLocation. The sales fee is paid to that legal entity if selected. If the sales location is not selected, the sales fee is paid to the counterparty of the trade if the domain "DefaultSalesMarginFeeLE" contains the value "UseTradeCptyAsDefault". Otherwise, it is paid to the "NONE" counterparty. |
2. Spread Cap Floor Trades
This also applies to Spread Collar trades.
Key Properties
"Product: Rate" Properties

Sample Spread Cap trade
"Product: Rate" Properties
| Properties | Description | ||||||
|---|---|---|---|---|---|---|---|
| Spread Rate Index |
Select the spread rate index. You can set additional properties:
The Reset Lag will persist is terms of days. Entering "30D" and saving will be displayed as "1M" on retrieval. Entering "d" for days, "w" for weeks, "m" for months and "y" for years as a tenor (EX: 1m b = -1M Business) will be saved as days. If not tenor is entered, the system will use days by default.
|
||||||
| Spread Rate Index Factor | Enter the index factor as needed to multiply the rate value. |
3. Setting an Amortization Schedule
To define an amortization schedule, right-click the trade and choose "Supplemental".
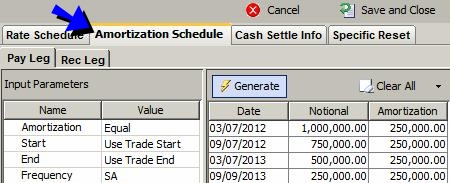
Sample Amortization Schedule
| » | Select the type of amortization and set the corresponding properties. |
See Product Details for information on the amortization types.
| » | Then click Generate to generate the schedule. |
You can click the "Clear All" menu to add / remove amortization dates.
| » | Click Save and Close to apply the schedule to the trade. |
4. FRA Trades
An FRA is a forward contract where one party pays a fixed rate and the other party pays an interest rate set on a specified future date.
Key Properties
Buy/Sell - "Product: Rate" properties - "Product: Payment" properties - Start Date - End Date
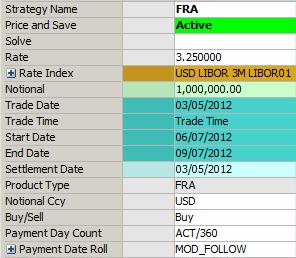
Sample FRA trade
"Product: Style" Properties
| Properties | Description |
|---|---|
| Product Type |
Displays the product type based on the selected strategy. |
|
Notional Ccy |
Select the currency of the notional. |
|
Buy/Sell |
Select the direction of the trade: Buy or Sell. |
"Product: Rate" Properties
| Properties | Description | ||||||||||||
|---|---|---|---|---|---|---|---|---|---|---|---|---|---|
| Rate | Enter the forward rate. | ||||||||||||
| Rate Index |
Select the rate index. You can also set the following properties:
|
"Product: Payment" Properties
| Properties | Description | ||||||||||||||||||||||||||||||
|---|---|---|---|---|---|---|---|---|---|---|---|---|---|---|---|---|---|---|---|---|---|---|---|---|---|---|---|---|---|---|---|
| Payment Day Count | Select the payment daycount. | ||||||||||||||||||||||||||||||
| Payment Date Roll |
Select the payment date roll, when the payment date falls on a non business day. You can specify the following additional properties:
Where: - ProjAmtEnd = Amount to settle if “in arrears” - ProjAmtBeg = Discounted amount to settle in advance - f = Forward rate projected from curve - F = Contracted FRA rate
|
5. Structured Flows Trades
Select a Floating Rate strategy or a Fixed Rate strategy.
Key Properties
Direction Type - Pay/Receive - Payment properties - Rate properties
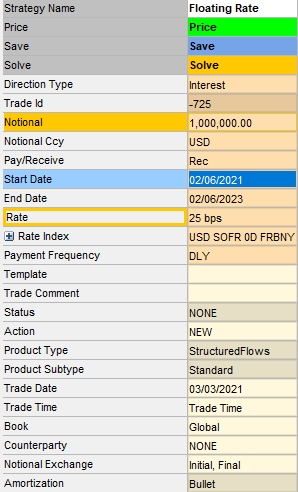
Sample Floating Rate trade
"Product: Style" Properties
| Properties | Description | ||||||||||||||||||||||||||||||||||||
|---|---|---|---|---|---|---|---|---|---|---|---|---|---|---|---|---|---|---|---|---|---|---|---|---|---|---|---|---|---|---|---|---|---|---|---|---|---|
| Product Type |
Displays the product type based on the selected strategy. |
||||||||||||||||||||||||||||||||||||
|
Product Subtype |
Select the product type as per your need. By default, it is Standard. |
||||||||||||||||||||||||||||||||||||
| Notional |
Enter the notional amount. |
||||||||||||||||||||||||||||||||||||
|
Notional Ccy |
Select the currency of the notional. |
||||||||||||||||||||||||||||||||||||
| Direction Type |
Select Interest or Principal. A "swap leg" should be defined as Receive Interest or Pay Interest. A "loan" should be defined as Pay Principal, and a "deposit" as Receive Principal. |
||||||||||||||||||||||||||||||||||||
|
Pay/Receive |
Select the direction of the trade leg from the book's perspective. |
||||||||||||||||||||||||||||||||||||
|
Rate Index |
Select the rate index for floating rates. You can set additional parameters:
If you select an Inflation Index, you can set the Fixed Inflation Rate in percent and the inflation calculation type. |
||||||||||||||||||||||||||||||||||||
| Rate | Enter the rate for fixed rates or the spread for floating rates. | ||||||||||||||||||||||||||||||||||||
| Notional Exchange |
Select Initial, Final, Amortization or any combination of the three to indicate that the notional amount will be exchanged, otherwise there is no exchange of notional. |
||||||||||||||||||||||||||||||||||||
| Amortization |
The amortization of the notional defaults to Bullet. You can also right-click the trade and choose "Supplemental" to specify an amortization schedule.
|
||||||||||||||||||||||||||||||||||||
| Custom Cashflows |
Displays "true" if the cashflows have been customized, or "false" otherwise. |
||||||||||||||||||||||||||||||||||||
| Collateral Type |
Select the Collateral Type as needed. Collateral Types can be defined in the domain "Advance.CollateralType". You can set additional parameters:
|
||||||||||||||||||||||||||||||||||||
| Open Term |
Check for an open term trade. In this case, you need to select a behavioral maturity and enter a number of notice days. |
"Compounding Type" Properties
| Properties | Description | ||||||||||||||||||||||||||||||
|---|---|---|---|---|---|---|---|---|---|---|---|---|---|---|---|---|---|---|---|---|---|---|---|---|---|---|---|---|---|---|---|
| Compounding Type |
Select the compounding type, if applicable, or none.
You can also set the following properties:
When you select a DLY compounding frequency for a rate index that is not setup for daily compounding, the DailyCompound calculator is used.
The value NCCR can be added to the domain "PartialPeriodCompRateEnrichmentMethods" if it is not available for selection. |
"Product: Payment" Properties
Swap "Product: Payment" properties also apply.
"B2B" Properties
| Properties | Description | ||||||||||||
|---|---|---|---|---|---|---|---|---|---|---|---|---|---|
| B2B |
The application automatically checks the B2B checkbox when an internal trade with an inter-company book is associated with the trade. The B2B configuration can be defined using Configuration > Automated Operations > Back to Back Trades.
|
||||||||||||
| SD_FILTER |
Optional. Enter the name of the Static Data Filter. As in the B2B configuration, you can filter by an amount, counterparty, legal entity attribute, sales person, or some other parameter. |
||||||||||||
| Transfer Margin |
Select this checkbox to transfer the sales margin (sales price) to the destination book. Clear the checkbox to ensure the margin remains in the original trade book. |
||||||||||||
| Transfer Book |
The book to which the B2B trade is transferred. |
||||||||||||
| Transferred Trade ID |
The ID of the B2B generated trade. |
||||||||||||
| Transferred Book | The book from which the original trade is transferred. | ||||||||||||
| User Override |
Check to override the default configuration. |
See Back to Back Trades for complete setup details.
6. Applying Reconvention Actions
You can apply reconventions to structured flows. Reconventions are changes made to the current trade that will affect cashflows, such as a change of notional amount or the maturity date. To perform a reconvention, select the trade column, choose Processing > Reconvention, and select the reconvention type.
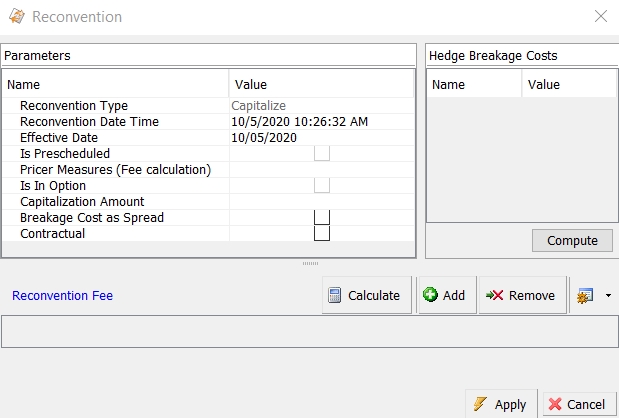
| » | In the Parameters area, enter the parameters of the reconvention. They are described below based on the reconvention type. |
| » | The Original and Replacement areas only apply if you have defined market measures. |
| » | You can add or calculate a reconvention fee as needed in the Reconvention Fee area. See below for details. |
| » | Click Apply when you are done to apply the reconvention. |
Reconvention Action
By default, the AMEND action is applied to the trade when a reconvention is performed or removed.
You can configure the reconvention actions to be applied when adding a reconvention, or deleting a reconvention, using the following domains:
| • | Domain for addition is “ReconventionAction.<reconvention type>”. |
Example:

The action NOTCHANGE will be applied to the trade when the "Notional Reconvention" is performed.
| • | Domain for removal is “ReconventionDeleteAction.<reconvention type>”. |
Example:

The action DELNOTCHANGE will be applied to the trade when a "Notional Reconvention" is removed.
Ⓘ [NOTE: The actions defined in these domains must be added to the Trade workflow for structured flows]
Common Parameters
The following parameters are common to all reconvention types. The other parameters are described below by reconvention tpye.
| • | Reconvention Type - Displays the type of reconvention to be performed. |
| • | Reconvention Date Time - Defaults to today's date and time. You can modify as necessary. |
| • | Effective Date - Enter the effective date on which the reconvention is to be applied. |
| • | Is Prescheduled - Check to ignore validations that control reconvention order, or clear otherwise. |
| • | Pricer Measures (Fee calculation) - You can select the pricer measures you want to compute for fee calculation. Their values are displayed when you click Calculate. |
| • | Breakage Cost as Spread - Check to convert breakage cost on synthetic hedge to spread. |
| • | Contractual - Check to indicate that the reconvention is contractual, or clear otherwise. For information purposes only. |
Hedge Breakage Costs
The hedge breakage cost can be simulated when a reconvention is applied based on FTP (Fund Transfer Pricing) rules.
Please refer to Calypso Liquidity documentation for information on setting up FTP rules.
Reconvention Fee
You can click Calculate to add a fee based on the selected pricer measures is any.
You can click Add to add a reconvention fee as needed. Enter the fee amount.
You can configure the fee type in the domain “DefaultReconventionFee”. If not set, it defaults to PREPAYMENT_FEE.
Viewing Reconventions
You can view all reconventions applied to the trade in the Events panel.
You can right-click a reconvention and drill down to the trade or to the details of the reconvention. You can also delete a reconvention.
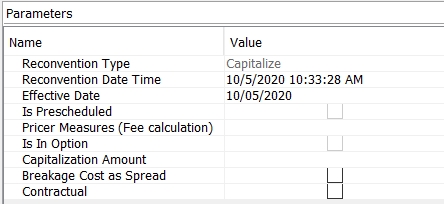
6.1 Capitalize
You can capitalize the current accrual using the Capitalize reconvention. The current accrual amount as of the Effective Date is moved to the principal.
Sample Capitalize reconvention
| » | Enter the effective date. |
6.2 Collateral Change
You can change the collateral using the Collateral Change reconvention.
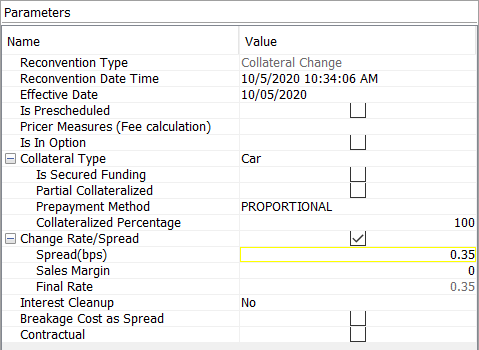
Sample Collateral Change reconvention
| » | Select the Collateral Type, and set additional parameters as needed. |
| – | Partial Collateralized - Check to perform a partial collateralization, then enter a percentage to be collateralized in the "Collateralized Percentage" field. |
| – | Prepayment Method - Select the method by which the collateral will be reduced. |
PROPORTIONAL - Whenever principal decreases, the collateral is reduced according to the proportion specified upfront.
SEQUENTIAL - Whenever principal decreases, the portion with the lower ranking collateral type will be reduced first until it's exhausted.
| » | Rate (%) or Spread (bps) - Enter a new rate (fixed) or spread (floating) to perform a rerate at the same time. |
Enter a sales margin as needed.
| » | Interest Cleanup - Select "Yes" to perform an interest cleanup at the same time, otherwise select "No". |
6.3 Disbursement
You can set a new Disbursement Schedule to override the current Disbursement schedule using the Disbursement reconvention. For a trade, if no specific disbursement dates are known, this reconvention allows individual disbursements to happen as lifecycle actions. You can use the Disbursement reconvention anytime until the last day specified on the original disbursement schedule.
Ⓘ [NOTE: The disbursements must still add up to the trade notional. If you need to change the trade notional, use the Notional Change reconvention]
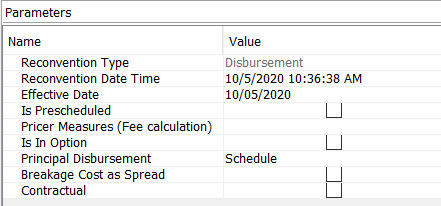
Sample Disbursement reconvention
| » | Principal Disbursement - Set the schedule parameters as needed. Then click Generate and OK. |
6.4 Flipper
You can change the leg type using the Flipper reconvention.
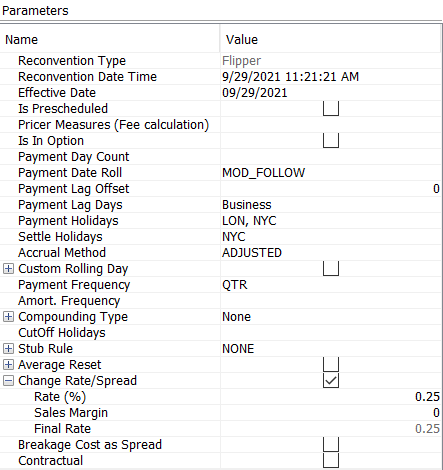
Sample Flipper reconvention
If the original trade's leg type is Float, the Flipper reconvention flips the leg type to Fixed. You can then specify the parameters for a Fixed leg (or vice versa if the original trade is Fixed).
6.5 Interest Cleanup
You can end the current payment period and pay out the interest on an effective date using the Interest Cleanup reconvention.
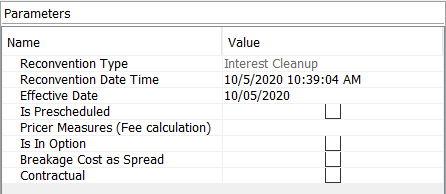
Sample Interest Cleanup reconvention
| » | Enter the new Effective Date on which the interest is to be paid out. |
6.6 Maturity Date Change
You can change the maturity date using the Maturity Date Change reconvention.
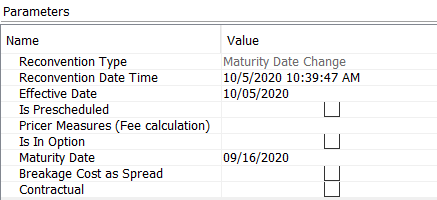
Sample Maturity Date Change reconvention
| » | Maturity Date: Select a maturity date. |
6.7 Notional Change
You can change the principal amount using the Notional Change reconvention.
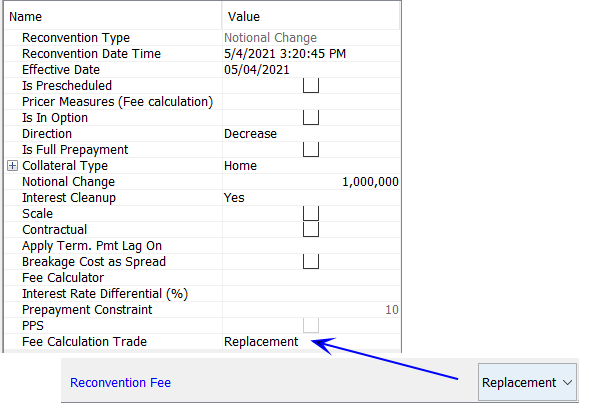
Sample Notional Change reconvention
| » | Enter the direction of the notional change: Increase or Decrease. |
| » | Enter the amount of the notional change. |
| » | Interest Cleanup - Select "Yes" to perform an interest cleanup at the same time as the rerate, select "Partial, Prepayment Amount only" for a partial interest cleanup, otherwise select "No" for no interest cleanup. |
| » | Check the Scale checkbox to scale the notional change with each amortization payment. |
| » | Check the Contractual checkbox to indicate that the notional change is contractual. You can then enter the contractual percentage. For information purposes only. |

| » | Fee Calculator - You can select a fee calculator to compute the fee amount when you click Calculate, or select Manual to enter the fee amount manually. |
| » | Apply Term. Pmt Lag On - This only applies to full notional change - Select the cashflows where the payment lag should be applied: Principal, Interest, Both, None or not set. |
Default is not set, which means that no lag applied to Principal and lag applied to Interest.
| » | Interest Rate Differential - Enter the percentage of interest rate differential, which is the fee computed based on the difference between the original trade and replacement trade. |
| » | Prepayment Constraint - This field is only applicable for Advance trades. |
| » | PPS - This field is only applicable for Advance trades. |
| » | Fee Calculation Trade - Set to Replacement or Original based on the selection in the Reconvention Fee area. |
| – | Replacement - The fee is computed based on the NPV of the replacement trade (default). |
| – | Original - The fee is computed based on the NPV of the original trade. |
6.8 Payment Frequency
You can change the payment frequency using the Payment Frequency reconvention.
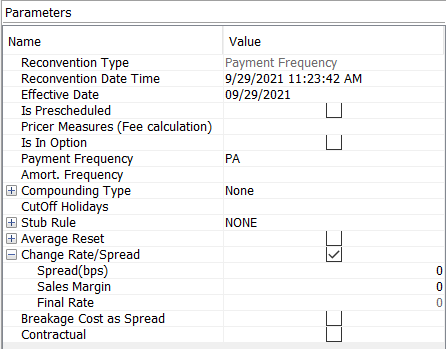
Sample Payment Frequency reconvention
| » | Select the Payment Frequency. |
| » | Select the Amortization Frequency. |
| » | Select the Compounding Type. You can expand this field to set additional compounding parameters. |
| » | Select the Stub Rule. You can expand this field to define the stub periods. |
| » | Enter a new rate (fixed) or spread (floating) to perform a rerate at the same time. |
Enter a sales margin as needed.
6.9 Payment Holiday
You can specify a payment holiday using the Payment Holiday reconvention. This allows you to delay the payment of all subsequent flows to begin again at a later date. For the duration of a payment holiday, no payments will be made.
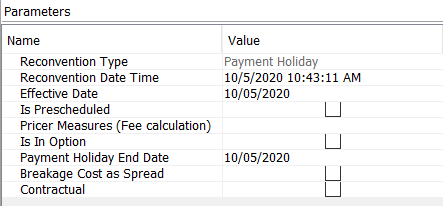
Sample Payment Holiday reconvention
| » | Effective Date - Enter the start date of the payment holiday. |
| » | Payment Holiday End Date - Enter the end date of the payment holiday. |
6.10 Principal Structure
You can change principal structure on the remainder of the trade using the Principal Structure reconvention.
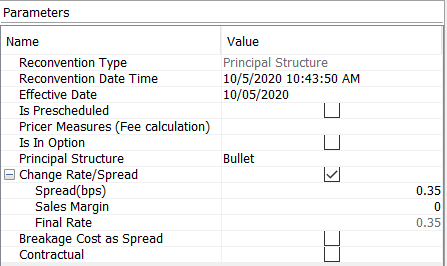
Sample Principal Structure reconvention
| » | Principal Structure - Select the type of amortization type and set the corresponding amortization parameters. Then click Generate and OK. |
If the amortization type requires calculation, the principal amount that was remaining on the Effective Date will be the starting amount.
| » | Enter a new rate (fixed) or spread (floating) to perform a rerate at the same time. |
If the rerate reconvention uses a hypersurface and the new structure is not Bullet, it triggers the IsAmortizing trigger and allows the calculation of the measures using the new amortization structure.
Enter a sales margin as needed.
6.11 Rate Index
You can change the index of a floating rate trade using the Rate Index reconvention.

Sample Rate Index reconvention
| » | Select a Rate Index. You can then specify its parameters. |
6.12 Rerate
You can change the rate on a fixed leg or the spread on a floating leg trade using the Rerate reconvention.
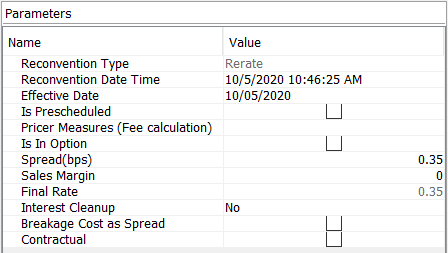
Sample Rerate reconvention
| » | Enter a new rate (fixed) or spread (floating). |
[NOTE: This will overwrite the market measures if any]
Enter a sales margin as needed.
| » | Interest Cleanup - Select "Yes" to perform an interest cleanup at the same time as the rerate, otherwise select "No". |
7. Swap Trades
Key Properties
Pay/Receive - Call Type - Cap "Product Rate" properties (no strike) - Structured Flows "Product: Payment" properties
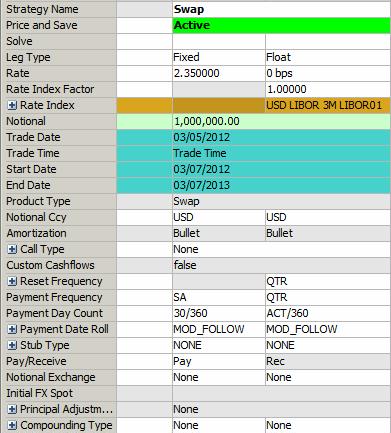
Sample Swap trade
"Product: Style" Properties
| Properties | Description | ||||||
|---|---|---|---|---|---|---|---|
| Trade Type |
Select "On Market" or "Off Market":
|
||||||
| Product Type |
Displays the product type based on the selected strategy. |
||||||
|
Notional Ccy |
Select the currency of the notional. You can select a different currency for each leg.
|
||||||
| Pay/Receive |
Select the direction of the trade leg from the book's perspective. |
||||||
| Notional Exchange |
Select Initial, Final, Amortization or any combination of the three to indicate that the notional amount will be exchanged, otherwise there is no exchange of notional. |
||||||
| Amortization |
The amortization of the notional defaults to Bullet. You can also right-click the trade and choose "Supplemental" to specify an amortization schedule.
|
||||||
| Leg Type | Select the trade leg type: Fixed or Float. | ||||||
| Call Type |
Select "None". You can select "Cancellable" for a cancellable swap.
|
||||||
| Custom Cashflows | Displays "true" if the cashflows have been customized, or "false" otherwise. |
"Product: Rate" Properties
| Properties | Description | |||
|---|---|---|---|---|
| Rate Index |
Select the Rate Index:
|
7.1 Brazilian Swaps
Key Properties
Swap Properties - Ccy - "Product: Rate" Properties - "Product: Payment" Properties
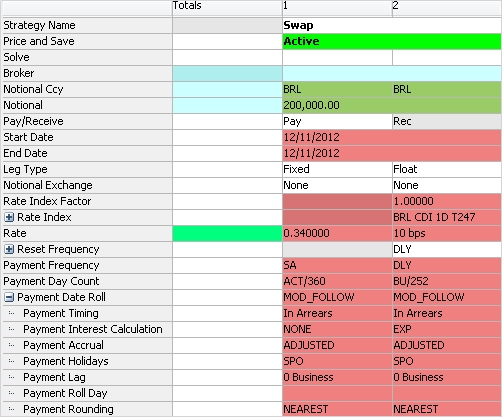
Sample Brazil Swap trade
"Product: Rate" Properties
| Properties | Description |
|---|---|
| Rate Index |
Select the rate index, CDI. CDI interest calculation is compounded exponentially. If a PTAX rate is used, it will have to be configured in the Exotic Type Creator. From the Calypso Navigator, navigate to Configuration > Product > Exotic Type Creator to define the index and added to the Exotic Swap Strategy in the Strategy Builder.
|
"Product: Payment" Properties
| Properties | Description |
|---|---|
|
Payment Frequency (Float Leg) |
Select the payment frequency. |
|
Payment Day Count (Float Leg) |
Select BU/252. Interest accrues using this daycount. The daycount fraction is the number of business days in the period divided by 252. Business days are set on the trade. |
|
Payment Interest Calculation (Float Leg) |
Select the interest calculation. |
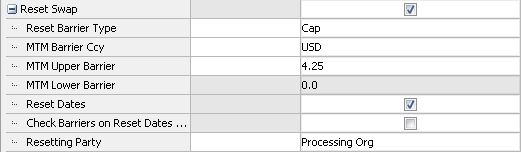
The Reset Swap properties allow for setting reset trigger conditions such as Cap, Floor, or Collar on the NPV of the swap or one or more reset dates. If any of the trigger conditions are met, the designated resetting party has the option to reset the swap.
| Properties | Description | |||||||||||||||
|---|---|---|---|---|---|---|---|---|---|---|---|---|---|---|---|---|
| Reset Barrier Type | Select a trigger type for the swap: None, Cap, Floor, Collar. | |||||||||||||||
| MTM Barrier Ccy | Select the trade currency. When a barrier is set, both the mark to market (MTM) and the barrier will be converted to the base currency defined by the pricing environment. | |||||||||||||||
| MTM Upper Barrier | Enter the limit for the MTM upper barrier. This box is enabled when the Reset Barrier Type is set to either Cap or Collar. | |||||||||||||||
| MTM Lower Barrier | Enter the limit for the MTM lower barrier. This box is enabled when the Reset Barrier Type is set to either Floor or Collar. | |||||||||||||||
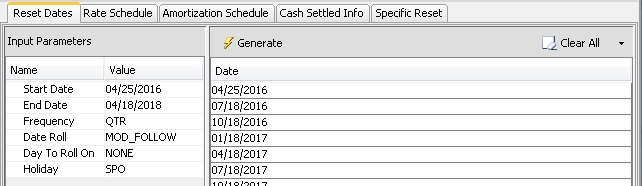
| Reset Dates |
Select the checkbox to generate a schedule of one or more reset dates.
This opens the Supplemental panel, which includes the Reset Dates tab.
|
|||||||||||||||
| Check Barriers on Reset Dates Only | Enabled when both barrier and date conditions are specified. When selected, the barriers will only be monitored on the designated reset dates. | |||||||||||||||
| Resetting Party |
Select Processing Org, Counterparty, or Mutual. Ⓘ [NOTE: This setting is for informational purposes only and does not impact trade behavior.] |
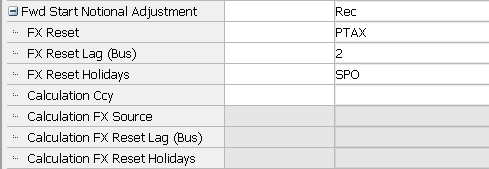
"Fwd Start Notional Adjustment" Properties
These properties allow you to define a forward start for either a cross currency swap or non deliverable swap and adjust the notional of one of the legs based on the FX rate on the forward swap Start Date. On a USD/BRL cross currency swap, this feature allows participants to hedge a forward USD amount by fixing the USD notional and updating the BRL notional at the swap’s Start Date. Between the Trade Date and the swap’s Start Date, on which the BRL notional is fixed, the valuation of the forward starting cross currency swap is based on a projected FX rate.
| Properties | Description |
|---|---|
| Fwd Start Notional Adjustment | Select which leg will receive the notional adjustment: Pay, Rec, or None. |
| FX Reset | Select the FX Reset to be used to fix the notional. |
| FX Reset Lag (Bus) | Enter a number to be used for the Reset Lag if a reset lag is desired. |
| FX Reset Holidays | Select the holiday schedule to be used with the Reset Lag. |
| Calculation Ccy | To use an intermediate currency to calculate the FX rate, double-click this field and enter the calculating currency from the list. |
| Calculation FX Source | Select the FX reset for calculation. The FX reset will auto-populate when selecting the currency if the reset already exists in the system. |
| Calculation FX Reset Lag (Bus) | Enter an FX reset lag to override the lag set in the FX reset. |
| Calculation FX Reset Holidays | Select one or more FX reset holiday schedule(s). This field will auto-populate when entering the currency if an FX reset already exists but can be overridden. |
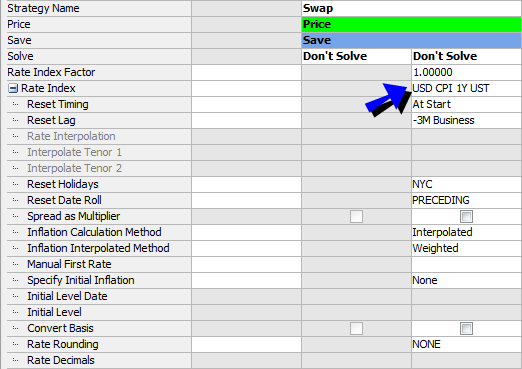
7.2 Inflation Swaps
To enter an Inflation Swap, select the Swap strategy and select an inflation index.
Key Properties
Swap properties - "Product: Rate" Properties
Sample Inflation Swap trade
"Product: Rate" Properties
| Properties | Description | ||||||||||||||||||||||||
|---|---|---|---|---|---|---|---|---|---|---|---|---|---|---|---|---|---|---|---|---|---|---|---|---|---|
| Rate Index |
Select an inflation index. An inflation index can be defined from the Calypso Navigator by navigating to Configuration > Interest Rates > Rate Index Definition. Inflation specific fields will only be editable if an inflation index is selected. |
||||||||||||||||||||||||
| Inflation Calculation Method |
Select the calculation method: • IndexLevel – Index levels are not interpolated between publication dates. • Interpolated – Daily index levels are interpolated between reference dates. Select the interpolation method from the Inflation Interpolated Method field. |
||||||||||||||||||||||||
| Inflation Interpolated Method | Only appears for the Interpolated calculation method. The only option is "Weighted". | ||||||||||||||||||||||||
| Specify Initial Inflation | Select "None", "Initial Level Date" or "Initial Level". | ||||||||||||||||||||||||
|
Initial Level Date |
Enter the initial level date. For a real rate swap, the Initial Level Date uses the Start Date as a base date rather than the Valuation Date. The Initial Level Date is therefore relative to the Start Date. When saving a strategy template for a real rate swap, be sure to select "Relative" for the "Save dates as?" option. When you use a tenor in the date fields (e.g., 1d, 1w, 1m), new trades using the template will then populate dates according to the tenor and based on the current date. If you use "0d" for the Initial Level Date when creating the template, it will be populated with the same date as the Start Date. |
||||||||||||||||||||||||
| Initial Level | Enter the initial level. | ||||||||||||||||||||||||
| Inflation Calculation Type |
Select the inflation calculation type:
You can also set the following properties:
Then right-click the Fixed Coupon Rate and choose "Supplemental" to define the fixed coupon schedule.
Ⓘ [NOTE: to add the Inflation Factor column on the Cash Flows panel, in Pricing Sheet point to Configuration > User Preferences and select the Cash Flows tab. From there you can move the Inflation Factor column to the Selected Columns field to expose it in cashflows.] |
Leg link for Inflation Swaps trades can be configured.
| • | Fixed Coupon Rate - can be set to "=", "*", "+" or "-" |
7.3 Brazilian Inflation (PTAX) Swaps
Key Properties
Swap Properties - Product: Rate Properties
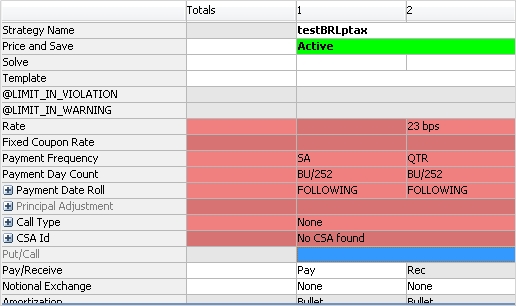
Sample PTAX Inflation Swap trade
"Product: Rate" Properties
| Properties | Description |
|---|---|
| Leg Type |
Select Fixed or Float on one leg, and select PTAX in the other. To configure this type of leg, create a PTAX exotic structure in Configuration > Product > Exotic Type Creator and add it to the Exotic Swap strategy in the Pricing Sheet using Configuration > Strategy Builder. |
7.4 Cross-Currency Swaps
Swaps where each leg is expressed in a different currency.
Key Properties
Swap properties - Ccy Pair - Initial FX Spot - Principal Adjustment

Sample Cross-Currency Swap trade
| Properties | Description | |||||||||
|---|---|---|---|---|---|---|---|---|---|---|
|
Ccy Pair |
Displays the currency pair when each leg is in a different currency. |
|||||||||
| Initial FX Spot |
Enter the FX spot trade between the two currencies. |
|||||||||
| Principal Adjustment |
If there is notional exchange, you can also specify notional adjustments at every coupon period based on FX rates. Select None, Pay (adjustments on the Pay leg), or Rec (adjustments on the rec leg). You can also set the following properties:
If "FX Reset Use Index Reset Date" is not checked, you can set the FX Reset Lag and FX Reset Holidays as needed. |
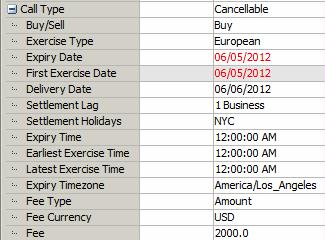
7.5 Cancellable Swaps
Key Properties
Swap properties - Call Type = "Cancellable"
Sample Cancellable properties
| Properties | Description | ||||||
|---|---|---|---|---|---|---|---|
| Call Type |
Select "Cancellable". For a Cancellable swap, you can set the following properties:
|
European
The trade can only be canceled on the expiration date.
| » | Enter the expiration date in the Expiry Date field. If you enter a non-business day, it will automatically move to the previous business day. |
| » | Enter the expiration time in the Expiry Time field, and select the corresponding timezone and holiday calendars. |
You can also enter the earliest exercise time and latest exercise time.
| » | The delivery date defaults to the spot date for the selected currency. You can modify as needed. You can also enter the number of lag days in the Settlement Lag field and select whether the lag days are business days or calendar days. |
| » | You can select a fee type in the Fee Type field (Amount or %), and enter the fee amount / percentage in the Fee field. Select the fee currency from the Fee Currency field. |
American
The trade can be canceled between the first exercise date and the expiration date.
| » | Enter the first exercise date in addition to the European properties. |
Bermudan
The trade can be canceled according to a user-defined schedule.
Right-click the trade and choose "Supplemental" to specify the Schedule.
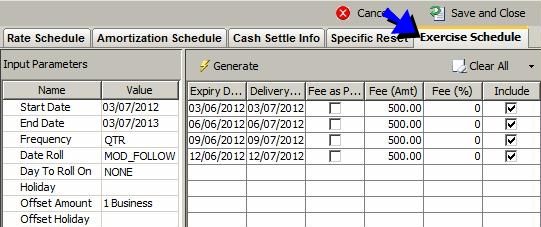
Sample Bermudan Schedule
| » | The start and end dates default to the trade's start and end dates. |
Select a frequency, date roll and holiday calendars to generate the schedule.
Enter a number of lag days to compute the delivery date based on the actual call date. And select Bus if the lag days are business days, or Cal for calendar days.
| » | Click Generate to generate the schedule. |
You can click the "Clear All" menu to add / remove dates.
You can enter the fees in the schedule in percentage or in amounts. The Fee currency is selected in the trade's "Fee Currency" property.
| » | Then click Save and Close to apply the schedule to the trade. |
7.6 Non-deliverable Swaps
Key Properties
Swap Properties - Currency type: Non-Deliverable - Product: Style properties - Product: Rate properties
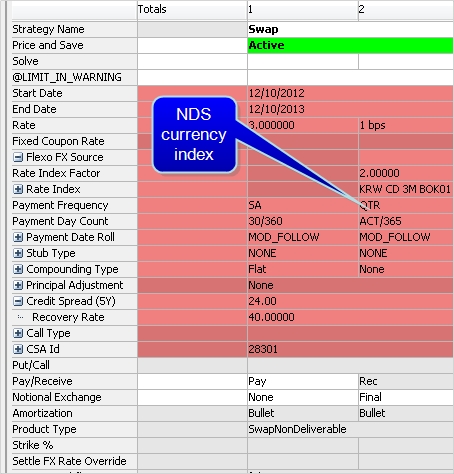
"Product: Style" Properties
| Properties | Description |
|---|---|
| Settle Type |
Select for Non-Deliverable FX Reset or Non-Deliverable Fixed FX. |
| Settle Ccy | Select the settlement currency. |
| Quanto Factor | Used when Settle Type = Non-Deliverable (Fixed FX). Displays the current quanto factor. |
| Quanto Ccy Pair | Used when Settle Type = Non-Deliverable (Fixed FX). Displays the currency pair between the Notional Ccy and the Settle Ccy. |
"Product: Rate" Properties
| Properties | Description | ||||||||||||
|---|---|---|---|---|---|---|---|---|---|---|---|---|---|
|
Flexo FX Source |
If Settle Type = Non-Deliverable (FX Reset), enter the following values: Flexo FX Reset Lag - Enter a lag value to override the default reset lag for the selected Settlement Source. Flexo FX Reset Holidays - Select a holiday calendar to override the default holiday calendar for the selected Settlement Source. |
||||||||||||
|
Calculation Ccy |
Select the intermediate currency to convert notional currency to settle currency. Enter:
|
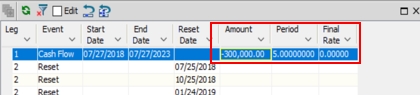
For NDS Swaps in the Pricing Sheet, the Events Viewer panel will display the following columns:
| • | Currency - Settlement currency |
| • | Currency Native |
| • | Amount - Interest amount in settle currency |
| • | Amount Native Ccy |
| • | Amount Calculation Ccy |
| • | Settle FX Reset |
| • | Settle Reset Date |
| • | Calculation FX Reset |
| • | Calculation Reset Date |
| • | PV Amt - PV Disc in Native Ccy |
| • | PV Amt Settle Ccy |
| • | df - df of native Ccy |
| • | df Settle Ccy |
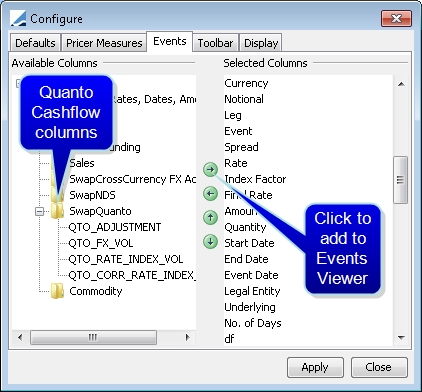
7.7 Quanto Swaps
A Quanto swap trade uses the Swap strategy. it is a swap where the rate index currency is different from the notional currency.
You can add the QTO cashflow values to the Events Viewer panel of the Pricing Sheet using Configuration > User Preferences > Events tab.
Key Properties
Swap Properties - Trade Events = QTO cashflow details
7.8 Real Yield Swaps
To enter a Real Yield Swap, select the Swap strategy and the "RealYield" leg type.
Key Properties
Swap properties - Underlying - Product ID

Sample Real Yield Swap trade
| Properties | Description | |||||||||
|---|---|---|---|---|---|---|---|---|---|---|
| Underlying |
Double-click to select the underlying inflation bond. |
|||||||||
| Product ID |
Displays the bond product identifier. You can also override the following bond properties:
|
7.9 Fixed Payment Swap
The Fixed Payment Swap strategy allows for entering a fixed amount on the fixed leg to specify a cashflow amount that will be exchanged at the end of the period. The floating leg, on the other hand, can have exchanges during the life of the swap. Instead of entering a notional and rate to calculate the payment amount, a value is entered directly in the Fixed Amount property.
Key Properties
Swap properties - Fixed Amount

Cashflows indicate the amount for the fixed leg and have no information for the rate.
7.10 Performance Swap
A Performance Swap trade is a swap where a set of future cash flows are exchanged between two counterparties. The primary leg can be a single asset only, with a bond or market index underlying. The secondary leg is currently limited to swaps.
Key Properties
Swap properties - Leg Type, Underlying - Product: Performance Schedule properties - Product: Income Schedule properties

| Properties | Description |
|---|---|
| Underlying | Select the product that underlies the performance swap: A bond or a market index depending on what you specify under Leg Type. |
| Leg Type |
Pricing sheet currently supports Bond and MarketIndex for the primary leg, and swap for the secondary leg. |
|
Modified Adj Duration |
Enabled when the primary leg type is "Market Index" and Fixing Type is set to "Spread". Enter a number. |
| Fixing Type |
When the primary leg is set to Bond: Default value is based on the selected Bond Quote Type. When the primary leg is set to MarketIndex: Can set to Spread to disable Initial Price and set Units Based to False. This disables "Modified Adj Duration". |
| Notional Price |
Bond asset detail. Select the notional price for the bond. |
| Use Asset Schedule | Bond asset detail that impacts the cashflows, set to true or false. |
"Product: Performance Schedule" Properties
| Properties | Description |
|---|---|
|
Income Payments Type |
Dropdown with options "NONE", "AT_MATURITY", "REF_ASSET_CPN_SCHEDULE", "CUSTOM_SCHEDULE", and "DATE_RULE". |
| Pmt Lag |
This string applies a payment lag to the income payments. |
| Pmt Holidays |
Selecting this property opens the Holiday Calendar widget from which payment holidays can be selected and customized. |
| Pmt Date Roll | Selecting this property opens the Date Roll widget from which payment date rolls can be specified. |
| Reinvestment Rate | Enter a number to apply a reinvestment rate. |
| Pmt Frequency | Select the frequency of payment from a dropdown menu. |
| Pmt Roll Day | Select the payment roll day from the dropdown. |
"Product: Income Payments Type" Properties
| Properties | Description |
|---|---|
|
Income Payments Type |
Bond only: Dropdown with options None, At Maturity, Upon Receipt, and Custom Schedule. Defaults to Upon Receipt. |
| Pmt Lag |
This string applies a payment lag to the income payments. |
| Pmt Holidays |
Selecting this property opens the Holiday Calendar widget from which payment holidays can be selected and customized. |
| Pmt Date Roll | Selecting this property opens the Date Roll widget from which payment date rolls can be specified. |
| Reinvestment Rate | Enter a number to apply a reinvestment rate. |
| Pmt Frequency | Select the frequency of payment from a dropdown menu. |
| Pmt Roll Day | Select the payment roll day from the dropdown. |
8. Capped Swap Trades
A swap with a cap floor on the floating leg. The trade can be fixed-floating or floating-floating.
Key Properties
Swap properties - Option Type - Strike 2 - Factor - Volatility
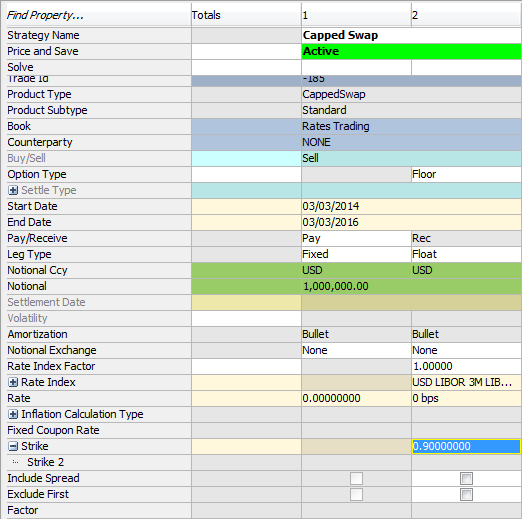
Sample Capped Swap trade
"Product: Style" Properties
| Properties | Description |
|---|---|
| Settle Type |
Select for Non-Deliverable FX Reset or Non-Deliverable Fixed FX. |
| Settle Ccy | Select the settlement currency. |
| Quanto Factor | Used when Settle Type = Non-Deliverable (Fixed FX). Displays the current quanto factor. |
| Quanto Ccy Pair | Used when Settle Type = Non-Deliverable (Fixed FX). Displays the currency pair between the Notional Ccy and the Settle Ccy. |
"Product: Payment" Properties
| Properties | Description | |||||||||||||||||||||||||||
|---|---|---|---|---|---|---|---|---|---|---|---|---|---|---|---|---|---|---|---|---|---|---|---|---|---|---|---|---|
| Compounding Type |
Select the compounding type, if applicable, or none.
You can also set the following properties:
When you select a DLY compounding frequency for a rate index that is not setup for daily compounding, the DailyCompound calculator is used.
|
|||||||||||||||||||||||||||
| Factor | Enter the factor. Available for the Option Type "Digital Cap", "Digital Floor" or "Digital Collar". |
"Product: Rate" Properties
| Properties | Description | ||||||||||||
|---|---|---|---|---|---|---|---|---|---|---|---|---|---|
| Strike |
Enter the upper strike. You can also specify the following property:
You can also right-click the fields and choose "Supplemental" to specify a Strike Schedule. For "Strike 2", you can specify different schedules for the Upper and Lower Strike. |
||||||||||||
| Option Type | Select an option type: None, Cap, Floor, Collar, Digital Cap, Digital Floor, Digital Collar. | ||||||||||||
|
Flexo FX Source |
If Settle Type = Non-Deliverable (FX Reset), enter the following values:
|
||||||||||||
|
Calculation Ccy |
Select the intermediate currency to convert notional currency to settle currency. Enter:
|
"Market Data" Properties
| Properties | Description |
|---|---|
| Volatility | Displays the volatility based on the market data associated with the selected pricing environment. You can modify this value. |
9. Swaption Trades
Key Properties
Swaption properties - Expiry Date - Delivery Date - Option Type - Exercise Type - Settle Type - Fixed Swap Tenor - Cash Settle Method
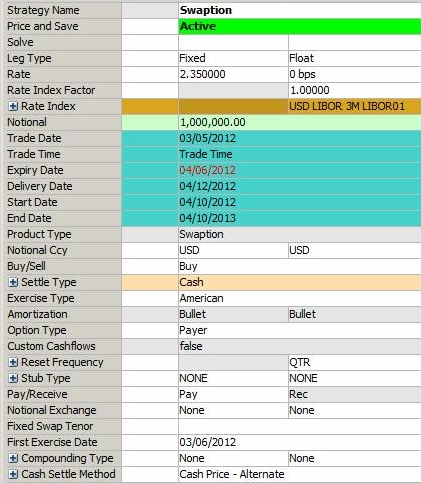
Sample Swaption trade
"Product: Style" Properties
| Properties | Description | |||||||||||||||||||||||||||||||||||||||
|---|---|---|---|---|---|---|---|---|---|---|---|---|---|---|---|---|---|---|---|---|---|---|---|---|---|---|---|---|---|---|---|---|---|---|---|---|---|---|---|---|
| Option Type |
Select the option type: Payer, Receiver, or Straddle. |
|||||||||||||||||||||||||||||||||||||||
| Exercise Type |
Select the exercise type:
You can select a fee type (Amount or %) and enter a fee.
You can define a fee schedule. Right-click the trade and choose "Supplemental" to define the fee schedule. For American Swaptions in the Pricing Sheet, changing the Delivery Date will not effect the underlying Swap Start Date. Shortcuts applied to the Swap Start Date are based on the Trade Start Date, not the Delivery Date. Changing the Swap End Date triggers the validation of the Expiry Date. If it is after the new End Date, the dates become equal.
Right-click the trade and choose "Supplemental" to define the exercise schedule. It is the same as defining a cancelable schedule.
|
|||||||||||||||||||||||||||||||||||||||
| Settle Type |
Select the settlement type at exercise. The application may automatically select it based on the product type.
You can also set the following properties:
Examples: 3D, 1M, 1Y, etc.
Swaptions can be automatically exercised using the AUTOMATIC_EXERCISE scheduled task, provided they are in-the-money. You can specify a threshold in percentage to trigger the automatic exercise. Otherwise, choose Processing > Exercise to exercise the option - Help is provided from that window.
You can specify the minimum and maximum notional that can be partially exercised. |
|||||||||||||||||||||||||||||||||||||||
| MidCurve / FixedSwapTenor |
Select an option from the drop-down list:
This selection disables the Start Date and End Date. You can also add a tenor to the Fixed Swap Tenor field (see below), press Enter, and the FixedTenor selection is automatically made.
Pricing for Mid-Curve Swaption Mid-curve swaption needs to be priced using the pricer PricerSwaptionMidCurve. In addition to the volatility surface, discount curve and forecast curve, it requires a correlation matrix between the swaption expiry (Offset Axis), underlying swap start date (1st Axis = Lag) and underlying swap expiry (2nd Axis = Tenor).
You can set the following parameters at trade level:
More details can be found in the Calypso Analytics Library documentation. |
|||||||||||||||||||||||||||||||||||||||
| Fixed Swap Tenor |
Enter the fixed tenor of the swap for Fixed Tenor Swaptions. The swap starts on the option’s delivery date and ends on the option’s delivery date + fixed tenor. The system currently only supports the pricing of European Fixed Tenor Swaptions. |
"Product: Payment" Properties
| Properties | Description | ||||||||||||||||||||||||||||||||||||||||||
|---|---|---|---|---|---|---|---|---|---|---|---|---|---|---|---|---|---|---|---|---|---|---|---|---|---|---|---|---|---|---|---|---|---|---|---|---|---|---|---|---|---|---|---|
| Cash Settlement Method |
Only applies to cash settlement. Select the settlement method to compute the settlement amount. [NOTE: If you have defined cash settlement defaults (CSD), it will pick up the settlement method from the CSD defined for the agreement specified in domain "CashSettleDefaultsAgreements" / rate index / currency - It is ANY by default. For example, ANY is defined in domain "CashSettleDefaultsAgreements", and you have a CSD defined for ANY / LIBOR / USD. If the trade is LIBOR / USD and settles in Cash, then the settlement method from the CSD will be set on the trade by default] You can set additional properties:
If you select none, you have to select a set of reference banks in Rek Bank 1, Ref Bank 2, Ref Bank 3, Ref Bank 4, Ref Bank 5 - Legal entities of role ReferenceBank. If you select OTHER_SOURCE, you need to select a rate index in Cash Settle Rate Index.
In the Option Exercise Window, there is a Settlement Rate field. You can get the value from the pricing environment by clicking Price, or you can enter a value. If you enter a rate, it will be displayed here.
|
9.1 Defining a Fee Schedule
Right-click the trade and choose "Supplemental" to define a fee schedule for American swaptions.
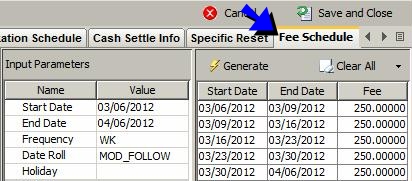
Sample American Fee Schedule
| » | The start and end dates default to the trade's start and end dates. |
Select a frequency, date roll and holiday calendars to generate the fee schedule.
| » | Click Generate to generate the schedule. |
You can click the "Clear All" menu to add / remove cancellation dates.
You can enter the fees amounts in the fee schedule.
| » | Then click Save and Close to apply the schedule to the trade. |
9.2 Computing the Premium Fee
The premium fee is a fee of type PREMIUM. Such a fee needs to be defined in the Calypso Navigator under Configuration > Fees, Haircuts, & Margins > Fee Definition.
Once you apply the premium fee to the trade, it is displayed in the Trade Events panel.
To compute the premium fee, price the trade, then right-click the trade and choose "Supplemental".
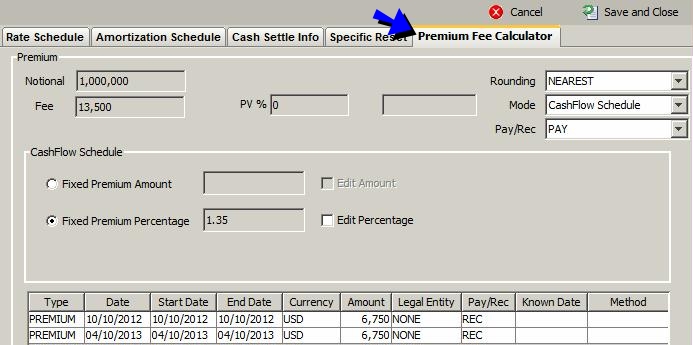
Sample Cashflow Schedule premium fee
There are multiple ways to compute the premium fee.
Cashflow Schedule
This is the default calculation when the trade is priced.
| » | You can modify the rounding convention from the Rounding field. |
| » | You can modify the fee amount as needed. |
| – | Click “Fixed Premium Amount” and check the “Edit Amount” checkbox to modify the fee amount for each fee period. |

| – | Or click “Fixed Premium Percentage” and check the “Edit Amount” checkbox to modify the fee percentage. |

| » | Then click Calc to recalculate the fee, and click Save and Close to save the fees. You can view the generated fees in the Trade Events panel. |
Single Premium Fee
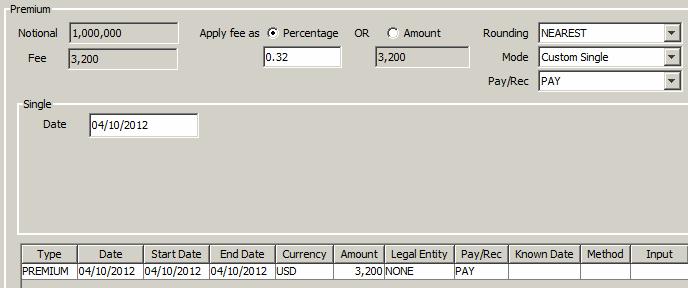
Sample Single Premium fee
| » | Select “Custom Single” from the Mode field. |
| » | Click Percentage to enter the fee as a percentage of the notional, or Amount to enter a fee amount. |
| » | Select the rounding convention from the Rounding field, and enter the fee date in the Date field. |
| » | Then click Calc to calculate the fee, and click Save and Close to save the fee. You can view the generated fee in the Trade Events panel. |
Custom Schedule
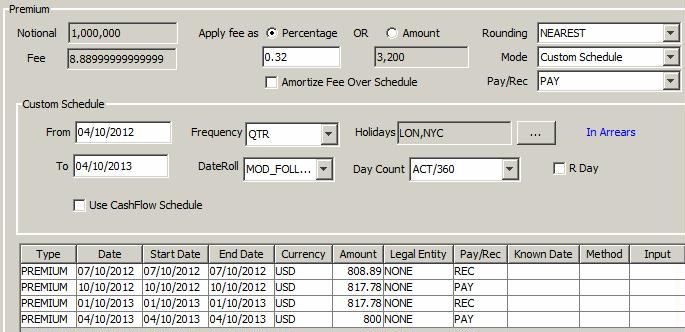
Sample Custom Schedule premium fee
| » | Select “Custom Schedule” from the Mode field. |
| » | Click Percentage to enter the fee as a percentage of the notional, or Amount to enter a fee amount. This is the total amount that will be broken down according to the schedule. |
| » | Select the rounding convention from the Rounding field. |
| » | Check “Amortize Fee Over Schedule” to assign the total premium by percentage or amount to each period, or uncheck to assign the same amount to each period. |
| » | Enter the criteria to define the custom schedule: From and To dates, frequency, payment calendars, date roll convention, day count, payment date, and roll day adjustment. |
The "Use Cashflow Schedule" checkbox only applies if the trade has stub periods.
When checked, if your trade has stub periods, all the correct dates will have been generated for the trade. Then you can overlay the settings of frequency, date roll, beg/end, etc. on top of that. Ensure that the frequency is less than or equal to the frequency of the cashflows. This is similar to the way Bermudan exercise dates generation works.
| » | Then click Calc to calculate the fees, and click Save and Close to save the fees. You can view the generated fees in the Trade Events panel. |

Sample PREMIUM fees in Trade Events panel
10. Setting Specific Resets
You can enter price fixings and rate resets specific to the current trade. The resets defined here are not used by other trades.
To set specific resets, right-click a trade and choose "Supplemental".
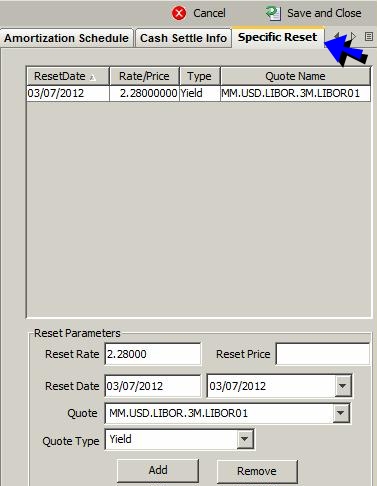
| » | Enter a reset rate (or reset price, as applicable), and select a reset date, then click Add. |
| » | Click Save and Close to save the specific resets. |
The rates will appear in the corresponding cashflows, and the Manual Reset checkbox will appear checked.
11. Islamic Trades
You can capture Islamic MM trades and Islamic Swap trades using the Pricing Sheet.
Islamic trades are standard loan / deposit trades and swap trades with an underlying commodity asset, and participants (brokers and counterparty). The underlying details are only stored for reference. The brokers need to accept the underlying details however in order for the trade to be validated.
The INTEREST flows are replaced with PROFIT and COST flows.
11.1 Before you Begin
Execute SQL
You need to add "<calypso home>/client/resources/samples/dbscripts/SchemaData_islamic.xml" to Execute SQL, in order to populate Islamic static data.
Underlying Names
The names of the commodity underlyings must be defined in the domain "IslamicMM.UnderlyingName" for Islamic MM trades, and in the domain "IslamicSwapLeg.UnderlyingName" for Islamic Swap trades.
Islamic trades are not actually linked to a commodity product. They are linked to an underlying name for reference.
Islamic MM Workflow Setup
The trades should only be validated once the brokers have accepted the underlying details.
So the trade lifecycle should be as follows:
1. Capture trades - Trades move to status PENDING, and confirmation messages are sent to the brokers.
2. When the trades are accepted by the brokers, the back office operator manually applies the ACCEPT action to the confirmations, which applies the same action to the trades through the message rule ApplyTradeSameAction.
The trades then follow the standard workflow.
Changes to Trade Workflow
Add the transition PENDING - ACCEPT - ACCEPTED.
Change the transition PENDING - AUTHORIZE - VERIFIED to ACCEPTED - AUTHORIZE - VERIFIED.
| Orig Status | Action | Resulting Status | Use STP | Product Type | Rules | Create Task |
|---|---|---|---|---|---|---|
| PENDING | ACCEPT | ACCEPTED | false | IslamicMM | true | |
| ACCEPTED | ACCEPT | ACCEPTED | false | IslamicMM | true | |
| ACCEPTED | AUTHORIZE | VERIFIED | false | IslamicMM | CheckSDI | false |
Message Workflow
| Orig Status | Action | Resulting Status | Use STP | Product Type | Rules | Create Task | Comment |
|---|---|---|---|---|---|---|---|
| NONE | NEW | PENDING | false | IslamicMM | true | ||
| PENDING | ACCEPT | VERIFIED | false | IslamicMM | ApplyTradeSameAction | true |
[action=ACCEPT] |
| PENDING | ACCEPT | VERIFIED | false | IslamicMM | ApplyTradeSameAction | true |
[action=ACCEPT] |
| PENDING | CANCEL | CANCELED | false | IslamicMM | ApplyTradeSameAction | true |
[action=CANCEL] |
| VERIFIED | CANCEL | CANCELED | false | IslamicMM | true |
The action defined in the Comment will be applied to the trade.
11.2 Islamic MM Trades
Select the "Islamic MM" strategy.
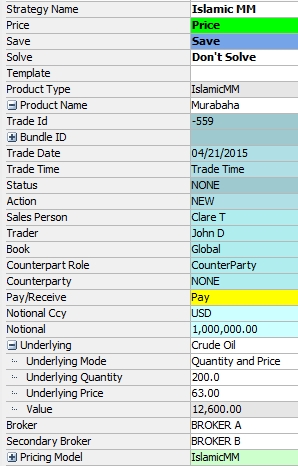
Key Properties
Pay/Receive - Product Name - Contract Type - Broker - Secondary Broker - Underlying - Rate - Rate Index - Cap %
| Properties | Description | |||||||||
|---|---|---|---|---|---|---|---|---|---|---|
|
Pay/Receive |
Select the direction of the trade, either Pay or Receive.
|
|||||||||
|
Product Name |
Select the product.
|
|||||||||
| Contract Type |
Applies to Wakala only. You can select the contract type for information purposes:
|
|||||||||
| Broker |
Optional for Murabaha trades. Not used for Wakala. Type in a few letters, and all brokers that start with those letters will appear. You can select a broker from the list. A broker is a legal entity of role Broker. Only favorite brokers can be selected. Favorite brokers are selected from the Calypso Navigator using Configuration > Favorites > Brokers. |
|||||||||
| Secondary Broker |
Optional for Murabaha trades. Not used for Wakala. Type in a few letters, and all brokers that start with those letters will appear. You can select a broker from the list. A secondary broker is a legal entity of role Broker. Only favorite brokers can be selected. Favorite brokers are selected from the Calypso Navigator using Configuration > Favorites > Brokers. |
|||||||||
|
Underlying |
Select the name of the commodity underlying. Underlying names are defined in the domain "IslamicMM.UnderlyingName". Not used for Wakala. |
|||||||||
|
Underlying Mode |
Select the calculation mode:
Principal = Underlying Quantity * Underlying Price.
|
|||||||||
| Underlying Quantity |
Applies for Underlying Mode = Quantity and Price. Enter the quantity of underlying. |
|||||||||
| Underlying Price |
Applies for Underlying Mode = Quantity and Price. Enter the unit price of underlying. |
|||||||||
| Value |
For Underlying Mode = Quantity and Price, displays the asset value. For Underlying Mode = Value Only, enter the asset value. |
|||||||||
| Rate | Enter the fixed rate for Isra, Murabaha, Tawaruq. | |||||||||
| Rate Index | Select the rate index for Wakala, and set the rate index parameters as needed. | |||||||||
| Cap % | Enter the cap rate for Wakala. |
11.3 Islamic Swaps
Islamic Profit Rate swaps allow buying / selling the underlying commodity asset t a certain date. The underlying details are only stored for reference.
Select the "Islamic Swap" strategy.
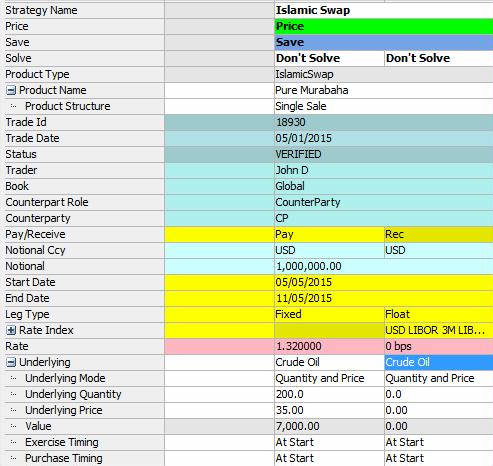
Islamic Swap Properties - Product Name - Product Structure - Broker - Secondary Broker - Underlying
| Properties | Description | |||||||||
|---|---|---|---|---|---|---|---|---|---|---|
|
Product Name |
You can select "Pure Murabaha" or "Waad Based". |
|||||||||
| Product Structure |
You can select "Single Sale" or "Double Sale". For a Single Sale swap, there is only one cashflows per payment period. Both legs must have the same payment frequency. You need to setup a netting method similar to the Trade netting method that uses the netting key IslamicTransferType instead of TransferType.
For a Double Sale swap, the cashflows are generated for each leg independently. |
|||||||||
| Broker |
Type in a few letters, and all brokers that start with those letters will appear. You can select a broker from the list. A broker is a legal entity of role Broker. Only favorite brokers can be selected. Favorite brokers are selected from the Calypso Navigator using Configuration > Favorites > Brokers. |
|||||||||
| Secondary Broker |
Type in a few letters, and all brokers that start with those letters will appear. You can select a broker from the list. A secondary broker is a legal entity of role Broker. Only favorite brokers can be selected. Favorite brokers are selected from the Calypso Navigator using Configuration > Favorites > Brokers. |
|||||||||
|
Underlying |
Select the name of the commodity underlying. Underlying names are defined in the domain "IslamicSwapLeg.UnderlyingName". |
|||||||||
|
Underlying Mode |
Select the calculation mode:
Principal = Underlying Quantity * Underlying Price.
|
|||||||||
| Underlying Quantity |
Applies for Underlying Mode = Quantity and Price. Enter the quantity of underlying. |
|||||||||
| Underlying Price |
Applies for Underlying Mode = Quantity and Price. Enter the unit price of underlying. |
|||||||||
| Value |
For Underlying Mode = Quantity and Price, displays the asset value. For Underlying Mode = Value Only, enter the asset value. |
|||||||||
|
Exercise Timing |
Select the exercise timing: "At Start" (exercise occurs at the beginning of the period) or "In Arrears" (exercise occurs at the end of the period). |
|||||||||
| Purchase Timing |
Select the purchase timing: "At Start" (purchase occurs at the beginning of the period) or "In Arrears" (purchase occurs at the end of the period). |
11.4 Sample Message Setup
Islamic MM
You need to setup message templates for each type of pending trade so that a confirmation is to the brokers and/or counterparty to be accepted:
| • | Pending loan to Broker 1 |
| • | Pending loan to Broker 2 |
| • | Pending deposit to Broker 1 |
| • | Pending deposit to Broker 2 |
| • | Pending deposit to CounterParty |
You can distinguish the types of trades using static data filters as needed.
Sample pending confirmation sent to the broker:
Ⓘ [NOTE: These are just sample values - You need to use the appropriate message type and template]
Once the trades are VERIFIED, an official confirmation can be sent to the counterparty.
Sample verified confirmation sent to the counterparty:
Ⓘ [NOTE: These are just sample values - You need to use the appropriate message type and template]
For Wakala, you can use the following templates:
| • | IslamicMMWakalaWakilOffer.html |
| • | IslamicMMWakalaWakilOfferArabic.html |
To use the Arabic template, set the language to Arabic, and the environment property FORMATTER_CHARSET=UTF-8.
Islamic Swap
You can use the following templates:
| • | IslamicSwapAssetSaleConfirmation.html |
| • | IslamicSwapConfirmation.html |
| • | IslamicSwapExerciseNotice.html |
| • | IslamicSwapAssetSaleConfirmationArabic.html |
| • | IslamicSwapConfirmationArabic.html |
| • | IslamicSwapExerciseNoticeArabic.html |
To use the Arabic template, set the language to Arabic, and the environment property FORMATTER_CHARSET=UTF-8.
Sample confirmation:
Sample exercise notice (not needed for Pure Murabaha Islamic swaps):
Sample asset sale confirmation (not needed for Pure Murabaha Islamic swaps):
See also
| • | Out-of-the-box Strategies |
| • | Using the Pricing Sheet |
| • | Capturing Trades |
| • | Solving Functions |