Product Details Window
This window appears when you double-click any red label in a trade worksheet.
This documents describes the settings of the Product Detail window.
| » | Click Apply after setting the details, to apply them to the selected product (a swap, a cap floor, etc.) – You then need to generate the cashflows to view the changes. |
1. Amortization and Accrual Panel
Select the Amortization and Accrual panel.
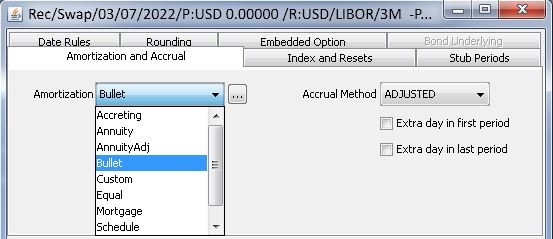
| » | Select the amortization structure from the Amortization field. Then click ... to set the parameters of the selected structure. The default is Bullet (no amortization, no parameters are required). The amortization structures are described below. They are defined in the domain "principalStructure". |
Not all amortizations structures are available for all products.
| » | Select the adjustment method of the accrual period from the Accrual Method field: |
| – | ADJUSTED — Adjusts the period’s end date if it falls on a non-business day, according to the payment date roll convention. Rolling the end date adjusts the period length, so a rolled date changes the interest amount. |
| – | UNADJUSTED — Does not adjust the period’s end date for non-business days. |
| – | MAT_UNADJUSTED — Adjusts the period’s end date if it falls on a weekend unless it is the last period (maturity), in which case it is not adjusted. Thus the adjustment method may affect intermediate interest amounts, but it does not change the maturity date. |
| – | MAT_ADJUSTED — Adjusts only the last accrual period on a valid business day. Cashflows up to maturity are treated as unadjusted. If the end date of final accrual lands on a non-business day, however, it is adjusted to the next valid business day. The maturity date of the trade is not affected. |
| – | FRN — Adjusts the period’s end date for non-business days to the next business day unless the next business day is in the following month, in which case it uses the preceding business day. |
| » | For trades using compounding, select from the Compounding Method field: |
| – | ADJUSTED — Adjusts the payment's begin/end dates if it falls on a non-business day, according to the payment date roll convention. |
| – | FRN — Adjusts the period’s end date for non-business days to the next business day unless the next business day is in the following month, in which case it uses the preceding business day. |
| – | MAT_UNADJUSTED — Adjusts the period’s end date if it falls on a weekend unless it is the last period (maturity), in which case it is not adjusted. |
| – | UNADJUSTED — Does not adjust the compound’s begin/end date for non-business days. |
| » | Click “Extra day in first period” to add a day to the first payment period, or “Extra day in last period” to add a day to the last payment period. The system uses the daycount (nominator+1)/denominator on the first or last cashflow - For example ACT+1/360. |
When a parametrized amortization type is used, it is possible to control the logic for the first amortization period by setting a true/false value for the domain "isAmortStartDateDirect":
| • | When false (default), it assumes the first amortization occurs in the first coupon period where Pmt End Date >= Amort Start Date + Amort Tenor. |
| • | When true, it assumes the first amortization occurs in the first coupon period where the Pmt End Date > Amort Start Date. |
|
Values |
Description |
||||||||||||||||||||||||||||||||||||||||||||||||
|
Accreting |
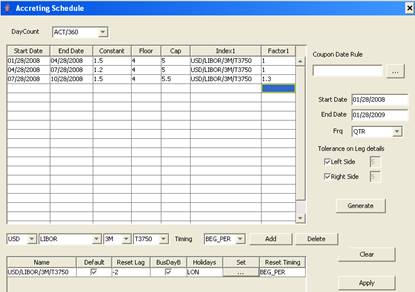
The principal accrues according to a rate schedule. The rate schedule is based on a formula that can be made of a constant rate increase, a cap, a floor, and one or more rate indices with a factor. The accretion rate calculated by inputs from the current period is applied to the next period. The accretion rate index can reset at the beginning of the period or in arrears. Rate = (1st Factor * 1st Rate Index Reset + ... nth Factor * nth Rate Index Reset + Constant), and is compared to the cap and floor. For the cases with actual principal exchange, you have to set one more period as accretion end date. You can select “Accretion Sample Dts” from the Cashflow menu to view the reset dates of the rate schedule. Click ... to set the Accreting parameters. It brings up the Accreting Schedule window.
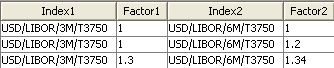
To add a rate index, select a rate index and set all the required parameters on the index then click Add. You can then enter a factor. If you add multiple indices, you can enter a factor for each index.
|
||||||||||||||||||||||||||||||||||||||||||||||||
|
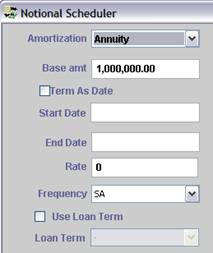
Annuity |
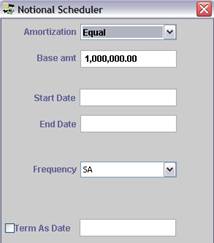
The amount of each payment (interest + principal) remains constant over the life of the product. The interest payments are larger in the beginning and decrease over time, while the principal repayments are smaller in the beginning and increase over time. Click ... to set the Annuity parameters. It brings up the Notional Scheduler window.
|
||||||||||||||||||||||||||||||||||||||||||||||||
|
AnnuityAdj |
Select this for non-constant annuity payments. For calculations where Amort = Annuity on a cash instrument, it will take into account the exact number of days according to the daycount on intermediate amounts. Click ... to set the AnnuityAdj parameters. It brings up the Notional Scheduler window. See Annuity above for details.
|
||||||||||||||||||||||||||||||||||||||||||||||||
|
Bullet |
No amortization - No parameters are required. |
||||||||||||||||||||||||||||||||||||||||||||||||
|
Custom |
The amortization structure is set to Custom by the system when you customize the cashflows. |
||||||||||||||||||||||||||||||||||||||||||||||||
|
Equal |
The principal is amortized in equal payments, one for each interest period of the trade, so that the final repayment of principal occurs in the last interest period. In this case, the amortized principal is the same for each calculation period. Click ... to set the Equal parameters. It brings up the Notional Scheduler window.
|
||||||||||||||||||||||||||||||||||||||||||||||||
|
Mortgage |
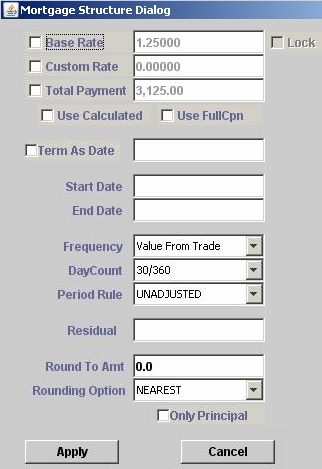
You can define a Mortgage structure for Swaps, Cancellable Swaps, Caps & Floors, and Swaptions. The Mortgage structure ensures that the annuity (interest plus amortization) for every period is the same. It is similar to the Annuity structure, but it supports all daycount conventions, and periods of different length. Click ... to set the Mortgage parameters. It brings up the Mortgage Scheduler window.
If you check "Use Calculated", the parameters are used to compute the amortization amount. Otherwise, they are used to compute the annuity amount (amortization plus interest). The base rate defaults to the fixed rate of the trade and the custom rate is an amortization rate that you can enter.
You can also modify the base rate as needed. Or, you can check "Lock" to lock the base rate.
For example, if “Round to Amt” is $1.00 and the rounding option is NEAREST, the mortgage amount will be rounded to the nearest dollar. You can check the “Only Principal” checkbox to apply the rounding conventions to the principal only. Otherwise, they also apply to the interest.
|
||||||||||||||||||||||||||||||||||||||||||||||||
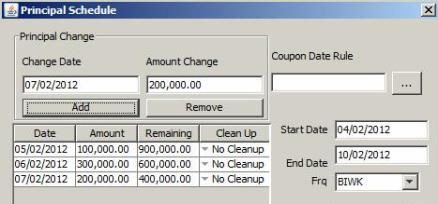
| Negotiable |
Only applies to Cash trades. To specify principal changes. Click ... to set the Negotiable parameters. It brings up the Principal Schedule window.
See below details
Interest Cleanup If FFCP = False, the interest calculation is split as follows:
Interest Cleanup = Principal on CF Start Date * Nb days from CF Start Date to first Cleanup Date * Rate / DayCount
Interest Cleanup = Remaining principal on CF Cleanup Date * Nb days from previous Cleanup Date to Next Cleanup Date (or CF End Date) * Rate / DayCount If FFCP = True, the interest calculation is split as follows:
Interest Cleanup = Principal Change amount * Nb days from CF Start Date to first Cleanup Date * Rate / DayCount
Interest Cleanup = Remaining principal on CF Cleanup Date * Nb days from CF Start Date to Next Cleanup Date (or CF End Date) * Rate / DayCount |
||||||||||||||||||||||||||||||||||||||||||||||||
|
Schedule |
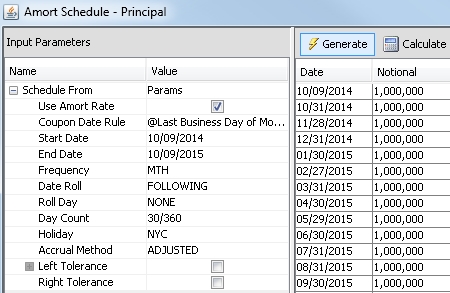
To generate an amortization schedule according to a date rule and a set of parameters, or according to custom cashflows. Click ... to set the Schedule parameters. It brings up the Schedule window.
Schedule from Parameters
Schedule from Custom Cashflows Only applies if you have generated the cashflows on the trade.
|
||||||||||||||||||||||||||||||||||||||||||||||||
|
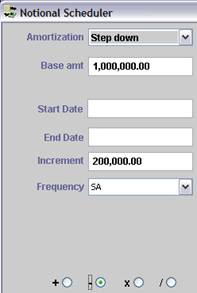
Step down |
The Step down amortization structure is an incremental structure whereby the base amount decreases (or increases) by a certain amount for a set number of payment periods. Click ... to set the Step down parameters. It brings up the Notional Scheduler window.
|


2. Index and Resets Panel
This panel only appears for floating legs.
Select the Index and Resets panel.
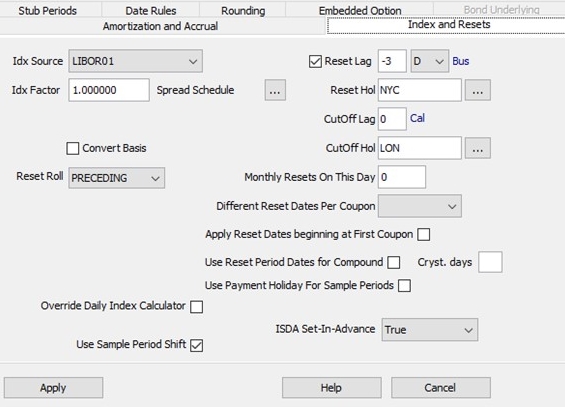
| » | The index source and index factor are displayed and can be altered directly. |
| » | Click ... next to "Spread Schedule" to define a spread schedule. It brings up the Spread Schedule window. |
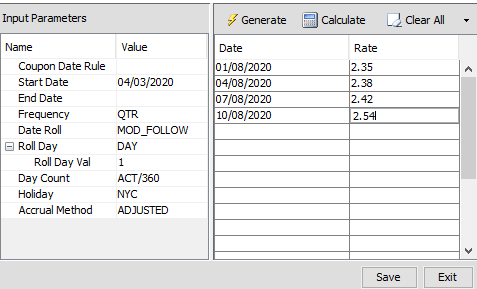
| – | Select a date rule from the Coupon Date Rule field to generate the schedule using the date rule, or select a frequency from the Frequency field to generate the schedule using a frequency. |
| – | Enter Start and End Dates. |
| – | Click Generate to generate the schedule. Then enter the spreads as needed. |
| – | Then click Save to apply the schedule. |
| » | The field "Cmp Sprd" only appears for a compounding rate with spread compounding - You can enter the spread in basis points, or click ... to define a compounding spread schedule. The Compound Spread Schedule window will appear, it is the same as the Spread Schedule window shown above. |
| » | Check the “Convert Basis” checkbox to check whether the reference index and the trade have the same daycount convention. If not, the rate’s daycount convention is converted to the trade’s daycount convention. The following cases are currently supported: |
| » | For RFR based Daily Compounding swaps, the conversion will get applied to the compounded rate and not on Daily Rates. Such Converted Rate will be used for Interest Amount calculation as well as the Accrual Amount calculation. Value displayed in the ‘Rate’ column will be the converted rate. Daily Rates displayed in the Sample Values Window will be the actual rates and not the converted rates. |
| » | In case of Spread and Index Factor, If Convert Basis is checked and if the trade has Index Factor value other than 1; by default ‘Apply Index Factor to Cmp Rate’ should get checked. It won’t be possible for the user to uncheck this (unless ‘Convert Basis’ checkbox is unchecked back). |
| » | In case of Unsupported Compounding Methods, when the user chooses Compounding Method other than ‘SimpleSpread’, while keeping ‘Convert Basis’ checked, below message will be displayed when the user hits on ‘Price’ or generates cashflows or tries to save the trade: |
“Convert basis is not supported with the selected Compounding Method”.
|
Rate Index Daycount |
Trade Daycount |
Conversion Method |
|
ACT/360 |
ACT/365 |
Multiply by 365/360 |
|
ACT/365 |
ACT/360 |
Divide by 365/360 |
|
ACT+1/365 |
ACT+1/360 |
Divide by 365/360 |
|
ACT+1/360 |
ACT+1/365 |
Multiply by 365/360 |
|
ACT/ACT |
ACT/360 |
Convert Basis unchecked, forward rate = higher rate (BEY) |
|
ACT/ACT |
ACT/360 |
Convert Basis checked, forward rate = lower rate (MMY by multiplying the rate by 360/365) |
| » | Check "Multiplicative Spread" so that the spread over the rate index is multiplicative rather than additive. |
This setting is available when the floating leg uses an inflation rate index, or when the floating leg uses flat compounding in addition to selecting "EXP" as the payment discount method.
This is the spread set next to the index on the Trade window.

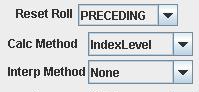
| » | Select the reset date roll convention from the Reset Roll field, if different from the payment date roll convention. Date roll conventions are described in the Calypso Navigator under Help > Date Roll Conventions. |
| » | For an inflation rate, the calculation method and interpolation method are displayed - You can modify as needed. |
| » | Check the Reset Lag checkbox to modify the reset lag (number of days between the reset date and the payment date). It defaults to the reset lag specified on the rate index. |
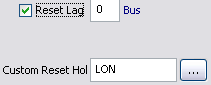
| – | You can double-click the Bus label (business days) to change to Cal (calendar days) if needed. |
| – | If the Bus label is selected, you can select a custom calendar from the Custom Reset Hol field. |
| » | The field “CutOff Lag” appears when resets are sampled at a frequency different from the payment frequency. It only applies to daily and weekly sampling. When daily, it should be set to “-1”. |
When used with the “Cutoff Adj.” weight method, set to the lag between the last sample period’s end date and the cutoff date.
![]()
| – | You can double-click the Bus label (business days) to change to Cal (calendar days) if needed. |
| – | You can specify the cutoff lag holidays. They are used for the cutoff lag on both daily compounding and daily averaging coupons. |
| » | The field “Monthly Reset On This Day” appears when resets are sampled at a frequency different from the payment frequency. It only applies to weekly and monthly sampling (weekly: day of the week, monthly: day of the month). |
![]()
| » | Set “Different Reset Dates Per Coupon” to True to generate the reset dates based on the coupon payment frequency, or N to generate the reset dates based on the index tenor. |
For a coupon frequency higher than the index frequency, all coupons within an index term can have a different reset date, or the same reset date.
For example, LIBOR 3M and coupon frequency = M. If True, every coupon within the index term will have a different reset date. If False, every coupon within the index term will have the same reset date.
If you do not select True or False, the system will use the value of the environment property DIFFERENT_RESET_DT_PER_CPN.
When False (default), you can check "Apply Reset Dates beginning at First Coupon" to combine coupons within the same index term from top to bottom - Otherwise, they are combined from bottom to top.
Example: LIBOR 3M, coupon frequency = M, and there are 4 coupon periods.
| – | If "Apply Reset Dates beginning at First Coupon" = True: |
Period 1, Period 2, Period 3 = Reset 1 and Period 4 = Reset 2
| – | If "Apply Reset Dates beginning at First Coupon" = False (default): |
Period 1= Reset 1 and Period 2, Period 3, Period 4 = Reset 2
| » | Check the “Use Reset Period Dates for Compound” to compound trades based on the reset dates rather than the payment dates. Only applies to compounding trades. |
| » | Select the "Use Payment Holiday For Averaging Periods" checkbox to calculate sample periods using payment holidays instead of the reset calendar. |

| » | The FX Reset panel appears for Cross-Currency Swaps and Cancelable Cross-Currency Swaps with principal adjustment (the Adj checkbox is checked). |
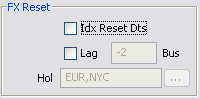
| – | Check the “Idx Reset Dts” checkbox to specify that the FX reset dates are the same as the index reset dates. |
Or check the Lag checkbox to specify that the FX reset dates are a number of days before the interest start date. Enter the number of days in the adjacent field. It defaults to the reset lag specified on the FX rate. You can double-click the Bus label (business days) to change to Cal (calendar days) if needed.
If the Bus label is selected, you can select a calendar from the Hol field.
| » | "Override Daily Index Calculator" - *** It is not recommended to check this field as it will be deprecated in an upcoming version *** |
When checked, the system uses the DailyCompound rate index calculator for trades based on rate indices defined with legacy rate index calculators.
| » | "Use Sample Period Shift" appears when coupons are daily compounding and daily averaging. When checked, it shifts the sample period by as many days as the Reset Lag, such that the weights of any given daily fixing remains the same. |
| » | "Partial Period Compounding" appears for daily compounding swaps with SimpleSpr compoundinh method - Select NCCR for Non-Cumulative Compound Rate, or not set for CCR (Cumulative Compound Rate). The NCCR rate is the daily change in CCR rate. |
The value NCCR can be added to the domain "PartialPeriodCompRateEnrichmentMethods" if it is not available for selection.
In the Reset Samples window, the Partial Period Comp Rate column is computed.
| » | ISDA Set-In-Advance appears for swap trades. Setting to True causes the system to use the ISDA 2021 convention for daily compounding and simple averaging coupons where the Reset Timing of the daily compounded rate is BEG_PER. |
You can set the default value of this field by setting Value = True in domain isdaSetInAdvance.
Introduce a new property by the name of 'Apply Index Factor to Cmp rate' in the trade window under ‘Index and Resets’ as below:
| » | When not checked (default), the index factor is applied to each daily rate. |
| » | When checked, the index factor is applied to the final compounded rate. |
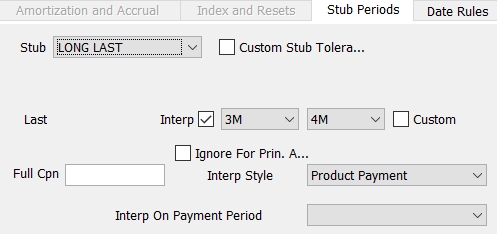
3. Stub Periods Panel
Select the Stub Periods panel.
The system automatically creates the stub periods when needed if Product > Automatically Adjusting Stub, or Product > Warn before Adjusting Stub is checked. Otherwise, you can define stub periods manually in this panel.
Stub periods take into account date roll conventions, holidays and accrual method.
The stub periods use the ISDA interpolation methodology to interpolate stub rates.
If a period (in calendar days) is less than or equal to the stub tolerance, it will be merged into the period immediately next to it. The default stub tolerance is 5 days (or set in the environment property STUB_TOLERANCE) - You can customize the stub tolerance in this window as well.
| » | Select the type of stub period from the Stub field. |
FIRST / LAST indicate whether the stub is the first period or the last period.
SHORT / LONG indicate whether the stub is shorter or longer than the payment frequency.
SPECIFIC FIRST – You can enter the end date of the first period.
SPECIFIC LAST – You can enter the start date of the last period.
SPECIFIC BOTH – You can enter the end date of the first period, and the start date of the last period.
FULL COUPON – You can enter the full coupon date (FULL COUPON is not applicable to Security Finance trades: repo and security lending).
Examples: You have a QTR interest frequency, and the trade start date is 03/01 and the trade end date is 10/15 (these examples do not take into account holidays, date roll conventions, and accrual method – Their purpose is to show how the stub periods are created).
| – | SHORT FIRST creates 3 periods (03/01 – 04/15 || 04/15 – 07/15 || 07/15 – 10/15) |
| – | LONG FIRST creates 2 periods (03/01 – 07/15 || 07/15 – 10/15) |
| – | SHORT LAST creates 3 periods (03/01 – 06/01 || 06/01 – 09/01 || 09/01 – 10/15) |
| – | LONG LAST creates 2 periods (03/01 – 06/01 || 06/01 – 10/15) |
| – | SPECIFIC FIRST (end date of first period is 03/15) creates 4 periods (03/01 – 03/15 || 03/15 – 06/15 || 06/15 – 09/15 || 09/15 – 10/15) |
| – | SPECIFIC LAST (start date of last period is 10/01) creates 4 periods (03/01 – 04/01 || 04/01 – 07/01 || 07/01 – 10/01 || 10/01 – 10/15) |
| – | SPECIFIC BOTH (end date of first period is 04/01 and start date of last period is 09/15) creates 4 periods (03/01 – 04/01 || 04/01 – 07/01 || 07/01 – 09/15 || 09/15 – 10/15) |
| – | FULL COUPON – It creates 3 periods (01/15 – 04/15 || 04/15 – 07/15 || 07/15 – 10/15) |
| » | Check the “Custom Stub Tolerance” checkbox to specify the stub period offset in days, and enter the number of days in the adjacent field. |
![]()
If a period (in calendar days) is less than or equal to the stub tolerance, it will be merged into the period immediately next to it. If not set, the default stub tolerance is 5 days (or set in the environment property STUB_TOLERANCE).
| » | Whenever there is a stub on a floating rate, the system automatically calculates the best index tenor for the stub period (provided “No Auto Interp” is unchecked on the rate index definition). If the length of a stub period matches exactly one of the index tenors, there is no interpolation required. If the length of a stub period is between two index tenors, the system defaults the stub index to interpolate between the two index tenors. |
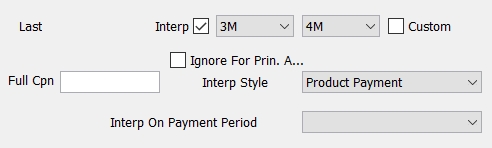
You can customize these tenors using the Interp checkbox and the adjacent tenor fields. If no interpolation is required, select the same tenor in both boxes. When you modify the index tenors, the Custom checkbox will appear checked. To return to the default tenors computed by the system, uncheck the Custom checkbox.
You can select the interpolation style:
| – | Index Based - The DateRoll, the holidays and the daycount are coming from the rate index. |
| – | Product Payment - The DateRoll, the holidays and the daycount are coming from the coupon panel. |
| – | Product Payment-Ignore EOM Rule - Same as "Product Payment", and the Follow End-End maturity is ignored. |
If the Roll Day setting in the payment details schedule is set to EOM, you can use the domain "InterpolateIgnoreEOMRoll" to ignore the Roll Day setting so that it does not interfere with the Interp Style setting.
When "InterpolateIgnoreEOMRoll" is set to True, interpolation ignores Roll Day=EOM. When "InterpolateIgnoreEOMRoll" is set to False, interpolation will include the date roll and roll day settings in the payment schedule.
For Cash trades and Structured Flows trades, you can select "Interp On Payment Period":
| – | Not set – In this case the value is taken from the domain “InterpolateOnPaymentPeriod” if any, or false otherwise. |
| – | True: Interpolate on payment period |
| – | False: Interpolate on forward period |
For a swap trade, if the system finds a curve for each stub tenor, it will use them to interpolate the stub period, otherwise it uses tenors on the curve of the trade’s tenor forecast curve.

Here the system is using a curve for the 3M tenor, and a curve for the 6M tenor.
You must have rate indices for each tenor with “No Auto Interp” unchecked, curves defined for each tenor, and the curves must be associated as forecast curves with the pricer configuration.
| » | You can enter a Full Cpn date to create periods starting on that date rather than the trade start date. The same logic applies with stub periods but for trade start date = Full Cpn date. |
| » | Cmp Stub - Only appears if the compounding frequency is LUN(R), BIWK(R), or WK(R). |
Select a stub for the compounding period as needed - This is used to adjust the compounding periods that are generated when they are not exactly divisible by the payment frequency.
Example: You pick a MTH payment frequency with compound frequency as WK(R). A month cannot be divided exactly in 7 days periods so we will have few extra days (if the month has 31 days you will have 4 extra days).
| – | SHORT FIRST: The first period will have 4 days, the others periods 7 days. |
| – | LONG FIRST: The first period will have 11 day, the others periods 7 days. |
| – | SHORT LAST: The first periods will have 7 days, the last one 4 days. |
| – | LONG LAST: The first periods will have 7 days, the last one 11 days. |
 For more detailed information, refer to Handling of Stubs.
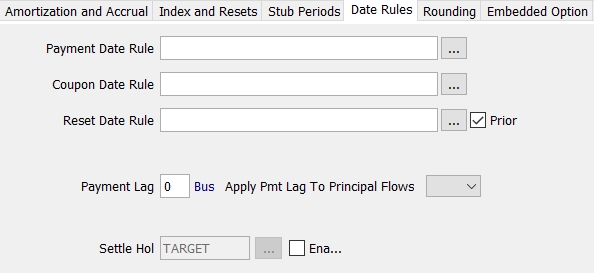
4. Date Rules Panel
Date rules can be used instead of frequencies to determine the interest periods.
Select the Date Rules panel.
| – |
|
| » | You can select a payment date rule, an interest date rule, and a reset date rule. |
The payment date rule determines the payment dates of the cashflows. If none is specified, the payment lag is used instead.
The coupon date rule determines the interest dates of the cashflows.
The reset date rule determines the reset dates of the cashflows.
For Cash products, the payment date rule determines the payment dates of principal flows - You can also select an interest payment date rule for the payment dates of interest flows.
| » | Check the Prior checkbox to perform the reset for the prior period (in arrears). |
| » | Enter a number of days between the interest date and the payment date in the Payment Lag field if needed. You can double-click the Bus label (business days) to change to Cal (calendar days) if needed. |
| » | You can select True from the Apply Pmt Lag To Principal Flows field to apply the payment lag to PRINCIPAL flows in addition to INTEREST flows. It is applied to INTEREST flows only otherwise. |
You can set a default value for this field using the domains "ApplyPmtLagtoPrincipalFlows" for IRD trades and "StructuredFlows.ApplyPmtLagToPrincipalFlows" for Structured Flows. Default is True.
| » | You can select additional settlement holidays as needed. |
5. Rounding Panel
Select the Rounding panel.

| » | Select the interest amount’s rounding method from the Amounts field. |
| » | Select the rate’s rounding method from the Rates field. You can enter the number of decimal places in the Dec Places field. |
| » | You can select the stub rate’s rounding method from the Interpolated Rates field. Only appears if stub periods are defined. You can enter the number of decimal places in the Dec Places field. |
| » | You can select the first reset rate rounding method from the 1st Rate field. Only appears if a first reset rate is set on the trade. You can enter the number of decimal places in the Dec Places field. |

| » | You can select the rate factor rounding method from the Rate Factor field. Only appears when a fixed leg's payment discount method is "EXP" or "NONE", or when the floating leg uses flat compounding, selects "EXP" as the payment method, and checks the multiplicative spread checkbox. You can enter the number of decimal places in the Dec Places field. |

| » | When the rate index on the floating leg is for inflation and Calculation Type on the Inflation tab is set to InflationIndexation, the Inflation Factor drop-down list is enabled. This provides the ability to round known values for Inflation Factor results in cashflows. The available rounding types are NEAREST, UP, or DOWN, and the number of decimal places can be entered. |

6. Inflation Panel
For inflation swaps, additional details can be specified in the Inflation panel.
Select the Inflation panel.
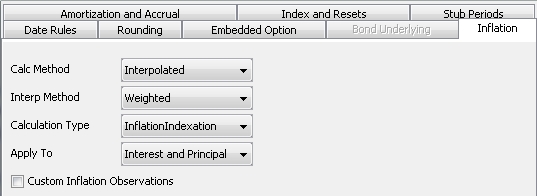
| » | Select the calculation method: |
| – | Interpolated - Daily index levels are interpolated between publication dates. |
| – | IndexLevel - Index levels are not interpolated between publication dates. |
| » | The only "Interp Method" option is "Weighted", which is only available for the Interpolated calculation method. |
| » | Select the calculation type to apply inflation level changes to cashflows: |
| – | InflationIncome - [(Final Level / Initial Level) - 1] |
| – | InflationIndexation - [Final Level / Initial Level] |
| » | Select whether to apply the InflationIndexation calculation type to just Interest, or both Interest and Principal. |
7. Embedded Option Panel
For daily compounding trades with the SimpleSpr compounding method, you can apply a cap or a floor to each daily interest rate before compounding.
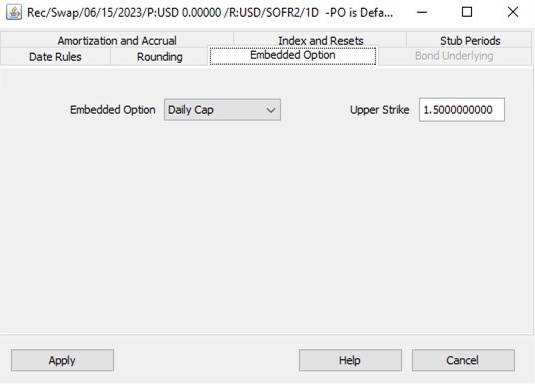
Select either Daily Floor or Daily Cap, and specify the upper or lower strike. If you don't want to apply a cap or a floor to each daily interest rate before compounding, select None.