Generating Orders from the Portfolio Workstation
You can generate orders from a Benchmark analysis with the "orders" function. The various decision support tools allow automatically managing business decisions with simple "templates".
Depending on the investment rule type, you can assign them to funds, mandates or strategies.
Ⓘ [NOTE: You can generate single orders and block orders from the Portfolio Workstation. To generate order bundles, you need to use the Pricing Sheet]
1. Before You Begin
In order to use a Benchmark analysis for orders, you need to set up the following, in addition to the usual analysis configuration requirements.
Order Workflows
Prior to generating orders, you need to configure the AMOrder workflow as described in the Orders Setup Requirements.
 See Orders Setup Requirements for details.
Fee Generation - Domain Value
Add “EXECUTE” (or the appropriate action if your workflow has been customized) to the AutomaticFeesTradeEnricher.TradeAction domain to ensure that automatic fees are generated when trades are booked from order executions.
Analysis Designer - Benchmark Parameters
In the Benchmark parameters, check the "Orders" checkbox. This adds necessary "order" columns and icons to the Portfolio Workstation.
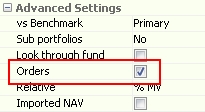
Columns are automatically added with specific suffix depending on the options selected in the Benchmark parameters.
See Benchmark Analysis for details on configuring a Benchmark analysis.
Ⓘ [NOTE: In order to generate FX orders from the Portfolio Workstation, at least one of the following columns must be included in the Trade Attributes of the Benchmark analysis parameter set: Currency, Trade Currency, or Product Currency]
Portfolio Workstation - Column Sets
Add "Command" columns to your column set. "Command" columns are identified with Edition Mode = Command.

See Portfolio Workstation for details on configuring and running analyses.
Portfolio Workstation - Orders Widget
Add the Orders widget to your column set and layout so that you can view the orders.
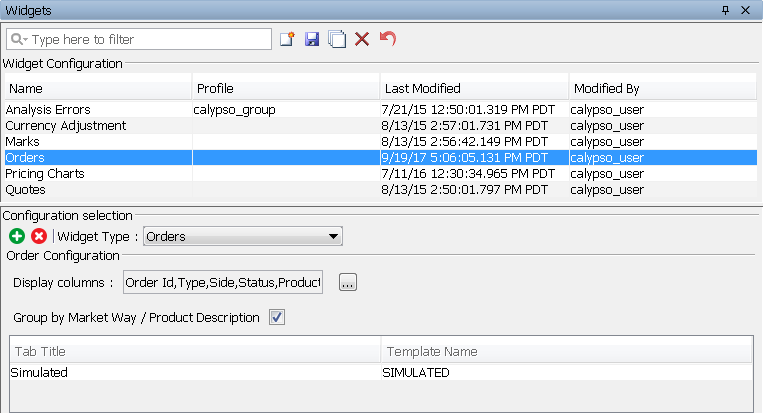
Select Widgets from the Configuration menu of the Portfolio Workstation to configure the Orders widget.
See Portfolio Workstation for general information on adding widgets to the Portfolio Workstation.
| » | Click |
| » | In the "Configuration selection" area, select Orders as the widget type. |
| » | Click ... and select the columns to be displayed in the widget. |
If you defined custom order attributes in the domain AMOrderAttributes, they will also be available for selection here.
| » | Check the "Group by Market Way / Product Description" checkbox to group the orders by direction (buy/sell) and product description for display in the Orders widget. |
| » | Click |
| » | Click in the Template Name column, then click New to create a new tab template. |
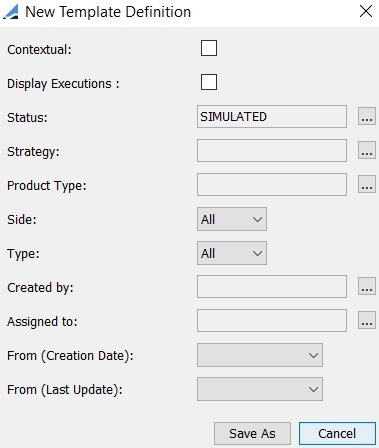
You can check "Contextual" to refresh the Orders widget based on the current selections in the Portfolio Workstation.
You can check "Display Executions" to view the execution orders. An Execution panel is added to the Orders Window.
Select order statuses, strategies, and product types as needed.
Select the sides (directions), types, and dates as needed.
Click Save As. You will be prompted to enter a template name. Then click Save.
Select a template and click OK.
| » | Click |
See Viewing Orders for information on viewing the generated orders.
Order Attributes Domain Values
You can add your own order attributes. The available custom order attributes are defined in the domain AMOrderAttributes. For an attribute to propagate from the order to the actual trade, you also need to add it to the tradeKeyword domain.
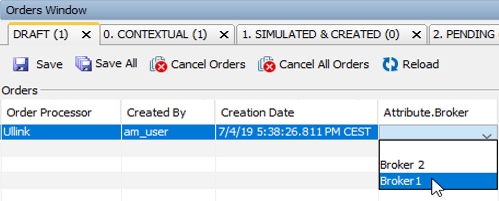
To modify an order attribute and apply options for it in the attribute field of the Orders window, you can add a keyword domain for it and create values.
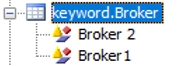
The values are then made available for the attribute in the Orders window.
2. Generating Orders based on Exposure
Once you have added "Command" columns to the Benchmark analysis, you can generate orders directly from the analysis.
You can quickly readjust a portfolio or invest in new instruments. It is not based on any investment rule.
The indicators on which the exposure can be computed are Market Value, Asset Value, CTMD (Contribution to Modified Duration), or Market Exposure.
Several supported scenarios are described.
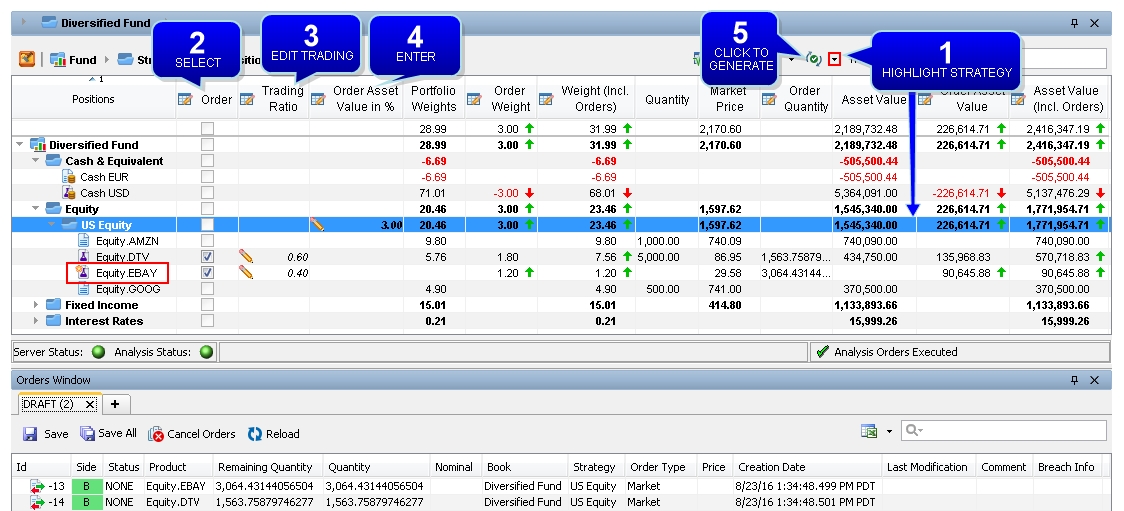
Fund Asset Value Increase
You can increase the asset value of the fund by investing in a selection of instruments.
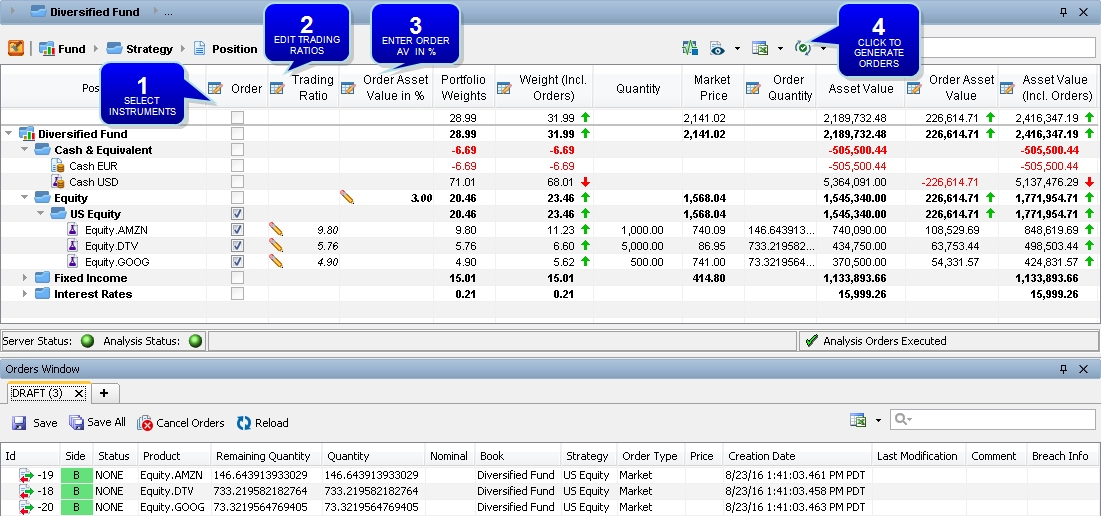
Ⓘ [NOTE: The columns of this picture have been renamed. When referred to by the name shown above, the original column name is also provided]
| » | Select the instruments on which you want to generate orders. |
| » | The Trading Ratios are automatically populated based on the Portfolio Weights (original column name: MV_BASE_REL), but you can edit them as needed. |
| » | Enter the Order Asset Value in % (original column name: Order MV_BASE in %) at the desired level. |
| » | Click |
Strategy & Criterion Asset Value Increase
You can increase the strategy or criterion asset value directly in the portfolio.
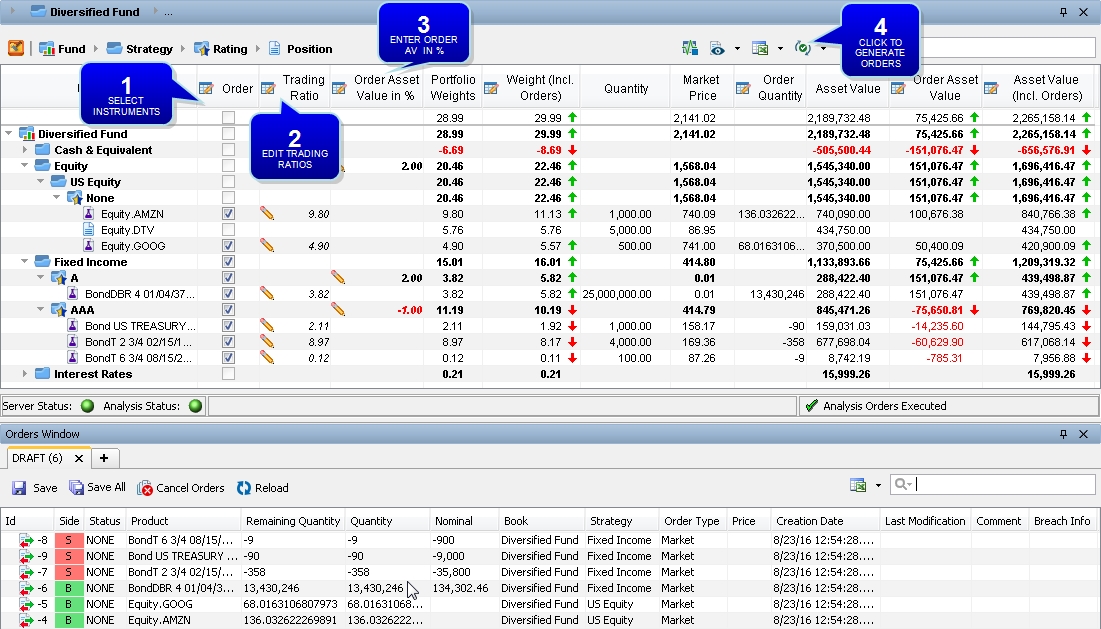
Ⓘ [NOTE: The columns of this picture have been renamed. When referred to by the name shown above, the original column name is also provided]
| » | Select the instruments on which you want to generate orders. |
| » | The Trading Ratios are automatically populated based on the Portfolio Weights (original column name: MV_BASE_REL), but you can edit them as needed. |
| » | Enter the Order Asset Value in % (original column name: Order MV_BASE in %) at the desired level. |
| » | Click |
Multi-Fund Asset Value Increase
You can increase the asset value of several funds at the same time by using a group of funds.
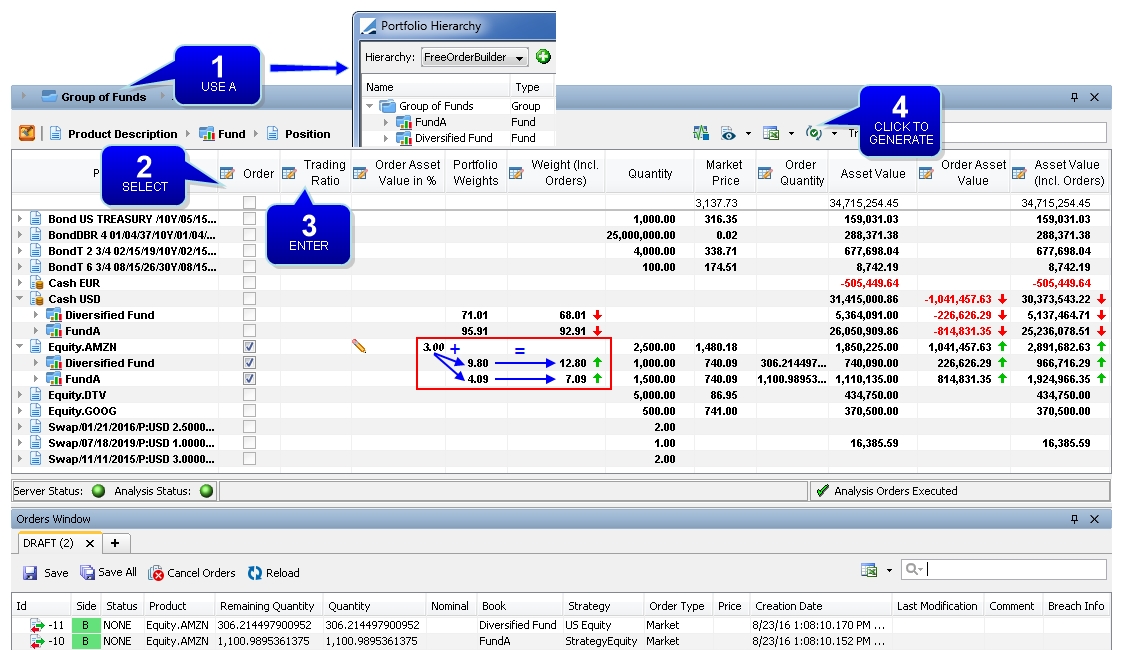
Ⓘ [NOTE: The columns of this picture have been renamed. When referred to by the name shown above, the original column name is also provided]
| » | In the Portfolio Hierarchy, you must have created a group of funds. |
| » | Select the instruments and funds on which you want to increase the exposure. |
| » | Enter the Order Asset Value in % (original column name: Order MV_BASE in %) at the desired level. |
| » | Click |
Asset Value Increase Using New Instruments
You can increase the exposure of a fund by investing in a new instrument.
Ⓘ [NOTE: The columns of this picture have been renamed. When referred to by the name shown above, the original column name is also provided]
| » | Highlight the strategy you want to add a new instrument to. Choose |
You can add a product using the Product Chooser (for listed products) or using the Pricing Sheet (for listed products and OTC products). For the Pricing Sheet, you will be prompted to select a product type and a product template.
| » | Select the instruments on which you want to increase the exposure. In the example shown above, a new instrument and an existing instrument are selected. |
| » | Enter the Trading Ratios. |
| » | Enter the Order Asset Value in % (original column name: Order MV_BASE in %) at the strategy level. |
| » | Click |
CTMD Increase
In a fixed income portfolio, you can generate orders by targeting a CTMD (Contribution to Modified Duration).
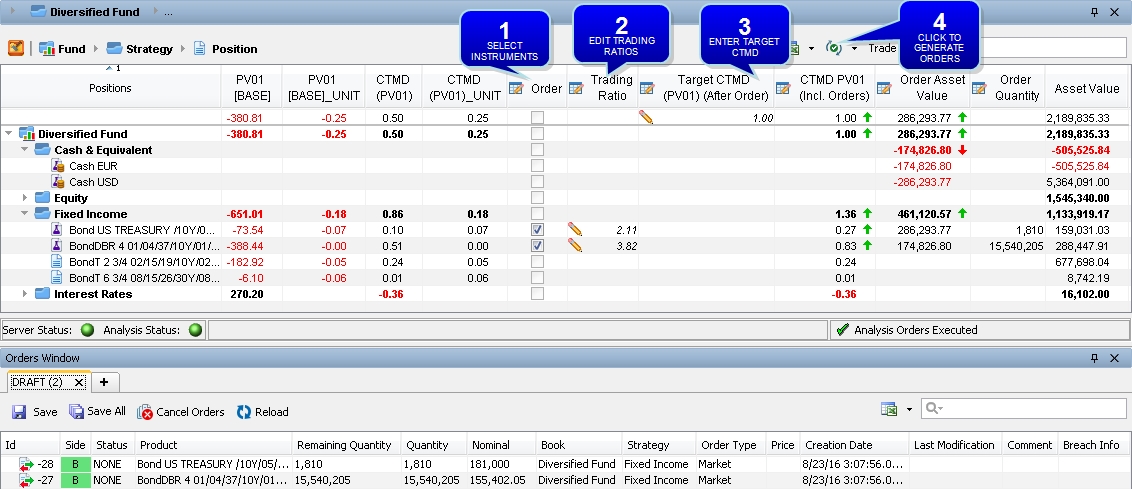
Ⓘ [NOTE: The columns of this picture have been renamed. When referred to by the name shown above, the original column name is also provided]
| » | Select the instruments on which you want to increase the duration of the fund. |
| » | The Trading Ratios are automatically populated based on the Portfolio Weights (original column name: MV_BASE_REL), but you can edit them as needed. |
| » | Enter the target CTMD at the fund level. |
| » | Click |
Grouping Asset Value Increase
You can increase the exposure of a grouping value across several strategies.
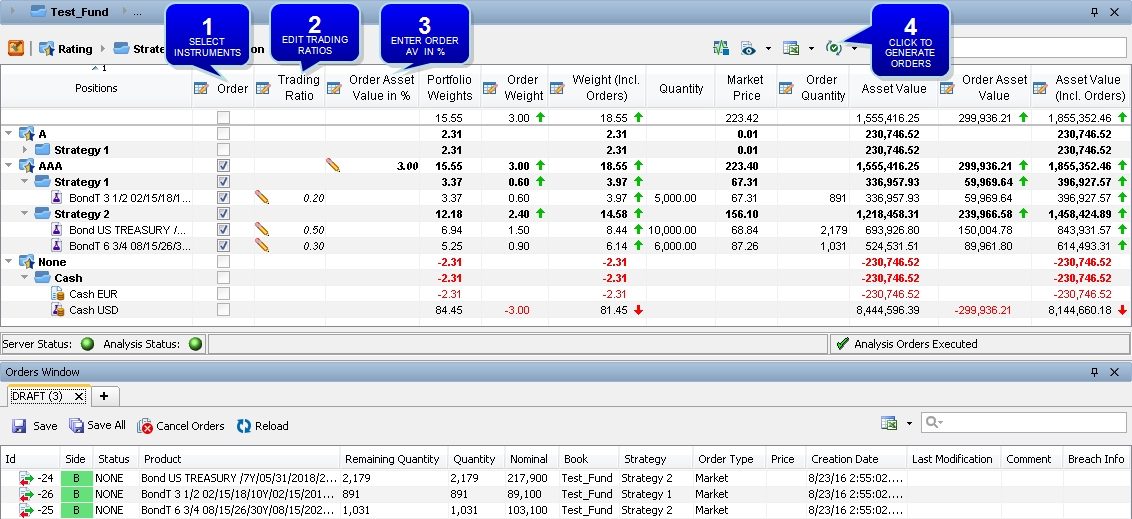
Ⓘ [NOTE: The columns of this picture have been renamed. When referred to by the name shown above, the original column name is also provided]
| » | Select the desired grouping at the grouping level. In the example shown above, the AAA rating grouping is selected. |
| » | The Trading Ratios are automatically populated based on the current weight of the products, but you can edit them as needed. |
| » | Enter the Order Asset Value in % (original column name: Order MV_BASE in %) at the grouping level. |
| » | Click |
Market Value Increase – Cash Simulation
You can simulate a cash transfer or withdrawal and see the impact on the portfolio.
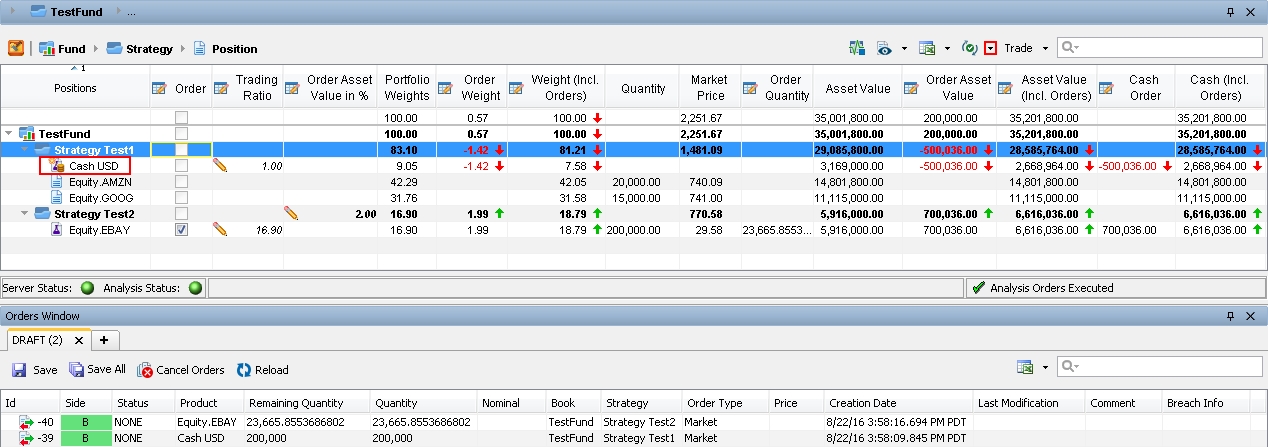
Ⓘ [NOTE: The columns of this picture have been renamed. When referred to by the name shown above, the original column name is also provided]
| » | Highlight a strategy. Choose |
| » | Enter the Cash Order amount (original column name: MV_SIM). An order is generated for the cash. In the example shown above, we entered 200,000, however the final result after the last step is shown. |
| » | Choose |
| » | Select the products/strategies on which you want to rebalance the portfolio. |
| » | The trading ratios are automatically populated based on the Portfolio Weights (original column name: MV_BASE_REL), but you can edit them as needed. |
| » | Enter the Order Asset Value in % (original column name: Order MV_BASE in %) at the desired level. |
| » | Click |
Cash Rebalancing – FX Order
You can rebalance your cash positions between currencies and/or between portfolios.
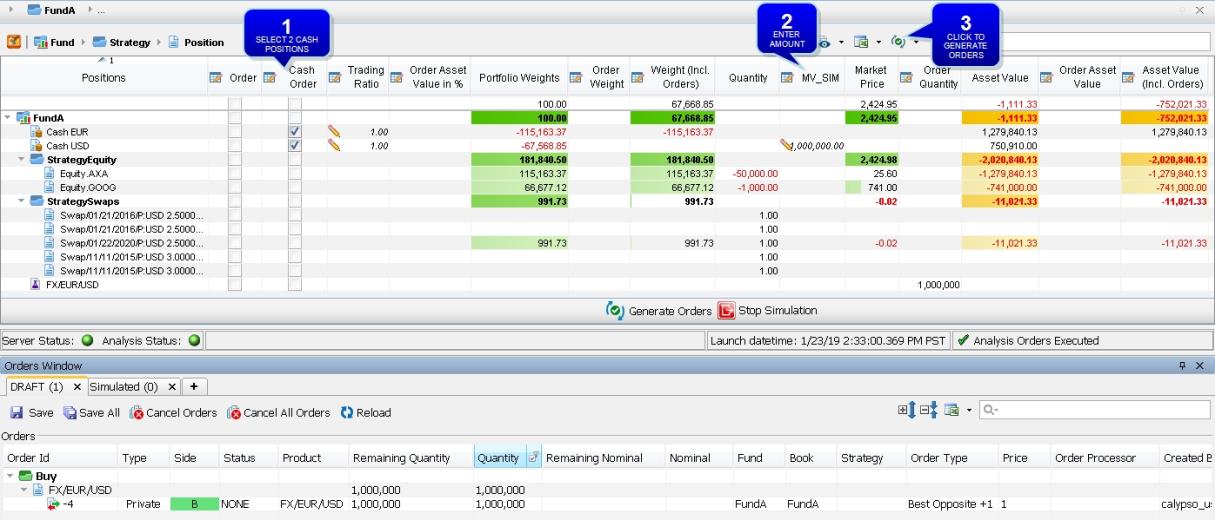
| » | In the Cash Order column, select the cash positions on which you want to perform a rebalancing. You must select exactly two cash positions, and they must be within the same strategy. |
To transfer cash between strategies, see Cash Transfer for details.
| » | Enter the desired amount on either one of the cash positions. The column MV_SIM should be used to size the FX order. |
| » | Click |
You can transfer cash between strategies within the same fund.
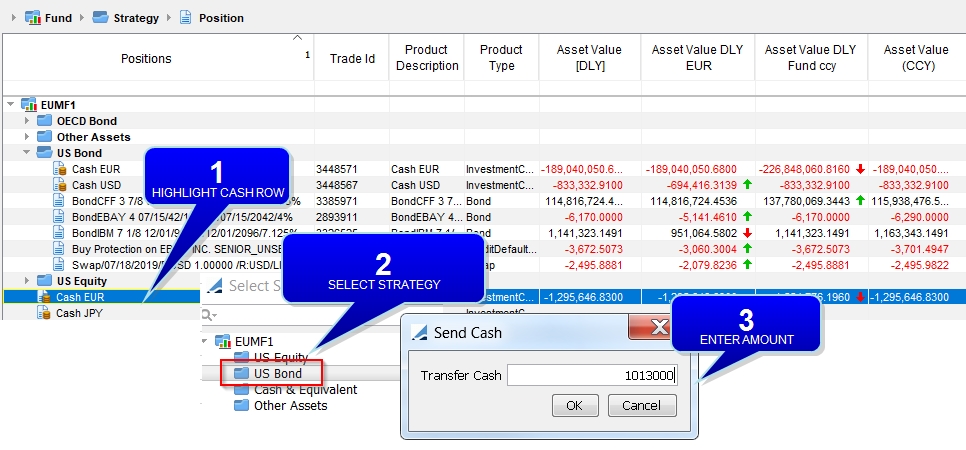
| » | Highlight the cash row from which you want to transfer cash. Right-click the row and choose Send Cash. |
| » | In the Select Strategy window, navigate to the strategy to receive the cash and click OK. |
| » | In the Send Cash window, enter the amount of cash to be transferred and click OK. |
The cash positions are updated accordingly, as shown in the example above - outlined in blue is the same analysis on the following day.
Two Simple Transfer trades of type PRINCIPAL are generated. If desired, you can specify a different transfer type in the domain value AMCashTransferSubType.

3. Generating Orders based on Targets
The modeling decision support tools allow you to rebalance a portfolio according to target weight or other target exposure, as defined in order models.
The general process is the following, assuming that the funds/strategies/hierarchies/etc. are already defined:
Step 1 – Define an order model or a trading basket.
Step 2 – Define an investment action and add it to the applicable column set.
Step 3 – Define investment rules.
Step 4 – Use the Order Generation panel in the Portfolio Workstation to apply the model using an investment action.
These steps are further described below.
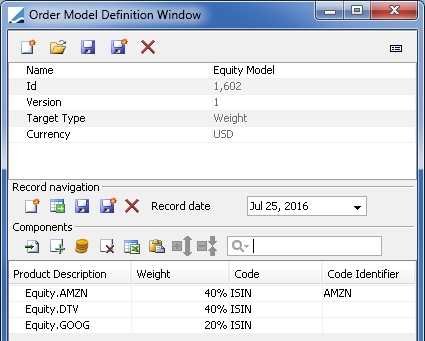
3.1 Defining Order Models
An order model can be used to rebalance a portfolio according to target weight or other target exposure.
From the Calypso Navigator, navigate to Configuration > Asset Management > Order Model Definition (menu action am.ordermangement.OrderModelWindow) to create an order model.
| » | To view an existing order model, click |
| » | To create a new order model, click |
| » | Add records as described below. Make sure that market quotes are set for the model instruments when using the model, as they may differ from those in the portfolio. |
| » | Click |
Fields Details
|
Fields |
Description |
|
Name |
The name of the order model. |
|
Id |
The order model is given a unique identifier by the system upon saving. |
|
Version |
Displays the version number of the order model. |
|
Target Type |
Select the target unit: Benchmark, Weight, Quantity, Market Value, or Nominal. |
|
Benchmark Grouping |
Only applies to Benchmark targets. Select the target benchmark. Benchmarks are created using Configuration > Asset Management > Benchmark from the Calypso Navigator.
You can also select a grouping criterion as needed. |
|
Currency |
Select the currency of the order model. |
Records Details – Benchmark Targets
The records area for benchmark targets is different from the other target types.

| » | Click |
| » | Then click |
You can adjust or nullify the weight of each component as needed.
| » | Click |
Repeat as needed to add more records.
| » | You can click |

| » | You can copy the components from an Excel spreadsheet and click |
Records Details – Non-benchmark Targets
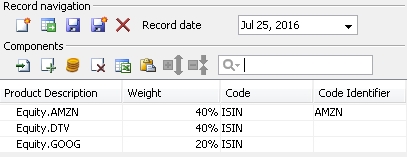
| » | Click |
| » | Then click |
Repeat as needed to add more components.
Adjust the weight, quantity, market value, or nominal of each component as needed.
| » | Click |
Repeat as needed to add more records.
| » | You can click |
The cash added is then available for selection as a component of InvestmentCash product.
| » | You can click |
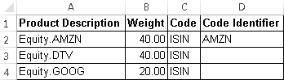
| » | You can copy the components from an Excel spreadsheet and click |
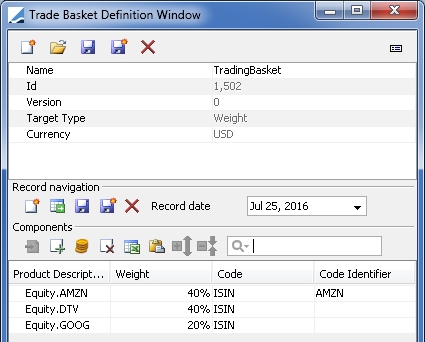
3.2 Defining Trading Baskets
A trading basket is a type of order model in which you define a basket of products that can be used for rebalancing.
From the Calypso Navigator, navigate to Configuration > Asset Management > Trading Basket Definition (menu action am.ordermangement.TradeBasketWindow) to create a trading basket.
| » | To view an existing trading basket, click |
| » | To create a new trading basket, click |
| » | Add records as described below. |
| » | Click |
Fields Details
|
Fields |
Description |
|
Name |
The name of the trading basket. |
|
Id |
The trading basket is given a unique identifier by the system upon saving. |
|
Version |
Displays the version number of the trading basket. |
|
Target Type |
Select the trading basket unit: Weight, Quantity, Market Value, or Nominal. |
|
Currency |
Select the currency of the trading basket. |
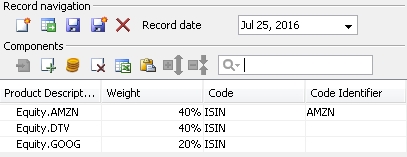
Records Details
The records area allows adding the products that can be used for rebalancing.
| » | Click |
| » | Then click |
Repeat as needed to add more components.
Adjust the weight, quantity, market value, or nominal of each component as needed.
| » | Click |
Repeat as needed to add more records.
| » | You can click |
The cash added is then available for selection as a component of InvestmentCash product.
| » | You can click |
| » | You can copy the components from an Excel spreadsheet and click |
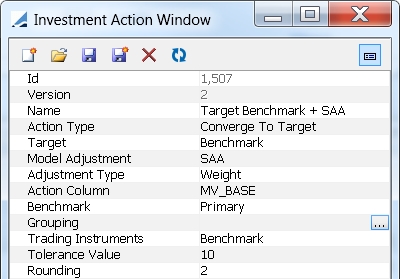
3.3 Defining Investment Actions
Investment actions are used to apply models to portfolios to rebalance them.
From the Calypso Navigator, navigate to Configuration > Asset Management > Investment Action Definition (menu action am.ordermangement.InvestmentActionDefinitionWindow) to create an investment action.
| » | To view an existing investment action, click |
| » | To create a new investment action, click |
| » | Click |
Upon saving an investment action:
| – | It is available for selection in the Investment Rules window. |
See Defining Investment Rules for details
| – | It is available for selection in the Column Sets window, which will add it to the Order Generation panel. |
See Column Sets for details.
Fields Details
|
Fields |
Description |
||||||||||||||||||||||||
|
Id |
The investment action is given a unique identifier by the system upon saving. |
||||||||||||||||||||||||
|
Version |
Displays the version number of the investment action. |
||||||||||||||||||||||||
|
Name |
The name of the investment action. |
||||||||||||||||||||||||
|
Action Type |
Select the action type: Converge To Model, Converge To Target, Invest All Cash, or Invest Cash. |
||||||||||||||||||||||||
|
Model Adjustment Adjustment Type |
Only applies to Converge To Model and Converge To Target + Benchmark. It allows reaching the defined strategic allocation while rebalancing the portfolios.
Ⓘ [NOTE: If using SAA or TAA, in the Benchmark analysis configuration you need to set the "Sub portfolios" parameter to "Both Portfolio and Sub Portfolio" and specify a level] |
||||||||||||||||||||||||
|
Action Column |
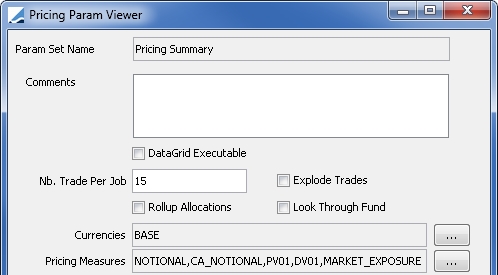
Select the column that will be stressed in order to reach the targets defined in the model. The potential columns available are:
Within this set of potential columns, the actual columns available are based on the pricing parameter sets of the configured Benchmark analyses. The configuration shown below will yield all potential columns.
Ⓘ [NOTE: You need to include "BASE" as a currency in the pricing parameter set in order to have the "[BASE]" values] |
||||||||||||||||||||||||
|
Target Benchmark |
Only applies to Converge To Target and Invest Cash.
SAA and TAA are specified in the Investment Rules window.
|
||||||||||||||||||||||||
|
Grouping |
Only applies to Converge To Model and Converge To Target + Benchmark. It allows applying the action to groupings, rather than individual items. Select a grouping criterion as needed. For Converge To Model, the order model selected in the Investment Rules window must have a compatible grouping. |
||||||||||||||||||||||||
|
Trading Instruments Trading Basket |
Select the instruments that will be used to rebalance the portfolio:
Trading baskets are created using Configuration > Asset Management > Trading Basket Definition from the Calypso Navigator.
|
||||||||||||||||||||||||
|
Tolerance Value |
You can define a threshold at which an order can be generated in order to avoid booking small orders. If the order "exposure" is below the tolerance, the order is not generated. |
||||||||||||||||||||||||
|
Rounding |
You can specify the decimals at which the order must be rounded. |
3.4 Defining Investment Rules
Before defining investment rules, you need to allocate strategies to funds or mandates.
See Defining Strategies for details.
From the Calypso Navigator, navigate to Configuration > Asset Management > Investment Rules (menu action am.InvestmentRuleFrame).
| » | Select a portfolio hierarchy. |
You can click ![]() to refresh the portfolio hierarchy list.
to refresh the portfolio hierarchy list.
| » | Select a fund or mandate from the portfolio hierarchy. |
| » | Select a strategy allocation. |
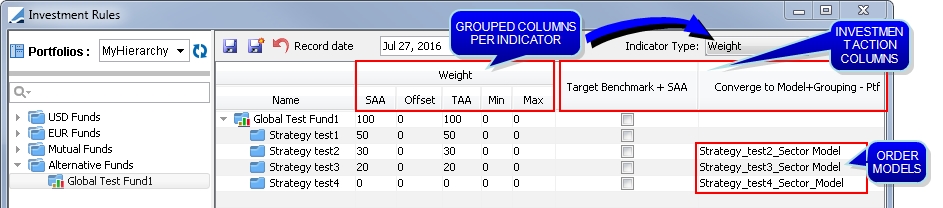
| » | Select the types of indicators that you want to set from the Indicator Type drop down. Grouped columns are displayed for each selected indicator type. |
Enter the following indicators for each type of indicator:
| – | SAA (Strategic Asset Allocation) |
| – | Offset |
| – | TAA (Tactical Asset Allocation): Sum of SAA and Offset |
| – | Min |
| – | Max |
| » | A column is displayed for each investment action, if any are defined. Investment actions are created using Configuration > Asset Management > Investment Action Definition from the Calypso Navigator. |
See Defining Investment Actions for details.
Make selections in each investment action column as needed. The benchmark or order model will provide the target values at the relevant strategy/fund levels when the investment action is applied.
| – | For Converge To Target actions, select the checkbox for each strategy/fund as needed. |
| – | For Converge To Model actions with no grouping, select an order model as needed. The order models with no grouping are available for selection. |
| – | For Converge To Model actions with a grouping, select an order model as needed. Only the order models with the same grouping as the investment action are available for selection. |
| » | Click |
| » | You can click |
3.5 Applying Models
Models are applied from the Order Generation window.
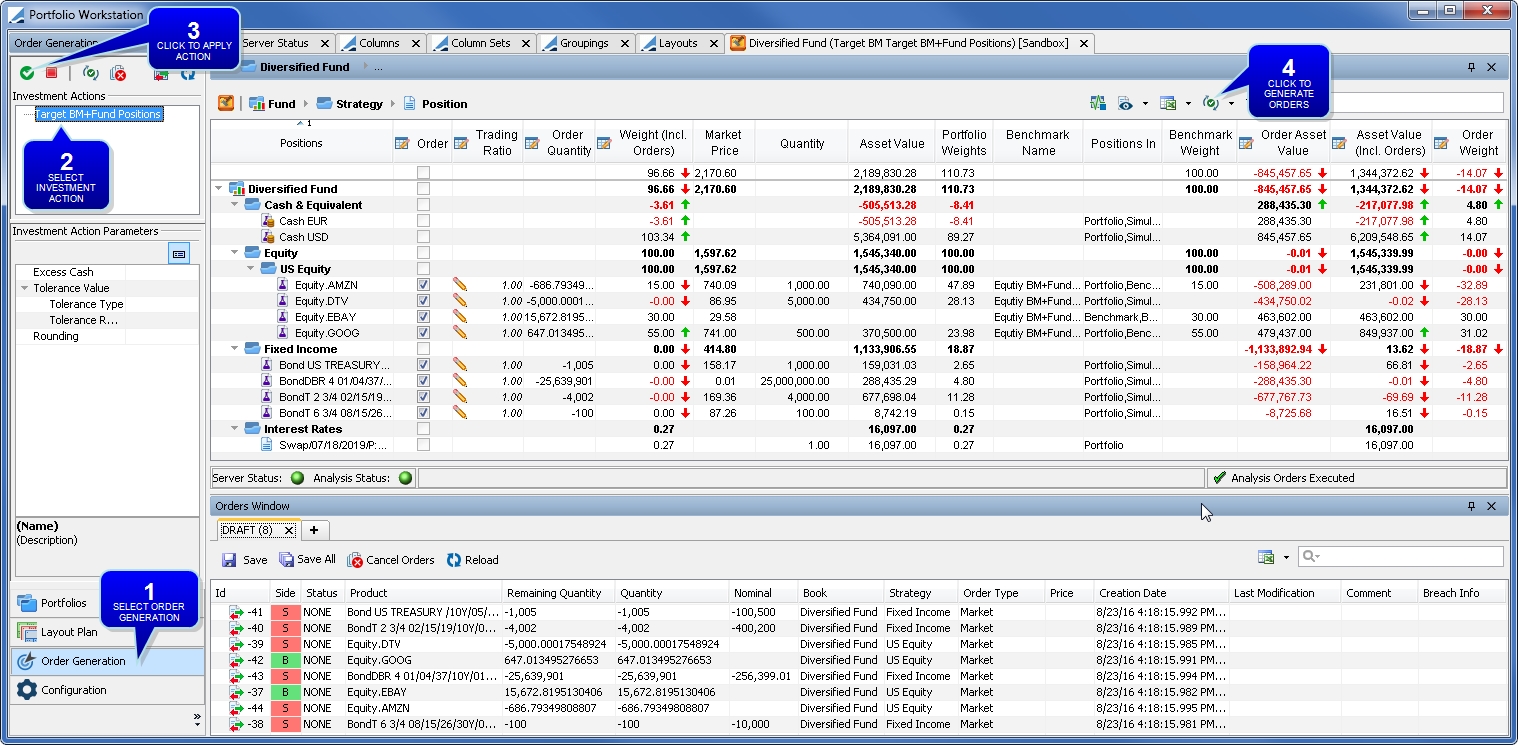
Ⓘ [NOTE: The columns of this picture have been renamed]
| » | Select Order Generation from the menu. |
| » | Select the investment action to be applied. |
| » | Click |
| » | Then click |
| » | The Investment Action Parameters area is not currently used. |
4. Viewing Orders
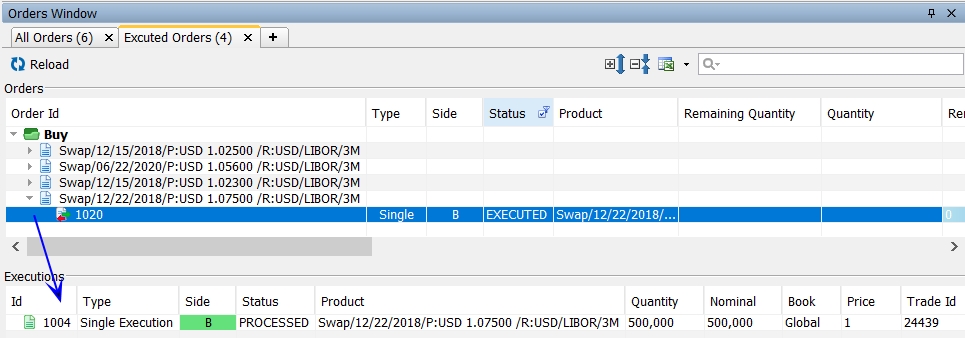
The Orders window appears in the Portfolio Workstation once you have configured the Orders widget.
The Orders window allows viewing orders generated from the Portfolio Workstation as well as orders generated from the Pricing Sheet.

By default the DRAFT tab is available. You can create new tabs as needed.
If you have selected "Display Executions" in the order widget template, the Executions panel is added to the Orders window.
4.1 Adding New Tabs
| » | You can click + to add a new tab. |
| » | Then select a tab template or click New to create a new tab template. |
Select order statuses, strategies, and product types as needed.
Select the sides (directions), types, and dates as needed.
Click Save As. You will be prompted to enter a template name. Then click Save.
| » | Click OK. You will be prompted to enter a tab name. Then click OK. |
4.2 Customizing the Column Display
You can customize the columns display in the Orders widget.
| » | Right-click any column heading and check/un-check the columns as desired. This can also be done from right-click > More. |
| » | You can drag columns to rearrange the order. |
| » | You can right-click and choose Reset to Default to restore the default columns display. |
4.3 Manipulating Orders
Orders follow the AMOrder workflow.
Saving DRAFT Orders
In the DRAFT panel, you can click Save to save selected orders or Save All to save all orders.
Orders will be moved to SIMULATED status.
Clearing Draft Orders
You can choose ![]() > Clear Orders to remove draft orders. This only applies to orders that have not yet been saved (Order Id = -1). Draft orders are only visible to the current user.
> Clear Orders to remove draft orders. This only applies to orders that have not yet been saved (Order Id = -1). Draft orders are only visible to the current user.
Assigning Orders
You can assign an order to another trader as defined in the trader domain.
| » | Select the desired order row(s). |
| » | Right-click and choose Assign Order from the popup menu. |
| » | Select the assignee from the drop down, and click Ok. |
Other users are able to view orders in any status other than DRAFT (assuming they have access permissions as needed). This is referred to as Sandbox Mode. The ![]() icon is added to the analysis to indicate Sandbox Mode.
icon is added to the analysis to indicate Sandbox Mode.

Viewing Orders in the Pricing Sheet
Right-click an order and choose Open Order to bring up the Order Sheet in the Pricing Sheet.
Applying Actions to Orders
You can apply actions to orders to promote them through the workflow: send them to the market, execute them, etc.
Right-click an order and choose Apply Action > <action>. The available actions depend on the current status of the order in the workflow.
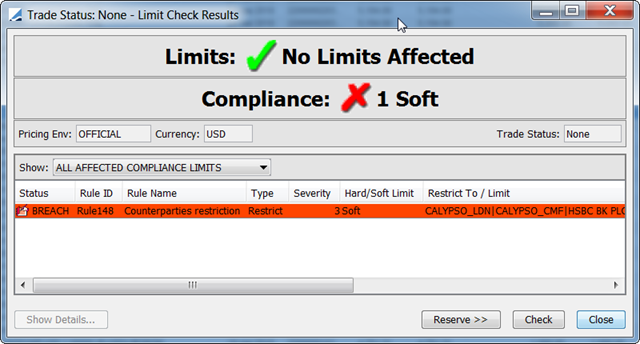
Checking for Limits and Compliance
Prior to checking for limits and compliance, you need to configure a compliance check workflow rule on the AMOrder workflow as described in the Orders Setup Requirements.
See Limits & Compliance Checks for details.
Ⓘ [NOTE: You can only use a Benchmark analysis to check for compliance on orders, and the Benchmark analysis can use a Pricing or Sensitivity parameter on both trades and orders]
Please refer to Calypso Limits & Compliance documentation for details on specifying rules and running the Compliance services.
You can select an order and click Check Compliance to check for compliance.
5. Viewing the Order Report
You can view orders and their executions in the Order report, which is available from the Calypso Navigator by selecting Reports > Cross-Asset Reports > Order Report.
See Order Report for details.
6. Viewing the Order Analysis
You can view orders and their executions in the Order analysis.
See Order Analysis for details.
7. Archiving Orders
You can archive orders and their executions.
See Orders Archiving for details.