Generating Orders from the Pricing Sheet
Prior to generating orders from the Pricing Sheet, you need to configure the AMOrder workflow and the OrderBundle workflow as described in the Orders Setup Requirements.
 See Orders Setup Requirements for details.
You also need to define a Pricing Sheet profile as described in the Calypso Pricing Sheet Setup documentation.
Click Pricing Sheet in the Calypso Navigator to bring up the Pricing Sheet (menu action pricingSheet.PricingSheetWindow).
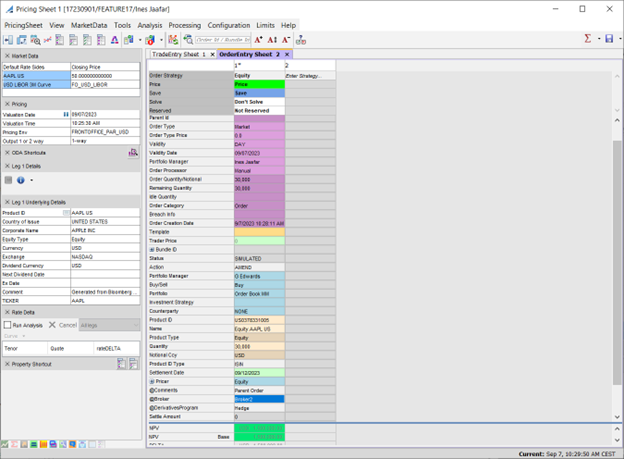
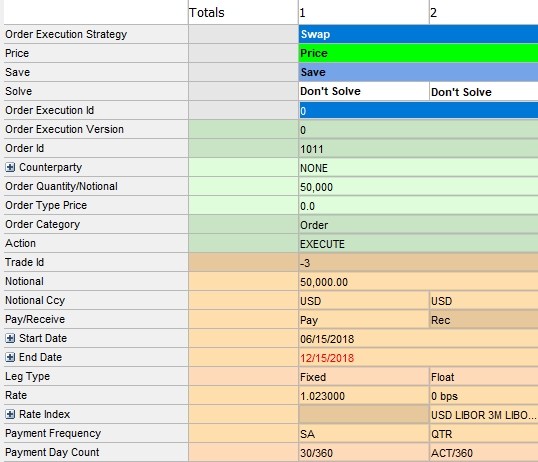
1. Entering a Single Order
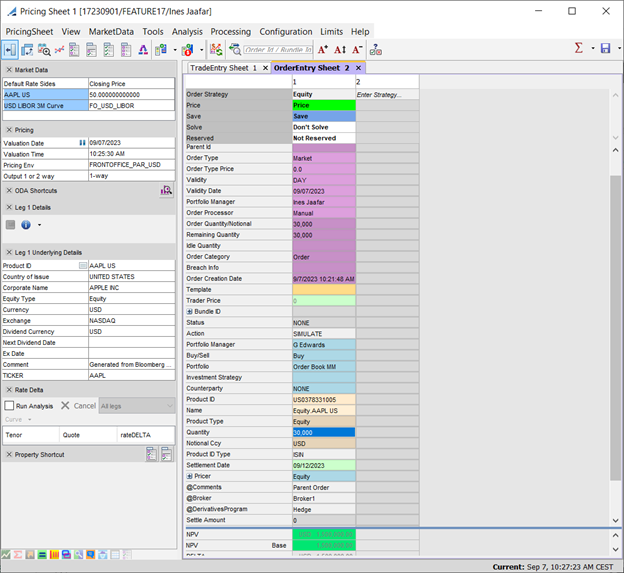
Choose Pricing Sheet > New Order Sheet for opening an Order Sheet.
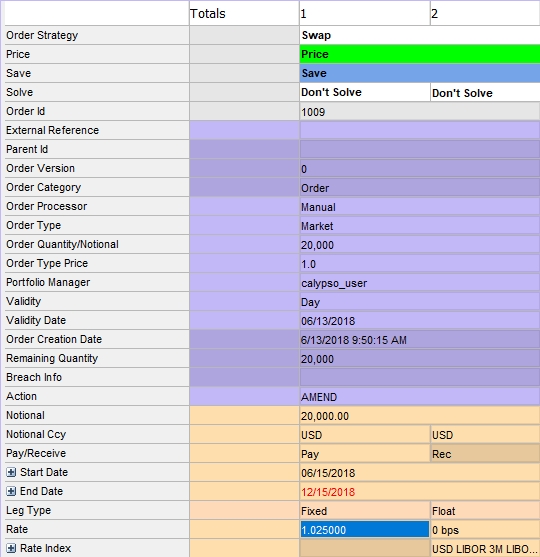
| » | Select a strategy and enter the fields as needed. |
Please refer to the Calypso Pricing Sheet User Guide for information on strategy fields.
A number of fields are specific to orders - They are described below.
You can also right-click and select Supplemental to access additional details panels which vary based on the type of product.
| » | Save the order when you are done. |
Single orders follow the AMOrder workflow.
Orders within a custom strategy are linked and managed as an Order Bundle, similar to a Trade Bundle, and they follow the OrderBundle workflow.
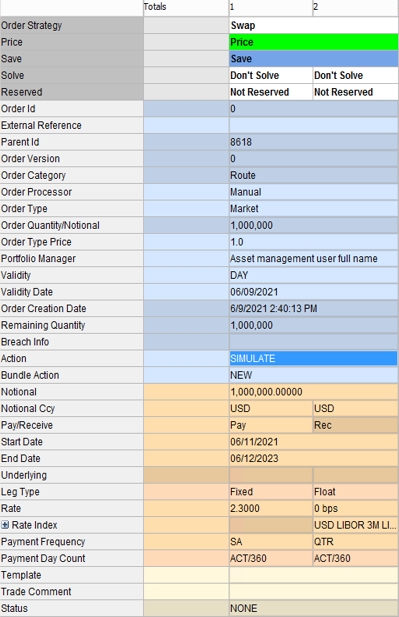
Order Fields
|
Fields |
Description |
|---|---|
|
Order Id |
Order id given by the system upon saving. |
|
Order Version |
Version number given by the system upon saving. |
|
Order Category |
Set to Order for a standard order, or Block for a block order.
|
|
Order Processor |
Select Manual. |
|
Order Type |
Select the order type: Market, Limit, Stop, Stop Limit, etc. |
|
Order Quantity / Notional |
Enter the order quantity or notional. |
|
Order Type Price |
Enter the stop price or limit price for Stop and Limit orders. |
|
Portfolio Manager |
Select the portfolio manager user. |
|
Validity |
Select the validity timeframe of the order: Day, gtc (valid until canceled), gtd (valid until a given date). |
|
Validity Date |
The validity date is set to the current date for Day validity. For gtd validity, enter the validity date or tenor. |
|
Order Creation Date |
Order creation date given by the system. |
Order Attributes Domain Values
You can add your own order attributes. The available custom order attributes are defined in the domains AMOrderAttributes. For an attribute to propagate from the order to the actual trade, you also need to add it to the tradeKeyword domain.
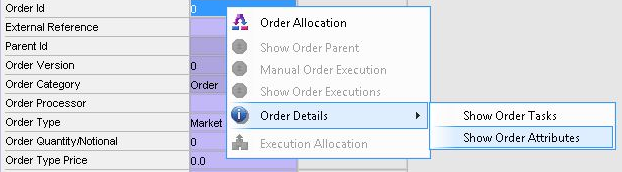
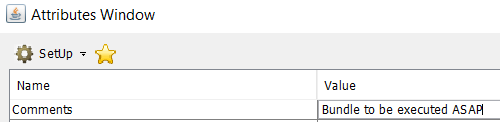
Order attributes are accessed from the Order Sheet by right-clicking anywhere in the strategy leg properties. This displays the allocation and details menu where you can select Order Details > Show Order Attributes to open the Order Attributes window.
To modify an order attribute and apply options for it in the Value field of the Order Attributes window, you can add a keyword domain for it and create values.
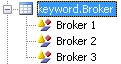
The values are then made available for the attribute in the Order Attributes window.

Trader Name Attribute
By default, the trader_name column of the decsupp_order database table it is set to the current user. It is possible to be able to modify the value and use this column to identify the person executing the order, similar to the Trader field in other Calypso trade windows. The PortfolioManager order attribute, if it exists, is mapped to the trader_name database column.
See "Order Attributes Domain Values" above for details on using custom order attributes.
To enable trader name selection, you need to add several domain values.
| » | Add the value "PortfolioManager" to the AMOrderAttributes and/or OrderBundleAttributes domains as needed. |
| » | Add the value "keyword.PortfolioManager" to the domainName domain. |
| » | Add the possible trader names as values to the keyword.PortfolioManager domain. The values should all be actual Calypso users defined in the system. |
The values are then made available for the PortfolioManager attribute in the Order Attributes window.
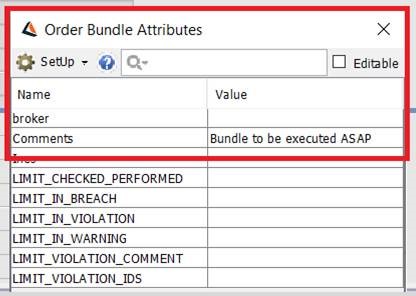
Bundle Attributes
You can display the bundle attributes in the order bundle attributes, provided they have the same name.
So if you have defined an attribute in the bundle attributes (TradeBundleAttributes domain), you can add the exact same attribute to the “OrderBundleAttributes” domain and its value from the bundle will be displayed in the Order Bundle Attributes.
Example:
Bundle Attribute:
Order Bundle Attribute:
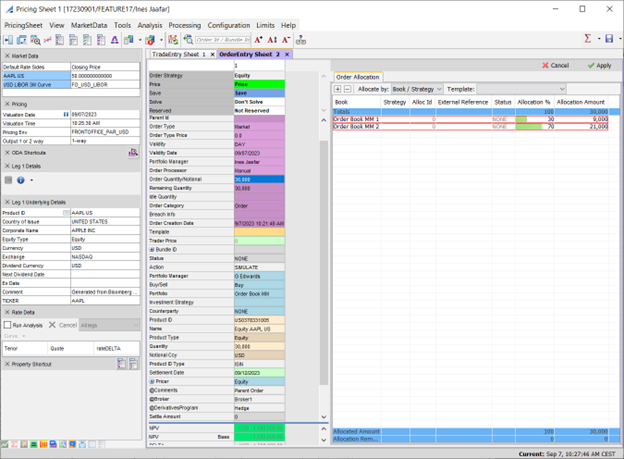
2. Entering a Block Order
Choose Pricing Sheet > New Order Sheet for opening an Order Sheet.
| » | Select a strategy and enter the fields as described above. |
See Order Allocation below for details.
| » | Save the order when you are done. |
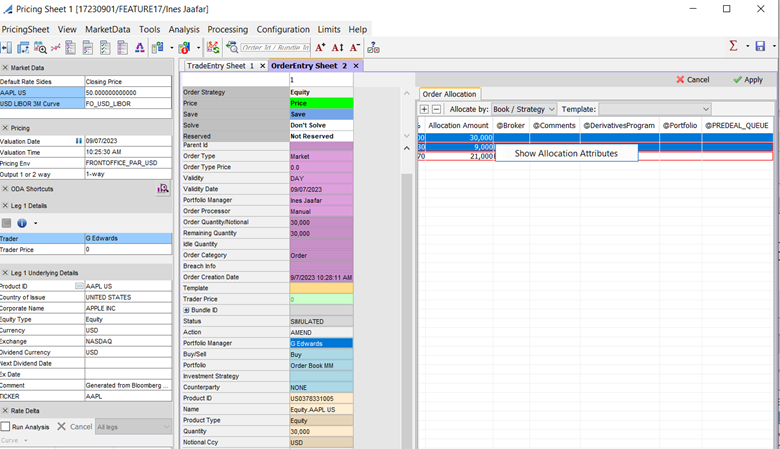
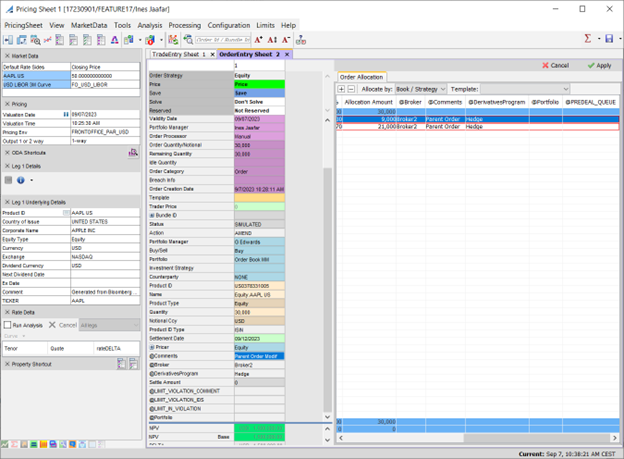
Order Allocation
| » | Click |
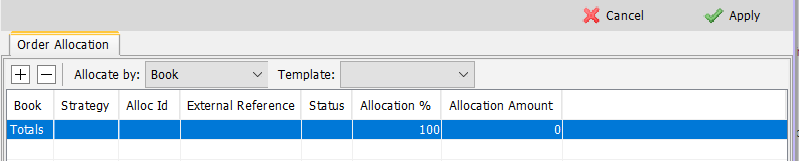
You can pre-allocate block orders by Book or by Book / Strategy. Allocation by Legal Entity is not currently supported for block orders.
| » | Select the allocation method and a template, or choose "Add a template" from the Template field to create a new template. |
You can also add allocation rows manually.
| » | Click Apply when you are done. |
Calypso dynamically generates “Child Orders” as allocations. Each allocation have its own unique identifier that is used as a reference, to handle the modification of allocations in post-allocation process. It is also used to track each allocation from order inception to cancel/correction, audit.
We will no longer generate order_id as the allocations are no more modeled as orders. The order_id is no more used and is replaced by new Alloc_id that belongs to the new allocation model.
Allocations attributes
Each allocation has its own attributes same as for child order. When creating an order, the attributes defined at the parent level is copied automatically into the allocations, by default. Any modification of the attributes at the parent level is copied to the allocation. We can add or modify attributes per allocation as required.
Adding allocation and its attributes
While adding, the attributes defined at the order is to the allocations automatically. But during this process, user cannot access to the attributes per allocation in the Allocation panel. Only the Order attributes can be populated by the user. This behavior is same as the existing one and consistent with the Block Trade as well.
For creating the allocations and its attribute, follow the below steps.
Adding:
After saving:

The list of attributes can also be accessible from the Attribute screen.
Modifying / Accessing the attributes per allocation
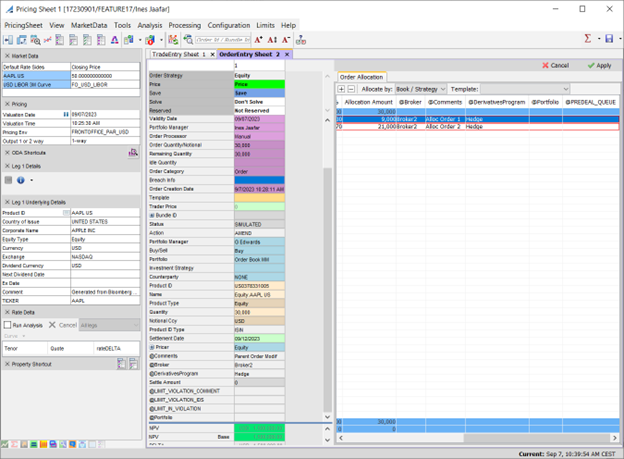
Once the Order and allocations are created and IDs are generated, it is possible to access to the attributes per allocation. As mentioned earlier, each allocation have its own attributes and it can be accessed via allocation panel. After selecting an allocation line, right-clicking on it allows you to access the attributes of each allocations.
For example, modifying Broker from the parent order:
After the save all the allocations have the same value:
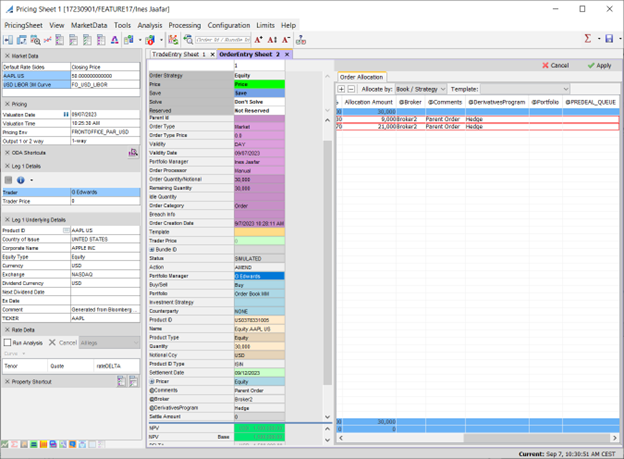
The Attributes can be modified in the Order/Allocation attributes screen.
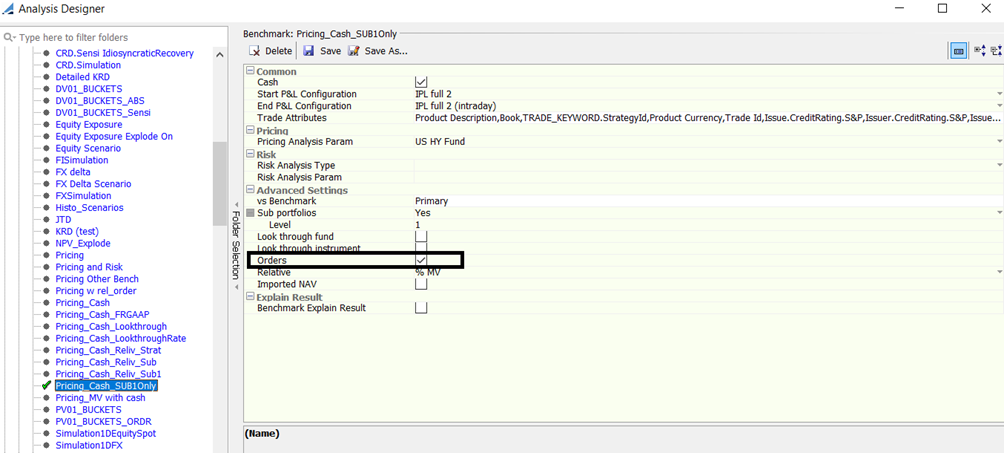
2.1 Impact on Benchmark Analysis
Allocations are in the benchmark analysis when ‘Orders’ are enabled in the analysis.
The hierarchy view is created in the benchmark analysis with new grouping definition. The ‘Open’ action is used to open the whole block order.
The manual order generation or the automatic order generation on block order are based on the new framework. The private Block generated refers to the order which handle the allocations.
The order generation as well as decision order support can generate block orders that need to use the new framework and impact the draft mode.
2.2 Impact on Order Widget
Since Assign Order is no longer used, workflow action on allocation cannot be applied. Open the Block Order, if the user use the Open Order on any allocation. Since, the allocations are no more orders so no more order_id is generated, instead allocation ID is generated.
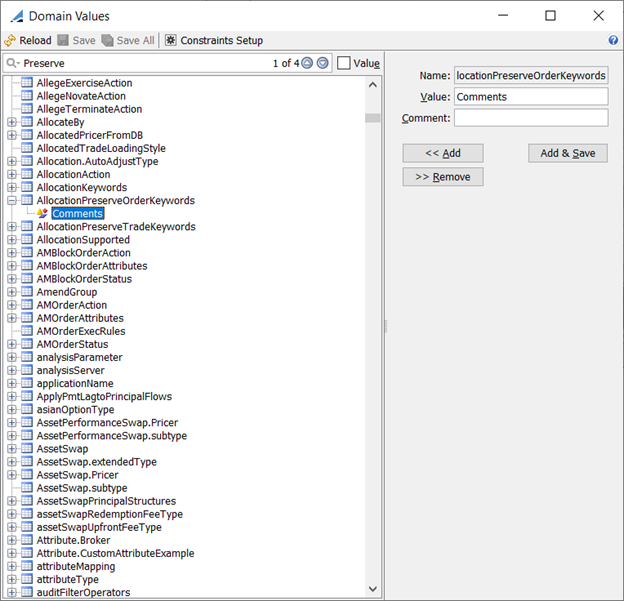
2.3 Domain “AllocationPreserveOrderKeyword”
The new domain value AllocationPreserveOrderKeyword is similar to the AllocationPreserveTradeKeyword. The keyword defined in this domain value will not be impacted by any modification on the parent level.
Examples of Order created with keyword values as follows.
Initial value:

Modification of the comment attribute at the parent level, but there is no impact in the allocations:
Modification on the allocations:
3. Executing an Order or a Block Order
Once an order / block order is in status SENT, you can right-click the order in the Pricing Sheet and select Manual Order Execution.
It opens the Execution Order Sheet where you can complete the order details as needed and save the order.
You can also modify the order quantity / notional to perform a partial execution.
For a block order, it creates the allocated trades in addition to the execution order trade.
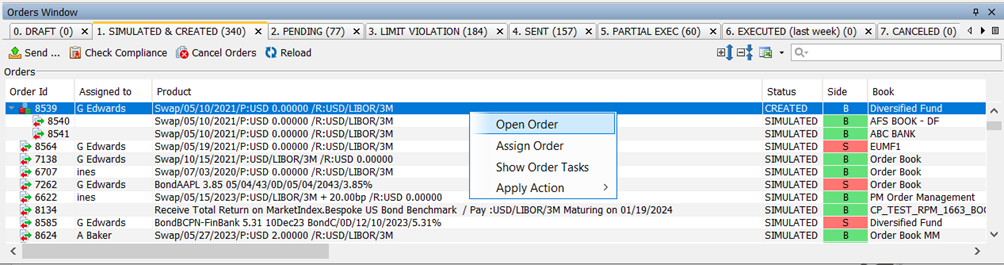
You can view orders and their executions in the Orders Window in the Portfolio Workstation.
See Viewing Orders for details.
You can also view orders and their executions in the Order report, which is available from the Calypso Navigator by selecting Reports > Cross-Asset Reports > Order Report.
See Order Report for details.
You can also view orders and their executions in the Order analysis.
See Order Analysis for details.
You can archive orders and their executions.
See Orders Archiving for details.
4. Routing Orders
Using the AMOrder workflow, you can fully or partially route orders to external systems such as Bloomberg, FXall, or Tradeweb.
In Calypso, the parent order is called a “Routed Order” and the child order is called a “Route”.
When a Route is fully or partially executed, the remaining quantity of the parent Routed Order is updated and its status is passed to EXECUTED or PARTIAL_EXEC, depending on the remaining quantity. The Routed Order can only pass to EXECUTED when the remaining quantity is 0.
4.1 Workflow Configuration
See Sample AMOrder Configuration with Order Routing for a sample workflow configuration.
Static Data Filter
You can use the "AMOrder.is a Route" criterion to create static data filters as needed for handling routing.
Workflow Rules
The following workflow rules can be used in the AMOrder workflow for order routing, in addition to all of the standard workflow rules:
| • | ExecuteRoutedOrderAndUpdateRemainingQty – Applies the EXECUTE or PARTIAL_EXEC action to the Routed Order and updates its remaining quantity. |
| • | RouteAndUpdateIdleQty – Applies the ROUTE action, and updates the status and idle quantity on the Routed Order. |
| • | CheckNoExecutionsAndNoActiveRoutes – Checks that no Route is open and no Execution is applied. |
| • | UpdateIdleQtyWhenClosingRoute – Updates the idle quantity on the Routed Order. |
| • | UdateFullyExecutedOrderQty – Updates the order quantity and remaining quantity. This rule is meant to be used along with CheckKickOff rule, but can be used independently. |
| • | CheckKickOff – Routed Orders and Routes can be expired using the CheckKickOff rule. |
 See "Expiring Orders" below for details.
4.2 Routing the Order
Once an order is in status SENT, you can right-click the order in the Pricing Sheet and select Route Order.
It opens the Routed Entry Sheet where you can complete the order details as needed and save the Route.
You can also modify the order quantity / notional to perform a partial routing.
Once you save the Route and apply the action SEND, the Routed Order (parent) is updated with the Idle Quantity as 0 for a full routing, or with the remaining amount for a partial routing.
You can right-click a Routed Order and select Show Routes to see the associated Routes (child orders).
You can right-click a Route and select Show Parent Order to see the associated Routed Order.
You can include Routes in the Order analysis.
See Order Analysis for details.
5. Expiring Orders
It is possible to expire orders based on Time In Force (TIF) values. Expired orders cannot be modified or routed, and they will not be taken into account by Limits & Compliance rules.
5.1 Workflow Configuration
The following workflow configuration is recommended for using the TIF functionality.
Please refer to Calypso Workflow documentation for complete details on workflow configuration.
Workflow Transitions
The following workflow transitions are set on the AMOrder workflows.
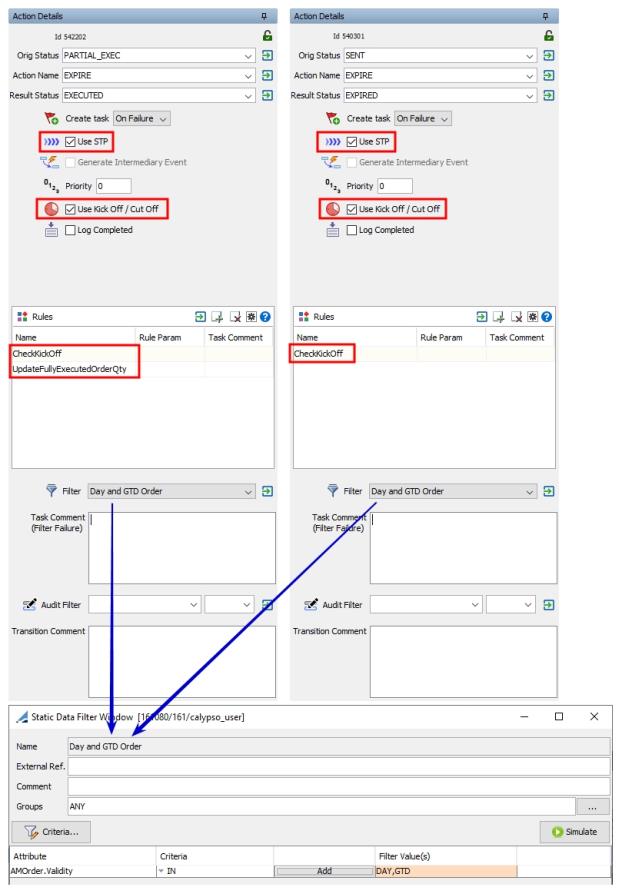
| » | Use STP is mandatory. |
| » | Use Kick Off / Cut Off is mandatory. |
| » | The static data filter must specify your desired validity types. |
Workflow Rules
The following workflow rules are used in at least one of the workflow transitions described above.
| • | CheckKickOff – TRUE if the current time is after Task Kick Off time, or FALSE otherwise. |
| • | UpdateFullyExecutedOrderQty – Updates the order quantity and remaining quantity. This rule is meant to be used along with CheckKickOff rule, but can be used independently. |
If an order expiring today is partially executed at end of day, the order is updated with the new notional as the executed amount and the status as fully executed. The non-executed amount is canceled.
Example: A $500M DAY order is made, $300M is executed, and the ORDER status as of day's end is PARTIAL_EXEC. The outstanding balance ($200M) is canceled, and the original order stays with the partially executed order which is now fully executed.
Kick Off Configuration
Identical kick off configurations as shown below are set on each of the workflow transitions described above.
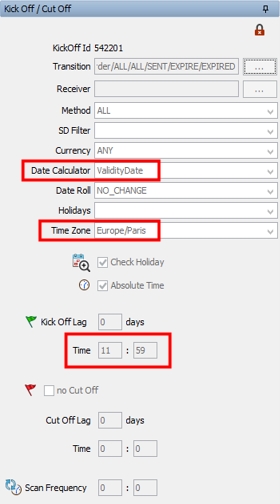
| » | The Date Calculator must be set to "ValidityDate". |
| » | A Kick Off time must be set. It is based on the selected time zone. |
5.2 Time In Force Values
TIF values are only able to be set in the Pricing Sheet, using the Validity and Validity Date fields.
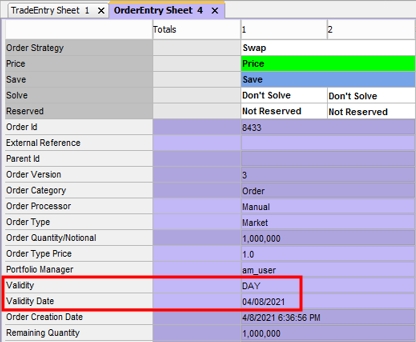
| • | Validity – Select the validity type: |
| – | DAY: A DAY order will be expired if it is not executed by the close of the trading day. It expires at end of day. |
| – | GTD: A GTD (Good-Till-Date) order will remain open in Calypso until executed or until the end of day of the Validity Date associated with it. |
| – | GTC: A GTC (Good-Till-Canceled) order will remain open in Calypso and in the marketplace until executed or canceled. |
| • | Validity Date – Enter the date or tenor until which the order is valid. Varies by validity type: |
| – | DAY: The Validity Date is always the current date. |
| – | GTD: The Validity Date can be any future date. |
| – | GTC: The Validity Date is always empty. |
5.3 Order Expiration
The Task engine runs the EOD task to expire orders based on the TIF values.
Please refer to Calypso Workflow documentation for details on running the Task engine.
5.4 Order Expiration Reporting
You can use the Order analysis to report on expired orders, orders expiring tomorrow, orders expiring on a specific date, etc.
See Order Analysis for details.