Capturing FX Option Trades
Before capturing FX Option trades in the Pricing Sheet, the following market data items are required:
| • | Spot rate |
| • | Vol surface |
| • | Two interest curves, or, one interest curve + one FX Fwd curve |
To capture an FX Option trade in the Pricing Sheet, select an FX Option strategy and set the properties as needed. You can also select a strategy template to populate default values.
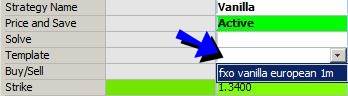
Sample Strategy and Template selection
The following categories of properties are common to all types of strategies:
| • | Trade properties |
| • | Product Amount properties |
| • | Market Data properties |
| • | Solver properties |
| • | Dealt Data properties |
| • | Keyword properties |
| • | Pricer properties |
 See Strategy Properties for details.
Properties specific to FX Options are described below.
Contents
- Volatility Forward Strategies
- FX Target Redemption Forwards
- Inverting Quanto and Flexo Settled Strategies
- Volatility and Variance Swaps Strategies
- Volatility and Variance Options Strategies
1. Vanilla Strategies
This also applies to Butterfly, Condor, Reversal, Spread, Straddle, and Strangle strategies.
Properties
Product Type - Constants - Ccy Pair - Notional Ccy - Settle Ccy - Quanto Ccy Pair - Quanto Factor - Buy/Sell - Put/Call - Ccy2 Put/Call - Exercise Type - Settle Type - Location - Allocated - Strike - Strike % itmf - Strike Inverse - Settlement Source
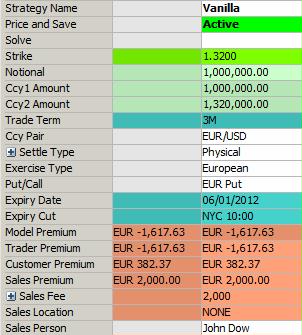
Sample Vanilla FX Option
"Trade" Properties
| Properties | Description |
|---|---|
| Customer Pay/Rec |
The values available for this property are “Customer Pays” and “Customer Receives.” The value is driven by the sign of the Customer Premium: negative populates “Customer Receives” while positive populates “Customer Pays.” In the case where multiple options with different directions are open in the same pricing sheet, the property helps keeping track of pay and receive obligations with customers. |
"Product: Style" Properties
| Properties | Description | ||||||||||||||||||
|---|---|---|---|---|---|---|---|---|---|---|---|---|---|---|---|---|---|---|---|
| Product Type |
Displays the product type based on the selected strategy. |
||||||||||||||||||
|
Constants |
Displays any value used in solving that is entered manually like Strike, etc. |
||||||||||||||||||
|
Ccy Pair |
Displays the default currency pair if any. The default currency pair is set in Configuration > User Preferences. You can select another currency pair as needed. |
||||||||||||||||||
|
Notional Ccy |
Select the currency of the notional. In a Digital or Digital with Barrier, Notional Ccy = Settle Ccy. |
||||||||||||||||||
| Settle Ccy |
Select the settlement currency for cash trades and self-quanto trades:
|
||||||||||||||||||
| Quanto Ccy Pair |
Only applies to "Self Quanto" or "Quanto" set as a Settle Type. Displays the currency pair used in the Quanto. This is Settlement Ccy/Secondary Ccy in the defined currency pair. The currency pair is defined in the Calypso Navigator under Configuration > Definitions > Currency Definitions.... |
||||||||||||||||||
| Quanto Factor |
Only applies to "Self Quanto" or "Quanto" set as a Settle Type. Not available with Digital and Digital with Barrier strategies. Enter the rate between the quoting currency and the primary currency if the settlement currency is the primary currency. You can enter "k" to populate it with the strike rate, "s" for spot rate, or enter a fixed rate. The trade keyword "QuantoSource" will be populated accordingly. |
||||||||||||||||||
| Flexo FX Source |
Only applies to the "Flexo" Settle Type. Choose the FX rate source for Flexo type trades. |
||||||||||||||||||
|
Buy/Sell |
Select the direction of the trade: Buy or Sell. |
||||||||||||||||||
| Put/Call |
Enter / displays the option direction for the primary currency. |
||||||||||||||||||
| Ccy2 Put/Call |
Displays / enter the option direction for the quoting currency. |
||||||||||||||||||
| Exercise Type |
Select the exercise type:
|
||||||||||||||||||
| Settle Type |
Select the settlement type at exercise. The application may automatically select it based on the product type.
|
||||||||||||||||||
| Location |
Select the location for commodities. |
||||||||||||||||||
| Allocated |
Refers to physical Precious Metal trades. Displays allocated/unallocated metal status. This field has no connection to the ALLOCATE trade status. |
"Product: Rate" Properties
| Properties | Description | ||||||||||||||||||||||||||||||
|---|---|---|---|---|---|---|---|---|---|---|---|---|---|---|---|---|---|---|---|---|---|---|---|---|---|---|---|---|---|---|---|
| Strike |
Enter the strike. The following FX Delta shortcuts are also available. Add the shortcut to the Strike property field and press Enter.
Rounding Any system generated strike (solver, shortcut entry) will respect the currency pair rounding settings. If the user manually enters a strike, it will only be rounded based on the constraints of the currency rounding of the amounts that the strike generates. Example: Ccy1 amount is 10,000.00 and a strike is entered as 1.234567.
The shortcut used will not be persisted if the trade is saved. EX: Entering "atms" in this field will calculate the at-the-money-strike and will appear as "<strike value> [atms] when pricing. If the trade is saved, the value is saved, but the shortcut used will not be saved. |
||||||||||||||||||||||||||||||
| Strike % itmf |
Displays the percentage of strike with respect to "in-the-money" forward: [(FX Fwd - Strike)/ FX Fwd]*100. |
||||||||||||||||||||||||||||||
| Strike Inverse |
Displays 1/Strike for an inverted trade. |
||||||||||||||||||||||||||||||
| Settlement Source |
Select an FX Rate Definition to fix the FX rates for cash settled trades. FX Rate Definitions are configured from the Calypso Navigator using Configuration > Foreign Exchange > FX Rate Definitions. |
||||||||||||||||||||||||||||||
| Reset Date |
Only applies to Physical NDF settle type. Displays "Delivery Date - Number of lag days defined in the FX Rate Definition". It is based on the FX Rate Definition selected in Settlement Source. You can modify as needed. |
"Date" Properties
| Properties | Description | ||||||||||||
|---|---|---|---|---|---|---|---|---|---|---|---|---|---|
| Trade FX Date |
Displays the trade date adjusted by the 5pm rule if set. |
||||||||||||
| Trade Date |
Displays the valuation date set in the Pricing window of the pricing sheet by default. You can modify as needed.
|
||||||||||||
| Trade Time |
Displays the valuation time set in the Pricing window of the pricing sheet. You can modify as needed.
|
||||||||||||
| Expiry Date |
Enter the expiration date. You can enter a relative term for the option expiration, for example, “1m” for one month. The Trade Term property will be updated accordingly. Ⓘ [NOTE: The expiration date takes into account "local" holiday calendars defined in the Defaults panel under Configuration > User Preferences] |
||||||||||||
| Expiry |
Displays expiration date details. |
||||||||||||
| Expiry Cut |
Displays the default expiry timezone. The default expiry timezone is set in the Defaults panel under Configuration > User Preferences. |
||||||||||||
| Expiry Delivery Link |
Select one of four options in the list:
|
||||||||||||
|
Delivery Date |
Displays the delivery date of the option. You can modify as needed. |
||||||||||||
|
Delivery |
Displays details on the delivery date. |
||||||||||||
| Trade Term |
Displays the expiry date as a tenor. |
||||||||||||
| First Exercise Date |
Enter the first date the option can be exercise for American options. |
"Price" Properties
| Properties | Description | ||||||||||||
|---|---|---|---|---|---|---|---|---|---|---|---|---|---|
| Premium Date |
Displays the premium payment date. The system uses the spot date by default. You can change this to a forward date. If you use a forward date, the application adjusts the premium amount using the discount curve from the selected pricing environment. |
||||||||||||
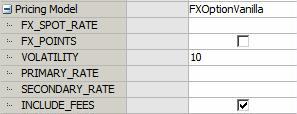
|
Pricing Model |
Select the pricer used to price the trade. It defaults to the pricer set in the pricer configuration. You can also specify pricing parameters associated with the selected pricing model.
Sample pricing parameters
|
||||||||||||
| Pricer Override |
The Pricer Override allows overriding the default pricer coming from the pricer configuration in a persistent fashion. This trade will always be priced using the new pricer. You can select a pricer-override key provided you have created override keys in the Pricer Configuration. |
||||||||||||
| Market Data Item Override |
The Market Data Item Override allows overriding the default market data coming from the pricer configuration in a persistent fashion. This trade will always be priced using the new market data. You can select a market data-override key provided you have created override keys in the Pricer Configuration. |
||||||||||||
| Price Format |
Select the currency and unit amount of the prices. The unit amount defaults to the price format specified under Configuration > User Preferences. You can select:
Premium primary % = (premium amount / primary amount) * 100.
Premium primary pips = (premium amount / quoting amount) * bp factor.
Premium quoting % = (premium amount / quoting amount) * 100.
Premium quoting pips = (premium amount / primary amount) * bp factor. |
2. Broker Butterfly and Broker Strangle Strategies
"Broker" strategies are quoted with the same volatility on all legs, giving them different strikes for a given delta. The behavior of the Volatility and Strike properties is different from standard Butterfly and Strangle strategies.
A single, linked volatility is entered in these strategies.

Sample Broker Strangle trade
A Broker Butterfly is a Broker Straddle with a delta neutral straddle.
3. Accrual Strategies
Ⓘ [NOTE: Quanto pricing for Accrual strategies is not currently supported]
Properties
Vanilla properties - Range Style - Observation Source - Reset Source - Known 1st Range - Reset Effective Date - Trigger properties
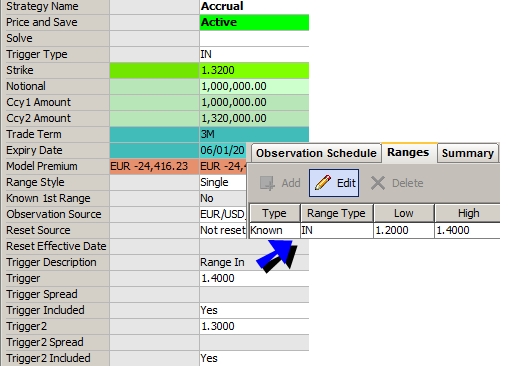
Sample Accrual FX Option
"Product" Style" Properties
| Properties | Description | |||||||||||||||||||||
|---|---|---|---|---|---|---|---|---|---|---|---|---|---|---|---|---|---|---|---|---|---|---|
| Observation Type |
For Accrual and Accumulator options, the choices are:
Where:
|
|||||||||||||||||||||
| Range Style |
Select Single for single range, or Multiple for multiple ranges.
|
|||||||||||||||||||||
| Known 1st Range |
Select Yes if the first range is known for a resetting range, or No otherwise. If Yes, you can specify the first range in Trigger and Trigger2. |
"Product: Rate" Properties
| Properties | Description |
|---|---|
| Observation Source |
Select an FX Rate Definition to fix the FX rates. FX Rate Definitions are configured from the Calypso Navigator using Configuration > Foreign Exchange > FX Rate Definitions. Then right-click the FX Rate Definition and choose "Supplemental" to define the accrual details.
|
| Reset Source |
Select "Not resetting" for non-resetting ranges, or select the FX Rate Definition that will be used to fix the rates. FX Rate Definitions are configured from the Calypso Navigator using Configuration > Foreign Exchange > FX Rate Definitions. Then right-click the FX Rate Definition and choose "Supplemental" to define the fixing schedule.
|
"Date" Properties
| Properties | Description |
|---|---|
| Reset Effective Date |
Enter the date at which the strike will be known. |
"Trade" Properties
| Properties | Description |
|---|---|
| Breakeven FX Rate |
Informs the trader or customer from which point the option begins to make profit, or, on the other side, from which point the option starts to lose money. It gives an indication of how far the option is from that point compare to market conditions. |
3.1 Setting Accrual Details
To define observation schedules, reset schedules, and ranges for Accrual options, right-click the trade and choose "Supplemental". Define the schedules as needed then click Save and Close to apply the details to the trade.
Observation Schedule
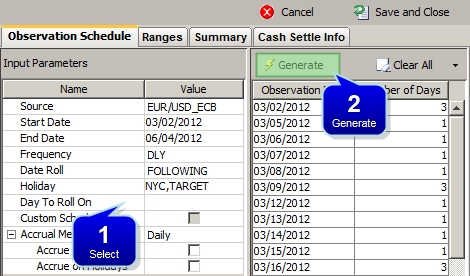
Accrual Configuration (Observation schedule)
The observation source (FX Rate Definition), start date, and end date default to the option's details.
Step 1 - Select the frequency, date roll convention, and holidays.
Select the Accrual Method: Daily or Unweighted (discrete accrual on each observation date).
For Daily, you can include weekends or not, and include holidays or not. If you include weekends and holidays, the precedent business day's rate will be used.
Step 2 - Click Generate to generate the schedule.
You can click the "Clear All" menu to add / remove observation dates.
Reset Schedule
Ⓘ [NOTE: The Reset Schedule panel only appears if the ranges are resetting ("Reset Source" property contains an FX Rate Definition)]
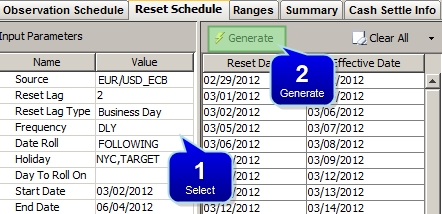
Accrual Configuration (Reset schedule)
The fixing source (FX Rate Definition) defaults to the option's details.
Step 1 - Set the reset lag (number of days between reset date and effective date), frequency, date roll convention, holidays, and first and last effective dates.
Step 2 - Click Generate to generate the schedule.
You can click the "Clear All" menu to add / remove observation dates.
Fixed Ranges

Accrual Configuration (Fixed ranges)
For a single range, you can only specify one range, for a multi-range, you can add multiple ranges.
Single Range - Select the range and click Edit.
| » | Select the range type: IN, OUT, ABOVE, or BELOW. |
| » | Enter the lower value of the range, the upper value of the range, the strike, and a leverage as needed (factor to increase / decrease the notional). |
Multi-Range - Click Add and define the range - The information is the same as for a single range.
| » | You can check "Allow overlapping ranges" to define ranges that are included in one another. By defining only two ranges, you can actually define three levels. |
| » | Repeat as needed for other ranges. |
Resetting Ranges

Accrual Configuration (Resetting Ranges)
For a single range, you can only specify one range, for a multi-range, you can add multiple ranges.
Single Range - Select the range and click Edit.
| » | Select the range type: IN, OUT, ABOVE, or BELOW. |
| » | Enter the lower spread, the upper spread, and a leverage as needed (factor to increase / decrease the notional). |
Multi-Range - Click Add and define the range - The information is the same as for a single range.
| » | You can check "Allow overlapping ranges" to define ranges that are included in one another. By defining only two ranges, you can actually define three levels. |
| » | Repeat as needed for other ranges. |
Summary
The summary panel shows a report of the range observation.
4. Asian Strategies
Ⓘ [NOTE: Quanto pricing for Asian strategies is not currently supported]
Properties
Vanilla properties - Fixings - Observation Source - Observation Type
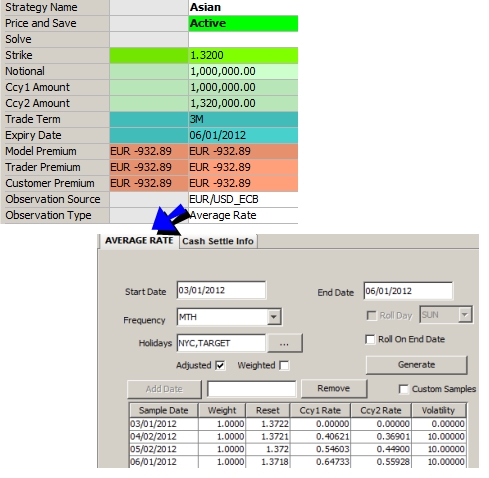
Sample Asian FX Option
"Product: Style" Properties
| Properties | Descripition | ||||||||||||||||||
|---|---|---|---|---|---|---|---|---|---|---|---|---|---|---|---|---|---|---|---|
| Observation Type |
The choices are:
|
"Product: Rate" Properties
| Properties | Description |
|---|---|
| Observation Source |
Select an FX Rate Definition to fix the FX rates. FX Rate Definitions are configured from the Calypso Navigator using Configuration > Foreign Exchange > FX Rate Definitions. Then right-click the FX Rate Definition and choose "Supplemental" to define the fixing schedule.
|
"Date" Properties
| Properties | Description | ||||||||||||
|---|---|---|---|---|---|---|---|---|---|---|---|---|---|
| Fixings |
Displays the number of fixings for averaging the rate or strike. You can also view the following properties:
|
4.1 Setting an Asian Observation Schedule
Right-click the FX Rate Definition and choose "Supplemental" to define the fixing schedule. Click Save and Close when you are done.
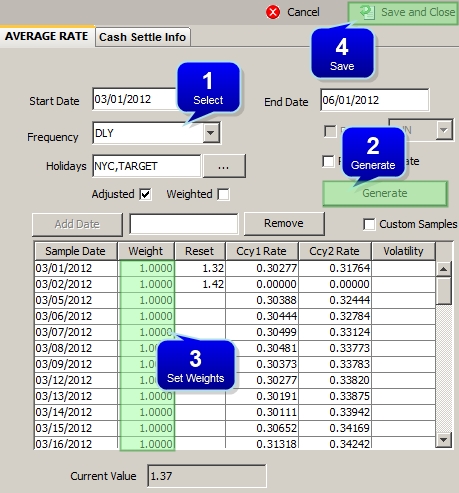
Fixing Schedule (Asian options)
The start and end dates default to the option's details.
Step 1 - Select the frequency. For the weekly frequency, you can check the Roll Day checkbox, and select the day from the adjacent field. For other frequencies, your can check the “Roll On End Date” checkbox to roll on the last day of the period.
Select holidays as needed.
You can check the Adjusted checkbox to adjust the sample dates for holidays based on the selected holiday calendars.
You can check the Weighted checkbox to adjust the weights for holidays based on the selected holiday calendars.
Step 2 - Click Generate to generate the schedule.
The FX rates are set from the Calypso Navigator using Trade Lifecycle > Reset > FX Rate Reset. They are saved as quote values for the quote value name of the FX Rate Definition.
You can also enter the reset values from the Calypso Navigator using Market Data > Market Quotes > Quotes for the quote value name of the FX Rate Definition.
The quote value name of the FX Rate Definition is of the form “FX.<primary currency>.<quoting currency>.<FX Rate Definition name>.<FX Rate Definition source>” - For example “FX.EUR.USD.EUR/USD_ECB.ECB”.
You can add and remove dates in the schedule. In this case the "Custom Samples" checkbox will appear checked.
Step 3 - You can modify the weights as needed. The weights are applied to the values when calculating an average rate value, or an average strike value.
The Current Value field displays the actual value of the average rate based on the averaging type and existing resets.
Step 4 - Click Save and Close when you are done.
5. Barrier Strategies
This also applies to Window Barrier strategies.
Properties
Vanilla Strategies properties- Barrier properties
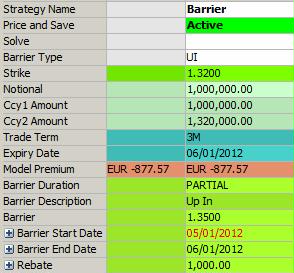
Sample Barrier FX Option
"Barrier" Properties
"Barrier" properties apply to Barrier, Window Barrier, Digital with Barrier FX options.
| Properties | Description | ||||||||||||||||||||||||||||||
|---|---|---|---|---|---|---|---|---|---|---|---|---|---|---|---|---|---|---|---|---|---|---|---|---|---|---|---|---|---|---|---|
| Barrier Duration |
Select the duration type:
|
||||||||||||||||||||||||||||||
| Barrier Description |
Displays the description of the barrier type. |
||||||||||||||||||||||||||||||
| Barrier Type |
Select the type of barrier:
|
||||||||||||||||||||||||||||||
| Barrier |
Strike rate for the single barrier, or upper barrier for a double barrier. |
||||||||||||||||||||||||||||||
| Barrier Start Date |
For a partial barrier: the start date of the barrier observation. You can also set the Barrier Start Time. |
||||||||||||||||||||||||||||||
| Barrier End Date |
For a partial barrier: the end date of the barrier observation. You can also set the Barrier End Time. |
||||||||||||||||||||||||||||||
| Barrier2 |
Strike rate for the lower barrier. |
||||||||||||||||||||||||||||||
| Barrier2 Start Date |
For a partial double barrier: the start date of the second barrier observation. You can also enter the Barrier2 Start Date. |
||||||||||||||||||||||||||||||
| Barrier2 End Date |
For a partial double barrier: the end date of the second barrier observation. You can also set the Barrier2 End Time. |
||||||||||||||||||||||||||||||
| Rebate |
Enter a rebate amount if applicable. You can also set the following properties:
|
5.1 Configuring Multiple Barriers
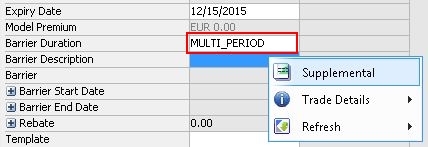
When the Barrier Duration property is set to MULTI_PERIOD, you can right-click anywhere in a barrier trade and choose "Supplemental" from the pop-up menu to open the Multiple Barrier Configuration panel.
Right-click in Barrier trade leg
Periods in which an observation occurs in the schedule are referred to as stages. Barriers define the specific window of observation of each stage and can be manipulated to customize the terms of the observation.
There are two methods for creating multiple stage barriers on the Multiple Barrier Configuration panel. The first is accomplished on the Barrier Schedule tab and lets you parametrically generate the duration of the stages in the schedule by frequency, such as weekly or bi-weekly. The second method is accomplished on the Barrier Definition tab and allows you to manually set the number and duration of the barriers, and apply unique definitions to each.
Notice that when you select MULTI_PERIOD in the trade leg, property settings such as Barrier , Barrier Type, barrier start and end dates, and Rebate are shifted to the Multiple Barrier Configuration panel. All barrier types are available except for KIKO options.
Follow the basic steps below for creating multi-period barriers.
TIP: If you create an observation schedule on the Barrier Schedule tab, you can make refinements and/or add stages to it on the Barrier Definition tab. To edit a specific barrier, highlight that barrier's row in the schedule and use the Barrier parameters to make changes.
Barrier Schedule Tab
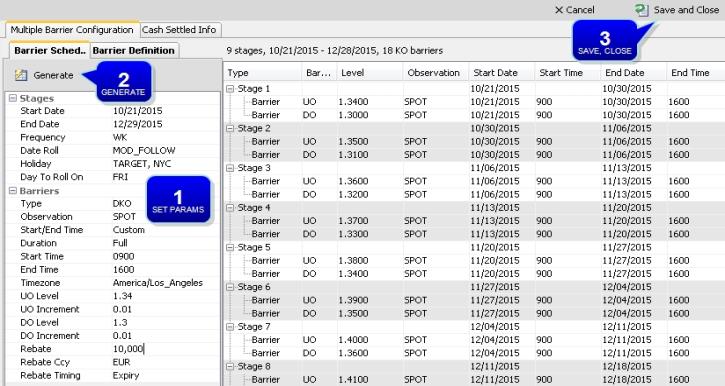
Example observation schedule generated on the Barrier Schedule tab.
Step 1 - Set Stages and Barriers parameters on the Barrier Schedule tab to generate the observation schedule.
| • | The Frequency determines the period of time for each stage, such as daily, weekly, bi-weekly, monthly, or quarterly. |
| • | The [Barriers] Type drop-down list provides the same barrier types as those described in Barrier properties with the exception of KIKO options. |
| • | For Observation, you can select SPOT or an FX Rate Definition (discrete observation). |
| • | For the Start/End Time, you can select "Default" to observe the barrier over the whole day, or "Custom" to observe the barrier within a specific frame of time during the day. In the latter case, you can set the Start Time and the End Time. |
| • | For the Duration, you can choose "Full" (each observation window has the same length based on the frequency), "Window at Start" (the observation window starts at the beginning of the stage, and Window Length determines its duration), "Window at End" (the observation window ends at the End Date of the stage and Window Length determines its duration), or Custom (each window has a user-defined length with possible offset). |
| • | Set the barrier level. You can also include an increment for defining progressive changes in the level from stage to stage. |
| • | You can set rebate details for "out" barrier types. |
Step 2 - Click Generate to generate the observation schedule. To make further edits, use the Barrier Definition tab. See details below for this tab.
Step 3 - Click Save and Close when you are satisfied with the schedule.
Barrier Definition Tab

Example observation schedule created manually on the Barrier Definition tab.
Ⓘ [NOTE: When you first open the Multiple Barrier Configuration panel and click the Barrier Definition tab, the system has generated the first stage including a start and end date based on the present day and Expiry Date, if one was entered on the Barrier trade leg. To begin manually adding stages, highlight the stage's row in the schedule, enter the Stage and Barrier parameters, and click Apply to override the autopopulated settings in Stage 1. (The Apply button is used for executing edits made to already existing stages.) Alternatively, you can simply highlight the first stage, delete it, and add a new first stage. See details below.]
Step 1 - Click New to initiate a new stage. Stage and Barrier parameters are reset to default.
Step 2 - Configure Stage parameters.
| • | The Barrier Type(s) drop-down list provides the same barrier types as those described in Barrier properties with the exception of KIKO options. |
| • | For the Observation, you can select SPOT or an FX Rate Definition (discrete observation). |
| • | Define the Start Date and End Date for the given stage. |
Ⓘ [NOTE: Start and end dates can be for any period of time provided the stage does not overlap with a previous or subsequent stage.]
| • | For the Start/End Time, you can select "Default" to observe the barrier over the whole day, or "Custom" to observe the barrier within a specific frame of time during the day. In the latter case, you can set the Start Time and the End Time, which are located under Barrier parameters. |
Configure Barrier parameters
| • | For the Duration, you can choose "Full" (the barrier's observation window shares the same period as the stage), "Window at Start" (the observation window starts at the beginning of the stage, and Window Length determines its duration), "Window at End" (the observation window ends at the End Date of the stage and Window Length determines its duration), or Custom (each window has a user-defined length with possible offset). |
Ⓘ [NOTE: When Custom, Window at Start, or Window at End is selected, the barrier's start and end must fall within the constraints of the stage's Start Date and End Date. Also, the Window Length parameter must not exceed the stage's period.]
| • | Set the Level for the barrier. |
| • | You can set rebate details for "out" barrier types. |
| • |
Step 3 - When you have finished configuring the stage, click Add. The stage is added to the observation schedule. To add further stages, repeat from Step 1.
Step 4 - If you need to make any changes to an already existing barrier, first highlight the barrier's row in the schedule and make changes to the parameters. Once the edits are made, click Apply to execute the changes. To delete a stage, highlight it in the schedule and click Delete.
Step 5 - Click Save and Close when you are satisfied with the schedule.
6. Compound Strategies
Properties
Vanilla properties - Compound Term - Compound Expiry Date - Compound Expiry - Compound Delivery Date - Compound Delivery - Compound Expiry Cut - Compound Put/Call - Compound Strike - Compound Strike Amount
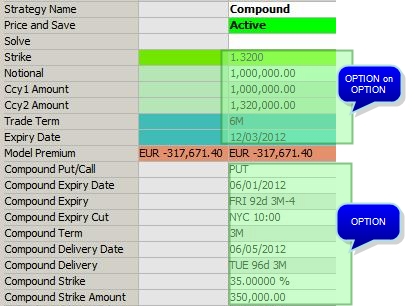
Sample Compound FX Option
"Product: Style" Properties
| Properties | Description |
|---|---|
| Compound Put/Call |
Select the direction of the compound option for the primary currency. |
"Product: Rate" Properties
| Properties | Description |
|---|---|
| Compound Strike |
Enter/displays the price of the underlying option as a percentage of the underlying primary amount. |
| Compound Strike Amount |
Compound Strike Amount = Compound Strike * Ccy 1 Amount / 100. You can also enter a compound strike amount and the Compound Strike will be updated accordingly. When exercising the compound option, the compound strike amount will be passed to the created plain vanilla as PREMIUM fee. |
"Date" Properties
| Properties | Description |
|---|---|
|
Compound Expiry Date |
Enter the expiry date of the compound option. |
| Compound Expiry |
Displays details about the "Compound Expiry Date". |
| Compound Expiry cut |
Displays the default expiry timezone for the compound option. The default expiry timezone is set in the Defaults panel under Configuration > User Preferences. |
| Compound Term |
Displays the "Compound Expiry Date" as a tenor. |
| Compound Delivery Date |
Enter the delivery date of the compound option. |
| Compound Delivery |
Displays details about the "Compound Delivery Date". |
7. Digital Strategies
This also applies to Digital with Barrier strategies.
Properties
Vanilla properties (no strike) - Trigger properties - Observation Source
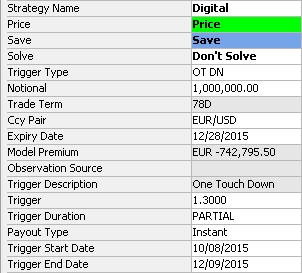
Sample Digital FX Option
"Product: Rate" Properties
| Properties | Description |
|---|---|
| Observation Source |
Select an FX Rate Definition to fix the FX rates. FX Rate Definitions are configured from the Calypso Navigator using Configuration > Foreign Exchange > FX Rate Definitions. |
"Trigger" Properties
"Trigger" properties apply to Accrual, Accumulator, Range Accrual, Digital, Window Digital, European Binary FX options.
| Properties | Description | ||||||||||||||||||||||||||||||||||||||||||||||||
|---|---|---|---|---|---|---|---|---|---|---|---|---|---|---|---|---|---|---|---|---|---|---|---|---|---|---|---|---|---|---|---|---|---|---|---|---|---|---|---|---|---|---|---|---|---|---|---|---|---|
| Trigger Duration |
Select the duration type:
|
||||||||||||||||||||||||||||||||||||||||||||||||
| Trigger Description |
Displays the description of the trigger type. |
||||||||||||||||||||||||||||||||||||||||||||||||
| Trigger Type |
Select the trigger type. For Digital options, the choices are:
For Digital at Expiry, the choices are:
For Digital With Barrier options, the choices are ABOVE or BELOW. For Accrual options and Accumulator options, the choices are:
|
||||||||||||||||||||||||||||||||||||||||||||||||
| Payout Type |
Select Instant (payout when the trigger is hit) or Expiry (payout at expiration). |
||||||||||||||||||||||||||||||||||||||||||||||||
|
Trigger |
Digital an European Binary options: Enter the strike rate for the single trigger, or upper trigger for a double digital. Accrual and Accumulator options: Enter the trigger for ABOVE and LOW options, or low trigger for a range. |
||||||||||||||||||||||||||||||||||||||||||||||||
|
Trigger Start Date |
Enter the start date of observation for a partial digital. |
||||||||||||||||||||||||||||||||||||||||||||||||
|
Trigger End Date |
Enter the end date of observation for a partial digital. |
||||||||||||||||||||||||||||||||||||||||||||||||
| Trigger Spread |
In case of resetting range, enter the upper spread for single range. |
||||||||||||||||||||||||||||||||||||||||||||||||
| Trigger Included |
Accrual options: For ABOVE and BELOW accruals, select Yes to monitor the trigger, or No otherwise. Range Accruals: Select Yes to monitor the upper value of the range, or No otherwise. |
||||||||||||||||||||||||||||||||||||||||||||||||
|
Trigger2 |
Digital and European Binary options: Enter the strike rate for the lower trigger. Accrual options and Accumulator options: Enter the high trigger for a range. |
||||||||||||||||||||||||||||||||||||||||||||||||
|
Trigger2 Start Date |
Enter the start date of second trigger observation for a double partial digital. |
||||||||||||||||||||||||||||||||||||||||||||||||
|
Trigger2 End Date |
Enter the end date of second trigger observation for a double partial digital. |
||||||||||||||||||||||||||||||||||||||||||||||||
| Trigger2 Spread |
In case of resetting range, enter the lower spread for single range. |
||||||||||||||||||||||||||||||||||||||||||||||||
| Trigger2 Included |
Range Accruals: Select Yes to monitor the lower value of the range, or No otherwise. |
8. Forward Starting Strategies
Properties
Vanilla properties - Reset Source - Reset Effective Date - Formula Strike

Sample Forward Starting FX Option
"Product: Rate" Properties
| Properties | Description | |||
|---|---|---|---|---|
| Strike |
You can enter the strike as a percentage of the "at-the-money" forward like "102% atmf", as an "in-the-money" spot like "atms", as a percentage of "out-the-money" like "10%otm", or as rate +/- pips like "2 pips". Entry shortcuts can be used for the strike: "o" for %OTM i.e. entering "10o" displays as 10%OTM. "f" for atmf i.e. entering "90f" displays as 90%atmf. "s" for atms i.e. entering "85s" displays 85%atms. "p" for pips i.e. entering "-10p" displays -10 pips. An option trade can be inverted (strike inverted). For percentage strikes, the strike is 1/original strike. For pip strikes, the strike is converted to percentage strike, and then inverted as 1/strike. This is then reconverted to a pip strike to display. Rounding Any system generated strike (solver, shortcut entry) will respect the currency pair rounding settings. If the user manually enters a strike, it will only be rounded based on the constraints of the currency rounding of the amounts that the strike generates. Example: Ccy1 amount is 10,000.00 and a strike is entered as 1.234567.
|
|||
| Formula Strike |
Displays the formula captured in the Strike property. |
"Product: Style" Properties
| Properties | Description |
|---|---|
| Reset Source |
Select the FX Rate Definition that will be used to fix the strike. FX Rate Definitions are configured from the Calypso Navigator using Configuration > Foreign Exchange > FX Rate Definitions. |
If ccy rounding of Ccy2 is 0dp (JPY for example) then Ccy2 amount would be 12346 and the strike would need to be rounded to 1.2346.
"Date" Properties
| Properties | Description |
|---|---|
| Reset Effective Date |
Enter the date at which the strike will be known. |
9. Lookback Strategies
Properties
Vanilla properties - Observation Source - Fixings - Observation Type
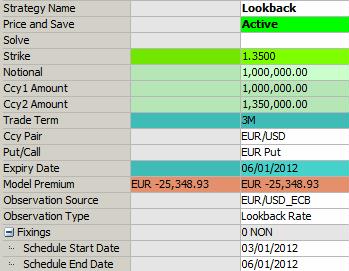
Sample Lookback FX Option
"Product: Style" Properties
| Properties | Description | ||||||
|---|---|---|---|---|---|---|---|
| Observation Type |
The choices are:
|
"Product: Rate" Properties
| Properties | Description |
|---|---|
| Observation Source |
Select an FX Rate Definition to fix the FX rates. FX Rate Definitions are configured from the Calypso Navigator using Configuration > Foreign Exchange > FX Rate Definitions. |
"Date" Properties
| Properties | Description | ||||||||||||
|---|---|---|---|---|---|---|---|---|---|---|---|---|---|
| Fixings |
Displays the number of fixings. The following properties are also displayed:
|
10. Volatility Forward Strategies
The Volatility Forward strategy supports both cash and physical settlement. When a physical-delivery Volatility Forward strategy is exercised, it creates an ATM delta-neutral straddle trade.
Properties
Vanilla properties (no strike) - Agreed Forward Volatility - VF Vol at Trade Expiry - VF Vol at Straddle Expiry - VF Implied Forward Vol – Vega - VF Straddle Expiry Date - VF Straddle Term - VF Straddle Cut
"Product: Rate" Properties
| Properties | Description |
|---|---|
|
Vega |
Displays what the Vega would be in a Vanilla option from the trade date to the number of days calculated from the difference of the Expiry Date and the Fixing Date of the Volatility Forward option. |
|
VF Vol at Trade Expiry |
Displays the volatility at trade expiration (from the market data). |
|
VF Vol at Straddle Expiry |
Displays the volatility at underlying expiration (from the market data). |
|
VF Implied Forward Vol |
Displays the implied forward volatility. |
|
Agreed Forward Volatility |
Enter the forward volatility agreed to on the trade date. The price that is agreed upon to buy the ATM straddle. It defaults to the calculated implied forward volatility. However, you can modify the value. |
"Date" Properties
| Properties | Description |
|---|---|
|
VF Straddle Expiry Date |
Enter the expiration date of the underlying option (straddle). |
|
VF Straddle Term |
Displays the "VF Straddle Expiry Date" as a tenor. |
|
VF Straddle Cut |
Select the expiry timezone for the expiration date of the underlying option (straddle). Expiry timezones are created from the Calypso Navigator using Configuration > Definitions > Expiry Time Zone. |
11. FX Target Redemption Forwards
Target Redemption Forwards (TARF) are options composed of a strip of FX Forwards with a knockout on the entire structure based on the accrued profit for the structure purchaser.
The FX TARF strategy must be created as a custom strategy using Configuration > Strategy Builder.
11.1 Defining the FX TARF Strategy
Choose Configuration > Strategy Builder an select the strategy "Script > Pricing Script".
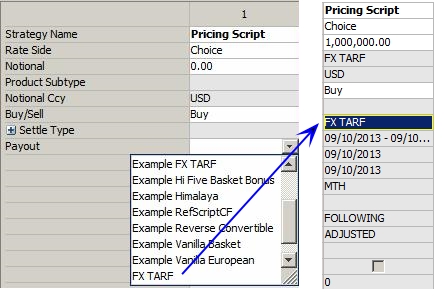
| » | Select the Pricing Script payout corresponding to the FX TARF, and complete the strategy definition as needed. |
Please refer to Calypso Pricing Script documentation for information on defining pricing scripts.
| » | Save the custom strategy and give it a name. |
| » | Make sure that you add the new strategy to the user profile. |
11.2 Using the FX TARF Strategy
Open a Pricing Sheet and select the custom strategy that you have created.
Each forward uses a fixing source. If the forward is at-the-money at the fixing time, the accrued interest is added to a counter. When the counter reaches the knockout level, the entire structure knocks out. The final payment may or may not be paid.
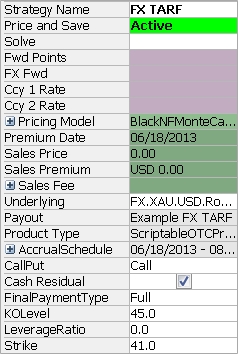
Sample FX TARF trade
"Product" Properties
| Properties | Description |
|---|---|
| Ccy Pair | Displays the currency pair used in the trade. |
| Buy/Sell | Select the trade direction. |
| Notional | Enter the trade notional. |
| Notional Ccy | Displays the notional currency used in the trade. |
| Observation Source | Select the observation source for FX underlying. |
| Model Premium | Displays the model premium in notional currency. |
| Underlying |
The underlying of an FX TARF is a currency pair. Displayed based on the selected currency pair. |
"Product: Accrual" Properties
| Properties | Description | ||||||||||||||||||||||||||||||||||||||||||||||||||||||
|---|---|---|---|---|---|---|---|---|---|---|---|---|---|---|---|---|---|---|---|---|---|---|---|---|---|---|---|---|---|---|---|---|---|---|---|---|---|---|---|---|---|---|---|---|---|---|---|---|---|---|---|---|---|---|---|
| Accrual Schedule |
Displays the accrual schedule dates and methods used. You can enter values for:
|
"Product: Type" Properties
| Properties | Description | ||||||
|---|---|---|---|---|---|---|---|
| Payout | Displays the Pricing Script payout selected in the strategy. | ||||||
| CallPut | "Call" or "Put". Select the direction of the option from the book's perspective. | ||||||
| Cash Residual | Click the checkbox for true, or clear otherwise. | ||||||
| Final Payment Type | Select "Full", "Exact", or "None". | ||||||
| KOLevel | Enter the knock out level. | ||||||
| LeverageRatio | Enter the factor to increase/decrease the notional by. | ||||||
| Strike |
Enter the strike. Rounding Any system generated strike (solver, shortcut entry) will respect the currency pair rounding settings. If the user manually enters a strike, it will only be rounded based on the constraints of the currency rounding of the amounts that the strike generates. Example: Ccy1 amount is 10,000.00 and a strike is entered as 1.234567.
|
12. Inverting Quanto and Flexo Settled Strategies
A user can invert strategies with a "Quanto" or "Flexo" settle type by selecting the strategy and clicking Tools > Invert > Selected Strategies. An entire sheet can be inverted by clicking Tools > Invert > Sheet.

Inverting a strategy with a "Quanto" settle type will change the following properties:
| • | Ccy Attributes |
| • | Put/Call |
| • | Strike/Trigger/Barrier Attributes- Value will invert to 1/<Original Value> or vice versa. |
EX: An entered strike of 1.25 will invert to 1/1.25 = .08
| • | Quanto Ccy Pair/Quanto Factor- The inverted currency and the settle currency. The order of the currencies in the "Pair Pos Ref" defined in the Currency Default window. To set this, click Configuration > Definitions > Currency Defaults.... |
| • | Trigger Type Attributes |
| • | Barrier Type Attributes |
Inverting a strategy with a "Flexo" settle type will change the following properties:
| • | Ccy Attributes |
| • | Put/Call |
| • | Strike/Trigger/Barrier Attributes- Value will invert to 1/<Original Value> or vice versa. |
EX: An entered strike of 1.25 will invert to 1/1.25 = .08
| • | Quanto Currency Pair- The inverted currency and the settle currency. The order of the currencies in the "Pair Pos Ref" defined in the Currency Default window. To set this, click Configuration > Definitions > Currency Defaults.... |
| • | Flexo Source - The Flexo Source will be the Settlement Source of the new Quanto Currency Pair. |
| • | Trigger Attributes |
| • | Barrier Attributes |
13. Volatility and Variance Swaps Strategies
FX Volatility Swaps and FX Variance Swaps are agreements between counterparties to swap a fixed rate of FX volatility or variance and a realized rate of FX volatility or variance over a set period of time. This strategy also provides an optional cap.
The key property in this strategy for determining whether the swap measures variance or volatility is "Swap Type." A drop-down list in the property field allows users to select between the two settings. Since variance is the mathematical square of volatility and computed differently, further properties for the Variance Swap also display Variance Strike and Variance Notional, which are editable fields when enabled. See property descriptions below for details.
Ⓘ [NOTE: Selecting the Pricing Model used for the FX Variance/Volatility Swap is integral to market data input and trade capture. For pricer details specific to this strategy, see "FX Options" in the Calypso Analytics and Pricing Environment documentation.]
Key Properties
Buy/Sell - Ccy Pair - Notional - Pricing Model - Swap Type - Observation Source - Vol Reference % - Vol Strike % - Variance Strike
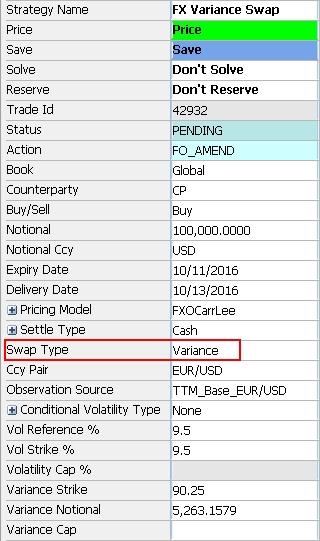
Sample FX Variation Swap with Swap Type "Variance"
|
Basic Steps for Capturing FX Variance/Volatility Swap Trades
|
"Trade" Properties
| Properties | Description | ||||||||||||
|---|---|---|---|---|---|---|---|---|---|---|---|---|---|
| Swap Type | This setting determines whether the swap is for variance or volatility. When Variance is selected, the Variance Strike, Variance Notional, and Variance Cap properties are enabled. | ||||||||||||
| Expected N | Displays the number of fixings expected during the life of the trade. | ||||||||||||
| Use First Observation | When the checkbox is selected, the trade will use the market fixing rate for the first fixing. When the checkbox is cleared, the trade uses a supplied rate for its first fixing. | ||||||||||||
| Annualization Factor | Enter the number of business days in a year to calculate the annualized volatility. Default is 252. | ||||||||||||
| Conditional Volatility Type |
This field allows you to select a condition type to include observations.
|
||||||||||||
| Vol Reference % | The volatility reference is used to compute the vega notional (or volatility exposure). The amount of volatility exposure in currency units per volatility point. VEGA_NOTIONAL = NOTIONAL / 2 * Volatility Reference = 100 000 / 2*27 = 1851,85 | ||||||||||||
| Vol Strike % | Enter the volatility strike for the trade. This is the fixed level against which the payout is computed as a percentage. | ||||||||||||
| Volatility Cap % | Enter a cap on the realized volatility. | ||||||||||||
| Variance Strike | Displays the volatility strike squared. Modifying this field re-computes the Volatility Strike %. Variance Strike = (Volatility Strike)^2. | ||||||||||||
| Variance Notional | Displays the notional amount for the variance swap. The payout is linked to this amount. Modify as needed and it will recompute the volatility notional. Variance Notional = Volatility Notional / (2 * Volatility Strike)^ | ||||||||||||
| Variance Cap | Enter a cap on the realized variance. |
"Style" Properties
| Properties | Description |
|---|---|
| Buy/Sell | Choose the direction of the trade. |
| Settle Type |
Select a settlement type: Cash, Quanto, or Compo. |
| Ccy Pair | Enter the currency pair used to measure the volatility. |
| Notional Ccy | Currency of the notional |
"Product: Rate" Properties
| Properties | Description |
|---|---|
| Observation Source | Select the FX rate definition used to fix the FX rates. |
"Product: Amount" Properties
| Properties | Description |
|---|---|
| Notional | Enter the notional amount for the trade. |
"Date" Properties
| Properties | Description |
|---|---|
| Expiry Date | Enter the expiration date of the trade. |
| Delivery Date | Enter the delivery date of the trade. |
"Price" Properties
| Properties | Description |
|---|---|
| Pricing Model |
Select the pricer used to price the trade. It defaults to the pricer set in the pricer configuration.
|
14. Volatility and Variance Options Strategies
FX Volatility and Variance Options are used to capture options on swaps that reference realized FX volatility or variance. They are captured the same way as FX Variance/Volatility Swaps with the addition of the Put/Call property, but have no provision for a cap or conditions on volatility.
Ⓘ [NOTE: Selecting the Pricing Model used for the FX Variance/Volatility Option is integral to market data input and trade capture. For pricer details specific to this strategy, see "FX Options" in the Calypso Analytics and Pricing Environment documentation.]
Key Properties
Buy/Sell - Put/Call - Ccy Pair - Notional - Pricing Model - Swap Type - Observation Source - Vol Reference % - Vol Strike % - Variance Strike
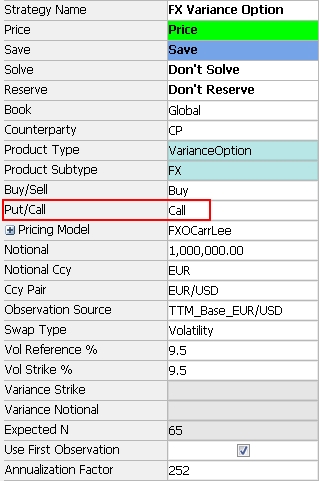
Sample FX Volatility Option with Swap Type "Volatility"
|
Basic Steps for Capturing FX Variance/Volatility Option Trades
|
"Trade" Properties
| Properties | Description |
|---|---|
| Swap Type | This setting determines whether the swap is for variance or volatility. When Variance is selected, the Variance Strike, Variance Notional, and Variance Cap properties are enabled. |
| Expected N | Displays the number of fixings expected during the life of the trade. |
| Use First Observation | When the checkbox is selected, the trade will use the market fixing rate for the first fixing. When the checkbox is cleared, the trade uses a supplied rate for its first fixing. |
| Annualization Factor | Enter the number of business days in a year to calculate the annualized volatility. Default is 252. |
| Vol Reference % | The volatility reference is used to compute the vega notional (or volatility exposure). The amount of volatility exposure in currency units per volatility point. VEGA_NOTIONAL = NOTIONAL / 2 * Volatility Reference = 100 000 / 2*27 = 1851,85 |
| Vol Strike % | Enter the volatility strike for the trade. This is the fixed level against which the payout is computed as a percentage. |
| Variance Strike | Displays the volatility strike squared. Modifying this field re-computes the Volatility Strike %. Variance Strike = (Volatility Strike)^2. |
| Variance Notional | Displays the notional amount for the variance swap. The payout is linked to this amount. Modify as needed and it will recompute the volatility notional. Variance Notional = Volatility Notional / (2 * Volatility Strike) |
"Style" Properties
| Properties | Description |
|---|---|
| Buy/Sell | Choose the direction of the trade. |
| Put/Call | Select whether the trade is a put or call. |
| Settle Type |
Select a settlement type: Cash, Quanto, or Compo. |
| Ccy Pair | Enter the currency pair used to measure the volatility. |
| Notional Ccy | Currency of the notional |
"Product: Rate" Properties
| Properties | Description |
|---|---|
| Observation Source | Select the FX rate definition used to fix the FX rates. |
"Product: Amount" Properties
| Properties | Description |
|---|---|
| Notional | Enter the notional amount for the trade. |
"Date" Properties
| Properties | Description |
|---|---|
| Expiry Date | Enter the expiration date of the trade. |
| Delivery Date | Enter the delivery date of the trade. |
"Price" Properties
| Properties | Description |
|---|---|
| Pricing Model |
Select the pricer used to price the trade. It defaults to the pricer set in the pricer configuration.
|
See also
| • | Out-of-the-box Strategies |
| • | Using the Pricing Sheet |
| • | Capturing Trades |
| • | Solving Functions |