Capturing BondMMInterest and BondMMDiscount Trades
Navigate to Trade > Money Market >
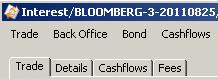
CD/CP/DN (menu action trading.TradeMoneyMarketFrontWindow) to open the Money Market Trade window, from the Calypso Navigator or from the Trade Blotter.
These bonds can also be traded using the standard Bond Trade window.
Prior to capturing bond MM trades, you need to specify bond product templates using Configuration > Fixed Income > Bond Product Definition for bond products BondMMInterest, BondMMDiscount, and BondMMDiscountWithAI. The bond products will be created on-the-fly from the Money Market window. You can also create the bond MM products directly.
For certain MM Discount products (Chinese bonds), you can use the bond selector window to choose a product.
 See Defining Bond Products for details.
|
Bond MM Quick Reference
Entering Trade Details
Or you can enter the trade fields directly. They are described below. Note that the Trade Date is entered in the Details panel.
Saving a Trade
You can also hit F3 to save the current trade as a new trade, or choose Trade > Save As New. You can also hit F12 to save the trade using any action available in the workflow, or choose Trade > Save Action. You will be prompted to select an action. A description will appear in the title bar of the trade worksheet, a trade id will be assigned to the trade, and the status of the trade will be modified according to the workflow configuration. Pricing a Trade
Financing a Trade
Or you can click Finance Trade in the Bundle Entry area. In the Bundle Entry area, you can also enter an asset swap by clicking Asset Swap, a performance swap by clicking Performance Swap, or an interest rate swap by clicking IR Swap – Help is available from these windows. Trade Lifecycle
|
1. Quick Entry Mode
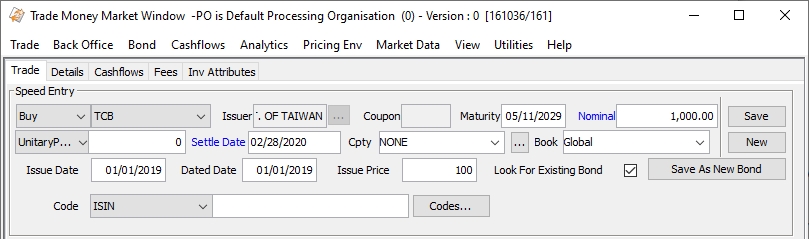
| » | Select the direction of the trade and select a bond product template from the adjacent field. The actual bond product will be created on-the-fly. Then enter the other fields as needed. |
| » | You can enable the other areas of the trade using the View menu. |
See Capturing Bond Trades for complete details on the other areas.
| » | Since those trades do not use the standard Bond Trade window, you need to specify their trade window so that when you open the trade from any report or blotter in the system, it will know which window to display. |
See Trade Window Setup for details.
| » | You can click Save to save the trade and create the bond product. Then if you modify any fields, choose the desired outcome: |
| – | Create a new bond product and amend the previously saved trade: Click Save again. |
| – | Create a new bond product and save a new trade: Click Save As New Bond. |
| – | Save a new trade and do not modify the previously created bond product: Hit F3 or choose Trade > Save As New. |
Speed Entry - Fields Details
|
Fields |
Description |
||||||
|
Buy / Sell / Issue |
Select Buy or Sell as applicable to indicate the direction of the trade from the book’s perspective. You can also select Issue to issue a bond from the processing org. You can switch between buy, sell, and issue using the space bar. For an issue, the bond should have the following characteristics:
|
||||||
|
Bond Product Template |
Select a bond product template for a "BondMMInterest", "BondMMDiscount" or "BondMMDiscountWithAI" bond product. Bond product templates are created using the Templates button in the Bond Definition window using Configuration > Fixed Income > Bond Product Definition. The Calypso Navigator must be restarted in order to load the template into the drop down menu. |
||||||
|
Issuer |
Displayed from the bond product template. |
||||||
|
Coupon |
Coupon rate displayed from the bond product template. |
||||||
|
Maturity |
Displayed from the bond product template, but you can enter a different maturity if desired. |
||||||
|
Nominal/Quantiity |
Enter the amount of nominal that is traded. This is the original nominal. Double-clicking the label will change it to Quantity (nominal/face value). You can enter the quantity if the quote type on the bond is set to "Price", "UnitaryPrice", or "GrossUnitaryPrice". |
||||||
|
Quote Type |
Defaults to the quote type of the bond product, but you can select a different quote type if desired. Defaults to the market quote as of the trade date if any. Modify as applicable. If there is no market quote and MMKT_FROM_QUOTE is false, we price the bond from curve to produce an initial price for trading. For bonds quoted using Price32, you can enter the trade’s price with two, three, or four digits after the dash. The first two digits represent the number of thirty-seconds (between 1 and 31). If the price contains 3 digits, the third digit represents the number of eighths of a thirty second (or 1/256, between 1 and 7). A bond price entered as "99-022" will be read as [99 + 2/32 + 2/8(1/32)], or 99.0703125. The third digit can also be +, indicating 4/8 of a thirty second. If the price contains 4 digits, the last two digits represent the number of sixteenths of a thirty second (or 1/512, between 1 and 15). Note that the four-digit logic only applies to bonds with the tick size 512. |
||||||
|
Settle Date |
The settlement date defaults to the trade date + the number of settle days specified in the bond template. The settlement date uses the holiday calendar of the bond template to identify business days. If you change the trade date in the Details panel, double-click the Settle Date label to update the settlement date accordingly. |
||||||
|
Cpty |
You can select a counterparty provided you have set up favorite counterparties. You can also type in a character to display the favorite counterparties that start with that character. Favorite counterparties are specified using Utilities > Configure Favorite Counterparties. Otherwise, click ... to select a counterparty from the Legal Entity Chooser. You can also type Ctrl-F to invoke the Legal Entity Chooser, or directly enter a Legal Entity short name. |
||||||
|
Book |
Trading book to which the trade belongs. Defaults to the book selected in the User Defaults. You can modify as applicable. You can select a book provided you have set up favorite books. You can also type in a character to display the favorite books that start with that character. Click ... to specify favorite books or Utilities > Configure Favorite Books. The processing org of the book identifies the processing org of the trade. |
||||||
|
Issue Date |
Displayed from the bond product template, but you can enter a different issue date if desired. |
||||||
|
Dated Date |
Displayed from the bond product template, but you can enter a different dated date if desired. |
||||||
|
Issue Price |
Displayed from the bond product template, but you can enter a different issue price if desired. Issue Price Base You can specify a different base to use for Issue Price and Redemption Price using the product code "Issue Price Base". If left blank, the default is base 100. Example: Taiwanese bills are entered in base 10,000.
|
||||||
|
Look For Existing Bond |
If checked, when you enter a template and maturity, the system attempts to find an existing bond. If none are found, a temporary dummy bond is created. When a bond (not a dummy bond) is loaded, that bond definition is used rather than the template. If un-checked, the system always creates a dummy bond, rather than looking for an existing one. You can control the defaulting behavior of this checkbox using the domain BondSpeedEntryNewBond. If set to true, "Look For Existing Bond" defaults to un-checked. If set to false or not set, it is checked by default. |
||||||
|
Code |
Displays the default code selected in Configuration > User Access Control > User Defaults, and its associated value in the adjacent field. Click Codes to enter the actual code values.
You can create product codes using Configuration > Product > Code. You can add security codes to the domain securityCode.ReprocessTrades that require checking if trades need to be reprocessed if the security codes are modified. You can update security codes in bulk using the Bond report.
|

2. Sample Bond MM Trade
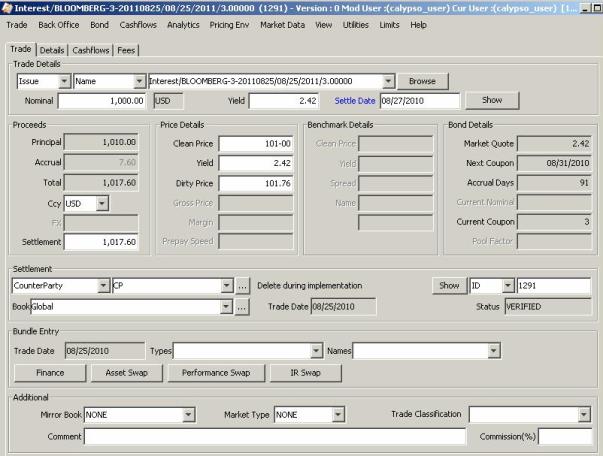
See Capturing Bond Trades for complete details.
3. Trade Window Setup
By default, all bond trades are captured using the standard bond window.
Since those trades do not use the standard Bond trade window, you need to specify their trade window so that when you open the trade from any report or blotter in the system, it will know which window to display.
From the Calypso Navigator, navigate to Configuration > User Access Control > Trade Window.
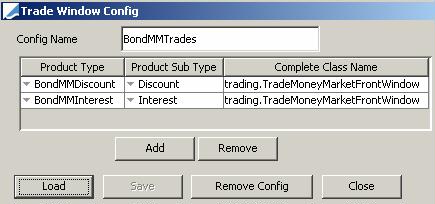
| » | Enter a configuration name and click Add. |
Select the product type BondMMDiscount, the sub-type "Discount" or ALL, and enter the complete class name trading.TradeMoneyMarketFrontWindow.
| » | Then click Add, and repeat for the product type BondMMInterest and sub-type "Interest" or ALL. |
| » | Click Save. |
Now you need to associate this window configuration with every user who needs it.
From the Calypso Navigator, navigate to Configuration > User Access Control > User Defaults.

| » | Select a user and select the window configuration from the field "Trade Window Config". |
| » | Click Save. |
Ⓘ [NOTE: You need to restart the Calypso Navigator in order for this change to take effect]