Defining Funds
From the Calypso Navigator, navigate to Configuration > Asset Management > Fund (menu action am.structure.FundWindow) to define funds.
A fund can be defined as Internal (managed by your processing organization), or External (managed by another organization).
For a given fund, you can define the tradable products as:
| • | Share classes |
| • | Series |
You can capture subscriptions and redemptions on the tradable products for internal funds.
A fund report is available from the Calypso Navigator by selecting Reports > Asset Management > Fund Report.
 See Fund Report for details.
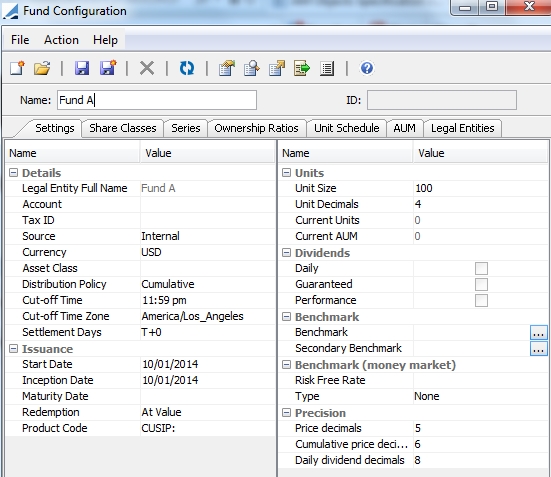
1. Fund Configuration Window
| » | To view an existing fund, click |
| » | To create a new fund, click |
Note that if the Authorization mode is enabled, an authorized user must approve your entry.
Upon saving an internal fund:
| – | The fund is given a unique id by the system. |
| – | The system creates a legal entity with roles CounterParty, ProcessingOrg, and Investor for the fund. It uses the fund's name as the legal entity short name and full name. |
You need to create at least one contact for the fund legal entity (Calypso Navigator > Configuration > Legal Data > Contact Personnel).
NOTE: A fund ProcessingOrg should not have child ProcessingOrgs. If the same processing configuration should be applied to different funds, it can be applied to a parent ProcessingOrg of the fund ProcessingOrgs. This parent ProcessingOrg should not be a fund.
| – | The system creates a trading book for the fund. It uses the fund's name as the book name. You can modify the default book as needed. |
See Associating a Fund with a Book or Legal Entity for details.
| – | The system creates an accounting book for the fund. It uses the fund's name as the accounting name. |
You need to create a settlement account for the fund (Calypso Navigator > Configuration > Accounting > Accounts, account of type SETTLE).
Upon saving an external fund:
| – | The fund is given a unique id by the system. |
| – | The system creates a legal entity with role CounterParty for the fund. It uses the fund's name as the legal entity short name and full name. |
The fund itself is created with product type UnitizedFund.
1.1 Settings Panel
Select the Settings panel to enter the fund's details.
Details
|
Fields |
Description |
||||||
|
Name |
Enter a name to identify the fund throughout the system. It populates the Legal Entity Full Name. |
||||||
|
Legal Entity Full Name |
Displays the fund's name. The system creates a legal entity with roles ProcessingOrg and CounterParty for the fund. It uses this name as the legal entity short name and full name. |
||||||
|
Account |
Enter an account number for the fund. This is optional. |
||||||
|
Tax ID |
Enter the fund’s tax id number. This is optional. |
||||||
|
Source |
Select whether the fund is Internal or External. |
||||||
|
Currency |
Select the fund's currency. |
||||||
|
Asset Class |
Select the asset class of the fund. These values come from the domain UnitizedFund.subtype. |
||||||
|
Distribution Policy |
Select the distribution policy:
|
||||||
|
Cut-off Time |
Enter the cut-off time for pricing. It defaults to 11:59 PM. It is for information purposes only and is not used to determine NAV date when subscribing to a fund. |
||||||
|
Cut-off Time Zone |
Select the reference timezone for the cut-off time. It defaults to the timezone selected in the User Defaults. |
||||||
|
Settlement Days |
Enter the number of days between the trade date and the settlement date in the form T+<number of days>. |
Issuance
|
Fields |
Description |
|
Start Date |
Enter the first quote date of the fund. It defaults to today's date. |
|
Inception Date |
Enter the first date that the fund reports returns. This could be "Start Date +1" if the fund reports daily returns, or it could be "Start Date + n" if the fund reports monthly returns. It defaults to "Start Date +1". |
|
Maturity Date |
Enter the maturity date of the fund as needed. The fund may be open-ended. The fund units may be redeemed on the maturity date according to the selected redemption type. The maturity date may later be extended on the fund. |
|
Redemption |
Select the redemption type: At Value, At Par, or Guaranteed Par. Typically, a fund that pays regular dividends will be redeemed at par. Certain funds include a principal protection provision. Such funds will also redeem at par. Select Guaranteed Par if the fund should redeem at the higher of the two values: At Value or At Par. |
|
Product Code |
Select the default product code. It will be displayed by default in the trade window. It defaults to the product code selected in the User Defaults. You can click
|
Units
|
Fields |
Description |
|
Unit Size |
Enter the face value of one unit of the fund. It is designated in the fund's currency. Example: If the unit size of a fund is 100 USD and you buy 1000 units, the nominal position is 100,000 USD. |
|
Unit Decimals |
Enter the number of decimal places of the units. |
|
Current Units |
Displays the latest number of units as recorded in the Unit Schedule panel, and neither the cumulative number of units nor the remaining number of units.
|
|
Current AUM |
Displays the current number of assets under management as recorded in the AUM panel. It can be updated using the scheduled task AM_EOD_AUM_UPDATE.
|
Dividends
Only applies to Distributive funds.
|
Fields |
Description |
|
Daily |
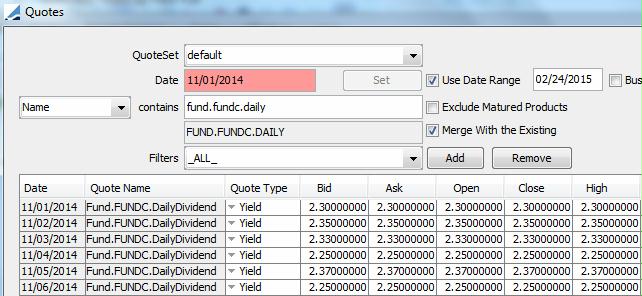
If checked, dividends accrue daily and are paid at the end of the dividend period. You can define the dividend period in the Daily Dividend Definition panel. The dividend rate is based on the quote "Fund.<fund name>.DailyDividend". You need to set this quote every day of the dividend period. You can also define a rebate in the Rebate Definition panel. Using the Corporate Action window, you can generate the corporate actions based on the Dividend History panel, and apply the corporate actions to the positions. The checkboxes "Guaranteed" and "Performance" are disabled in this case. |
|
Guaranteed |
If checked, dividends are guaranteed based on a rate index. You can define the rate index in the Guaranteed Dividend Definition panel, and the actual dividend schedule in the Dividend History panel. Using the Corporate Action window, you can generate the corporate actions based on the Dividend History panel, and apply the corporate actions to the positions. The checkbox "Daily" is disabled in this case. |
|
Performance |
If checked, dividends are based on the fund's performance. Performance dividends can be paid in addition to guaranteed dividends or independently. You can define the actual dividends in the Dividend History panel. Using the Corporate Action window, you can generate the corporate actions based on the Dividend History panel, and apply the corporate actions to the positions. The checkbox "Daily" is disabled in this case. |
Benchmark
|
Fields |
Description |
|
Benchmark Secondary Benchmark |
You can click ... to select a benchmark, and a secondary benchmark if desired, for analysis purposes as needed. Benchmarks are created using Configuration > Asset Management > Benchmark from the Calypso Navigator.
You can also link a benchmark to a portfolio instead of an individual fund.
|
Look Through
Only applies to external funds.
|
Fields |
Description |
|
Composition |
For lookthrough of external funds, the constituents of the external fund are represented in Calypso by a benchmark. In this context, the benchmark is not actually used as a benchmark for relative performance, but rather just to describe the external fund constituents.
Click ... to select a constituents benchmark. Benchmarks are created using Configuration > Asset Management > Benchmark from the Calypso Navigator.
|
Benchmark (money market)
|
Fields |
Description |
|
Risk Free Rate |
You can select a risk free rate index as needed. |
|
Type Rate Index Spread |
You can select a benchmark rate index as needed. To do so, select the type RateIndex. Then select the rate index and enter a spread as needed. |
Precision
|
Fields |
Description |
|
Price decimals |
Enter the number of decimal places of the fund's price. The rounding method is NEAREST. |
|
Cumulative price decimals |
Enter the number of decimal places of the fund's cumulative price. The rounding method is NEAREST. |
|
Daily dividend decimals |
Enter the number of decimal places of the fund's daily dividend price. The rounding method is NEAREST. |
1.2 Share Classes Panel
Select the Share Classes panel to define class tradable products. They are created with product type "ShareClass".

| » | Click |
Repeat as needed.
Save the fund when you are done.
|
Fields |
Description |
|
Id |
The id is given by the system upon saving. |
|
Name |
Enter the class name. |
|
Currency |
Select the class currency. It defaults to the fund's currency. |
|
Start Date |
Enter the class start date. It defines when the class is opened. |
|
End Date |
Enter the class end date. It defines when/if the class is closed. |
|
Unit Size |
Enter the number of trading units of the class. It defaults to the fund's unit size. |
|
Price Decimals |
Enter the number of decimal places of the class price. |
|
Reference |
Click to set product codes for the class as needed. |
|
Description |
Enter a class description as needed. |
|
Number of Shares |
Not currently used. |
|
NAV |
Not currently used. |
Ⓘ [NOTE: The support for share classes is very limited: No NAV per share class and no valuation of number of shares, and no support for full subscription/redemption process.]
1.3 Series Panel
Select the Series panel to define series tradable products. They are created with product type "Series".

| » | Click |
Repeat as needed.
Save the fund when you are done.
|
Fields |
Description |
|
Id |
The id is given by the system upon saving. |
|
Name |
Enter the series name. |
|
Share Class |
Select the share class. |
|
Main Series |
For the main series, do not select anything. For a sub series, select the main series. |
|
Start Date |
Enter the series start date. |
|
End Date |
Enter the series end date. |
|
Unit Size |
Enter the number of trading units of the series. It defaults to the fund's unit size. |
|
Price Decimals |
Enter the number of decimal places of the series price. |
|
Reference |
Click to set product codes for the series as needed. |
|
Description |
Enter a series description as needed. |
|
Number of Shares |
Not currently used. |
|
NAV |
Not currently used. |
1.4 Ownership Ratios Panel
Select the Ownership Ratios panel to define ownership percentages of internal funds.

| » | Click |
Repeat as needed.
Save the fund when you are done.
Alternatively, you can import ownership ratios using a scheduled task as described below.
|
Fields |
Description |
|
Ratio Date |
Displays the valuation date of the ratio. |
|
Owner |
Select the owner (investor or other investment vehicle). An owner is defined in Calypso as a legal entity with role Investor. |
|
% |
Enter the percentage of ownership. |
|
Status |
Select Pending or Validated. This field is optional and for information purposes only. The Rolled status is displayed, along with the latest available ownership in the past, when ownership was entered on a previous day with no entry thereafter. Once an ownership ratio is set to 0 it will not be further rolled. Note that setting an ownership ratio to 0 will close the lookthrough positions, however to completely close the original unitized fund position, the unitized fund trade must also be closed. |
|
Entered Date |
Displays the date entered. |
|
Type |
Displays the source type: Manually Keyed if entered manually, or Imported if done by scheduled task. |
|
Source |
Displays the source of the ratio, either the user name who entered it, or the source as defined in the CSV file. |
Importing Ownership Ratios
You can import ownership ratios from a CSV file using the scheduled task AM_FUND_OWNERSHIP_RATIOS_IMPORT.
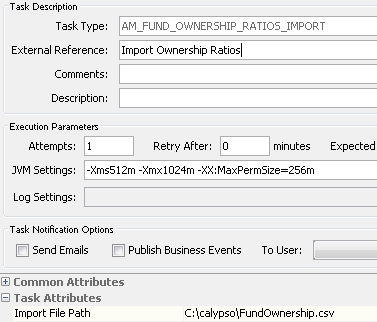
Task Attributes:
| • | Import File Path – Enter the path and file name that contains the ownership ratios. |
Sample File
Fund Short Name, Date Time, Owner, %, Source, Status
FUND LOOK E,05/26/2016 10:06:00 AM PDT,FUND LOOK A,25,calypso_user/uploader,Validated
FUND LOOK E,05/26/2016 10:06:00 AM PDT,FUND LOOK C,15,calypso_user/uploader,Validated
Ⓘ [NOTE: The date time format must be compliant to the locale preference of your environment.]
1.5 Unit Schedule Panel
Select the Unit Schedule panel to define the unit issuance schedule.
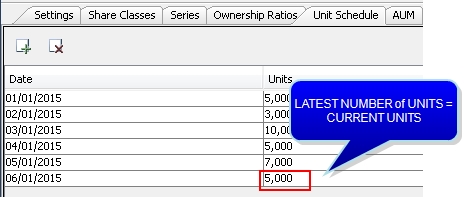
| » | Click |
Enter the date and the number of issued units.
Repeat as needed.
Save the fund when you are done.
1.6 AUM Panel (Assets Under Management)
Select the AUM panel to define the AUM schedule.
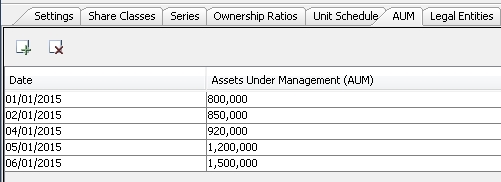
| » | Click |
Enter the date and the market value of the assets under management.
Repeat as needed.
Save the fund when you are done.
AM_EOD_AUM_UPDATE Scheduled Task
The scheduled task AM_EOD_AUM_UPATE can be used to update the Fund AUM on a given date. It can be run daily to take the latest Shadow NAV and store it for usage in other parts of Calypso, such as Limits & Compliance or Treasury.
Shadow NAV = Asset Value of Fund - Liabilities
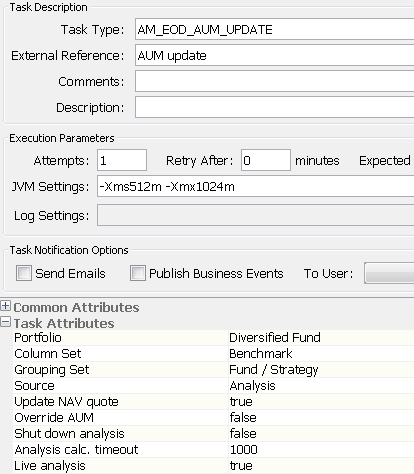
Task Attributes:
| • | Portfolio – Enter the portfolio entry point name or id, as defined in the Portfolio Hierarchy window. |
| • | Column Set – Enter a column set name, as defined in the Column Sets window. |
| • | Grouping Set – Enter a grouping, as defined in the Groupings window. |
| • | Source – Select the source of the Fund AUM: "Analysis" to use the MV_BASE_TOTAL of a Benchmark analysis on that fund, or "NAV quote" to use the imported NAV as Fund quote. |
| • | Update NAV quote – Only applies if the source is Analysis. Set to true to use MV_BASE_TOTAL to update both the Fund AUM and Fund NAV quotes in the quote set. |
| • | Override AUM – Set to true to update the existing AUM in case the task is run several times on a given date. |
| • | Shut down analysis – Select true to stop the analysis when the scheduled task finishes, or false to leave the analysis running. |
| • | Analysis calc. timeout – Enter the Analysis Server request timeout in seconds. |
| • | Live analysis – Select true if the scheduled task is run on the current day (val date = today). Otherwise, for back-dated runs, select false. |
1.7 Legal Entities Panel
Select the Legal Entities panel to set product codes by legal entity. You can use this panel to specify, for example, product codes by market place, custodian, etc.

| » | Click |
Select a role, a legal entity and a product code, and enter a product code value.
Repeat as needed.
Save the fund when you are done.
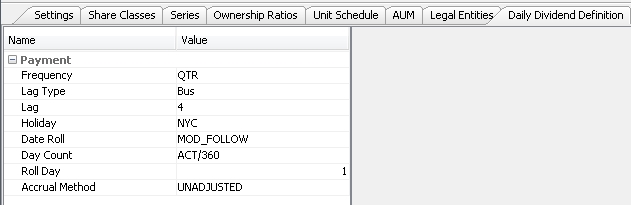
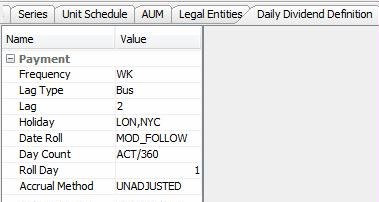
1.8 Daily Dividend Definition Panel
Only appears for Daily Distributive funds.
Select the Daily Dividend Definition panel to enter the payment frequency of the dividend.
| » | Enter the fields described below. |
Then save the fund.
See Sample Corporate Action Generation for details.
Payment Details
|
Fields |
Description |
||||||||||||
|
Frequency |
Select the payment frequency. |
||||||||||||
|
Lag Type |
Select whether the payment lag is in business days or calendar days. The default value is Bus for business days. |
||||||||||||
|
Lag |
Enter the number of days between the dividend date and the payment date. It defaults to the spot days associated with the fund's currency. |
||||||||||||
|
Holiday |
Specify the holiday calendar(s) to use when calculating the payment date. |
||||||||||||
|
Date Roll |
Specify the date roll convention to roll non-business days. From the Calypso Navigator, navigate to Help > Date Roll Conventions for descriptions of the date roll conventions. |
||||||||||||
|
Day Count |
Specify the day count convention to determine the number of days in a dividend period. From the Calypso Navigator, navigate to Help > Day-Count Conventions for descriptions of the day count conventions. |
||||||||||||
|
Roll Day |
Enter the day of the month on which the dividend period starts and ends. |
||||||||||||
|
Accrual Method |
Select the adjustment method of the dividend period:
|
1.9 Rebate Definition Panel
Only appears for Daily Distributive funds.
Select the Rebate Definition panel to define a rebate as needed.
The daily rebate amounts are summarized and the final payment is processed using a separate month-end dividend payment corporate action.
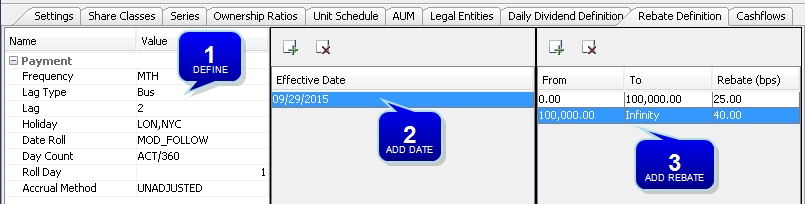
| » | Enter the fields described below. |
| » | Click |
| » | Click |
Repeat as needed.
Save the fund when you are done.
Payment Details
|
Fields |
Description |
||||||||||||
|
Frequency |
Select the payment frequency. |
||||||||||||
|
Lag Type |
Select whether the payment lag is in business days or calendar days. The default value is Bus for business days. |
||||||||||||
|
Lag |
Enter the number of days between the dividend date and the payment date. It defaults to the spot days associated with the fund's currency. |
||||||||||||
|
Holiday |
Specify the holiday calendar(s) to use when calculating the payment date. |
||||||||||||
|
Date Roll |
Specify the date roll convention to roll non-business days. From the Calypso Navigator, navigate to Help > Date Roll Conventions for descriptions of the date roll conventions. |
||||||||||||
|
Day Count |
Specify the day count convention to determine the number of days in a rebate period. From the Calypso Navigator, navigate to Help > Day-Count Conventions for descriptions of the day count conventions. |
||||||||||||
|
Roll Day |
Enter the day of the month on which the rebate period starts and ends. |
||||||||||||
|
Accrual Method |
Select the adjustment method of the rebate period:
|
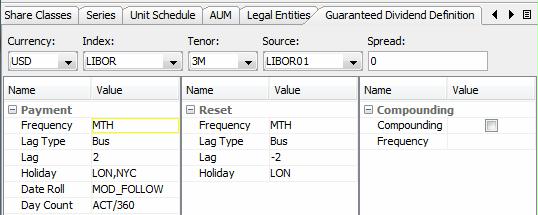
1.10 Guaranteed Dividend Definition Panel
Only appears for Guaranteed Distributive funds.
Select the Guaranteed Dividend Definition panel to select the rate index.
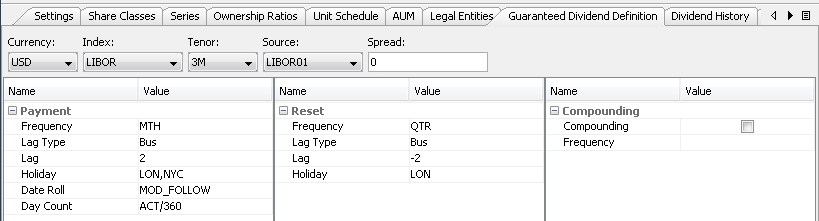
| » | Select a rate index, and enter a spread as needed. |
| » | Then enter the fields described below to determine the payment frequency and reset frequency. |
Then save the fund.
See Sample Corporate Action Generation for details.
Payment Details
|
Fields |
Description |
|
Frequency |
All payment frequencies are supported except ZC. This defaults to and is driven by the index tenor. |
|
Lag Type |
Specify whether the payment lag is in business days or calendar days. The default value is Bus for business days. |
|
Lag |
Specify the number of payment lag days. The default is the spot days associated with the fund currency, as defined in the currency definition. |
|
Holiday |
Specify the holiday calendar(s) to use when calculating the payment date. The default is the Pay Holidays specified in the rate index definition. |
|
Date Roll |
Specify the date roll convention to roll non-business days. From the Calypso Navigator, navigate to Help > Date Roll Conventions for descriptions of the date roll conventions. |
|
Day Count |
Specify the day count convention to determine the number of days in an interest period. From the Calypso Navigator, navigate to Help > Day-Count Conventions for descriptions of the day count conventions. |
Reset Details
|
Fields |
Description |
|
Frequency |
The reset frequency must be more frequent than the payment frequency. The default is driven by the payment frequency. |
|
Lag Type |
Specify whether the reset lag is in business days or calendar days. The default value is Bus for business days. |
|
Lag |
Specify the number of reset lag days. The default is the Reset Days specified in the rate index definition. |
|
Holiday |
Specify the holiday calendar(s) to use when calculating the reset date. |
Compounding Details
|
Fields |
Description |
|
Compounding |
Check to apply compounding. |
|
Frequency |
Select the compounding frequency if compounding is selected. |
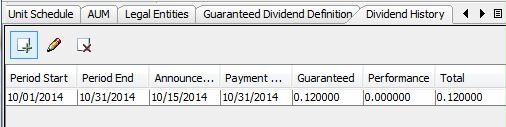
1.11 Dividend History Panel
Only appears for Guaranteed and Performance Distributive funds.
Select the Dividend History panel to define the actual dividend.

| » | Click |
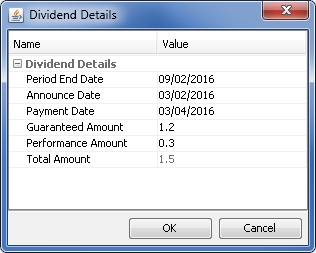
| – | Enter the dividend dates, the guaranteed amount for a Guaranteed Distributive fund and/or the performance amount for a Performance Distributive fund. |
| – | Then click OK. |
Repeat as needed.
Save the fund when you are done.
See Sample Corporate Action Generation for details.
1.12 Cashflows Panel
Only appears for Distributive funds.
Select the Cashflows panel to display the cashflows.

| » | You can select a pricing environment to generate the cashflows, and click |
| » | You
can click |
Note that if you have customized the cashflows, you should not generate the cashflows if you have not locked the columns that contain modified values, because those columns will be overridden. You should instead right-click a cashflow and choose "Recalc" from the popup menu.
| » | Check the “Customized” checkbox to modify the cashflows as applicable. |
To modify a value, double-click a cell and modify its value as applicable.
A column that contains modified values will show a star to the right of the column heading.
Note that if you don't want modified values to be overridden when the cashflows are generated, you need to lock the corresponding columns. Right-click a modified value and choose "Lock Column” or “Lock All Modified Columns” from the popup menu.
A locked column will show a star to the left of the column heading.
The Manual Amt column is automatically checked when the Pmt Amt is manually modified. It indicates that changing parameters that would normally be used in the calculation (fixed rate, interest start and end dates) will have no effect since the payment amount has been manually set.
| » | Right-click any cell in the cashflows to display the Cash Flow Menu. |
Cash Flow Menu
The menu items of the Cash Flow menu are described below.
|
Menu Items |
Description |
|
Copy Ctl-C Paste Ctl-V |
To copy and paste into cashflow cells. Select a cell, type [Ctrl+C], then select another cell and type [Ctrl+V]. The content of the first cell will be pasted into the second cell. |
|
Add |
To add a cashflow. Right-click a row and choose Add. The selected row will be split between two rows. The first one will be one day long, and the second one will fill the remaining term of the original period. You can edit the periods as applicable. |
|
Remove |
To remove a cashflow. Right-click a row and choose Remove. The selected row will be removed. |
|
Scheduler |
To define an amortization schedule for the principal. This menu item requires customized cashflows. Right-click one or multiple Notional cells and choose Scheduler. It will bring up the Scheduler Notional window. You can select a Step-Down, Equal Principal, or Annuity structure. |
|
Sample Values |
Not applicable. |
|
Accretion Sample Values |
Not applicable. |
|
Show Details |
Not applicable. |
|
Lock Column |
To lock a customized column. Right-click a customized column and choose Lock Column so that the values will not be overridden when the cashflows are generated. A locked column will show a star to the left of the column heading. Note that cashflows columns which are locked but not modified will cause the corresponding fields to be outlined in blue in the trade worksheet. |
|
Lock All Modified Columns |
To lock all customized columns. |
|
Unlock Column |
To unlock a locked column. Right-click a locked column and choose Unlock Column to unlock it. |
|
Unlock All Columns |
To unlock all locked columns. |
|
Recalc |
When cashflows have been customized, choose Recalc to display the cashflows without overriding unlocked columns. |
|
Generate |
To generate the cashflows. Note that if you have customized the cashflows, you should not choose Generate if you have not locked the columns that contain modified values, because those columns will be overridden. You should instead choose Recalc. |
|
Configure Columns |
To select and organize the displayed columns. |
|
Save Column Config |
To save the column configuration. |
|
Export to Excel |
To export the cashflows to an Excel spreadsheet. |
|
Export to HTML |
To export the cashflows to an HTML page. |
1.13 Setting Fund Attributes
You can click ![]() to set user-defined attributes for the fund as needed.
to set user-defined attributes for the fund as needed.
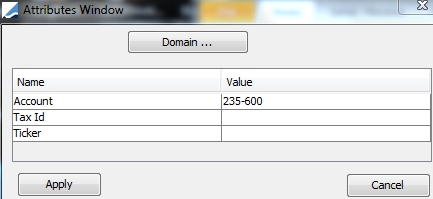
| » | You can set the value of an attribute in the Value field. |
| » | You can click Domain to add new attributes to the FundAttributes domain. |
| » | Click Apply to set the attributes. |
Save the fund when you are done.
1.14 Displaying Pending Authorizations
If the Authorization mode is enabled, an authorized user must approve any changes.
You can click ![]() to view any pending changes that require authorization.
to view any pending changes that require authorization.
1.15 Associating a Fund with a Book or Legal Entity
You can click ![]() to edit the default legal entity and book (for an internal fund) or legal entity
(for an external fund) associated with the fund. It brings up the Manage Fund Associations window.
to edit the default legal entity and book (for an internal fund) or legal entity
(for an external fund) associated with the fund. It brings up the Manage Fund Associations window.
Internal Fund
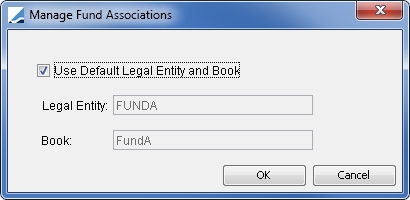
| » | To associate a legal entity and book different from the defaults, clear the "Use Default Legal Entity and Book" checkbox, and select a legal entity and book. |
| » | Then click OK. |
External Fund
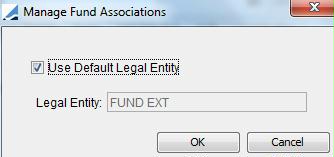
| » | To associate a legal entity different from the default legal entity, clear the "Use Default Legal Entity" checkbox, and select a legal entity. |
| » | Then click OK. |
1.16 Setting Credit Ratings
You can click ![]() to set the credit rating of the fund. It brings up the Credit Rating report.
to set the credit rating of the fund. It brings up the Credit Rating report.
You can also set the credit rating for the legal entity associated with the fund.
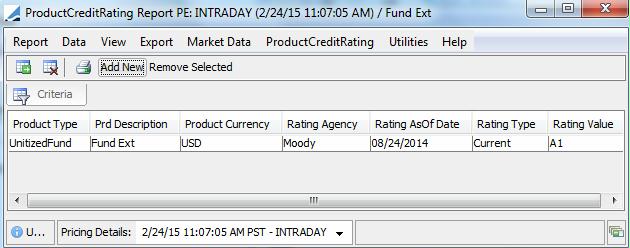
| » | You can click Add New to add a credit rating. |
| » | You can choose Help > ProductCreditRating Report for complete details. |
1.17 Setting Product Code Values
You can click ![]() to set product code values.
to set product code values.
Product codes and their values are user-defined. For reference, product codes are created using Configuration > Product > Code from the Calypso Navigator.
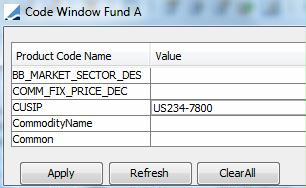
| » | Enter values as needed and click Apply when you are done. |
1.18 Deleting a Fund
| » | To delete a fund, click |
| » | Click |
Note that if the Authorization mode is enabled, an authorized user must approve your entry.
| » | The other objects that were automatically created when the fund was created, such as the legal entity, trading book, and accounting book, are not automatically deleted along with the fund. These objects must be deleted individually in their respective windows. |
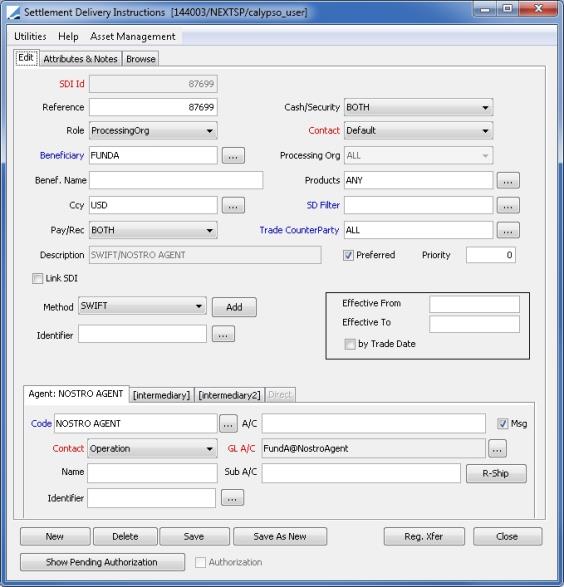
2. Sample Settlement and Delivery Instructions (SDIs)
Settlement and Delivery Instructions (SDIs) for the fund/mandate must be defined for the role ProcessingOrg (Calypso Navigator > Configuration > Settlements > Delivery Instructions).
Please refer to Calypso Settlements documentation for details on defining SDIs.
3. Sample Corporate Actions Generation
3.1 Sample Daily Dividend
Dividends accrue daily and are paid at the end of the dividend period.
The dividend period is defined in the Daily Dividend Definition panel.
You can also define a rebate in the Rebate Definition panel.
The dividend rate is based on the quote "Fund.<fund name>.DailyDividend". You need to set this quote every day of the dividend period.
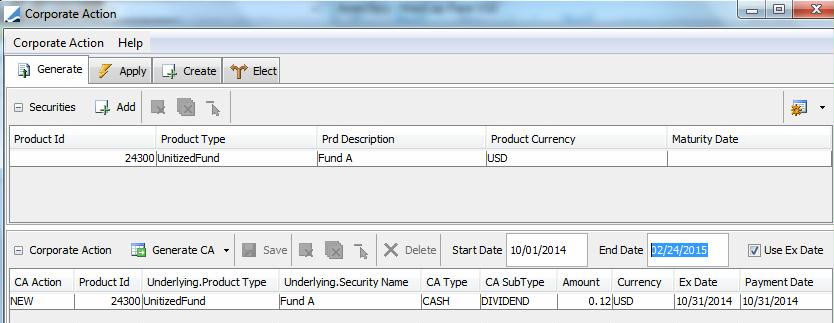
From the Calypso Navigator, navigate to Trade Lifecycle > Corporate Action > Corporate Action, and select the Generate panel.
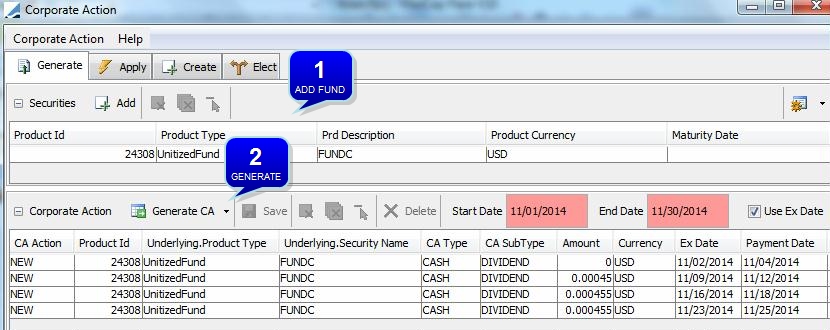
| » | Click Add to select the fund. |
| » | Select the start and end dates, and click Generate to generate the corporate actions. |
| » | Select the corporate actions you wish to save, and click Save. |
You can then double-click a corporate action to view its details.
You can apply the corporate actions to the positions using the Apply panel.
Please refer to Calypso Corporate Actions documentation for details.
3.2 Sample Guaranteed Dividend
Dividends are guaranteed based on a rate index.
The rate index is defined in the Guaranteed Dividend Definition panel.
The actual dividend schedule is defined in the Dividend History panel.
From the Calypso Navigator, navigate to Trade Lifecycle > Corporate Action > Corporate Action, and select the Generate panel.
| » | Click Add to select the fund. |
| » | Select the start and end dates, and click Generate to generate the corporate actions. |
| » | Select the corporate actions you wish to save, and click Save. |
You can then double-click a corporate action to view its details.
You can apply the corporate actions to the positions using the Apply panel.
Please refer to Calypso Corporate Actions documentation for details.