Defining Credit Facilities
![]() Download PDF - Credit Facilities
Download PDF - Credit Facilities
A Credit Facility is a structured agreement in which a lender sets out the terms and conditions on which it is prepared to make money available to the borrower. It details the extent of the agreement as well as the conditions of drawdown, interest rate, repayment schedule, fees etc.
There is no principal movement and no cashflow associated to the Credit Facility product. Consequently, there is no transfer generated for a Credit Facility, except for Fees when charged at Credit Facility level.
A Credit Facility can have a number of:
| • | Tranches: A tranche is a sub-division of a Credit Facility that may have a separate start or end date, or be dependent upon a number of business outcomes to become available. Each tranche can have one or multiple drawdowns. The drawdown is the actual money that is lent. |
Each tranche has its own limit; the sum of the tranche limits must not exceed the Credit Facility limit.
| • | Rate Conditions Configurations: A Credit Facility may have one or more rate conditions configurations to allow: |
| – | Each tranche to have its own rate conditions (e.g. a different margin or index), or |
| – | Each drawdown to have its own rate conditions |
Note that the configuration of rate conditions is optional, you can always set the rate conditions when you capture a drawdown.
| • | Statement Configurations: A Credit Facility may be required to provide statements on a predefined frequency (e.g. weekly, monthly, quarterly, etc.) broken down by tranche and/or drawdown. |
|
Credit Facility Quick Reference Setup Requirements In order for all the components of a Credit Facility to be synchronized, you need to add the trade rule UpdateTrancheActions to the domain mandatoryTradeRule. It is also recommended to enable the status bar in the Credit Facility related windows (Trade > Status Bar) so that you don't have a popup message each time a component of a Credit Facility is added or modified - All messages are redirected to the status bar. |
||||||||||||
|
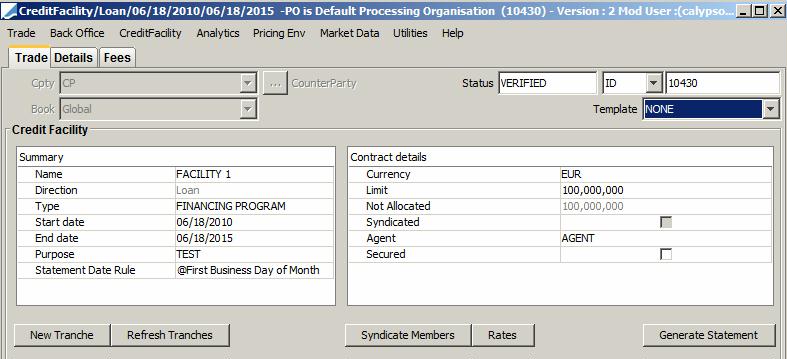
Credit Facility Definition Create a Credit Facility to define the general money availability using the Credit Facility Trade window.
Or you can enter the trade fields directly. They are described below. Note that the Trade Date is entered in the Details panel.
In particular, you can select the date rule to generate periodic fees in the Fees panel.
You can also hit F3 to save the current trade as a new trade, or choose Trade > Save As New. A description appears in the title bar of the trade worksheet, a trade id is assigned to the trade, and the status of the trade is modified according to the workflow configuration.
|
||||||||||||
|
Tranche Definition For a given Credit Facility, define tranches that provide details about lending conditions.
|
||||||||||||
|
Drawdown Capture For a given Tranche, capture the actual drawdowns of money.
|
||||||||||||
|
Periodic Fees You can compute periodic fees for credit facilities.
|
||||||||||||
|
Trade Lifecycle You can terminate a credit facility using Back Office > Terminate. Note that you cannot terminate a credit facility if it contains active tranches. You first need to terminate the tranches.
|
1. Sample Credit Facility
From the Calypso Navigator, navigate to Trade > Money Market > Credit Facility to bring up the Credit Facility window (menu action trading.TradeCreditFacilityWindow).
1.1 Trade Details
Trade Details
| Fields | Description |
|---|---|
|
Cpty / Role |
Select the trade's counterparty. The default role is CounterParty but you can change it as needed by double-clicking the CounterParty label. The default role is specified using Utilities > Set Default Role. You can select a legal entity of specified role provided you have setup favorite counterparties. You can also type in a character to display the favorite counterparties that start with that character. Favorite counterparties are specified using Utilities > Configure Favorite Counterparties. Otherwise, click ... to select a legal entity of specified role from the Legal Entity Chooser. You can also type [Ctrl-F] to invoke the Legal Entity Chooser, or directly enter a Legal Entity short name. |
|
Status |
Current status of the trade. The status is automatically assigned by the system based on the workflow configuration. The status will change over the lifetime of the trade according to the workflow configuration and the actions performed on the trade. |
|
Id Ext Ref Int Ref |
Unique identification number of the trade. The trade id is automatically assigned by the system when the trade is saved. You can load an existing trade by typing the trade id into this field, and pressing [Enter]. You can also display the internal reference or external reference. The default trade reference to be displayed can be selected in the User Defaults. The internal reference and external reference can be set in the Details panel of the trade worksheet. |
|
Book |
Trading book to which the trade belongs. Defaults to the book selected in the User Defaults. You can modify as applicable. You can select a book provided you have setup favorite books. Favorite books are specified using Utilities > Configure Favorite Books. Otherwise, click ... to select a book. The owner of the book (a processing organization) identifies your side of the trade. |
|
Template |
You can select a template from the Template field to populate the worksheet with default values. Then modify the fields as applicable. |
Ⓘ [NOTE: The Counterparty set on the Credit Facility is automatically conveyed for all Tranches and Drawdowns linked to that Credit Facility]
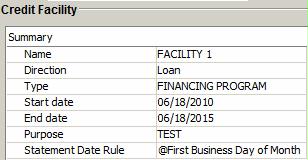
Summary Details
| Fields | Description |
|---|---|
|
Name |
Free-text field. Enter the Credit Facility Name. This is used only for Message purposes. |
|
Direction |
Loan/Deposit. Default is Loan. Deposit direction must only be used when the processing organization is user (and not provider) of the Credit Facility and, as such, must pay commission on non-used principal and interest on drawdowns. The Credit Facility Direction defaults the Tranche(s) and Drawdown(s) direction linked to that Facility. |
|
Type |
Free-text field. Enter the Credit Facility Type. This is used only for Message purposes. Click OK when you are done. |
|
Start Date |
Start Date of the Credit Facility. |
|
End Date |
End Date of the Credit Facility (you can use xD/xM/xY as shortcuts). |
|
Purpose |
Free-text field. Enter the Credit Facility Purpose. This is used only for Message purposes. Click OK when you are done. |
|
Statement Date Rule |
Set a predefined Date Rule if a you must send a periodic Facility Statement to your Counterparty/Customer. This field can also be left blank when no statement is required. Asample message setup is provided below. |
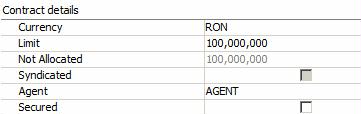
Contract Details
| Fields | Description |
|---|---|
|
Currency |
Credit Facility Currency. |
|
Limit |
Credit Facility Limit Amount. The Sum of Tranches Limit cannot exceed the Facility Limit. |
|
Not Allocated |
Unallocated principal of the Facility. This is dynamically computed by the system on the Trade Valuation Date when you click the Price button. The system will compute on ValDate the unallocated part of the Facility based on Sum of the Tranche(s) Limits associated to that Facility. By changing the ValDate you can price at different dates to simulate the future or check the past. |
|
Syndicated |
Check or clear as needed. This is for information and message purposes only. |
|
Agent |
Select a legal entity defined with the Role Agent. This is for information and message purposes only. |
|
Secured |
Check or clear as needed. This is for information and message purposes only. |
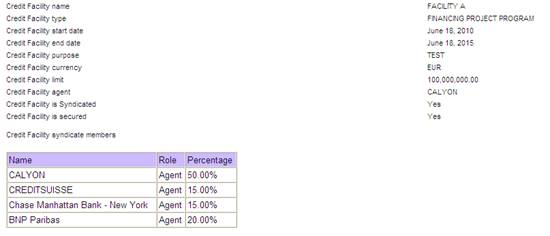
2. Defining Syndicate Members
You can define the participants in the Credit Facility by clicking Syndicate Members.
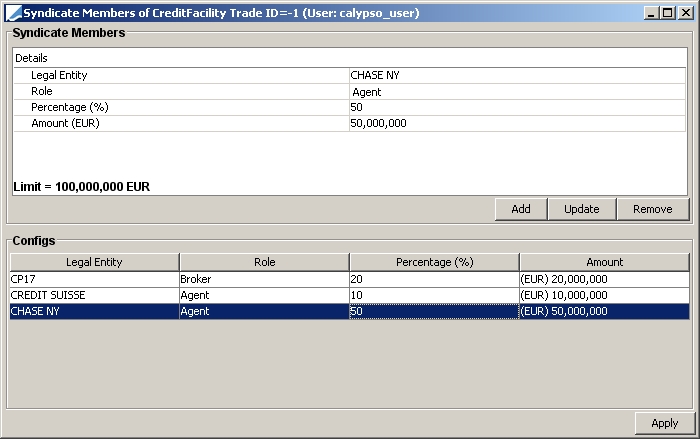
| » | Enter the Legal Entity Short Name, select its Role, and enter its participation percentage. The system checks that the participation percentage for each role does not exceed 100%. |
| » | You may enter either a percentage or an amount and the system will automatically calculate the figure for the alternate field.. |
This is for information and message purposes only.
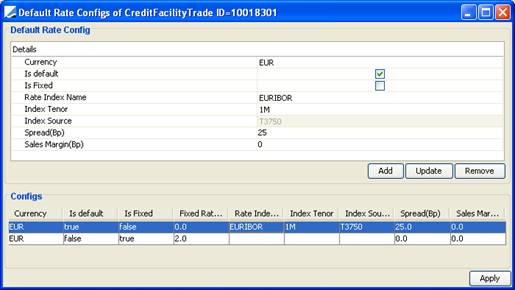
3. Defining Rate Conditions
Click Rates to define the possible rate conditions for the drawdowns associated with a Credit Facility.
You can define as many rate conditions as you like, and one default configuration per currency. When adding a new drawdown, the system proposes the default rate condition defined at the Credit Facility level for the drawdown currency. You can always override the rate conditions at drawdown level.
4. Generating Confirmations and Statements
You can generate a credit facility statement using the "CreditFacilityStatement.html" template through the standard message engine process.
You can generate statements on-the-fly, or generate periodic statements.
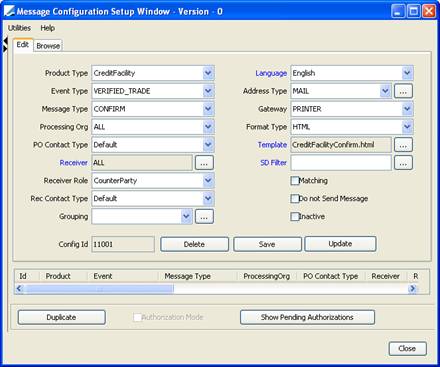
4.1 Message Setup
Credit Facility Confirmation Setup
Ⓘ [NOTE: A Credit Facility Confirmation is generated by the standard message engine process]
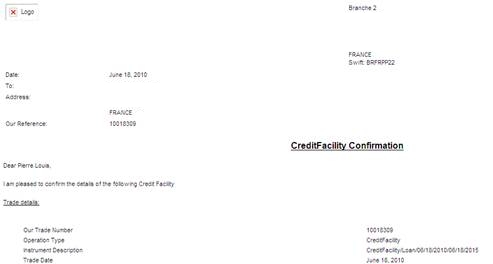
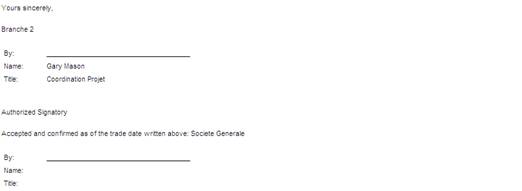
Facility Confirmation Example
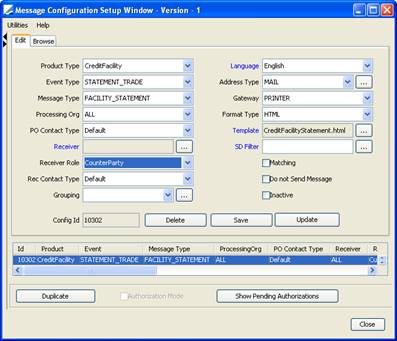
Credit Facility Statement Setup
See below for details on generating statements.
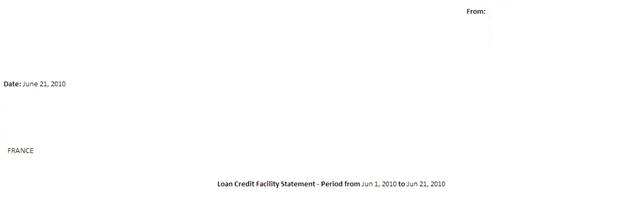
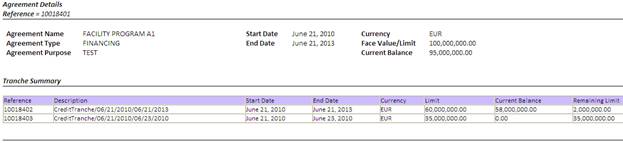
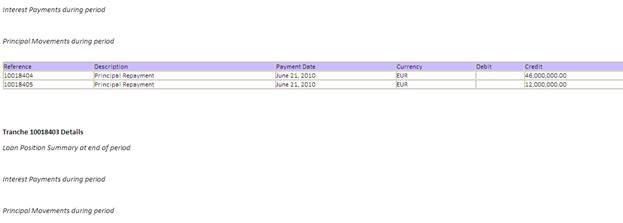
Credit Facility Statement Example

4.2 Generating Statements On-the-fly
Credit Facility statements are triggered by a trade event. When clicking Generate Statement, the user has to select the trade status triggering the statement generation (as set in the Message Setup for the product type Credit Facility), and click Send. This will create an ad-hoc statement from last End Date to Current Day.

4.3 Generating Periodic Statements
Credit Facility Periodic Statements are generated via the scheduled task CREDIT_FACILITY_STATEMENT.
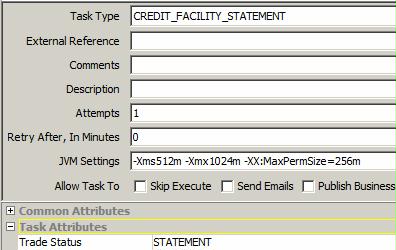
In the Scheduled Task, choose for the attribute "Trade Status", the status selected in the Message Setup to trigger the Credit Facility Statement.
With the above setup, the scheduled task sends a STATEMENT_TRADE event to trigger the Message Engine and to generate a Credit Facility Statement by FacilityId.
Please note that the pricing environment is mandatory to compute, on Statement End Date, the limit figures and pricing measures (accrual, current rate, etc.).
5. Accounting Events
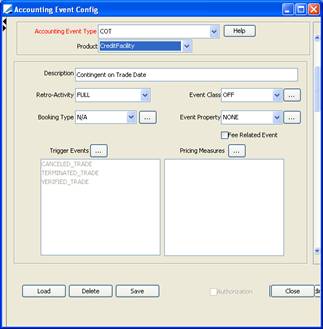
It is possible to book the contingent facility limit on facility start date, and to reverse it on facility end date, using the COT and COT_REV accounting events.

6. Viewing Tranche Details
Once the Credit Facility is saved, click New Tranche to create a tranche.
 See Capturing Credit Tranches for details.
The Tranche Details panel shows the tranches associated with a credit facility.

![]()
To display (or modify) a Tranche, double-click on a Tranche Details line.
Reporting capabilities are included in the Credit Facility trade screen, to give at any Val (Price) Date the status of the Facility with respect to Tranche(s) Limit, Sum of Drawdown(s) by Tranche and Tranche Remaining Limit.
As this part of the trade screen relies on the Calypso reporting framework, you can display any information/field which is available as a column.
To configure that default report, go to the Tranche Details panel, right-click and select Configure Columns.
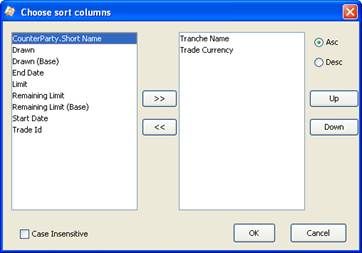
Choose the following columns:
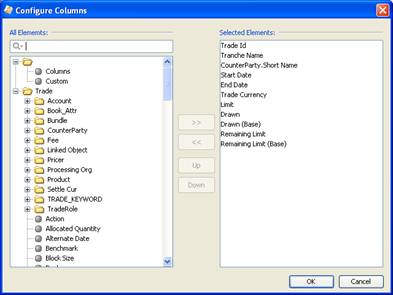
Then, go to Sort and sort the columns as shown below: