Utilities Menu
In the Calypso Navigator, a number of utilities are available from the Utilities menu.
1. Maintenance
1.1 Logging Information
From the Calypso Navigator, navigate to Utilities > Maintenance > Log to access log-related functions.
The functions of the Log menu are described below.
|
Menu Items |
Description |
||||||||||||||||||
|
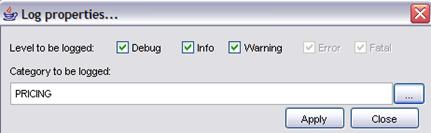
Configure Log |
Opens the Log Properties window to configure the Calypso Navigator’s on-the-fly.
You can exclude certain log categories when the log category is set to ALL by prefixing a category with - as shown in the example below.
|
||||||||||||||||||
|
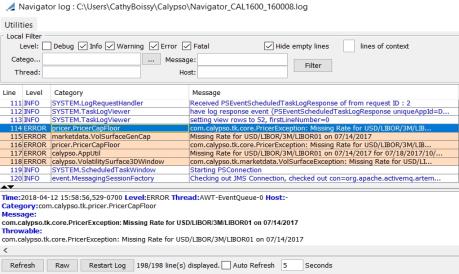
Show Log |
Displays the Calypso Navigator’s log, as shown below.
|
||||||||||||||||||
|
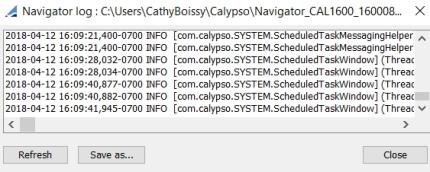
Restart Log |
Clears the Calypso Navigator’s log and restarts it. |
||||||||||||||||||
|
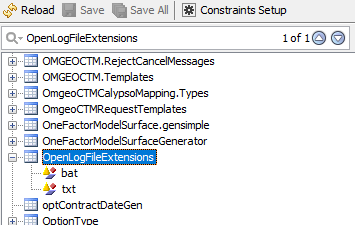
Open Log File |
Allows selecting a log file for display. By default, only .log files can be selected. To view additional file types, the file type should be added to the domain OpenLogFileExtensions.
|
||||||||||||||||||
|
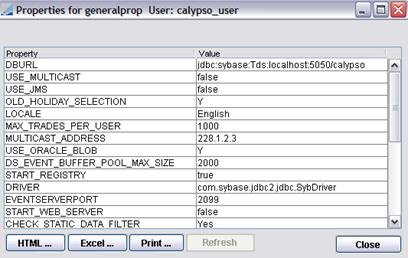
Show Options |
Shows the Properties window which displays the environment properties currently set for your Env.
|

2. Monitoring
From the Calypso Navigator, navigate to Utilities > Maintenance > Monitoring to access monitoring functions.
The functions of the Monitoring menu are described below.
|
Menu Items |
Description |
||||||||||||||||||||||||
|
Activates the profiler for the Calypso Navigator when selected, or stops the profiler. The profiler monitors RMI client methods (number of calls and CPU usage). Note that activating the profiler impacts the performance. It should only be activated for debugging purposes. |
|||||||||||||||||||||||||
|
Launch Webadmin |
Allows launching Web Admin.
|
||||||||||||||||||||||||
|
Profiler: Capture Stack |
Captures the stack when checked (history of profiling information). |
||||||||||||||||||||||||
|
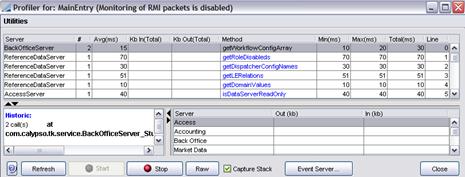
Profiler |
Opens the Profiler window as shown below.
The profiler monitors RMI client methods (number of calls and CPU usage) for the Calypso Navigator.
|
||||||||||||||||||||||||
|
Monitoring Events |
Opens the Monitoring Events window.  See Monitoring Events for details. See Monitoring Events for details. |
||||||||||||||||||||||||
|
Monitoring Dispatcher |
Opens the Monitoring Dispatcher window. See Monitoring Dispatcher for details. |
||||||||||||||||||||||||
|
Watcher Configuration |
Deprecated. In previous versions of Calypso, this option opened the Watcher Configurator window. The functionality of the Watcher (but without notification emails) is available in Web Admin (Web Admin > * > Monitoring > Alerts).
|
||||||||||||||||||||||||
|
Admin Market Data Server |
Opens the Admin Market Data Server Window.
|
||||||||||||||||||||||||
|
Opens the Archive window.
|
|||||||||||||||||||||||||
|
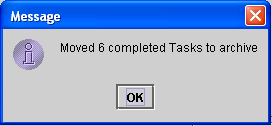
Clean-up: Archive All Completed Tasks |
Workflow tasks that have been completed remain in the task tables after completion. It may be useful to archive these completed tasks on a regular basis. When "Archive All Completed Tasks" is executed from the menu, the administrator will receive a message as shown below:
Archived tasks are moved from the Note that the Completed Tasks panel of the Clean-up Database function is used to archive specific completed task types as opposed to the general ALL tasks coverage of "Archive All Completed Tasks". You can also use the scheduled task PURGE to purge completed tasks. It is recommended to run this scheduled task daily. |
||||||||||||||||||||||||
|
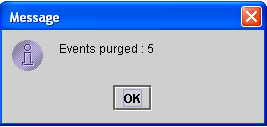
Clean-up: Purge Consumed Events |
Calypso events are either persistent (stored in the database) or non-persistent. Persistent events remain in the database even after they are consumed by all subscribers. The Purge Consumed Events menu item will permanently delete all consumed persistent events from the database. A message as the one shown below will appear.
You can also use the scheduled task PURGE to purge consumed persistent events. It is recommended to run this scheduled task daily. |
||||||||||||||||||||||||
|
Clean-up: Clean-up Database |
Opens the Database Clean-up window.
|
||||||||||||||||||||||||
|
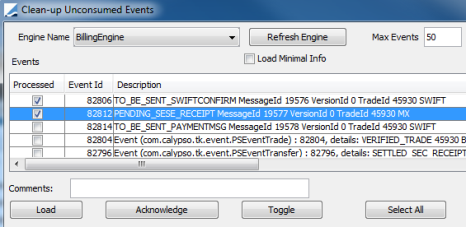
Clean-up: Purge Unconsumed Events |
Ⓘ [NOTE: You should only use this function when you have unconsumed events due to a defective workflow and these events will never be consumed] Opens the Clean-up Unconsumed Events window as shown below.
You can check the Load Minimal Info checkbox to limit the information loaded for the events as shown below.
You can double-click an event to view its details as shown below.
Green rows represent Calypso objects such as trades, transfers and messages. You can double-click a green row to bring up the corresponding object.
You can add “Admin.ManualPurgedEvents” to the domain "classAuditMode" to record audit information. |
||||||||||||||||||||||||
|
Consistency: Check Kickoff |
Shows the tasks that have a kickoff datetime earlier than the entered date, or have no kickoff datetime, but a kickoff id if the entered date is null. |
||||||||||||||||||||||||
|
Consistency: Check Trade Open Quantity |
Shows the trades that do not have a trade open quantity. |
||||||||||||||||||||||||
|
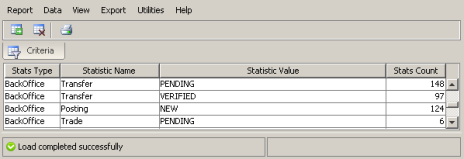
Consistency: Check Global Stats |
Displays the Global Stats report that shows general statistics on data.
|
||||||||||||||||||||||||
|
Consistency: Check Posting Reversal |
Shows the postings that have no reversal or more than one reversal, with a date earlier than the entered date, or that match the posting type selected. |
||||||||||||||||||||||||
|
Instant Messenger |
Opens the Calypso Instant Messenger which allows communication between users currently logged on the system. It can also be accessed from the Calypso Navigator using Help > Instant Messenger. Ⓘ [NOTE: The maximum message length is 500 characters] |
 as
applicable to stop and start the profiler.
as
applicable to stop and start the profiler.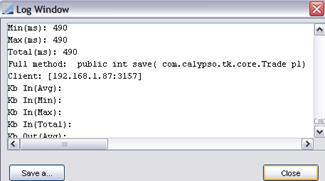


2.1 Monitoring Events
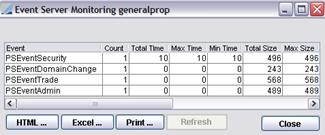
The Events panel allows monitoring the operation of the Event Server. The scrollable panel on the right side of the window displays published events and a log of all connections to and disconnections from the Event Server.
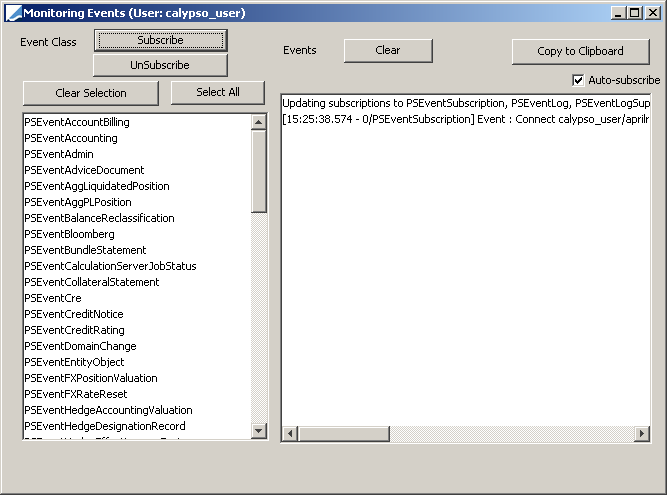
Monitoring Events window
The number displayed to the left of the event type is the Event ID. The Event ID links to an event trace for easier troubleshooting in the engine log. An Event ID specified only for persistent events. Also, note that not all message statuses are used. For example, not all statuses of an event message are used by a sender engine. If your event filter allows it, and an event is saved, then you will have an id.
| » | Select types of events from the Event Class list, and click Subscribe to subscribe to these events. |
As the Event Server sends events of these types, a record will appear in the Events list.
NOTE: Clicking Subscribe cancels previous subscriptions.
![]() Operational Anomaly Detection
Operational Anomaly Detection
For example, you have subscribed to PSEventTrade, and you save a trade. However the event does not appear in the Events list. Note that it does not mean that the Event Server is not functioning properly. It might only mean that the Data Server has lost the connection to the Event Server and cannot publish the event.
See Reconnection for details on reestablishing the connection.
| » | Select types of events from the Event Class list, and click UnSubscribe to unsubscribe to these events. |
| » | Click Clear Selection to clear the selection in the Event Class list. |
| » | Click Clear to clear highlighted items from the Events list. |
Left-click a row to select a single event, press Ctrl+A to select all events, or hold Ctrl and left-click to select multiple events.
| » | Click Copy to Clipboard to copy the Events list to the clipboard. This is useful to paste the Events list into another application such as Excel or Word when you have to scroll through a long list of events. |
| » | Check the Auto-subscribe checkbox to automatically subscribe to the following types of events: |
| – | PSEventTrade |
| – | PSEventSubscription |
| – | PSEventLog |
| – | PSEventProfilerData |
| – | PSEventMonitor |
| – | PSEventMessenger |
| – | PSEventDomainChange |
| – | PSEventSecurity |
2.2 Monitoring Dispatcher
The Monitor Dispatcher allows monitoring the distributed jobs currently executing.
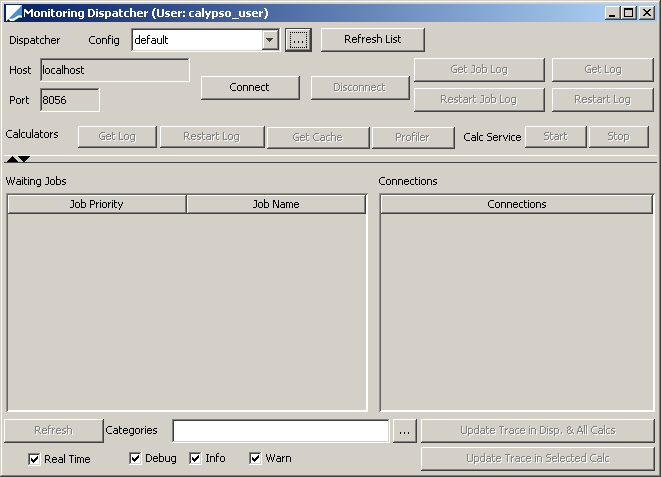
Monitoring Dispatcher window
| » | Select a Dispatcher Config from the Config field. Click Refresh List if your Dispatcher Config does not appear. |
| » | Click Connect to establish a connection with the Dispatcher (provided the Dispatcher is running). |
Refer to the Calypso Installation Guide for details on setting up distributed processing and information on starting the Dispatcher and the Calculators.
| – | The connection will appear in the Connections list. |
| – | The jobs currently running, or waiting to be executed, will appear in the Waiting Jobs list as will their assigned Job Priority. |
| » | Click Refresh to get the latest information. |
| » | Configure the log levels for the Dispatcher and the Calculators as applicable. |
You can click Update Trace in Disp. & All Calcs to propagate the settings to all calculators.
| » | Click Get Log to view the log of the Dispatcher. You can click Restart Log to start a new log. |
| » | Click Get Job Log to view the jobs that have been executed. You can click Restart Job Log to start a new log. |
2.3 Archive Window
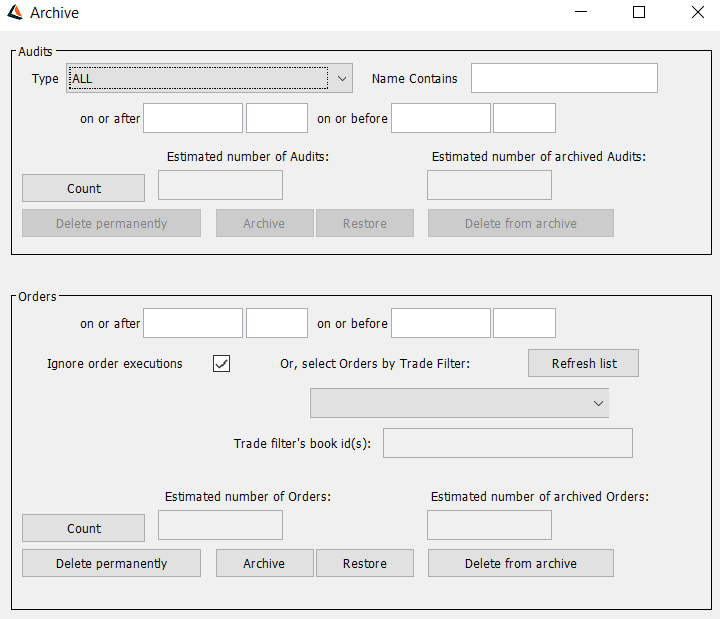
Archive window
Audit data is stored in the bo_audit table by audit data type and modification date. Once a data type and the date range have been specified, the audit data may be archived. Archived audit data is moved to the bo_audit_hist table.
| » | Enter selection criteria (Type, Object Name, and dates) as applicable, then click Count. |
The application displays the active audit data corresponding to the selection criteria under "Number of Audits selected:", and the archived audit data corresponding to the selection criteria appears under "Number of archived Audits selected:".
| » | Click Archive to archive the selected active objects. The objects are moved from the current tables to the history tables, and deleted from the current tables. |
| » | Click Restore to restore the selected archived objects. The objects are moved from the history tables to the current tables, and deleted from the history tables. |
| » | Click Delete from archive to delete the selected archived objects. The objects are deleted from the history tables, and are no longer available in the database. |
Field Descriptions
|
Fields |
Description |
||||||
|
Type |
Select the type of audit data to be processed. |
||||||
|
Name Contains |
Enter the name of the object to archive or delete. Examples:
|
||||||
|
on or after on or before |
Enter an "on or before date" to select all audits with a modification date stamp on or before the entered date. Enter both an "on or after" date and an "on or before" date to select all audits with a modification date stamp on or in between the date range. An "on or after" date may not be entered without an "on or before" date. |
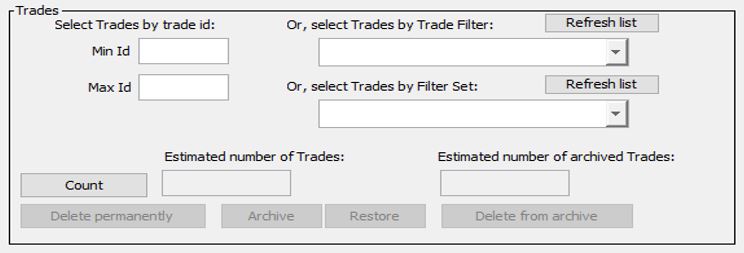
Archive Window allows archiving of trades when Domain Value 'showTradeArchiveWindow' is set to true (default is false).
Field Descriptions
|
Fields |
Description |
|
Min Id |
Enter the minimum trade id you want to archive Or, select trades by Trade Filter. |
|
Max Id |
Enter the maximum trade id you want to archive Or, select trades by Filter Set. |
|
Estimated number of Trades |
The count for estimated number of Trades is displayed. |
|
Estimated number of archived Trades |
The count for estimated number of archived Trades is displayed. |
Please refer to Calypso Orders documentation for details.
2.4 Database Clean-up Window
The Database Clean-up window allows archiving or deleting individual objects.
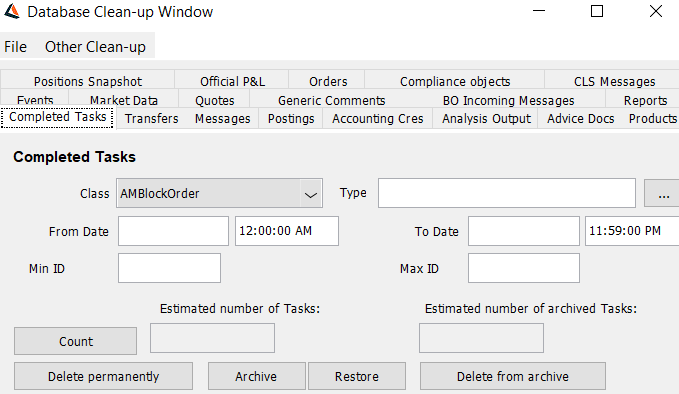
Database Clean-up window
| » | Select the panel corresponding to the object you want to process, and enter selection criteria as applicable. The panels are described below. |
| » | Then click Count to select the objects. |
| » | The active objects corresponding to the selection criteria will appear under "Estimated number of <objects>", and the archived objects corresponding to the selection criteria will appear under "Estimated number of archived <objects>". |
Ⓘ [NOTE: You need to run the Database Clean-up tool on a test database so that you can evaluate the impact of removing certain data - Only when you are satisfied with the impact, should you run the Database Clean-up tool on a production database - Also, since removals are not reversible, it is recommended to back up the database before using the tool]
Archive Operations
| » | You can click Archive to archive the selected active objects. The objects are moved from the current tables to the history tables, and deleted from the current tables. |
| » | You can click Restore to restore the selected archived objects. The objects are moved from the history tables to the current tables, and deleted from the history tables. |
| » | You can click Delete from archive to delete the selected archived objects. The objects are deleted from the history tables. The objects are no longer available in the database. |
Note that the archive operations carried out using the Database Clean-up window can also be performed using the Archive scheduled task.
See Archive (scheduled task) for details.
Advice Documents Panel
Advice documents created by the Sender Engine are stored in the advice_document table. Archived advice documents are moved to the advice_doc_hist table.
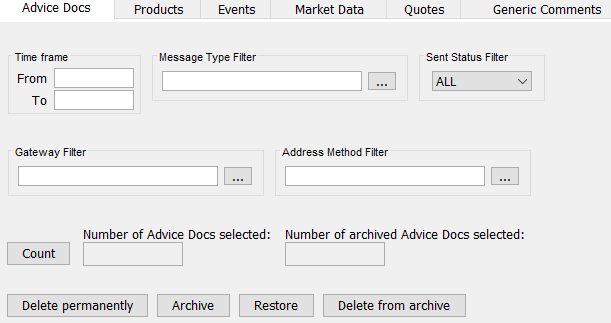
Database Clean-up Window – Advice Documents Panel
| » | Enter a "From" date, a "To" date, or both to select advice documents by generation date. |
| » | Click ... next to the Message Type Filter field to select a message type filter. |
| » | Select All, Sent, or Unsent from the Sent Status Filter field. |
| » | Click ... next to the Gateway Filter field to select a gateway filter. |
| » | Click ... next to the Address Method Filter field to select an address method filter. |
| » | Then click Count and select an archive operation. |
Products Panel
The Products panel allows deleting secondary market products, as well as product templates.
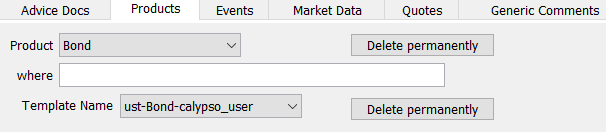
Database Clean-up Window – Products Panel
| » | Select a Product type from the Product drop-down. |
| » | In the "where" field, enter an SQL where clause on the product_desc table to further restrict the selection. |
| » | Click Delete permanently next to the Product field to delete the corresponding products. The application displays a confirmation query similar to Purge Product confirmation query, below: |
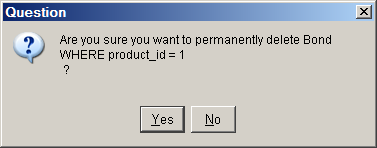
Purge Product Confirmation Query
Click Yes to purge the Product, or click No to abandon the action.
The administrator will receive a message similar to Deleted Products Message, below:
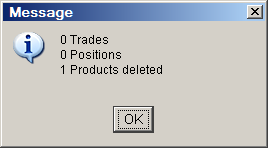
Deleted Products Message
| » | Select a product template from the Template Name field. |
Click Delete Permanently next to the Template Name field to delete the product template.
| – | If the Access Permissions mode is disabled, then only public templates can be deleted. |
| – | If the Access Permissions mode is enabled and the user has the "AdmPurgeProductTemplates" permission, then all the templates can be deleted. Delete permanently is disabled if the user does not have the "AdmPurgeProductTemplates" permission. |
Events Panel
The Events Panel allows deleting events from the database by Event ID, whether they are consumed or unconsumed.

Database Clean-up Window – Events Panel
| » | Enter both a Minimum Event ID and a Maximum Event ID. |
| » | Then click Delete permanently. The application displays a confirmation query similar to Purge Events confirmation query, below: |
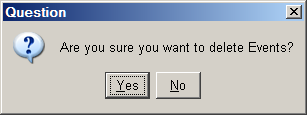
Purge Events Confirmation Query
Click Yes to purge the Product, or click No to abandon the action.
The administrator will receive a message similar to the Deleted Events Message:
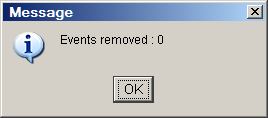
Deleted Events Message
Market Data Panel
The Market Data panel allows archiving instances of market data items.

Database Clean-up Window – Market Data Panel
Ⓘ [NOTE: You can save this clean-up configuration Save Template as a template for later reuse Load Template]
| » | Select a Type of market data item from the Type field. |
| » | Click ... to select a specific market data Item of the selected Type. |
| » | Enter a From Date, a To Date, or both to select instances by date. |
| » | Check the Open, Close, and Last checkboxes as applicable to specify the type of instance to process. |
| » | Then click Count and select an archive operation. |
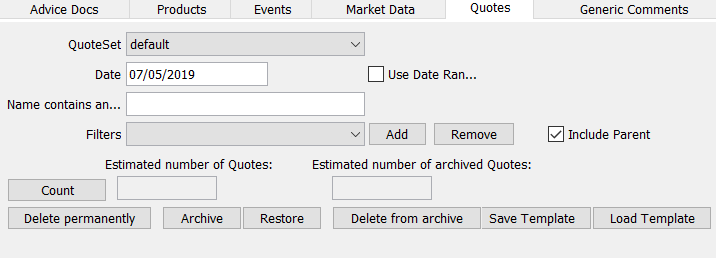
Quotes Panel
Quotes are stored in the quote_value table. Archived quotes are moved to the quote_value_hist table.
Database Clean-up Window – Quotes Panel
Ⓘ [NOTE: You can save this clean-up configuration Save Template as a template for later reuse Load Template]
| » | Select a quote set from the QuoteSet dropdown. |
| » | Enter a date in the Date field. You can also check the Use Date Range checkbox to specify a date range. |
| » | Enter a string in "Name contains any of" as applicable, to further restrict the selection. Click Add if you wish to save the string as a filter. |
| » | Select a filter from the Filters dropdown as applicable. A filter contains a list of characters that you have typed in the "Name contains any of" field and saved. See above. |
| » | Then click Count and select an archive operation. |
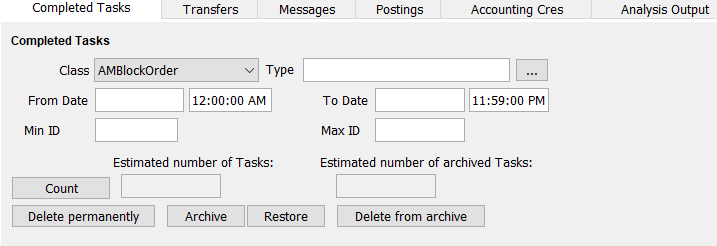
Completed Tasks Panel
Workflow tasks are stored in the bo_task table. Archived tasks are moved to the bo_task_hist table.
Database Clean-up Window – Completed Tasks Panel
| » | Select a task class from the Class dropdown. |
| » | Click ... next to the Type field to select specific types of tasks for the selected class. |
| » | Enter a From Date, a To Date, or both to select tasks by date. |
| » | Enter a Min ID and a Max ID as applicable, to select tasks by ID. |
| » | Then click Count and select an archive operation. |
Transfers Panel
Transfers (cash or securities) from trades and other activity are stored in the bo_transfer table, and transfer attributes are stored in the xfer_attributes table.
Archived transfers are moved to the bo_transfer_hist table and archived transfer attributes are moved to the xfer_attr_hist table.
![]()
Database Clean-up Window – Transfers Panel
| » | Click ... next to the Status field to select which status codes to process. |
| » | Enter a starting date, an end date, or both in the Transfer Date fields to select transfers by transfer date. |
| » | Click ... next to the Filter Set field to select a filter set to further restrict the selection. |
| » | Then click Count and select an archive operation. |
Messages Panel
Messages such as trade confirmations or rate reset advices created for trades and other activity are stored in the bo_message table. Message attributes are stored in the mess_attributes table, and message comments are stored in the message_comment table.
Archived messages are moved to the bo_message_hist table, archived message attributes are moved to the mess_attr_hist table, and archived message comments are moved to the message_cmt_hist table.
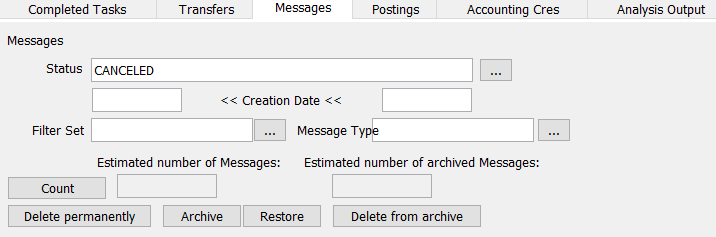
Database Clean-up Window – Messages Panel
| » | Click ... next to the Status field to select status codes to be processed. |
| » | Enter a starting date, an end date, or both in the Creation Date fields to select messages by creation date. |
| » | Click ... next to the Filter Set field to select a filter set to further restrict the selection. |
| » | Then click Count and select an archive operation. |
Postings Panel
Account postings are stored in the bo_posting table. Archived postings are moved to the bo_posting_hist table.
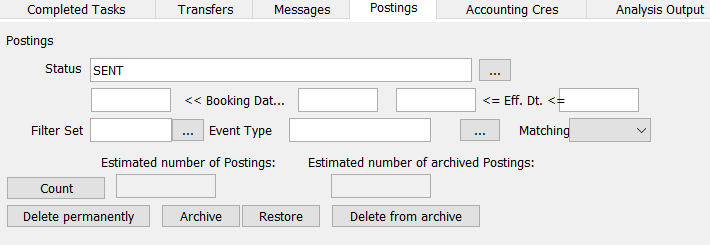
Database Clean-up Window – Postings Panel
| » | Click ... next to the Status field to select status codes to be processed. |
| » | Enter a starting date, an end date, or both, in the Booking Date fields to select postings by booking date. You can also enter a starting date, ending date, or both, in the Effective Date fields to further filter the postings. |
| » | Click ... next to the Filter Set field to select a filter set to further restrict the selection. |
| » | Click ... next to the Event Type field to select event types as applicable. |
| » | Select True or False from the Matching field. |
| » | Then click Count and select an archive operation. |
Accounting CREs Panel
The CRE engine ("Compte Rendu d’Evenement" or Account Enrichment) generates "accounting events" that contain data needed by external general ledger systems. CREs are stored in the bo_cre, cre_amount and cre_attribute tables.
Archived CREs are moved to the bo_cre_hist, cre_amount_hist and cre_attribute_hist tables.
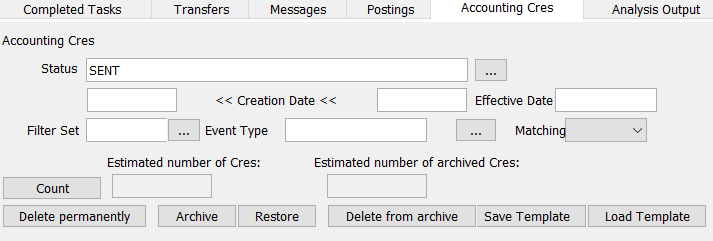
Database Clean-up Window – Accounting CREs Panel
Ⓘ [NOTE: You can save this clean-up configuration Save Template as a template for later reuse Load Template]
| » | Click ... next to the Status field to select which status codes to process. |
| » | Enter a starting date, an end date, or both, in the Creation Date fields for selecting postings by creation date. You can also enter an effective date in the Effective Date field. |
| » | Click ... next to the Filter Set field to select a filter set to further restrict the selection. |
| » | Click ... next to the Event Type field to select event types as applicable. |
| » | Select Yes or No from the Matching field. |
| » | Then click Count and select an archive operation. |
Analysis Output Panel
The Analysis Output panel allows deleting risk analyses outputs from the database.
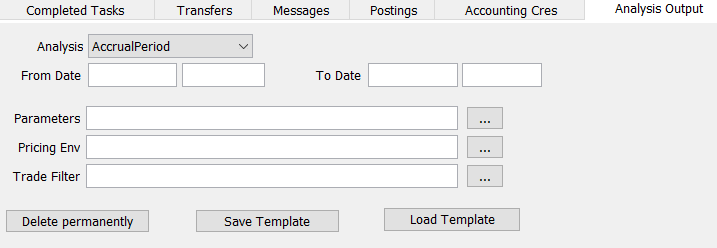
Database Clean-up Window – Analysis Output Panel
Ⓘ [NOTE: You can save this clean-up configuration Save Template as a template for later reuse Load Template]
| » | Select a risk analysis from the Analysis field. |
| » | Enter a From Date, a To Date, or both, to select risk analysis. |
| » | Click ... next to the Parameters field to select a set of analysis parameters. |
| » | Click ... next to the Pricing Env field to select a Pricing Env. |
| » | Click ... next to the Trade Filter field to select a trade filter. |
| » | Then click Delete permanently. |
Generic Comments Panel
Generic Comments are stored in the GENERIC_COMMENT table. Archived Generic Comments are moved to the GENERIC_COMMENT_HIST table.
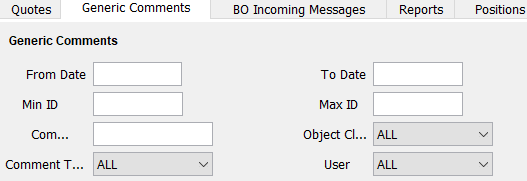
Database Clean-up Window – Generic Comments Panel
Ⓘ [NOTE: You can save this clean-up configuration Save Template as a template for later reuse Load Template]
| » | Enter a From Date and To Date to select comments by date. |
| » | Enter a Minimum ID and Maximum ID to select messages by Comment ID. |
| » | You can also select a comment type, object class and user as needed. |
| » | Then click Count and select an archive operation. |
Back Office Incoming Messages Panel
Generic Comments are stored in the BO_IN_MESSAGE table. Archived Generic Comments are moved to the BO_IN_MESSAGE_HIST table.
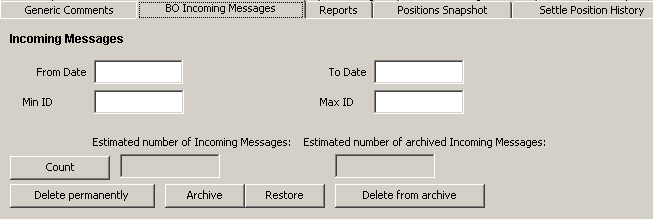
Database Clean-up Window – Generic Comments Panel
| » | Enter a From Date and To Date to select message by date. |
| » | Enter a Minimum ID and Maximum ID to select messages by Message ID. |
| » | Then click Count and select an archive operation. |
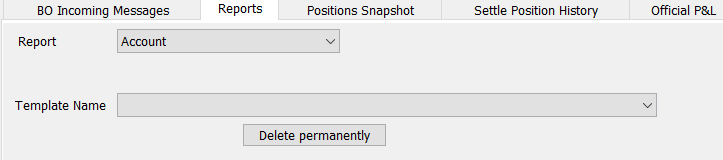
Reports Templates Panel
Reports are stored in the REPORT_TEMPLATE table. With the Report panel, the user can delete Public Templates and their own Private Templates.
Database Clean-up Window – Reports Panel
| » | Select a Report to populate the Template Name drop-down. |
| » | Select a template from the available Templates Names. |
| » | Click Delete permanently to delete the selected template. |
The application displays a confirmation prior to deleting any template:
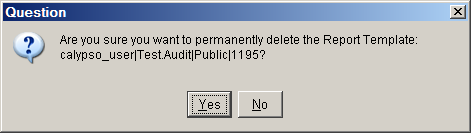
Delete Report Template Confirmation Query
Click Yes to delete the template or click No to abandon this action.
Positions Snapshot Panel
To remove position snapshots created by the scheduled task CREATE_POSITION_SNAPSHOT.
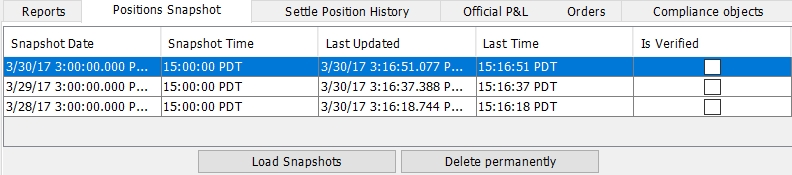
| » | Click Load Snapshots to load position snapshots. |
| » | Select the snapshots you want to remove and click Delete permanently. |
Official P&L Panel
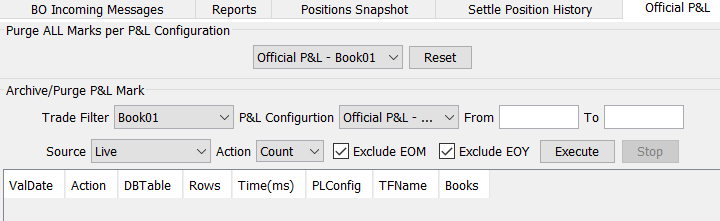
Database Clean-up Window – Official P&L
| » | To purge ALL P&L Marks from a P&L Configuration, select a P&L configuration from the drop-down, then click Execute. |
To Archive or Purge Selected Official P&L Marks
| » | Select an available P&L Trade Filter from the Trade Filter drop-down. |
| » | Select an available P&L Configuration from the P&L Configuration drop-down. |
| » | Enter a From date, a To date, or both. |
| » | Select the data on which to act from the Source drop-down. Choose Live for current data or Archive for archived data. |
| » | Select an Action: Choose Count to count the affected rows; Archive, to archive the data; or Purge, to delete the selected data. |
| » | Click Execute to take action on the selected data. |
Compliance Objects Panel
Please refer to Calypso Compliance documentation for details.
3. Maintaining Caches and Memory
From the Calypso Navigator, navigate to Utilities > Maintenance > Cache/Memory to access cache and memory related functions.
The functions of the Cache/Memory menu are described below.
|
Menu Items |
Description |
|||
|
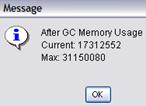
Garbage Collection |
Runs the garbage collector to clean up unused memory, and displays a status message as shown below.
|
|||
|
Memory |
Displays a status message on memory usage. |
|||
|
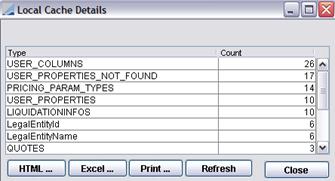
Local Cache Stats |
Displays the Local Cache Details window as shown below.
|
|||
|
Clear Local Cache |
Clears the local caches. |
|||
|
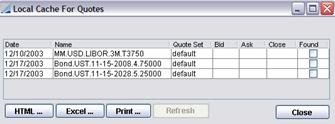
Local Quote Cache |
Displays the Local Cache for Quotes window as shown below.
|
|||
|
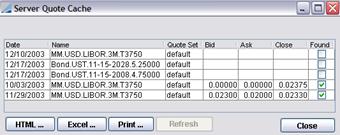
Server Quote Cache |
Displays the Server Quote Cache window as shown below.
|
4. System
From the Calypso Navigator, navigate to Utilities > System to access system related functions.
The functions of the System menu are described below.
|
Menu Items |
Description |
|
Product Generator |
This feature is not currently supported. |
|
Event Monitor |
Opens the Event Monitor window that monitors the activity of the event server.
|
|
Dispatcher Monitor Client |
Opens the Dispatcher Client Monitor window.
|
|
Stop All Host Connections |
Cancels all database connections for a client. |
|
VaR Data |
This feature is not currently supported. |
|
User Display Defaults |
Opens the User Display Defaults window that allows you to specify display resources.
|
|
User Prefs |
Opens the User Preferences window that allows copying properties and column configurations between users.
|
4.1 Event Monitor
From the Calypso Navigator, navigate to Utilities > System > Event Monitor to open the Event Monitor window that monitors the activity of the event server as shown below.
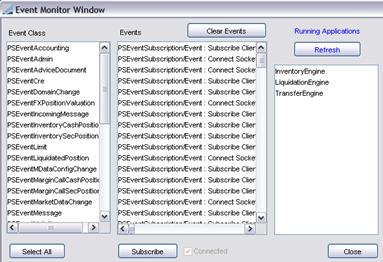
| » | Select event classes to which you wish to subscribe, and click Subscribe. As the Event Server sends events of the selected types, a record appears under the Events label. |
| » | Click Refresh to display the engines currently running. |
| » | Click Clear Events to clear the subscriptions. |
| » | Click Close when you are done. |
4.2 User Display Defaults
From the Calypso Navigator, navigate to Utilities > System > User Display Defaults to open the User Defaults window that allows you to specify resources as shown below.
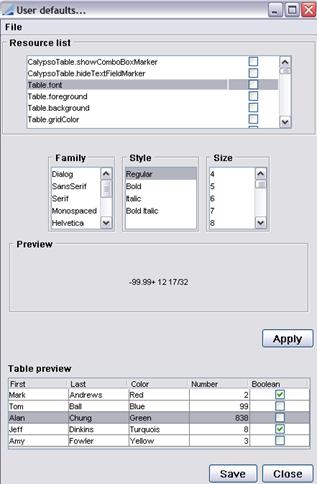
| » | Select a resource from the Resource list and specify its attributes as applicable. Then click Apply to apply your changes. The checkbox corresponding to the selected resource will be checked to indicate that this resource has been modified. Repeat as needed. |
| » | Click Save to save your changes. |
| » | Choose File > Restore to default L&F to restore the Calypso default look & feel. |
4.3 User Prefs
From the Calypso Navigator, navigate to Utilities > System > User Prefs to open the User Preferences window that allows copying properties and column configurations between users as shown below.
Ⓘ [NOTE: These properties are set by the system when the user uses a particular window - You cannot directly set these properties, but you can copy them between users]
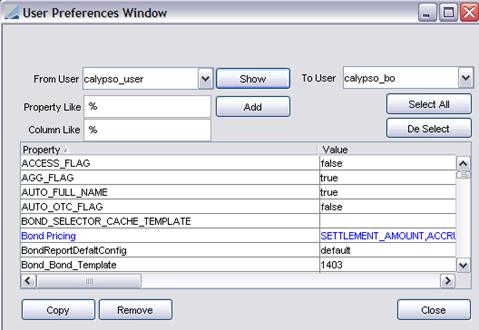
Note that properties appear in black and column configurations appear in blue.
| » | Select a user from the From User field and click Show to display all the properties and column configurations specified for that user. You can filter the display using the Property Like and Column Like fields. |
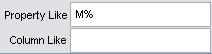
For example, entering M% in the Property Like field and nothing in the Column Like field will only display properties starting with the letter M. Note that you should enter capital letters only.
| » | Select a user from the To User field. |
| » | Select properties and column configurations as applicable and click Copy. |
| » | Click Close when you are done. |
5. Main Entry Customizer
From the Calypso Navigator, navigate to Utilities > Main Entry Customizer to configure the Calypso Navigator.
See Configuring the Calypso Navigator for details.
6. Window Layout Manager
The functions of the Navigator Window Layout menu are described below.
|
Menu Items |
Description |
| Load Layout |
Opens the Load Window Layout window. Choose a layout from the Select Layout to Open listbox, then click Load to open the Calypso windows saved in that layout. Click Cancel to dismiss the window. |
| Save & Manage Layouts | Opens the Window Layout Manager. From the Window Layout Manager, you can add, rename, delete, and set a default layout to load on login. |
Calypso’s Window Layout Manager provides a simple, effective method to store and recall saved Calypso window layouts (i.e., geometry and desktop positioning) for various purposes. Calypso stores window layout information in the Calypso database.
After arranging Calypso application windows on the desktop to your satisfaction, you can then save that layout for later use. Each layout can be designed to accomplish different user tasks. For example, you could have specific layouts for specific tasks such as trading, reporting, data authorization, user administration, etc.
Users can also designate a Window layout to automatically load on login.
6.1 Opening a Window Layout
To open a saved window layout, select Navigator > Utilities > Window Layouts > Load Layout to access the Load Window Layout window:
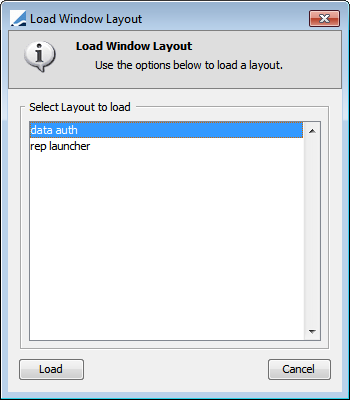
Next, select (highlight) the desired layout and then click Load to open the windows saved with the selected layout. Click Cancel to dismiss the window.
6.2 Working with the Window Layout Manger
To access the Window Layout Manager, select Navigator > Utilities > Window Layouts > Save & Manage Layouts:
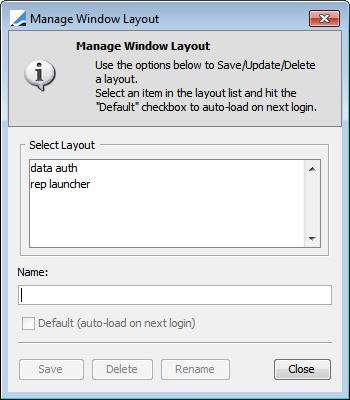
Users can save, delete, or rename the selected Window Layout. To dismiss the window, click Cancel.
6.3 Adding a Layout
To save a Window Layout from the Window Layout Manager, enter the desired name, then click Save. To automatically load that Window Layout on login, you can select (check) Default before clicking Save.

You can also make an existing Window Layout load automatically by simply selecting it and clicking Save.
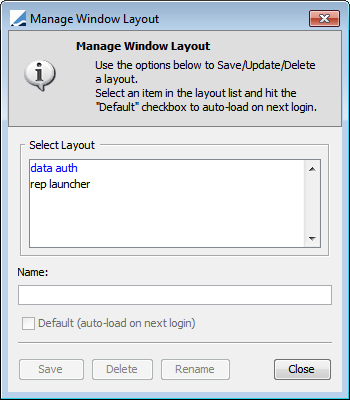
Default Window Layouts are displayed in blue text:
6.4 Delete a Window Layout
Highlight the desired Window Layout, then click Delete.
6.5 Rename a Window Layout
Highlight the desired Window Layout, modify its name in the Name field, then click Rename.
7. Reconnect
From the Calypso Navigator, navigate to Utilities > Reconnect to reconnect to the Event Server in case the connection got lost.
8. Reload Access Perm
Not operational - You need to restart the Calypso Navigator to reload access permissions.
9. Configure DB Relations
From the Calypso Navigator, navigate to Utilities > Configure DB Relations to configure database relations for the DB Relations report which allows checking for missing data.
10. Calendar
From the Calypso Navigator, navigate to Utilities > Calendar to open the Calendar window. It allows viewing holiday calendars. You can also choose Utilities > Calendar from a trade worksheet.
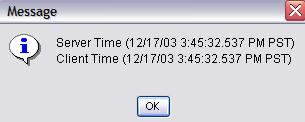
11. Check Server Time
From the Calypso Navigator, navigate to Utilities > Check Server Time to display the current server time as shown below.