Capturing Portfolio Swap Trades
This document describes how to capture portfolio swap trades using the Trade Portfolio Swap Window.
|
Portfolio Swap Quick Reference
Underlying Configuration
Entering Trade Details
You can also enter the trade fields manually. They are described below.
Saving a Trade
You can also press F3 to save the current trade as a new trade, or select Trade > Save As New. A description appears in the title bar of the trade worksheet, a trade ID is assigned to the trade, and the status of the trade is modified according to the workflow configuration. |
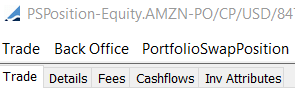
1. Sample Portfolio Swap Trade
Select Calypso Navigator > Trade > Equity > Portfolio Swap (menu action trading.TradePortfolioSwapPositionWindow) to open the Trade PortfolioSwap Window.
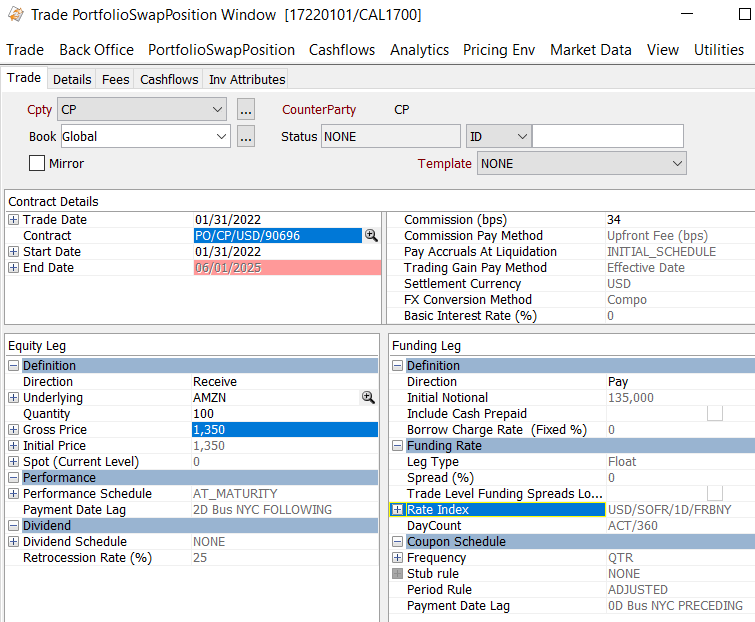
Trade Details
| Fields | Description |
|---|---|
|
Role / Cpty |
The first two fields of the worksheet identify the trade counterparty. The counterparty's role is displayed next to the counterparty field. Double-click the label to change the role. You can select a legal entity of the specified role provided you have set up favorite counterparties. Double-click the Cpty label to set the list of favorite counterparties. You can also type in a character to display the favorite counterparties that start with that character. Favorite characters are specified using Utilities > Configure Favorite Counterparties. Otherwise, click ... to select a legal entity of specified role from the Legal Entity Chooser. |
|
Book |
Trading book to which the trade belongs. Defaults to the book selected in the User Defaults. You can modify as applicable. The owner of the book (a processing organization) identifies your side of the trade. You can select a book provided you have set up favorite books. |
|
Status |
Current status of the trade. The status is automatically assigned by the system based on the workflow configuration. The status will change over the lifetime of the trade according to the workflow configuration and the actions performed on the trade. |
|
ID Ext Ref Int Ref |
Unique identification of the trade. The trade ID is automatically assigned by the system when the trade is saved. You can load an existing trade by typing the trade ID into this field and pressing the Enter key. You can also display the internal reference or external reference. The default trade reference to be displayed can be selected in the User Defaults. The internal and external reference can be set on the Details tab of the Trade worksheet. |
|
Template |
You can select a template from the Template field to populate the worksheet with default values. Modify the fields as necessary. |
| Mirror |
Check to generate a mirror trade. You will be prompted to enter additional fields in the Contract Details.
|
Contract Details Fields
| Fields | Description |
|---|---|
|
Trade Date |
Enter the trade date. Double-click the plus sign (+) to make Trade Time and Current options available. Select the Current checkbox to use the current date and time. |
|
Contract |
The contract is automatically displayed based on the Processing Organization of the selected trade book, the counterparty, and the trade date. If several contracts have the same Processing Organization and Counterparty, no contract will be chosen by default. The user will be able to select the contract from a list of contracts active at trade date. Ⓘ [NOTE: There must be a saved Portfolio Swap contract whose legal entities and roles match those selected in the trade window before you can select the contract in the Portfolio Swap Contracts search window] You can click |
|
Start Date |
Effective date of the underlying contract. |
|
End Date |
End date of the underlying contract. |
|
Commission |
The commission fee rate in bps defaulted from the underlying contract. The user can override the default value. |
|
Commission Pay Method |
Commission pay method of the underlying contract. |
|
Pay Accruals at Liquidation |
Accruals payment at liquidation method for the underlying contract. |
|
Trading Gain Pay Method |
Trading gain pay method of the underlying contract. |
|
Settlement Currency |
Settlement currency of the underlying contract. |
|
FX |
FX conversion method of the underlying contract. |
|
Basic Interest Rate (%) |
Basic interest rate of the underlying contract. |
Equity Leg Details
| Fields | Description |
|---|---|
|
Direction |
Direction of the leg from the Processing Organization's perspective. Select either Pay or Receive. |
|
Underlying |
Select the underlying product. You can click |
|
Quantity |
Enter the number of shares. |
|
Gross Price |
Enter the negotiated trade price. |
|
Initial Price |
Calculated by the system. In the case of Embedded Commission Pay Method, the commission rate / price is included in the Initial Price. In any other case, the Initial Price is equal to the Gross Price. This price is used to calculate the first payoff of a swap. |
|
Spot (Current Level) |
Displays the current market price. |
|
Initial FX Rate |
When the settlement currency is different from the contract currency, you can set the initial FX rate in this field. |
|
Initial Price (Settle Ccy) |
This field is displayed when the settlement currency is different from the contract currency and the FX Conversion Method is Compo. It is defined as the initial price converted into settlement currency using the Initial FX Reset of the trade. |
|
FX Reset |
When the settlement currency is different from the contract currency, the FX Reset Reference as defined in the underlying contract is displayed here. |
|
Performance Schedule |
Displays the performance payoff schedule of the underlying contract. |
|
Dividend Schedule |
Displays the dividend payment schedule of the underlying contract. |
|
Retrocession Rate (%) |
Retrocession Rate corresponds to Dividend Receivable percentage or Dividend Payable percentage from the underlying contract. |
Funding Leg Details
| Fields | Description | ||||||||||||||||||||||||
|---|---|---|---|---|---|---|---|---|---|---|---|---|---|---|---|---|---|---|---|---|---|---|---|---|---|
|
Direction |
Pay or Receive. The selection is based on the performance leg's direction. |
||||||||||||||||||||||||
|
Initial Notional |
Initial funding notional in pricing currency. Pricing currency is underlying the underlying security currency for the Flexo conversion method. Pricing currency is settlement currency for the Compo conversion method. |
||||||||||||||||||||||||
|
Include Cash Prepaid |
Displays the value entered in the contract |
||||||||||||||||||||||||
|
Borrow Charge Rate (Fixed %) |
Borrow charge rate of the underlying contract. The borrow charge rate can be seen in the Trade Browser in the following columns:
|
||||||||||||||||||||||||
|
Leg Type |
Fixed or Float (based on the underlying contract). |
||||||||||||||||||||||||
|
Fixed Rate (%) |
For a fixed leg, displays the fixed rate of the underlying contract by default. You can click |
||||||||||||||||||||||||
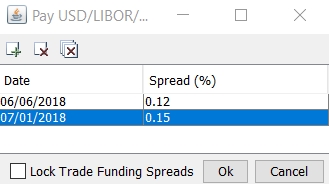
| Spread (%) |
Displays the funding spread of the underlying contract by default using the latest version of the country grid. You can see the version number in the trade keyword PortfolioSwapPositionSpreadVersion. If you customize the spread at the trade level, the version number is increased and prefixed with "-" to indicate it is customized. You can click
The spread as of trade start date can be displayed in the Trade Browser in the column "SettleDateSpread". |
||||||||||||||||||||||||
|
Rate Index |
For a floating leg, select the rate index: currency, reference index, tenor, and source (from the underlying contract). You can also set the following parameters:
|
||||||||||||||||||||||||
| DayCount |
Displays the daycount from the underlying contract. |
||||||||||||||||||||||||
| Coupon Schedule |
Displays the coupon schedule from the underlying contract. |
||||||||||||||||||||||||
|
Frequency |
Displays the funding payment frequency from the underlying contract. |
||||||||||||||||||||||||
|
Stub Rule |
Displays the stub rule defined in the underlying contract. |
||||||||||||||||||||||||
|
Period Rule |
Displays the period rule from the underlying contract. |
||||||||||||||||||||||||
|
Payment Date Lag |
Displays the payment date lag from the underlying contract. |
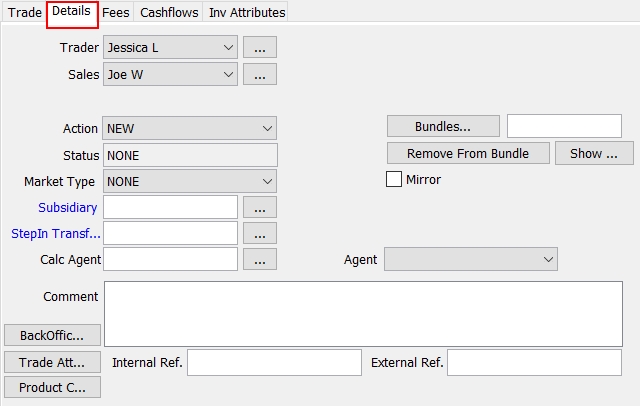
2. Specifying Additional Details
Select the Details tab to modify trade details.
| » | You can click Bundles to associate the Portfolio Swap trade with a bundle. You will be prompted to select a bundle. |
Field Details
| Fields | Description |
|---|---|
|
Trader |
Select a Trader. Click ... to add new traders. You will be prompted to enter a new trader name. |
|
Sales |
Select a Sales Person. Click ... to add a new sales person. You will be prompted to enter a new sales person name. |
|
Action |
Shows the action currently performed on the trade based on the workflow configuration. You can select an action that will be applied on the trade upon saving as applicable. |
|
Status |
Status of the trade. |
|
Market Type |
Select None, Primary, Re-Issue, Secondary, or When-Issued. |
|
Subsidiary |
Click ... to select a subsidiary. The Legal Entity Chooser will appear. You will prompted to select a legal entity for the role of subsidiary. |
|
StepIn Transferor |
Transferor from a Step-In Novation done through DTCC. |
|
Calc Agent |
Click ... to select a calculation agent. The calculation agent is the party who acts as the referee in the event of a disagreement about a payment detail. The calculation agent will be designated in a legal agreement. |
|
Comment |
Enter a comment as applicable. |
|
Mirror |
|
|
Internal Ref |
Enter an internal reference for the trade as needed. It can be used for reporting purposes, and you can search trades using their internal reference throughout the system. You can set the environment property AUTO_FEED_INTERNAL_REF to true to automatically populate the internal reference with the ID of the original trade for trades created through partial termination and novation, else with the trade ID. |
|
External Ref |
Enter an external reference for the trade as needed. It can be used for reporting purposes, and you can search trades using their external reference throughout the system. You can set the environment property AUTO_FEED_EXTERNAL_REF to true to automatically populate the external reference with value of the trade keyword TRANSFER_FROM if not empty, else with the trade ID. |
3. Capturing Trade Fees
The Fees tab allows entering fees for the trade. It also shows fees that have been automatically computed.
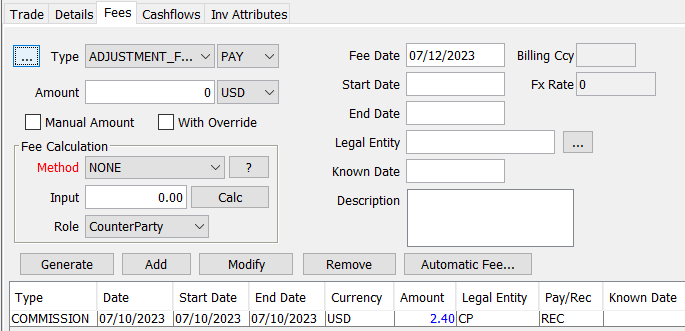
| » | Select a fee type from the Type field or click ... to create a new fee type. The Fee Definition window will appear. |
| – | Select PAY or REC next to the fee type as applicable. This indicates whether the processing org pays or receives the fee to / from the recipient. |
| – | Select the payment currency of the fee from the field next to the Amount field. |
| – | Enter the payment date of the fee in the Fee Date field. |
The fee date defaults to trade date + spot days (from the fee currency) + fee offset (from the fee definition).
For automatic fees, the fee date can be overridden by the attributes of the fee grid.
| – | Select the role of the fee recipient from the Role field and click ... next to the Legal Entity field to select the fee recipient. The Legal Entity Chooser will appear. You will be prompted to select a legal entity of specified role. |
| » | Click Add to add a fee row or click Generate to amortize the fee over a given period. |
When amortizing a fee, you will be prompted to enter a start date, end date, and amortization frequency.
| » | Click Apply to generate fee rows as applicable. |
Fields Details
| Fields | Description |
|---|---|
|
Amount |
Enter the fee amount for a flat fee only (method NONE). Otherwise, the amount will be calculated with the designated method. |
|
Method |
Select a fee calculation method and click Calc to calculate the fee. Keep in mind that the NONE method does not require calculation. When defining a fee type, you can select a default fee calculator. Click ? for information on a given method. |
|
Start Date End Date |
Start Date and End Date will be set to the Fee Date, unless you choose to amortize the fee over a given period. |
|
Known Date |
Allows you to enter a fee for a given date when you choose to amortize the fee over a give period. Enter a fee with a known date and click Add. A fee row will be added for the date. The known date must be between the start and date. |
|
Description |
Enter a comment as applicable. |
4. Generating Cashflows
Select the Cashflows tab to display cashflows.
The cashflows are generated when you click Price on the Trade tab, or when you choose Cashflows > Generate.
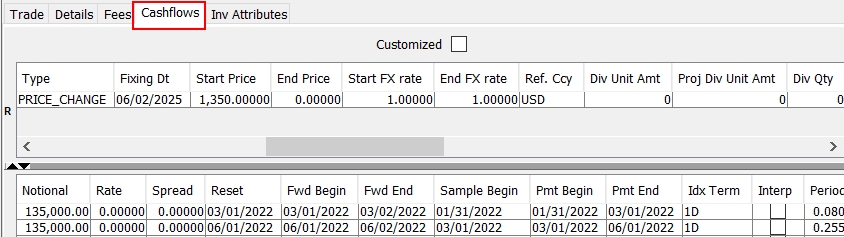
4.1 Cashflows Menu
The Cashflows menu items are described below.
The Cashflows menu is accessible from the Trade PortfolioSwap Window menu bar or by right-clicking a cashflow.
| Menu Item | Description |
|---|---|
|
Generate |
To generate the cashflows. Ⓘ [NOTE: If you have customized the cashflows and not locked the columns containing modified values, you should not choose Generate, because those columns will be overridden. You should choose Recalc instead] |
|
Recalc |
When cashflows have been customized, choose Recalc to display the cashflows without overriding unlocked columns. |
|
Copy Ctl-C Paste Ctl-V |
To copy and paste into cashflow cells. Select a cell, type [Ctrl+C], then select another cell and type [Ctrl+V]. The content of the first cell will be pasted into the second cell. |
|
Add Coupon |
To add a cashflow. Right-click on a row and choose Add. The selected row will be split between two rows. The right one will be one day long, and the second one will fit the remaining term of the original period. You can edit the periods as applicable. |
|
Remove Coupon |
To remove a cashflow. Right-click and row and choose Remove. The selected row will be removed. |
|
Add Coupon Period Remove Coupon Period |
To add or remove compounding periods. These menu items require customized cashflows and a compounding trade. Then you can add or remove compounding periods. |
|
Scheduler |
To define an amortization schedule for the principal. Right-click one or multiple Notional cells, and choose Scheduler. It will bring up the Scheduler Notional window. |
|
Sample Values |
|
|
Lock Column |
To lock a customized cashflow. Right-click a customized column and choose Lock Column. The values will not be overridden when the cashflows are generated. |
|
Lock All Modified Columns |
To lock all customized columns. |
|
Unlock Column |
To unlock a locked column. Right-click a locked column and choose Unlock Column to unlock it. |
|
Unlock All Columns |
To unlock all locked columns. |
|
Configure Columns |
To select and organize displayed columns. |
|
Save Column Config |
To save the column configuration. |
|
Export to Excel |
To export the cashflows to an Excel spreadsheet. |
|
Export to HTML |
To export the cashflows to an HTML page. |
|
Show Consolidated Cashflows |
To bring up the Cashflow Report that displays all the cashflows associated with the trade. |
Portfolio Swaps should be liquidated using FIFO by trade date.
Each trade has its own trade costs like Accrual Buy/ Accrual Sell / Basic Interest Buy / Basic Interest Sell / Borrow Charge. These carry the accrual from the last cashflow start date until the settle date of the deal - PERFORMANCE, FUNDING_CHARGE_REALIZED, SERVICE_CHARGE_REALIZED, BORROW_CHARGE_REALIZED. They are generated by the liquidation process.
In order to generate TRADING_GAIN and PERFORMANCE transfers on aggregated positions per product type, and to exclude some product types from Liquidation Aggregation, you can use the following domains:
| • | “XferPosAggregation.Exclude” – Add the product types for which you do not want to generate TRADING_GAIN and PERFORMANCE transfers on aggregated positions. |
| • | “XferLiquidationConfig” – Add the product types and liquidation configurations for which you want TRADING_GAIN and PERFORMANCE transfers to be generated. |
Example: PortfolioSwap.DEFAULT
Position details and basic interest, borrow charge, and funding accrual calculations can be viewed in the Position Valuation Report.
 See Position Valuation Report for details on configuring and using the report.
4.2 BASIC INTEREST
Basic Interest flows are part of the service charges paid by the user of the portfolio swap to the provider (provider can be the prime broker). These flows are paid by the user regardless of the direction of the position. The schedule is the same as the funding schedule defined on the contract level. The rate is fixed and is the same for long and short positions.
If FX Conversion Method = Compo:
BASIC_INTEREST =Position Notional * (Basic Rate) * Period
| • | Position Notional = Position Open Quantity * Avg Cost Price |
| • | Avg Cost Price is in settlement ccy = Avg cost Price in underl ccy * FX Reset |
If FX Conversion Method = Flexo:
BASIC_INTEREST =Position Notional * (Basic Rate) * Period
| • | Position Notional = Position Open Quantity * Avg Cost Price |
| • | The User of the portfolio swap contract will always be the payer of this flow regardless the direction of the trade. |
Formula for CA trade with Counterparty (BO transfer amount):
BASIC_INTEREST =Position Notional * (Basic Rate) * Period * FX Reset
| • | Position Notional = Position Open Quantity * Avg Cost Price |
| • | The User of the portfolio swap contract will always be the payer of this flow regardless the direction of the position. |
| • | FX Rate Reset Date = Payment date – FX reset date lag (defined on the FX Rate Definition) |
4.3 FUNDING CHARGE
If the “Include Cash Prepaid” checkbox is selected in Funding Leg Details of the Portfolio Swap contract, the funding is calculated on the contract position level. It takes into account the margin call position.
FUNDING_CHARGE_REALIZED = Funding Notional * (Funding Rate + Short Funding Spread) * Period
| • | Case 1: PO = Provider of the Portfolio Swap contract. PO will receive the FUNDING regardless the direction of the position. |
Funding Notional = MAX (0; Short Positions Notional – Margin Call Position + Long Positions Notional * Initial Margin Ratio)
Short and Long Positions Notional = Position Open quantity * Avg Cost Price * Avg Cost FX
FX Conversion is done on the pricing and PL level only if FX conversion method of the contract is Compo
| • | Case 2: PO = User of the Portfolio Swap contract. PO will pay the FUNDING regardless the direction of the position. |
Funding Notional = MAX (0; Long Positions Notional – Margin Call Position + Short Positions Notional * Initial Margin Ratio)
Short and Long Positions Notional = Position Open quantity * Avg Cost Price * Avg Cost FX
FX Conversion is done on the pricing and PL level only if FX conversion method of the contract is Compo.
Funding notional will be adjusted on each fixing date of the performance leg.
If the “Include Cash Prepaid” checkbox is cleared in the Portfolio Swap contract, the funding is calculated on the contract / underlying security position level. It does not take into account the margin call position. The funding will be paid by the Processing Organization on long positions and received on the short positions.
FUNDING_CHARGE_REALIZED = Funding Notional * (Funding Rate + Short or Long Funding Spread) * Period
| • | Funding Notional = Position Open quantity * Avg Cost Price * Avg Cost FX |
FX Conversion is done on the pricing and PL level only if FX conversion method of the contract is Compo
Funding notional will be adjusted on each fixing date of the performance leg.
4.4 BORROW CHARGE
The Borrow Charge is paid by the user of the Portfolio Swap on long positions.
BORROW_CHARGE_REALIZED = Position Notional * (Borrow Charge Rate + Spread) * Period
| • | Case 1: PO = Provider of the Portfolio Swap contract. PO will receive the BORROW_CHARGE_REALIZED on all long positions. There will be no BORROW_CHARGE_REALIZED flows on short positions. |
Position Notional = Long Position Open Quantity * Avg Cost Price
Avg Cost Price is in settlement ccy = Avg cost Price in underl ccy * FX Reset
FX Conversion is done on the pricing and PL level only if FX conversion method of the contract is Compo.
| • | Case 2: PO = User of the Portfolio Swap contract. PO will pay BORROW_CHARGE_REALIZED on all short positions. There will be no BORROW_CHARGE_REALIZED flows on long positions. |
Position Notional = Short Position Open Quantity * Avg Cost Price
Avg Cost Price is in settlement ccy = Avg cost Price in underl ccy * FX Reset
FX Conversion is done on the pricing and PL level only if FX conversion method of the contract is Compo.
4.5 PERFORMANCE FLOWS
Compo FX Conversion method:
PRICE_CHANGE = Position Quantity * (Start Market Price * Start FX Rate – End Market Price * End FX Rate)
Position Quantity = open quantity of the position
Position Open Quantity is updated at each liquidation, and the funding notional is impacted accordingly.
Flexo FX Conversion method:
PRICE_CHANGE = Position Quantity * (Start Market Price – End Market Price)
Position Quantity = open quantity of the position
The BO transfer will be converted into the settlement currency using the quote of the FX Reset Reference on the payment date – Reset Days of the corresponding FX Reset Definition.
Position Open Quantity is updated at each liquidation, and the funding notional is impacted accordingly.
4.6 DIVIDEND FLOWS
DIVIDEND = Position Open Quantity * Dividend Amount % * Retrocession Rate * FX Rate
5. Portfolio Swap Trade Allocation
The Allocation window allows allocating a trade to multiple books or multiple legal entities. When allocating a trade (referred to as a block trade), child trades are created for each book or legal entity to which the block trade is allocated. The allocation can be accomplished manually or according to an allocation template. The allocation is performed based on a percentage of the notional amount (or quantity) of the block trade.
To allocate trades from the portfolio swap trade window, go to Back Office > Allocate. Alternatively, you can apply the ALLOCATE action in a Trade Browser / Task Station.
| » | Click  to add a row or to add a row or  to remove a row. to remove a row. |
| » | In the Allocate by: drop-down list, indicate whether the allocation is specified by Legal Entity, Book/Strategy, or Book. |
| » | Enter details in the fields to define the allocation. |
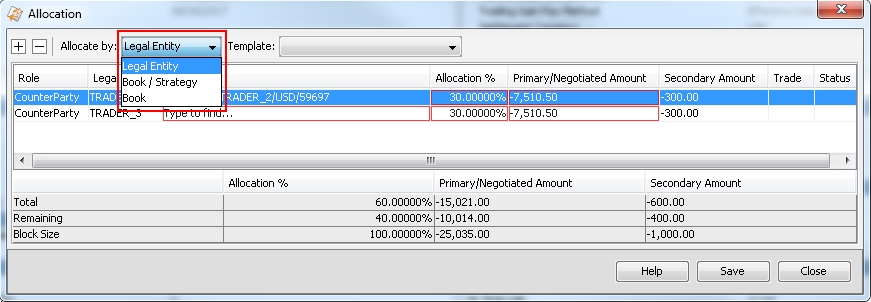
Allocation by Legal Entity
The Allocation window allows allocation by legal entity and an associated portfolio swap contract. Keep in mind the following requirements.
| • | The processing organization in the initial trade should be the processing organization in the contract. |
| • | The counterparty or counterparties selected for allocation should be counterparty in contracts associated with the allocation. |
| • | The trade date of the initial trade should fall within the contract period. |
Allocation by Book/Strategy or Book
The Allocation can also be specified by a book and portfolio swap contract or a book/strategy and contract. Keep in mind the following requirements.
| • | The processing organization connected to the book selected in the allocation should be the processing organization in the contract. |
| • | The counterparty associated with the contract should be the counterparty on the initial trade. |
| • | The trade date of the initial trade should fall within the contract period. |
See Allocating Trades for more information on trade allocation.
Refer to the Calypso documentation Allocating Trades for more information on trade allocation.
6. Portfolio Swap Mirror Trades
Mirror trades involve one Portfolio Swap trade between a processing organization and counterparty, and a mirror trade between the original processing organization and other legal entity.
A mirror trade requires a Portfolio Swap contract between parties for both the original trade and the mirror trade.
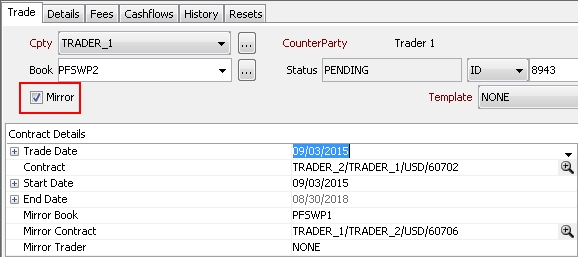
| » | To initiate a mirror trade, select the Mirror checkbox in the upper left corner of the trade window. Mirror trade options appear in the Contract Details panel. |
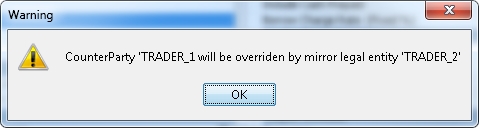
| » | Select the Mirror Book. If the original trade's counterparty is different from the legal entity associated with the mirror book, the following warning message appears. Click OK to accept the change to counterparty. |
| » | Select the Mirror Contract. Click |

Contracts made available by the search are those whose processing organization is associated with the mirror book or whose counterparty is the processing organization for the original trade's book.
Once the mirror trade is saved, two "child" trades are created. The following considerations apply:
| • | Details for each trade correspond to the contract and trade direction. |
| • | Corporate actions (funding, price change, basic interest, borrow charges, dividend, and split) are applied on both positions. |
| • | Back office transfers and accounting are done on positions for both books. |
| • | Commission fees, if any, are generated on both trades according to the Portfolio Swap contract details. |
| • | Official P&L and Risk can be run for positions on both books. |
After the trade is saved, the ID of the mirror trade will appear next to the Mirror checkbox.
If you add trade keywords to the MirrorKeywords domain, when these trade keywords are populated on the original trades, they will be saved on the mirror trades as well.
Upon saving, two trades will be saved, and two tasks will be created, one for each trade. This is the default behavior with the environment property MIRROR_WORKFLOW = true. So after the trades are saved, the mirror trade will be independent from the original trade and will follow its own workflow.
If you set MIRROR_WORKFLOW = false, two trades will be saved, but only one task will be created. So from the point of view of the workflow you will see one trade, and any modification to one of the trades will be automatically propagated to the other. The task will be updated accordingly, whether you modify the original trade or the mirror trade.
7. Portfolio Swap Corporate Actions
Please refer to Calypso Portfolio Swaps Corporate Actions documentation for details.