Generating Margin Calls
Margin calls are generated by the Collateral Manager based on collateral data, trades (native Calypso trades, or imported collateral exposures), and existing margin call positions. Margin call positions are calculated by the Margin Call engine.
The Margin Call engine and Transfer engine are run in the background by your administrator. The Message engine should also be running for generating margin call statements, and the Inventory engine should be running for generating Inventory positions for cash and security collaterals.
The Collateral Management module allows you to use trades for collateral management purposes which have been created outside of the Calypso system, and are imported into the Calypso system as Collateral Exposure trades. Margin calls can be computed on those trades as on any other native Calypso trade.
This applies, for example, to initial margins imported from the clearing houses, in the context of OTC clearing.
Which inventory positions are generated is controlled through the InventoryPositions domain value.
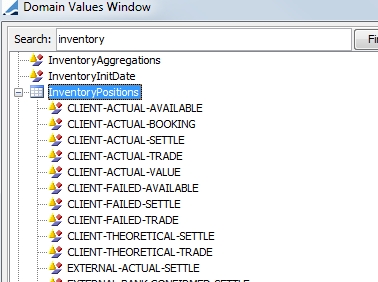
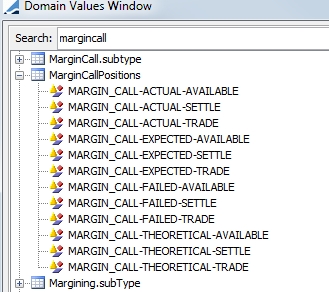
Which margin call positions are generated is controlled through the MarginCallPositions domain value.
 Please refer to the Calypso Cash Management documentation for details on computing inventory positions.
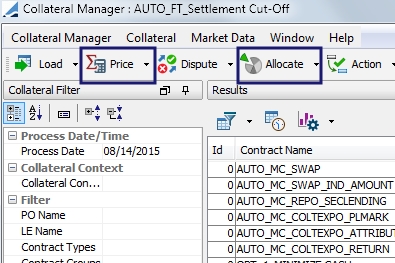
1. Collateral Manager Window
Choose Processing >
Collateral Management > Collateral Manager (menu action reporting.margincall.MarginCallDesktop) to display the Collateral Manager.
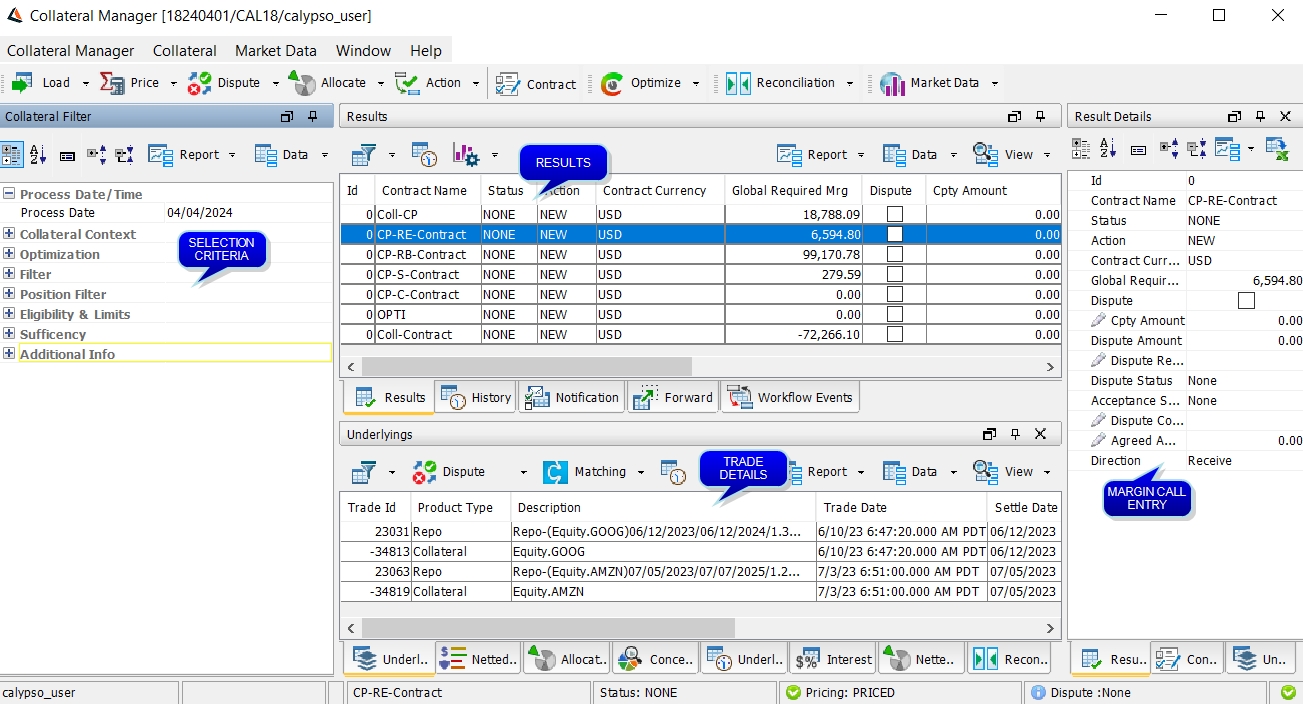
Below is an overview of the Margin Call Manager layout.
| • | Selection criteria to load margin call contracts are defined in the Selection Criteria area. |
| • | Margin call contracts are loaded in the Results panel, and the associated trades are loaded in the Underlyings panel. |
The Underlyings panel also displays the margin call trades once they are generated.
A Last User column is available in the Results panel which displays the username of the user who has applied the last workflow action.
| • | Once the margin calls are computed, they can be viewed in the Trade Details area. There is one Margin Call Entry for each contract. Select a contract in the Results panel to view the corresponding Margin Call Entry. The Trade Details area contains the following panels: |
| – | The Underlyings panel allows you to view the actual margin call details. You can link a template to the contract so that it will be loaded by default when the contract is loaded (  > Link Template to Contract). > Link Template to Contract). |
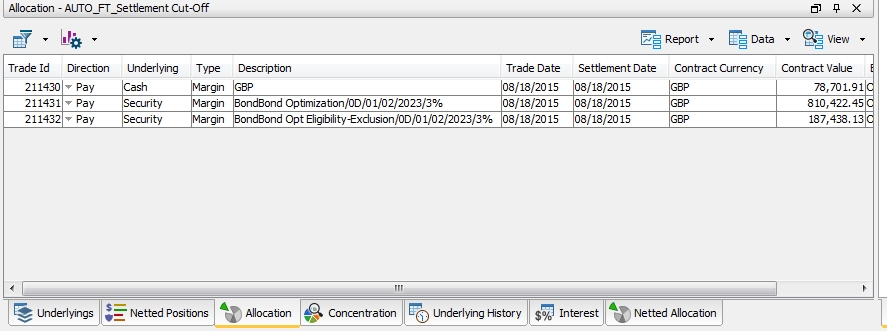
| – | The Allocation panel displays allocation details after allocation is completed. |
| – | The Interest panel displays the interest calculation details on cash margins between the previous margin call date and the process date. |
| – | Details History displays the margin call details. |
| – | The Concentration panel displays the Concentration Limits data. |
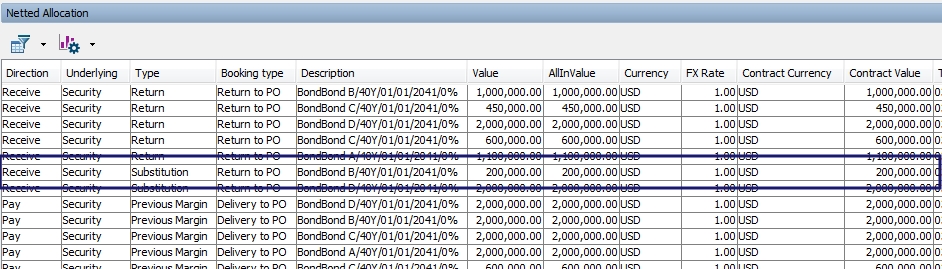
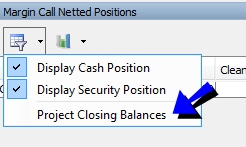
| – | The Netted Positions panel displays a global view of the netted positions and the current allocations. You are able to select multiple contracts at one time for this view. |
| • | The following panels are also available: |
| – | The Forward panel displays projected collateral requirements over a period specified in the Forward Margin options - The default is 5 days. You can double-click a projected margin call to view the trade details. |
| – | The History panel displays the history of trade-level disputes over a period specified in the History options - The default is 7 days in the past.. |
See Disputing a Margin Call at Trade Level for details.
| – | The Notification panel displays details regarding any notification that has been sent on the margin call contract |

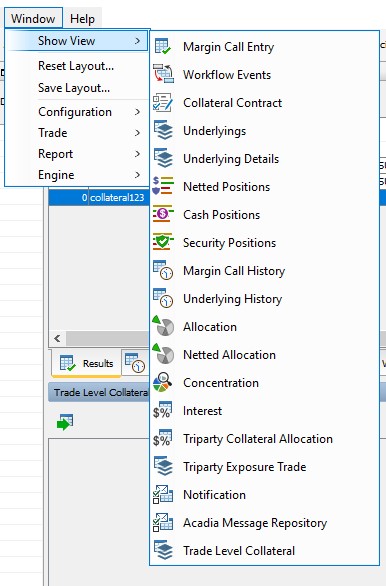
| • | If any of the desired panels are not displayed, select Window > Show View to select the panel you wish. |
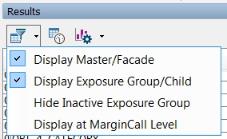
| • | The results can be filtered to display Master contracts, Exposure Groups, Hide Inactive Exposure Groups or Display at Margin Call Level. Display at Margin Call Level is used to display the Margin Call entry at the level of the call, regardless of whether it is at contract or exposure group level. |
2. Loading Margin Call Contracts
Enter selection criteria to filter the margin call contracts and trades that you want to process. The selection criteria are described below.
You can choose Data > Configure Filter to define a filter template and manage filter templates from the Report menu. The filter criteria are described in Template Manager below.
You can also select Collateral Manager > Preferences to load pre-defined search criteria via the Template Manager.
Either select a contract or contracts to load and click Load Selected, or click Load All to load all of the contracts that fulfill the search criteria.
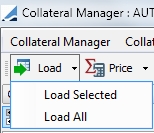
The default action when simply clicking the Load button is Load All.
| » | You can configure the display and create report templates using the Report, Data, and View menus from the Collateral Manager, and Margin Call Entry area. |

Trades can be excluded from the calculation by checking the Excluded checkbox in the Details panel.
| » | Once the contracts are loaded, you can select a contract and choose Market Data > Check to check that all required market data are available on the “Trade Date”, and enter missing market data. |
| » | With the Refresh option, you are able to load contracts for one day, and then change the date and refresh a contract or contracts. By doing this, you would have contract entries of different days loaded together. To prevent this, set the Collateral Context attribute READ_ONLY_MC_FILTER to True. This prevents the date from being changed when refreshing. |
Search Criteria Details
| Search Criteria | Description | |||||||||
|---|---|---|---|---|---|---|---|---|---|---|
|
Process Date / Time |
||||||||||
|
Process Date |
Defaults to the current date - Effective date of the margin calls. All valuation date and time information is specified in the Margin Call Contract. |
|||||||||
|
Collateral Context |
||||||||||
|
Collateral Context |
Select a desired Collateral Context configuration to use. If a Collateral Context has been chosen in the Collateral Manager Template, it will appear here. The Collateral Context can be manually changed here as well, depending on the desired pricing scenario. (NOTE: The Pricing Environment Type is chosen in the Collateral Context. The pricing environment corresponding to that type is chosen in the Details panel of the Margin Call Contract.) |
|||||||||
|
Filter |
||||||||||
|
PO Name |
Select a processing organization, or leave empty for all. |
|||||||||
|
LE Name |
Select a legal entity name, or leave empty for all. |
|||||||||
|
Contract Types |
Select a contract type, or leave empty for all. |
|||||||||
|
Contract Groups |
You may select a contract group, defined in the Collateral Context Currency Definition panel, to load contracts based on that group currency. NOTE: If no group is selected, contracts with different group currencies will be loaded and there could be a mix of currencies in the Remaining Mrg (Group Ccy) column. |
|||||||||
|
Contract Filter |
Select a static data filter if desired. |
|||||||||
|
Contracts Ids |
Select individual contracts, or leave empty for all. NOTE: When populated, this filtering criteria overrides any other criteria. Whatever is set in this field, whether they be master contract Ids or child contract Ids, they system will load the entire "group" (master and child). |
|||||||||
| Status | Select a contract status, or leave empty for all. | |||||||||
|
Processing Types |
Processing Types allow for the ability to generate margin call entries on valuation only days and process substitutions independently. The choices for this criteria are:
Processing Type can also be chosen as a Workflow Product and Workflow Subtype in the Collateral Context. Refer to Collateral Context for more information on how these affect the Processing Type. |
|||||||||
|
Direction |
Filter by Pay or Receive contracts |
|||||||||
|
Exclude Unsaved Fully Dispute |
This filter selection applies to fully disputed entry types. If set to true, only Fully Disputed processing types with a non-zero Id will be displayed in the Results panel. If set to false (left blank), fully disputed entries are displayed for every contract loaded, regardless of whether the contract has been saved or not. |
|||||||||
|
Dispute |
If the checkbox is enabled, then this filter displays all the disputed calls. If the checkbox is disabled, then both disputed and non-disputed calls are loaded. |
|||||||||
|
Position Filter
|
||||||||||
|
Position Type |
Options are Posted (load only short positions, positions that were posted by the PO) and Held (load only long positions, positions posted by the CP) |
|||||||||
|
Cash Position |
Select the Cash Position checkbox to choose currencies to filter margin call positions in cash of that currency |
|||||||||
| Currency | ||||||||||
|
Security Position |
Select the Security Position checkbox to choose a product code, such as ISIN, CUSIP, etc.... Enter the security's reference in the Security field. |
|||||||||
|
Product Codes |
||||||||||
|
Security |
||||||||||
|
Eligibility & Limits |
||||||||||
|
With Ineligible Collateral |
Choose whether to include contracts with ineligible collateral. | |||||||||
|
With Limit Breach |
Choose whether to include contracts with a limit breach. |
|||||||||
|
Sufficiency |
||||||||||
|
Collateralization Status |
Choose to include certain collateralization statuses in the filter.
These statuses are described in Margin Call Entry Columns. |
|||||||||
|
Optimization |
||||||||||
|
Configuration |
Select an optimizer from the those that were created in the Collateral Optimization Configuration window, which is accessed in the Margin Call Contract. |
|||||||||
3. Template Manager
From the Template Manager, you are able to select a template for Collateral Manager as well as configure individual fields and templates for the panels. To display the Template Manager, select Collateral Manager > Preferences. From this window, you are able to:
| • | Edit a template |
| • | Create a new template -  |
| • | Delete a template - select the template on the left side of the window and click  |
| • | Designate a default template - select the template on the left side of the window and click  |
| • | Update a template with current window settings - select the template on the left side of the window and click  |
| • | Make a copy of an existing template - select the template on the left side of the window and click  |
| » | To display a template in Collateral Manager, select the template on the left and click Select. |
| » | When saving a new template, you may designate whether it should be private or public. |
Below is a description of the definition criteria fields in the Template Manager.
|
Field |
Description |
|||||||||
|---|---|---|---|---|---|---|---|---|---|---|
|
Filter |
||||||||||
|
PO Name |
Select a processing organization, or leave empty for all. |
|||||||||
|
LE Name |
Select a legal entity name, or leave empty for all. |
|||||||||
|
Contract Types |
Select a contract type, or leave empty for all. |
|||||||||
|
Contract Groups |
You may select a contract group, defined in the Collateral Context Currency Definition panel, to load contracts based on that group currency. Note: If no group is selected, contracts with different group currencies will be loaded and there could be a mix of currencies in the Remaining Mrg (Group Ccy) column. |
|||||||||
|
Contract Filter |
Select a static data filter if desired. |
|||||||||
|
Contracts Ids |
Select individual contracts, or leave empty for all. Note: When populated, this filtering criteria overrides any other criteria. Whatever is set in this field, whether they be master contract Ids or child contract Ids, they system will load the entire "group" (master and child). |
|||||||||
| Status | Select a contract status, or leave empty for all. | |||||||||
|
Processing Types |
Processing Types allow for the ability to generate margin call entries on valuation days only and process substitutions independently. The choices are:
Processing Type can also be chosen as a Workflow Product and Workflow Subtype in the Collateral Context.
|
|||||||||
|
Direction |
Filter by Pay or Receive contracts |
|||||||||
|
Position Filter Note: For performance reasons, this filter only works if a Processing or Valuation entry has been priced and saved for a given date. The filtering is based on what is in the margin call position (netted position). It does not filter on underlying trades or today’s allocation/margin call trades. To be filtered, entries must be saved. |
||||||||||
|
Position Type |
Options are Posted (load only short positions, positions that were posted by the PO) and Held (load only long positions, positions posted by the CP) |
|||||||||
|
Cash |
Select currencies to filter margin call positions in cash of that currency |
|||||||||
|
Product Types |
Choose a product code, such as ISIN, CUSIP, etc.... |
|||||||||
|
Securities |
Enter the security's reference |
|||||||||
|
Collateral Context |
||||||||||
|
Collateral Context |
Select a desired Collateral Context configuration to use for the optimization. |
|||||||||
|
Allocation Window |
||||||||||
|
Check Allocation Position |
When checked, when the collateral is being paid, the Margin Call process displays only the instruments (cash or securities) that are eligible to be given as collateral as specified on the Margin Call contract that have an actual inventory position. If this is not checked then all eligible securities are displayed, without reference to whether an actual position is held. |
|||||||||
|
Validate Eligibility |
When selected, eligible currencies and securities are considered during allocation. If non-eligible currency or security is selected for allocation, a warning message is displayed. |
|||||||||
|
Allocation |
Select an Optimization Configuration from those that were created in the Collateral Optimization Configuration window. You may also choose the type of allocation, whether allocate, analyze or check market data for this template. |
|||||||||
|
Netted Allocation |
Choose a Netted Allocation report template. |
|||||||||
|
Concentration Limits |
Choose a Concentration Limits report template. |
|||||||||
|
Concentration History |
Choose a Concentration History report template. |
|||||||||
|
Pending Substitution |
Choose a Pending Substitution report template. |
|||||||||
|
Auto Adjustment Used to provide a default value in the Auto Adjustment field on the Allocation window. |
||||||||||
|
Pay |
The following options are available when PO is paying: None - no automatic calculation Return - Return is done automatically when possible using previous position currency. New Margin allocation is manual. Return & New Margin - Return is done automatically when possible using previous position currency. New Margin allocation are done in the default currency. If no auto adjustment currency has been defined on the Margin Call contract, no allocation is created. Standard - Default Currency - Everything is done using the default currency with the ability to explode the Margin and Return. |
|||||||||
|
Receive |
The following options are available when PO is receiving: None - no automatic calculation Return - Return is done automatically when possible using previous position currency. New Margin allocation is manual. Return & New Margin - Return is done automatically when possible using previous position currency. New Margin allocation are done in the default currency. If no auto adjustment currency has been defined on the Margin Call contract, no allocation is created. Standard - Default Currency - Everything is done using the default currency with the ability to explode the Margin and Return. |
|||||||||
|
Optimization |
||||||||||
|
Configuration |
Choose an Optimization Configuration |
|||||||||
|
Allocation |
Use optimization results as an allocation or open results as a standalone optimization |
|||||||||
|
Log |
Select this checkbox to produce a log for the optimization |
|||||||||
|
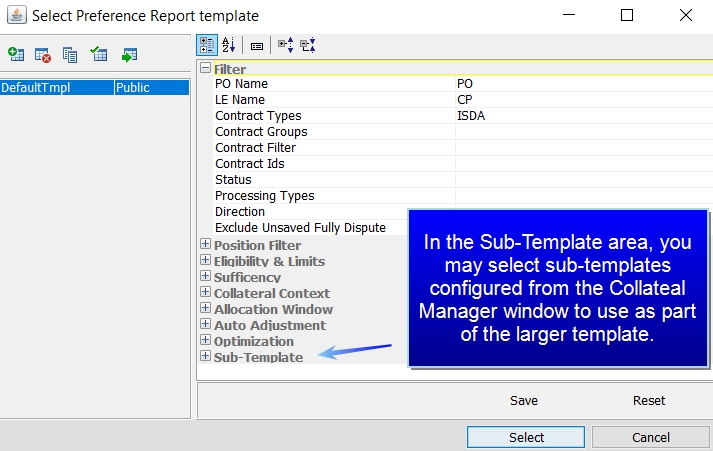
Sub-Template Sub-templates are the templates that are designated in each panel of the Collateral Manager window. In this area, you are able to select one of those pre-defined templates for use in the larger template. Each sub-template has its own search criteria. |
||||||||||
4. Pricing and Allocation
By default when you click the Price button, you must then apply the NEW action in order to save the priced contract. You must also perform a save function after an allocation is applied from the ALLOCATE window.
To allow the save action to be performed automatically after a contract is priced or allocation is applied, you may link a workflow action directly to these two buttons.
This function is available through the Collateral Context window. Refer to the documentation on this window for details.
To see details on the Allocation window, see Constituting a Margin.
You may price and re-price all of the contracts or selected contracts through the Price drop-down menu.

You may also choose to deactivate the Price button and price all contracts through the Load menu options. To do this, set the HIDE _PRICE_BUTTON context attribute in the Collateral Context window to True.
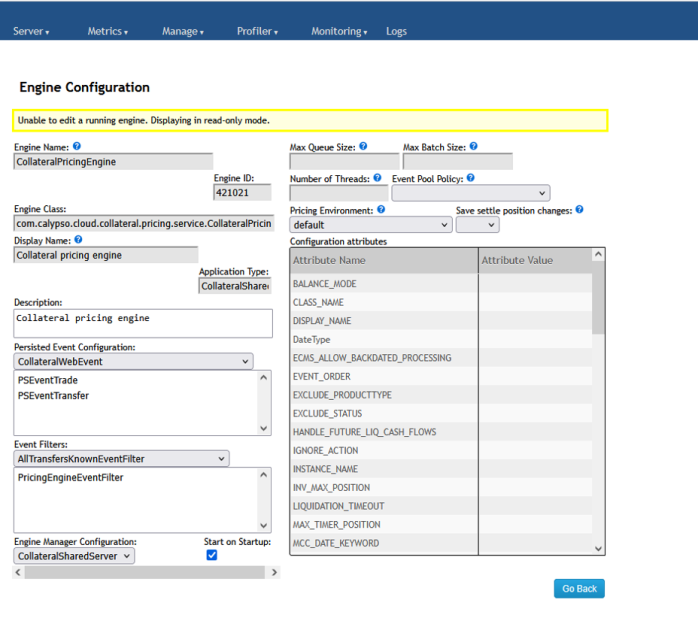
To improve performance, collateralsharedserver.bat can be used to price/reprice contracts in real time for Exposure trades and Margin Call trades. This server requires the Collateral Pricing Engine to be started first.
5. Collateral Management Workflow
There is a default workflow supplied with the Collateral Management module. This workflow is specific to the handling of margin calls. The workflow is defined under the Collateral folder and supports standard Calypso workflow features. To install this workflow, select Collateral Workflow when running Execute SQL during your Calypso install.
Below is a graph of an example workflow.
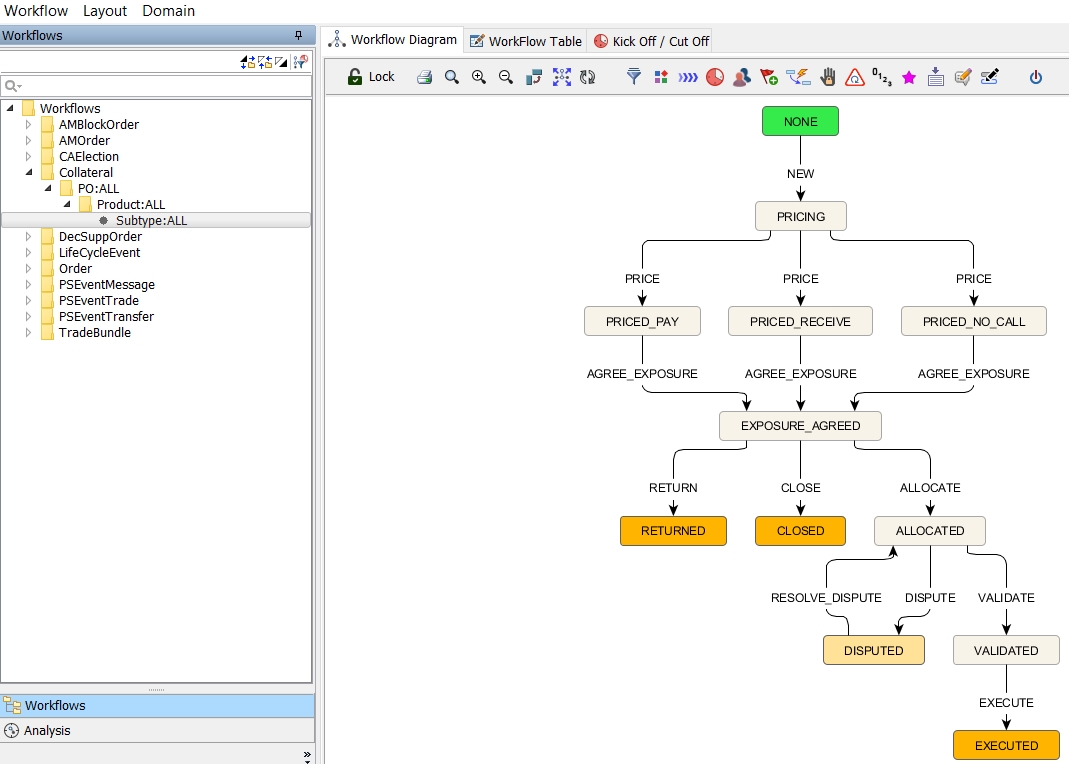
You may add or edit workflow rules to suit your business purposes.
| » | Workflow rules are listed under the domain value workflowrulecollateral |
| » | Workflow statuses are listed under the domain value CollateralStatus |
| » | Workflow actions are listed under the domain value CollateralAction |
| » | The following business actions are triggered by workflow rules: Execute, Close and Return. |
| » | If a rule applies at all transitions in the workflow, you may add the rule to the domain mandatoryCollateralrule. Rules added to this domain value apply to each transition of the collateral workflow automatically rather than the rule needing to be added to each transition. |
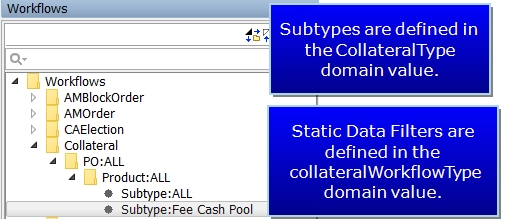
| » | A static data filter can be applied to the entire workflow. The filter must have the suffix _collateralWorkflow.This filter needs to be designated in the collateralWorkflowType domain value. When entering it in the domain, omit the _collateralWorkflow suffix. For example, if the filter is called MyFilter_collateralWorkflow, the domain value is just MyFilter. |
Example:
| – | Create a static data filter MccId1234_collateralWorkflow |
| – | Add the domain value MccId1234 to the collateralWorkflowType domain |
| – | Add the domain value MccId1234 to the CollateralType domain |
| – | Configure workflows for the workflow subtype MccId1234 |
| » | You may aggregate the collateral workflows by product and subtype. Selecting a product and subtype under the Workflow heading in the Details panel of the Margin Call contract will process the contract through the corresponding workflow. The subtype comes from the domain value CollateralType. |
| » | The system checks for an applicable static data filter first, then it looks for the Product/Subtype designation in the Margin Call Contract. |
The default Collateral workflow rules are described below.
|
Workflow Rule |
Description |
||||||
|---|---|---|---|---|---|---|---|
| AutoAdjust |
Allocation is done using the default currency with the ability to explode the Margin and Return. (Used in conjunction with Explode Return/New Margin field in Eligible Currencies Definition window in Margin Call contract.) Calypso recommends using this rule for single currency contracts only. |
||||||
|
AutoReturn |
Return is done automatically when possible (partial return in single currency, full return), using previous position currency. New Margin allocation is manual. Dispute scenarios are not supported with this rule. |
||||||
|
AutoReturnAndAdjust |
The Return is done automatically when possible (partial return in single currency, full return) using the previous position currency. New Margin allocation is done in the default currency. If no auto adjustment currency has been defined on the Margin Call contract, no allocation is created. Dispute scenarios are not supported with this rule. |
||||||
|
AgreeDispute |
Agree to a contract level dispute amount and set the counterparty amount equal to the processing org amount. |
||||||
|
Checkbook-access |
Returns false if the current user has no access to the allocated books. |
||||||
|
CheckDispute |
Returns false if the current dispute status is OPEN. |
||||||
|
CheckFullAllocation |
Returns false if the contract is not fully allocated. Checks both the pending allocations and the executed allocations for validation. |
||||||
|
CheckMultiEntryPosition |
Prevents an allocation from being applied if the allocation > previous margin of the processing entry + (daily margin) of all non-selected entries. If the process is run on the processing or valuation entry, the daily margin of the substitution entry is checked. If the process is run on the substitution entry, the daily margin of the processing/valuation entry is checked. |
||||||
| CheckNoCall |
Returns true if the required margin is 0. |
||||||
|
CheckPay |
Returns true if the processing org must pay the margin |
||||||
|
CheckPrice |
Returns false if the contract is not fully priced |
||||||
|
CheckRecieve |
Returns true if the counterparty must pay the margin |
||||||
|
Close |
Returns the current positions and closes the contract Note: Closing a contract is available from the contract level only. A contract cannot be closed at the Exposure Group level, even if calling is done at that level. |
||||||
|
Execute |
Creates margin call trades. Returns false if no allocation is set. |
||||||
|
ExecuteUpdate |
Creates margin call trades or updates existing trades if possible. Returns false if no allocation is set. |
||||||
|
GenerateEvent |
This rule should be used in the case of multiple workflow transitions in STP to generate an intermediary event. For example, if the following workflow transitions are both STP: PLEDGED_REC - PLEDGE_ACCEPT - PLEDGE_ACCEPTED PLEDGED_ACCEPTED - EXECUTE - EXECUTED And, the following message is generated from PLEDGE_ACCEPTED status:
|
||||||
|
ResetDispute |
Resets contract level dispute. |
||||||
|
ResolveDispute |
Resolves contract level dispute. |
||||||
|
ResolveDisputeWithCPAmount |
Resolves contract level dispute with the counterparty amount. Used to auto accept the Counterparty Amount when Counterparty Amount is fed via Data Uploader. This rule confiders the dispute tolerance when determining whether to tick the dispute flag and set the dispute status. This rule works in conjunction with UpdateDisputeFields. |
||||||
|
ResolveDisputeWithPOAmount |
Resolves contract level dispute with the processing org amount. |
||||||
|
Return |
Returns current positions. |
||||||
|
UpdateDisputeFields |
Used to compute the related dispute fields when Counterparty Amount is entered via Data Uploader. This rule mimics what happens when the Counterparty Amount is entered manually in the Collateral Manager GUI. The ResolveDisputeWithCPAAmount workflow rule works in conjunction with this rule. |
NOTE: Sending of notifications is configured through the message configuration setup.
5.1 General Collateral Statuses
Described below are some commonly used collateral statuses. Collateral statuses and workflows can be customized to fit your needs.
NONE
When first loading a contract in Collateral Manager, it appears in the status NONE.
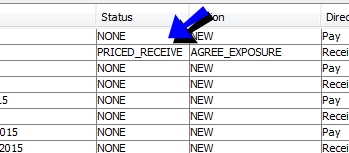
PRICING
By clicking the Price button, the status moves to PRICING. This status means that Calypso has been able to do the following:
| • | Price all of the underlying trades |
| • | Calculate the trade exposure |
| • | Value any previous collateral held by either party. |
All of the market data must be available. To check market data select Market Data > Check.
The quotes used for pricing are the quotes as of the 'trade date' on the Collateral Manager.
EXPOSURE AGREED
The EXPOSURE AGREED status indicates:
| • | The value of the collateral to be paid / received is agreed with the counterparty. |
| • | The actual collateral movements can be created by creating the Margin Call trades. |
ALLOCATED
The ALLOCATED status means that the collateral movements have been agreed to and the only outstanding action is to create the Margin Call trades in Calypso.
The workflow is moved to this status after allocation is applied through the Allocation window or allocation is done through Optimization.
VALIDATED
The VALIDATED status means that the Margin Call process for that contract (for that day) has been completed and that the Margin Call trades have been created. Created margin call trade Ids appear in the Allocation panel.

5.2 Workflow Events
A Workflow Events panel is available which displays workflow events for a contract. This panel can also be used to inform the user of new workflow updates. This is helpful when multiple people are working on the same perimeter. This is also helpful for Acadia users, as Calypso receives updates frequently and the user may not know if a reload should be done to update to the latest status. If an update is needed, it is indicated by the  in the bottom right corner of the window.
For example, in Collateral Manager the user sees:
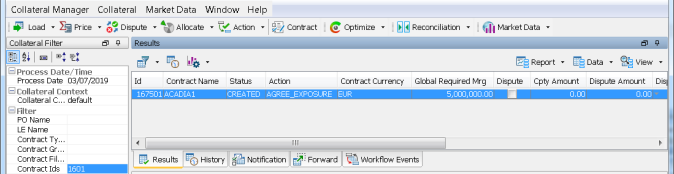
In the Workflow Events panel for this entry, the user sees:
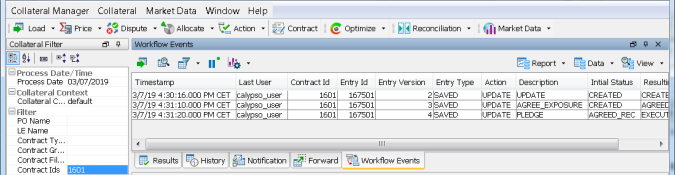
There are three updates on entry #167501. Double-clicking on any of these lines automatically takes the user back to the Results panel and the entry is displayed in its latest status:

Going back to the Workflow Events panel, it is now empty as there are no more updates and the latest version is in the Results panel.
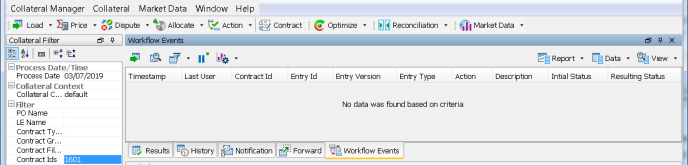
There are two columns available to display Initial Status and Resulting Status.
Note: If User 1 is filtering in Collateral Manager based on status A and there are no entries in that status, the Workflow Events panel will be empty. If User 2 moves one entry from status A to status B, a line appears in the Workflow Events tab of User 1. If User 1 double-clicks on it, it appears in their Results tab.
If User 1 is filtering on Status B and has one entry displayed in the Results panel, and User 2 moves the entry from status B to status A, this displays on the Workflow Events panel. If this line is double-clicked in the Workflow Events panel, the entry will be removed from User 1's view, as it is no longer in status B.
5.3 DISPUTED Statuses
The status DISPUTED is independent from the collateral workflow. You are able to put the trade into DISPUTED status by using the Action button. If your status is appropriate (ALLOCATED in the workflow example), you may select the Action button to apply the DISPUTE workflow action and place the contract in DISPUTED status. This will only change the status of the contract. The actual dispute information must be entered in the Margin Call Entry area.
For details on disputes, refer to Disputing a Margin Call at Contract Level and Disputing a Margin Call at Trade Level.
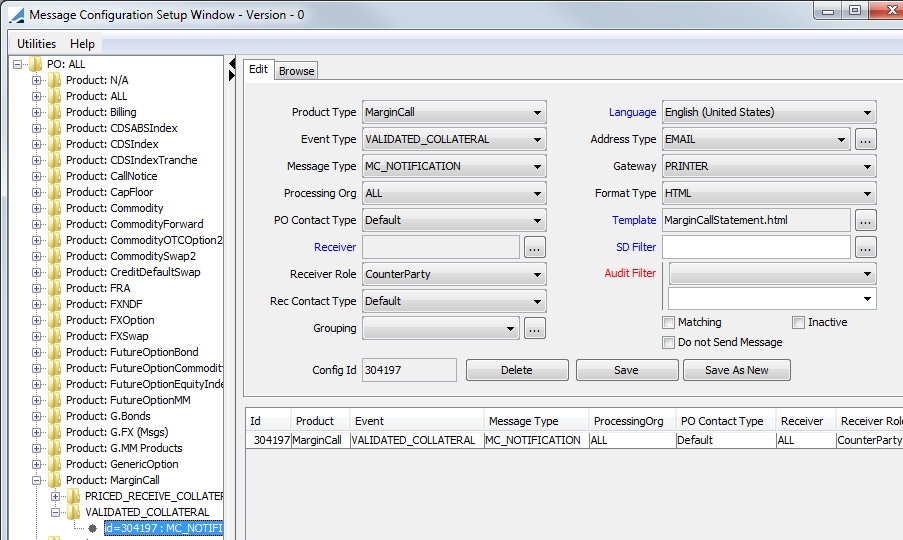
6. Messages and Notifications
The Calypso Collateral module uses the standard Calypso messaging set up. For detailed information on this setup, please refer to Message Setup.
In the following example, a message type MC_NOTIFICATION is sent when status VALIDATED is reached.
Note in this example, the EventType domain must be updated to reflect the status name, STATUS_COLLATERAL. (In the example below, VALIDATED_COLLATERAL.)
6.1 Notification Status
Notification statuses are listed under the domain value MarginCall.NotificationStatus.The Notification Status column may be updated manually or by using the following message workflow rule in calypso.
| • | UpdateMarginCallEntryMessageRule - Updates the Margin Call Entry Notification status. |
7. Generating Margin Calls
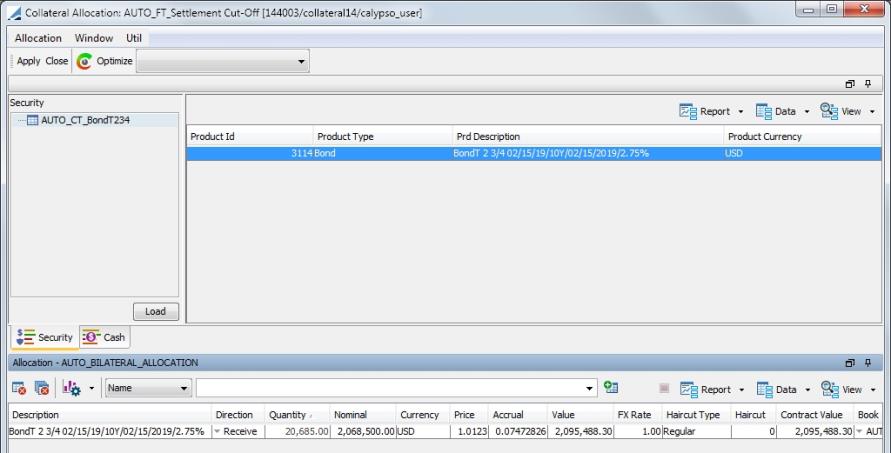
After loading the desired Contracts in Collateral Manager, click  or choose Collateral > Price to
calculate the margins.
or choose Collateral > Price to
calculate the margins.
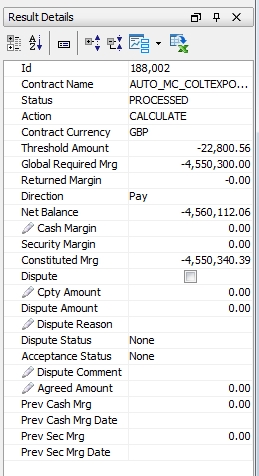
Once the trades have been loaded, the system calculates the collateral exposure on each trade, (according to the appropriate methodology for each trade type), and calculates a “Net Balance” of the total of all of the relevant trade exposures.
This "Net Balance" is shown in the Margin Call Entry area, and is used as the starting point for the Margin Call Collateral calculation. (Note: The information displayed in the Margin Call Entry area can be configured to suit your needs.)
By default, a cash margin is computed for the default currency specified in the contract. If you want to create a security margin, or create a cash margin in a different currency, choose Collateral > Allocate.
See Constituting a Margin (Allocation) for details.
All fields with the  icon can be edited
The Calypso Margin Call Calculation is as follows:
| • | Margin Required = Net Exposure after applying Threshold (Amount of allowable exposure) |
| • | Total Prev Margin = Prev Cash Margin + Prev Security Margin |
| • | Total Margin = Margin Required – Total Prev Margin, which is rounded as specified in the Margin Call Contract. |
If Total Mrg > MTA, Required Margin = Total Margin
If Total Mrg <= MTA, Required Margin = 0
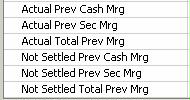
| • | Previous Cash and Security Margins |
You can view the previous cash and security margins broken down into actual (settled) and unsettled positions, based on the Back Positions - Refer to Calypso Inventory Engine documentation for details on computing actual and unsettled positions.
| • | Margin Call Hierarchies |
The margin calls are calculated for a given hierarchy, and generated at the root contract level. For example, a root contract is defined between PO1 and CPTY1, and children contracts are defined between children of PO1 and children of CPTY1. The margin calls are calculated for all children and aggregated at the PO1/CPTY1 level.
In the Margin Call report, when loading a contract, all children are loaded too. You can identify the root contract using the static data filter element MARGIN_CALL_IS_PARENT.
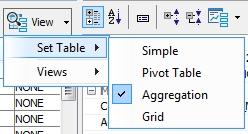
You can view the contract hierarchy when you are in Aggregation View (View > Set Table > Aggregation), provided you have added the columns Hierarchy Level 0 through 9 to the column configuration, sort columns and subheadings.
The actual margin call trades are generated upon Allocation. They are displayed in Allocation panel.
The following trade transfer types can be generated:
| • | Margin Call trade with type COLLATERAL for each cash margin. |
| • | Margin Call trade with type SECURITY for each security margin. |
| • | Margin Call trade with type INTEREST or ROLLED_INTEREST (if interest rolling is setup) for each interest calculation. |
Note: To see rolled interest reflected on Netted Positions and Global Required Margin, add the value ROLLED_INTEREST to the flowType domain.
![]()
The margin call positions will only be updated if the margin call trades have been authorized (VERIFIED status).
Ⓘ NOTE: The modified Margin Call Trade window can be accessed using the domain value "DisplayMarginCallTradeWindow" and its associated value "NewMarginCallTradeWindow".
7.1 Margin Call Entry Columns
Some of the most commonly used columns in the Margin Call Entry area are described below. Columns can be configured by selecting Data > Configure Columns.
|
Columns |
Description |
|
(Daily Cash Mrg) |
Cash margin previously saved for that day. |
|
(Daily Interest) |
Interest amount previously saved for that day. |
|
(Daily Sec Mrg) |
Security margin previously saved for that day. |
|
Agreed Amount |
Enter the amount that has been agreed by both parties. |
|
Cash Margin |
You can double-click this field to modify the amount (subject to the Minimum Adj and Maximum Adj amounts / percentages entered in the margin call contract.) This represents the amount of cash margin to be paid or received on the process date.
|
|
Cash Movement |
Total amount of cash (including the interest amount). This field is used to create the margin call trades (one for the margin call amount and one for the interest amount). |
|
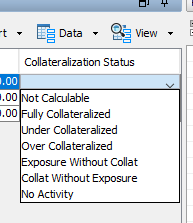
Collateralization Status |
To simplify the end of day controls on Collateral activity, the Collateral Status column can be used to indicate whether a contract is fully collateralized, under collateralized or over collateralized.
The column contains several options which are automatically updated based on the following logic:
The fields Fully Priced and Remaining Mrg and Actual Outstanding Margin are existing fields at the Margin Call Entry level. They are computed during a pricing action (PRICE / REPRICE) on a Margin Call contract. Tolerance, as referred to above is specified in the Collateral Context, Pricing tab. If the Tolerance is defined on the Collateral Context using a percentage of the Global Required Margin, the Collateralization Tolerance shows the value of Net Balance * Tolerance Percentage / 100. NOTE: If the Collateralization Tolerance cannot be calculated because the FX Rate Base Currency / Contract Currency is missing, that does not prevent the user from processing the contract. NOTE: The Collateralization Status static data filter can be used to “park” the margin call entries which are under collateralized in a specific status or to drive a triparty contract with no activity to a status where MT527 won’t be generated, as it is not required. NOTE: Regarding collateralization of Commodity Forward trades, once the trade matures a Commodity Spot trade is created. The Commodity Spot trade is collateralized until the greater of the Commodity Settle Date and the Cash Settle Date. |
|
Concentration Limit Breach |
Set to true if the concentration limit(s) is/are “Out of Limit”, otherwise it is set to false. |
|
Constituted Margin |
The margin constituted for the process date (cash margin + security margin). Constituted Margin = Margin Required - Total Previous Margin The Constituted Margin is then rounded (according to the rounding convention specified in the Margin Call Agreement) and compared to the relevant Minimum Transfer Amount (as set on the Margin Call Agreement). |
|
Contract Id |
Margin call agreement contract id. |
|
Cpty Amount |
Enter the amount calculated by the counterparty. |
|
Description |
Description of the margin call contract. |
|
Dispute |
Automatically checked when a dispute arises.
|
|
Dispute Amount |
The system calculates and displays the difference between the Calypso generated amount and the counterparty’s amount. |
|
Effective Date |
You can double-click this field to modify the date. Effective date of the margin (process date) |
|
Global Required Mrg |
The delivery/return amount required as of the process date. (Constituted Margin after applying MTA) |
|
Ineligible Collateral |
Set to true if there is/are ineligible collateral on the contract, either at allocation level or netted position level. Otherwise, it is set to false. |
|
Interest |
You can double-click this field to modify the amount. Interest amount to be paid or received on the process date. The interest is calculated between the previous margin call data and the process date. |
|
Margin Required |
Trade Margin – Threshold (or “0” if the Threshold is greater then the Trade Margin). Net Exposure after applying Threshold (amount of allowable exposure) |
|
Minimum Transfer Amount |
The MTA defined in the margin call contract. |
|
Net Balance |
Net exposure = Global Margin Requirement – Total Previous Margin – Interest. (NPV of underlying trades) |
|
Prev Cash Margin |
Previous cash margin: amount of the last cash margin paid or received on this contract. |
|
Prev Sec Margin |
Previous security margin: amount of the last security margin paid or received on this contract. |
|
Prev Sec Mrg Date |
Date of the previous security margin. |
|
Remaining Margin |
Required Margin – (Cash Margin + Security Margin) – (Daily Cash and Security Margin). Should be equal to zero. |
|
Rounding Method |
The rounding method defined in the margin call contract. |
|
Security Margin |
Amount of security margin.
|
| Status |
The status of the contract is "NOT CALCULATED" by default. It will be modified depending on which actions are applied to the contract. When the margin call is computed, it is set to "CALCULATED". If the global requirement is zero, it is set to "NO CALL REQUIRED".
|
|
Threshold |
Threshold amount defined in the margin call contract. |
|
Total Prev Margin |
Total of the previous margin: previous cash margin amount + previous security margin amount. |
|
Trade Margin |
Net Balance + Independent Amount. (When the Margin Flow Approach is used, this is IA post Threshold + MTM) |
|
Validate |
Check to validate the margin calls. |
8. Constituting a Margin - Allocation
Select a Contract and click  (or choose Collateral > Allocate) to display the Allocation window.
| • | The Available Positions area differs for cash margins and security margins - Select Cash or Security as needed. For Cash, it shows deliverable currencies, and for Security is shows available collaterals, as defined in the margin call contract. |
| • | The Netted Positions panel shows existing collateral positions prior to the process date (the same view as Netted Positions panel in Collateral Manager). You can configure the display and create report templates using the Report, Data, and View menus. |
To substitute collateral, click  , see Substituting a Margin Call for details.
| • | The Allocations panel shows margin calls on the process date. You can configure the display and create report templates using the Report, Data, and View menus. |
| • | The values at the bottom of the window show the margin call requirements. |
| • | You may choose to optimize the allocation of the collateral payment by making the best use of the inventory, by using Calypso's Optimization feature. |
| • | You many cancel all or selected allocations by selecting the appropriate option from the drop-down menu that is part of the Allocation button. |
| • | When an allocation is executed and a Margin Call trade is booked, a unique identifier called an 'Execution Id' is generated. This Id can be displayed as a column in any collateral allocation report (Collateral Manager, Collateral Allocation or a stand alone report). |
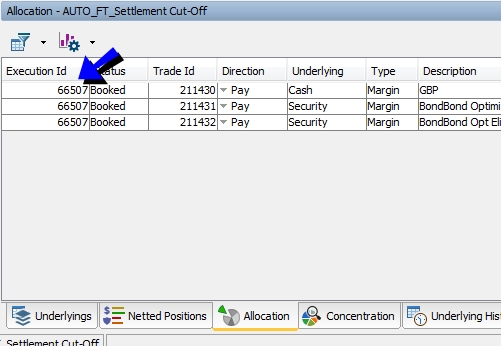
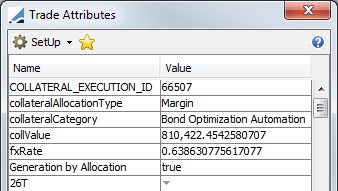
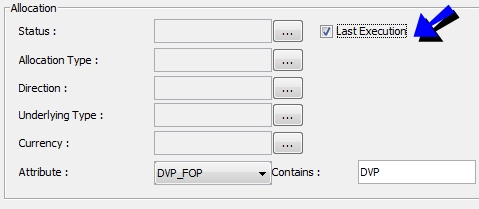
The Execution Id is propagated to the Margin Call trade under the trade attribute COLLATERAL_EXECUTION_ID.
| • | In the Allocation Report, you can display the last execution only by selecting the Last Execution checkbox. |
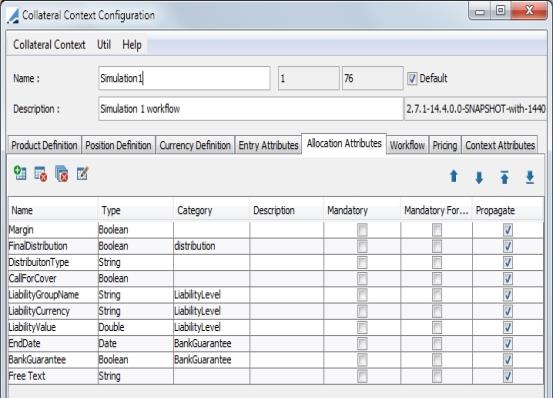
8.1 Allocation Attributes
| » | An allocation can be customized with allocation attributes which are defined in the Collateral Context window. |
| » | An alternate way to input an allocation attribute is to use a custom workflow rule. |
In the following example, the attribute "AllocationType" is set to "Substitution" before executing an allocation:
ExecuteSubstitutionCollateralRule - checks the CUSTOM_ATTRIBUTE rule.
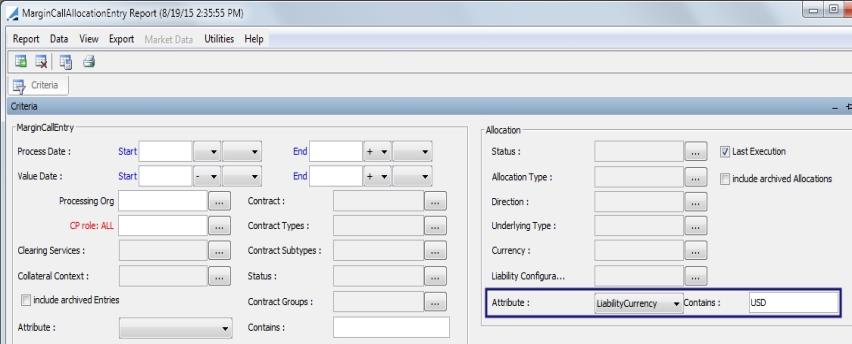
| » | The Margin Call Allocation Entry Report contains selection criteria allowing you to filter by an allocation attribute. |
8.2 Allocation Validators
An allocation can be customized with allocation validators which are defined in the Collateral Context window. This is used to define validators when allocating and creating margin call trades. There are three validators, Increment Lot Size, Minimum Purchase Amount and Multi Entry Position.
Refer to Collateral Context for additional details.
8.3 Security Margins
Select the Security panel to enter security margins.
Note that if "Is Check Allocation Position" is checked in the Option area of the Collateral Manager, deliverable securities will only appear if you have a Inventory position for these securities (it requires a SETTLE internal Inventory position).
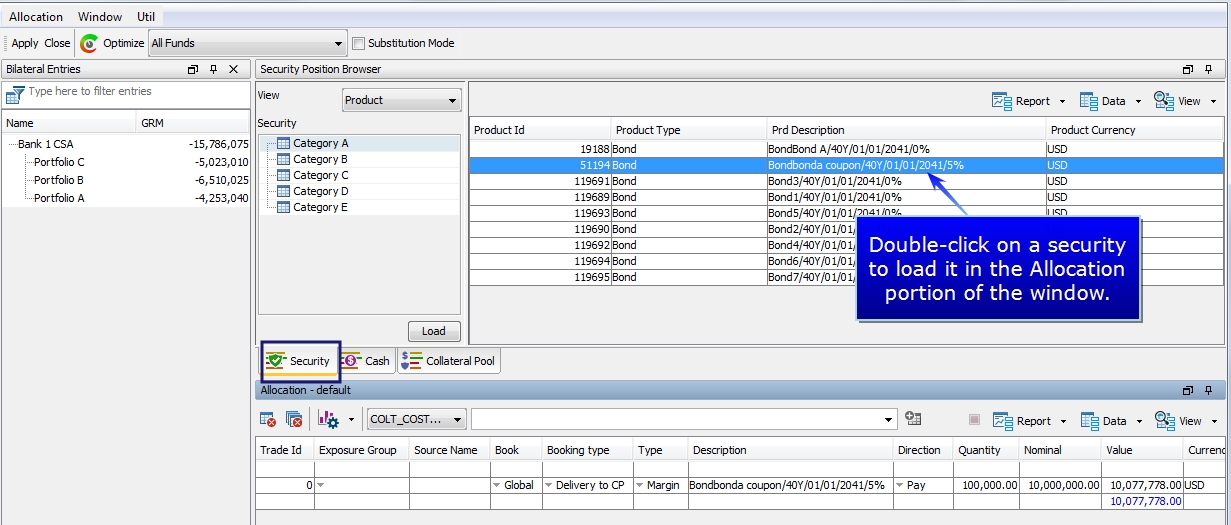
| » | Double-click a deliverable security from the Available Positions area to load it the Allocation area. Then enter the quantity and price. The bottom right corner of the window indicates if additional margins are required. |
| » | The quick entry area is available to quickly search and add a security to the Allocation area. |

Select a security identifier (Name, ISIN, etc.) and type in a few characters in the adjacent field. All corresponding securities are displayed - Select a security and hit Enter. If the security is available as a collateral for this contract, the icon is enabled. Click to add the collateral. Then enter the price and quantity as needed.
Available securities are defined in the margin call contract in the Eligibility > Eligible Securities panel.
| » | Repeat for another deliverable security as needed, or select the Cash panel to adjust cash margins. On the bottom right corner of the window, there is an indication if additional margins are required. |
| » | Click Apply when finished. |
| » | Depending on your workflow, apply the appropriate action to complete the allocation. |
Ⓘ NOTE: The Collateral Allocation search depends on product types added to the ProductSelectorTypes.Repo and bondType domains. If all of the expected bonds are not displaying in the search, make sure that the appropriate bond type is in each of these domains.
8.4 Cash Margins
Select the Cash panel to enter cash margins.
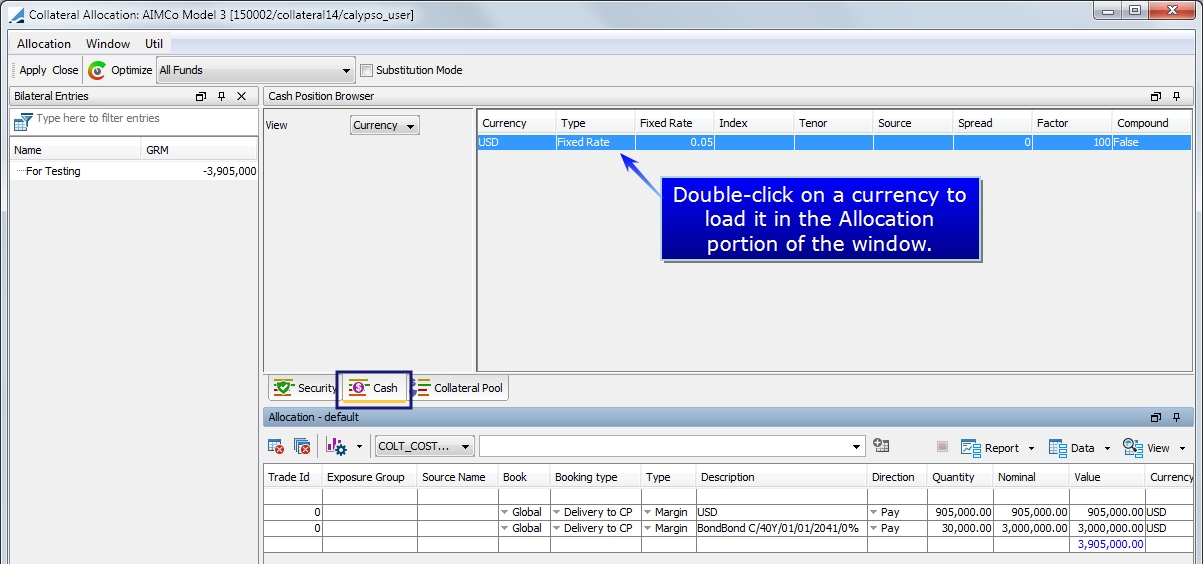
| » | Double-click a deliverable currency from the Available Positions to load it in the Allocation area below. |
| » | Enter the margin call amount and the FX rate if applicable. |
| » | Repeat for another deliverable currency, or select the Security panel to enter security margins. On the bottom right corner of the window, there is an indication if additional margins are required. |
| » | Click Apply when finished. |
| » | Depending on your workflow, apply the appropriate action to complete the allocation. |
NOTE: The behavior of the Quote Price column in the Collateral Allocation report can be changed using the Collateral.ReportConfig domain. The domain value is ALLOCATION_RPT_DISPLAY_QUOTE_FROM_PE and can be set to True or False. When it is set to True, the Quote Price is fetched from the pricing environment. When it is set to False, the value is displayed according to the security price definition.
8.5 Reserving Positions for Allocation
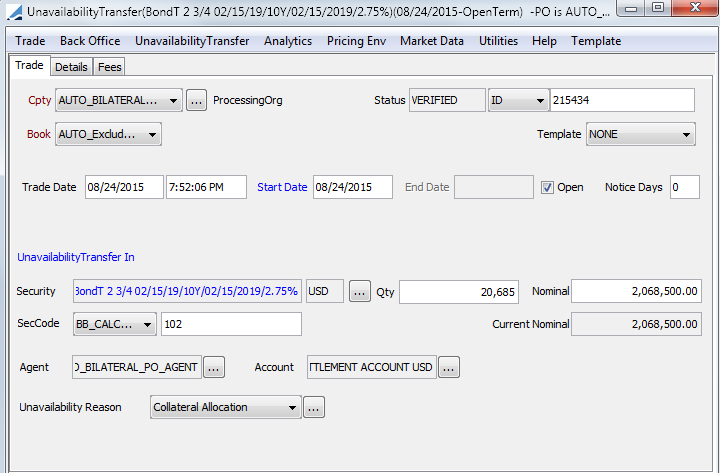
It is possible to reserve a security for allocation while the availability of the security is verified. Using this process, the security cannot be used for allocation in another margin call at the same time, preventing collateral from being allocated that is no longer available.
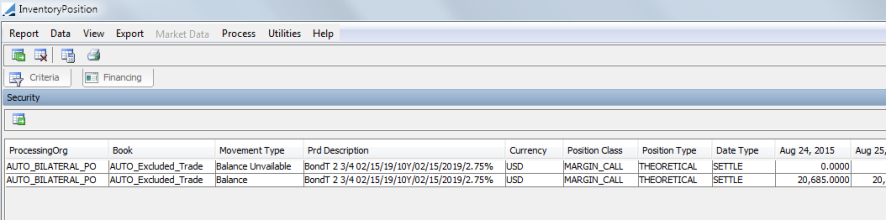
When proceeding with the allocation, the system creates an unavailable transfer trade by using the Reserve workflow rule. The unavailability transfer trade creates a new balance type name, Balance Unavailable, which can be viewed in the Back Office Position report. After the numbers and collateral are confirmed with the counterparties, the allocation is validated to create the margin call trades. At this point, the unavailability transfer trades are canceled. This is done using the Release workflow rule. The Balance Unavailable amount is then zero and the allocation is reflected in the internal balance.
Even if the margin is partially allocated or if the saved margin call trades are not the ones suggested by the optimization, all of the unavailable transfer trades for the contract are still canceled.
Workflow rules
| • | Reserve - This rule creates the unavailability transfer trade. It should be used on ALLOCATE action - Example: EXPOSURE_AGREED - ALLOCATE - ALLOCATED transition. |
| • | Release - This rule cancels the unavailability transfer trades. It should be used on EXECUTE action - Example VALIDATED - EXECUTE - EXECUTED. |
| • | CheckPosition - This rule verifies that the reserved allocation is still available in the pool. It should be used on EXECUTE action as above. |
| • | CheckFullExecution - These rules are used to check if the collateral is still available in the Check Position Collateral Pool when executing. It should be used on EXECUTE action as above. |
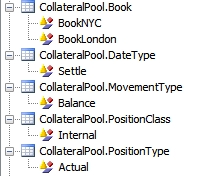
Check Position Collateral Pool
The collateral pool is what the CheckPosition rule uses to verify availability. It is defined using domain values. These values define the scope of the pool. When the CheckPosition workflow rule is used, it is the collateral that meets these requirements that are considered for allocation. These domain values are the same as those defined in the Inventory Optimization Constraint Configuration, but when the CheckPosition workflow rule is used, the system looks to these domain values and not the Inventory Constraint.
| • | CollateralPool.Book |
| • | CollateralPool.DateType |
| • | CollateralPool.PositionType |
| • | CollateralPool.PositionClass |
| • | CollateralPool.MovementType |
Example
Below is a example of an allocation in the Allocation window.
When the allocation is done, using the above referenced workflows, an Unavailability Transfer (or reservation trade) is created. A unique reservation Id is also created.
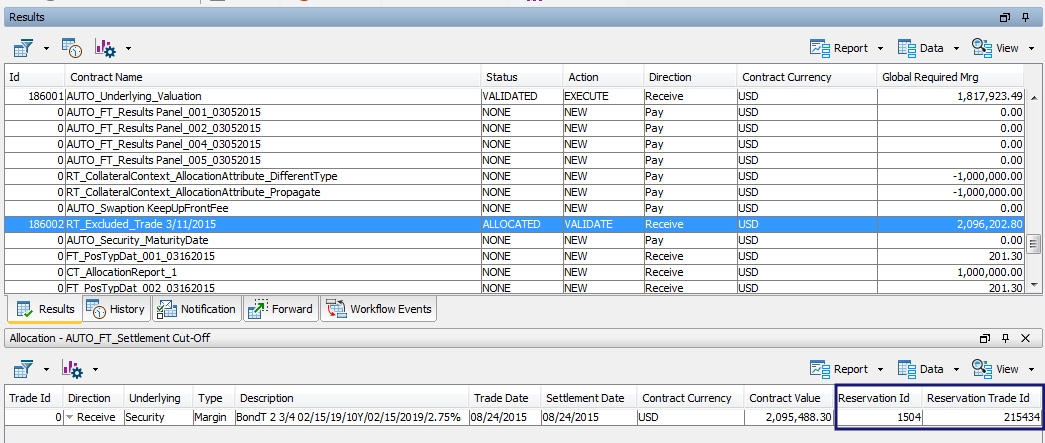
To view the Unavailability transfer, right-click on the row of the allocation and select Show > Reservation. At this point, no margin call trade has been saved.

This trade and its transfer create a Balance Unavailable movement (which can be seen in the Inventory Position report).

When the allocation is validated and executed, the margin call trades are created and unavailability transfer trades are canceled. The Reservation Trade Id becomes the Margin Call Trade Id.
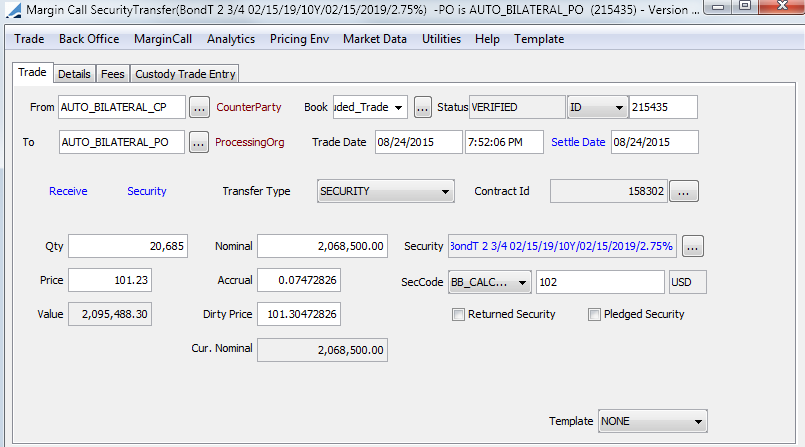
The balance is updated with the margin call transfers and the Balance Unavailable becomes zero. The margin call position is now.
8.6 Allocation Hold
In the Allocation window, a column called Hold Allocation can be added to the display. This column gives the user the ability to release specific allocations (such as daily call allocations), but to hold other allocations (for substitutions, perhaps). This allows the daily call allocations to be processed and the substitution allocations to be kept for release/processing independently once they have been agreed upon.
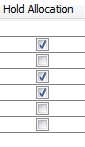
Any allocation that has Hold Allocation selected, has the following behavior:
| • | Will not generate a margin call trade at the execution of the margin call entry |
| • | Will re-appear in the Allocation window the next time it is opened |
| • | Will not be included in Daily Security and Cash Margin columns in the Collateral Manager > Results panel |
| • | Will not impact calculations / results panel of Collateral Manager |
An Allocation that does not have Hold Allocation selected has the following behavior:
| • | Behaves the same way as other allocation functionality |
| • | Will be saved as margin call trades |
| • | Will not re-appear in the Allocation window the next time it is opened |
| • | Populates the Daily Security and Cash Margin columns in the Collateral Manager > Results panel |
8.7 Allocation Summary - Auto Adjustment
The Allocation Summary is an area of the Allocation window that displays a summary of the allocation information regarding Margin and Value. Additionally in this area is an Auto Adjustment field.
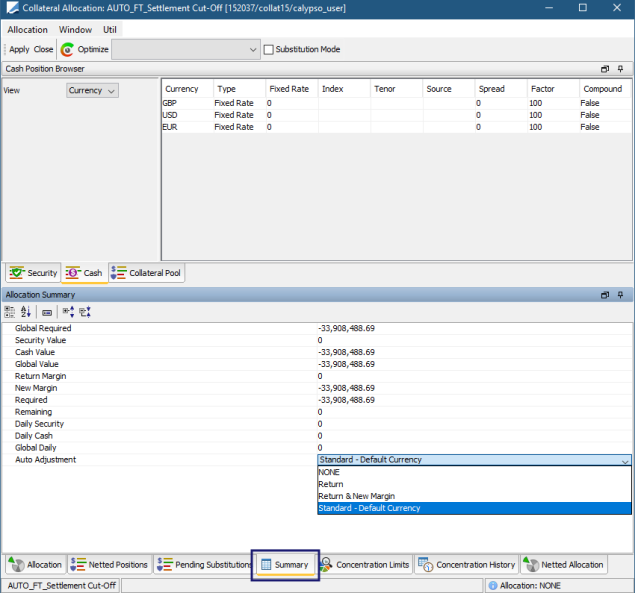
The Auto Adjustment field allows the user automate returns when there is a previous position in a different currency and automate a return but not a new margin.
The Auto Adjustment options are:
| • | None - no automatic calculation |
| • | Return - Return is done automatically when possible using previous position currency. New Margin allocation is manual. |
(Dispute scenarios are not supported with this Auto Adjustment method.)
| • | Return & New Margin - Return is done automatically when possible using previous position currency. New Margin allocation are done in the default currency. If no auto adjustment currency has been defined on the Margin Call contract, no allocation is created. (When Margin Flow Approach is used, the constituted margin is the new Margin Required (MFA) – Total Previous Margin.) |
(Dispute scenarios are not supported with this Auto Adjustment method.)
| • | Standard - Default Currency - Everything is done using the default currency with the ability to explode the Margin and Return. |
(Calypso recommends using this Auto Adjustment method for single currency contracts only.)
NOTE: This feature is also available in the Template Manager (Collateral Manager > Preferences). In the Template Manager, it is also possible to automate when paying, receiving, or both.
There are three workflows used to accommodate the three auto adjust options. These workflows should use a full STP workflow. When using these workflows rules, there is no need to open the Allocation window. The Margin Call entry goes through the workflow transition anatomically. The workflow rules are: AutoAdjust, AutoReturn and AutoReturnAndAdjust. These rules should be added to a transitions such as:
EXPOSURE_AGREED - ALLOCATE - ALLOCATED
ALLOCATED - VALIDATE - VALIDATED
Ⓘ NOTE: Currently, the Auto Adjustment feature is not available for dispute cases. This functionality will be available in a future release.
9. COLLATERAL_MANAGEMENT Scheduled Task
You may run the optimization as part of an End of Day process using the scheduled task COLLATERAL_MANAGEMENT. To view the Scheduled Task window, from the Calypso Navigator, select Configuration > Scheduled Tasks > Scheduled Tasks.
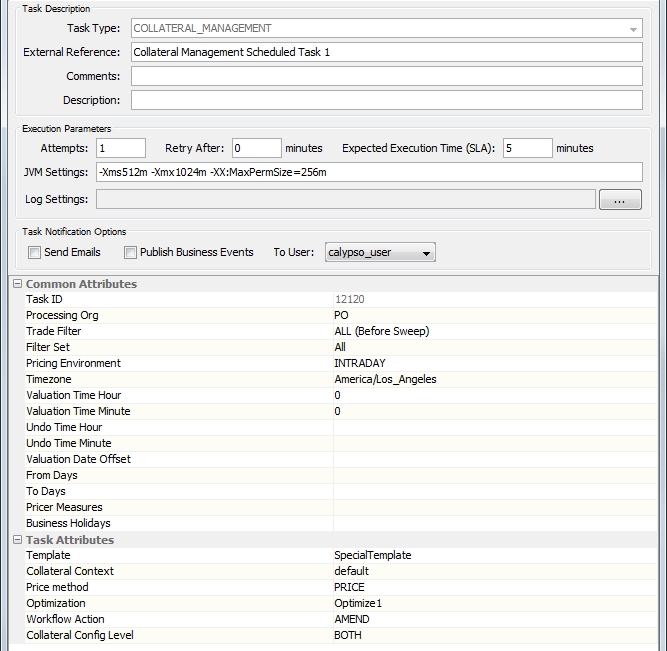
You are able to run the scheduled task for a range of days by utilizing the From Days and To Days fields. If no date range is selected, all dates are generated.
Below is a description of the required scheduled task attributes:
|
Attribute |
Description |
|---|---|
|
Template |
Select a collateral template (This is the same as Collateral Manager > Preferences in Collateral Manager) |
|
Collateral Context |
Select a Collateral Context to use for the running of the scheduled task. |
|
Optimization |
Choice of the Optimization configuration (Same as the Optimizer that can be selected in Collateral Manager) |
|
Price method |
Defines the pricing method used upon loading. REPRICE resets the pricing and reprices everything. PRICE updates what has not been priced. NONE allows the scheduled task to apply a collateral workflow action without repricing the entry. |
|
Workflow Action |
Select the workflow action to apply when the contracts are priced or repriced. |
|
Collateral Config Level |
Select BOTH, EXPOSURE_GROUP or MASTER to determine whether the scheduled task is run at the Master or Exposure Group level. BOTH indicates that it will be run at both levels. |
If an optimizer is defined in the attribute Optimization, the system will proceed to optimization on the contracts included in the template selected.
10. Disputing a Margin Call
A dispute is when there is a discrepancy between the amount of margin that the processing org believes needs to be paid/received and the amount the counterparty believes needs to be received/paid. A dispute is resolved once the processing org's margin call agrees with that of the counterparty which is the same exposure/collateral balance.
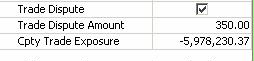
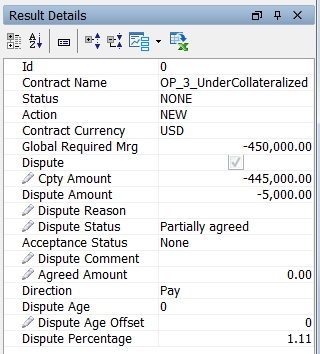
Enter the counterparty’s calculated amount in the Cpty Amount field. If this amount is not the same as the Global Required Margin, the Dispute checkbox and the Dispute Amount field will be automatically populated.
10.1 Dispute Process
For example, if a processing org indicates that the margin to be paid today is 650,000 and the counterparty thinks that it should be 645,000, there is a dispute of 5,000. The processing organization would rather accept part of the margin than nothing at all, therefore they will accept the 645,000 and the dispute will be ongoing.
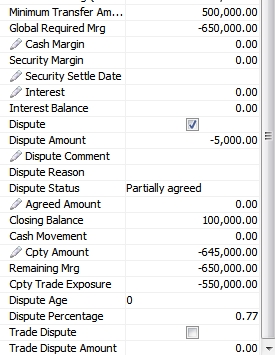
| » | The system calculates the dispute amount as the difference between the processing org’s calculated amount and the counterparty’s calculated amount. |
| » | A dispute is resolved once the processing org's margin call amount agrees with that of the counterparty. |
| » | You can resolve the dispute by agreeing to the counterparty's, PO's or another amount.amount. |
| » | The Dispute checkbox remains checked after the dispute has been resolved. |
| » | As soon as the disputed is resolved, the contract can be returned to ALLOCATED status. |
11. Disputing a Margin Call at Trade Level
In the Details area, a number of columns allow managing disputes at the trade level.

11.1 Automatic Disputes
Ⓘ If the contract is defined as loading trades by "REAL_SETTLEMENT" date, the trades and collateral that are not settled will automatically appear in Dispute mode, and they will not be taken into account in the Margin Call computation - The "Exclude" checkbox will be checked - To include them, you need to clear the "Exclude" checkbox.
If the trades settle on the same day as the margin call, you can reprocess the margin call and they will automatically be included. Otherwise, they will be automatically included when they settle.
11.2 Initiating a Dispute
| » | Enter the exposure amount computed by the counterparty in the Cpty Amount field - If this is different from the Global Required Margin, the Dispute checkbox is selected. Calypso computes the Dispute Amount as the difference between the counterparty's exposure and the Global Required Margin. |
| » | You can enter a dispute comment, and select a dispute reason - Dispute reasons can be added to domain "MarginCall.DisputeReason". |
| » | You can filter which trades to display in the Details area using the filter menu  . . |
Automatic Resolution
| » | If the Dispute Amount is within the Dispute Tolerance set on the contract, the dispute is automatically resolved using the counterparty's amount. |

| » | If there is no tolerance, whether the dispute is less than or equal to the MTA, it is treated as a dispute. Set the Tolerance to the MTA if you would like a dispute less than the MTA to be ignored. |
11.3 Resolving a Dispute
You have multiple options to resolve a dispute.
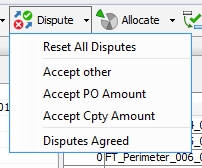
Option 1 - Resolve using Agreed Amount
| » | Enter the amount of exposure that is agreed in the Agreed Amount field, and choose Dispute > Accept other. If the agreed amount is null, you will be prompted to exclude the trade. |
The Acceptance Status will be set to "Accept other". (When this action is applied, the Allocation window will show the Global Required Margin equal to the agreed amount.)
Option 2 - Resolve using Calypso Amount
| » | Choose Dispute > Accept PO Amount. |
The Agreed Amount is automatically set to the PO Net Balance, and the Acceptance Status is set to "Accept Processing Org".
Option 3 - Resolve using Counterparty Amount
| » | Choose Dispute > Accept Cpty Amount. |
The Agreed Amount is automatically set to the Counterparty's Exposure, and the Acceptance Status is set to "Accept Counterparty".
As soon as the disputed is resolved, the contract returns to ALLOCATED status.
11.4 Updating Agreed Amount
You can choose Dispute > Disputes Agreed to set the agreed amount to the Net Balance for all trades for which there is no dispute.
All open dispute can be viewed at the contract level using the following fields.
These are for information purposes only.
Dispute information is saved along when the margin calls are saved.
11.5 Viewing the History of Trade-Level Disputes
Once the margin calls with disputed trades have been saved, you can view the history of trade-level disputes in the History panel. By default you can view the last 7 days of disputes. You can change the history period in the History options.

11.6 Dispute Age
A dispute begins aging when the Processing Org and the Counterparty call different amounts and it runs over to the following day. The aging of the dispute is determined by the Dispute Age Start, which is set in the Details panel of the Margin Call contract. If the setting is T+1 in the contract, the Dispute Age on the day the dispute is initiated is 0. If the setting is T, the Dispute Age on the day the dispute is initiated is 1.
To calculate the Dispute Age, the system looks at yesterday's entry. If there was a Dispute Age, the age is accrued one day.
Additionally, to accommodate for the import of existing contracts into Calypso, two fields are available for offset dates: Dispute Age Offset and Directional Dispute Age Offset. These fields are editable provided the appropriate access permissions are selected. The access permissions for these fields are: AllowEditDisputeAgeOffset and AllowEditDirectionalDisputeAgeOffset.
When the dispute amount hits 0, the dispute is over.
Dispute Aging Example
(Dispute Age Start set to T+1)
|
Day |
PO Call | Cpty Call | Agreed Collateral | Disputed Amount | EOD Dispute Status | Comments | Age | New Collateral Balance | Previous Collateral Balance |
|---|---|---|---|---|---|---|---|---|---|
|
1 |
12,000,000 |
2,000,000 |
2,000,000 |
10,000,000 |
Partially Agreed |
Under Investigation |
0 |
2,000,000 |
---- |
|
2 |
10,00,000 |
----- |
----- |
10,000,000 |
Fully Disputed |
Reconciliation in progress |
1 |
2,000,000 |
2,000,000 |
|
3 |
9,000,000 |
4,000,000 |
4,000,000 |
5,000,000 |
Partially Agreed |
Cpty referred to middle office |
2 |
6,000,000 |
2,000,000 |
|
4 |
6,000,000 |
6,000,000 |
6,000,000 |
---- |
Fully Agreed |
|
0 |
12,000,000 |
6,000,000 |
Directional Dispute Age
There is Directional Dispute Age column available for display in Collateral Manager. The Dispute Age is reset to 0 when there is no call from either party or when a margin call is agreed in full. In addition to those occurrences, the Direction Dispute Age column is rest to 0 when there is an exposure swing.
This applies to Contract disputes only.
12. Substituting a Margin Call
The substitution process consists of reversing an existing collateral position, and constituting a new margin.
| » | In the Allocation window, select Substitution Mode at the top of the window. |
| » | Then, in the Netted Positions panel of the Allocation window, select any margin call positions that you would like to substitute and click  . The selected positions will appear reversed in the Netted Allocations panel. If you would like to substitute all of the positions, click . The selected positions will appear reversed in the Netted Allocations panel. If you would like to substitute all of the positions, click  . (Note: If you do not select the Substitution Mode flag, a return will be processed instead of a substitution.) . (Note: If you do not select the Substitution Mode flag, a return will be processed instead of a substitution.) |
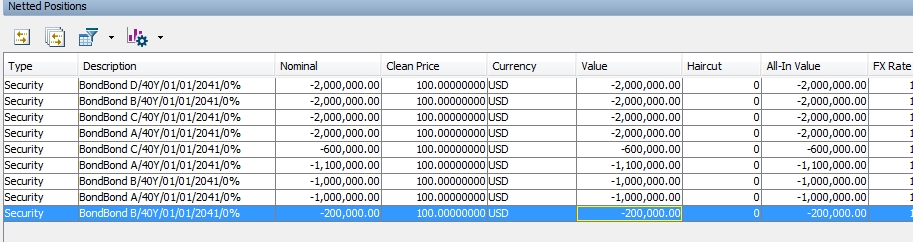
| » | Also in the Netted Positions panel of the Allocation window as well as Collateral Manager, you are able to net the position with the booked daily allocations (allocation with a margin call trade) to display the end of day balance at the position level. |
| » | Select the Cash or Security panel to constitute a new margin. |
| » | Click Apply when finished. |
| » | Depending on the workflow setup, apply the appropriate actions to execute the allocation. |
13. Returning a Margin Call
If you would like to return a margin call, select the position to be returned in the Netted Positions panel of the Allocation window and click . The selected positions will appear reversed in the Netted Allocations panel.
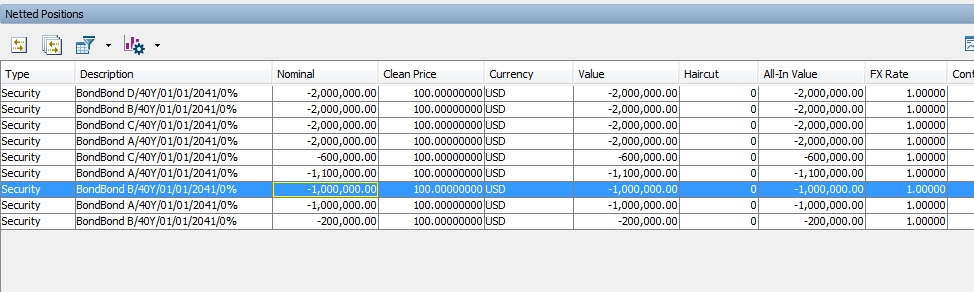

14. Allocating a Margin Call Trade to Multiple Books
Once a margin has been constituted, it can be allocated to multiple books.
Open a margin call trade and choose Back Office > Allocate.
The allocation can be manual or according to allocation rules. Allocation rules are defined under Configuration > Books & Bundles > Allocation Template.
15. Margin Call Trade Mirroring
Margin Call trade mirroring can be specified either via the Margin Call trade itself or from the Margin Call contract.
15.1 Mirroring on Margin Call Trade
To set up mirroring directly from the Margin Call trade, select the Mirror check box in the Details panel of the trade. This selection displays the Book Mirror, Trade Mirror and Contract Id fields.
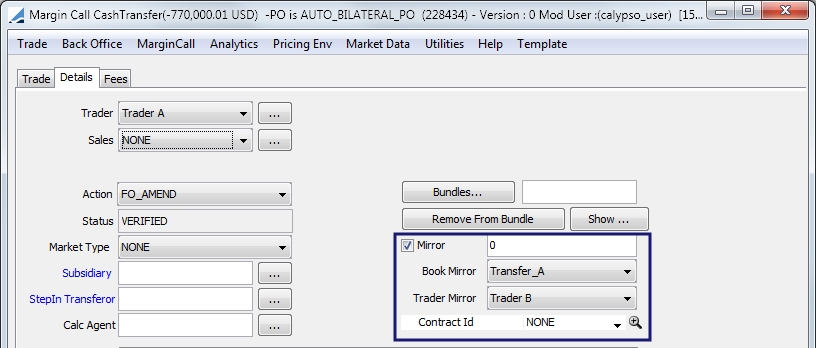
The Margin Call contracts available for selection in the Contract Id field have a mirrored PO and LE and have the Subtype designation of Mirror. For example, if the PO for the trade is LE1 and the CP is LE2, the mirror Contract Id chooser loads only margin call contracts where the PO=LE2 and CP=LE1.
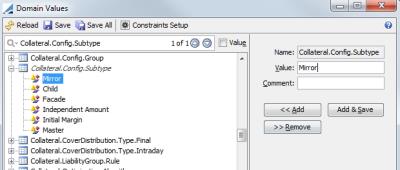
Note: The Mirror Subtype must be added to the Collateral.Config.Subtype domain value.
| » | Once the trade is saved with the Mirror checkbox selected, the mirror Margin Call trade is generated with the Contract Id = the mirror contract's Id. |
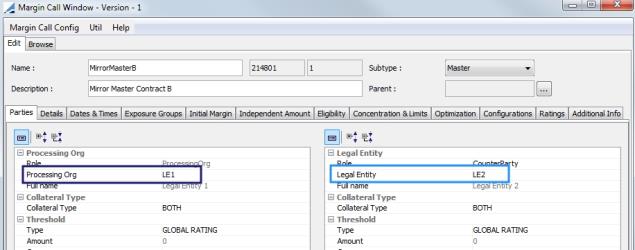
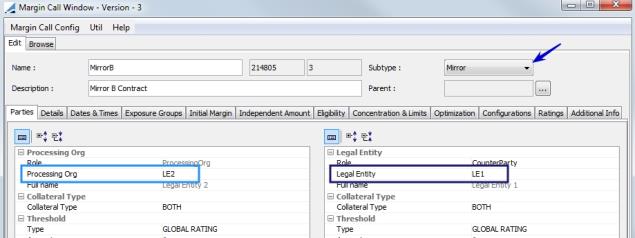
15.2 Mirroring Through Margin Call Contract
To automate mirroring of Margin Call trades, a Mirror Contract can be selected in the Details panel of the contract. As in the Margin Call trade, the only contracts available for selection must have a mirrored PO and LE and have the Subtype designation of Mirror.
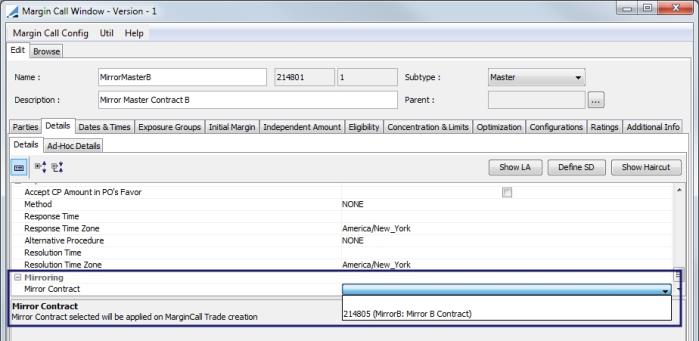
After the master contract is executed, two margin call trades will be generated.
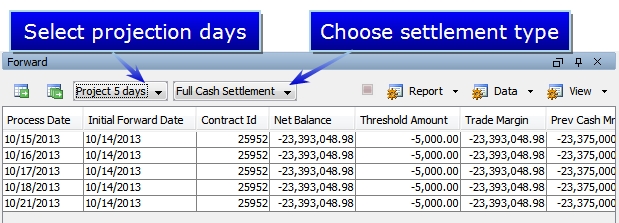
16. Computing Collateral Projections - Forward Panel
Collateral projections can be viewed in the Forward panel. By default you can view projections over the next 5 days. You may select a different amount of projection days from the drop-down.
You may also select the forward type. The available types are:
| • | Full Cash Settlement - assumes a cash settlement for future margin calls |
| • | Trade Settlement - bases the calculation on the forward margin on the settle date of the real margin call trades generated, assuming full settlement of the related transfers. (For the projected previous security margin, the coupon is accrued.) |
| » | You can click  to compute collateral projections for the contract currently selected, or to compute collateral projections for the contract currently selected, or  to compute collateral projections for all contracts currently loaded. to compute collateral projections for all contracts currently loaded. |
| » | You may drill down to the underlying trades constituting the forward margin. Right-click on an entry to display a Show menu from which you can select different views. |
Selecting Margin Call Positions opens a report window showing the margin call positions. Double-clicking on a margin call position in any report of margin call positions opens the Back Office Inventory report for that contract. This makes it possible to drill down to the transfers (thus the margin call trades or other trades as well) associated with the positions when double-clicking on a row and the column of a date (showing transfers for that day and that position only).
16.1 Projected Trade Exposure Valuation
To calculate the Projected Trade Exposure Valuation, Calypso takes the closing price of the Security.
For Fixed Income Securities Calypso projects forward the valuation by adjusting the value to include the additional day(s) of Accrued Interest.
For the Cash valuation we will project forward by adjusting the cash value by the additional day(s) of Interest due on the cash value of the Trade .
This would be the same as adding additional day(s) to the Collateral Date for the Trade valuation.
As part of the Projected Collateral Calculation Calypso, applies the relevant Threshold / MTA and Rounding convention, as would apply to the direction of the Collateral Exposure.
16.2 Projected Cash Margin Valuation
When forward valuing the value of Cash Collateral held Calypso uses the current (last known) FX rates (if applicable) to value the Cash Collateral in the Margin Call Contract Currency.
Although the forward projected value of Previous Cash Margin should not change, Calypso will assume cash settlement of future margin calls to provide a cash forecast of the daily collateral requirements.
16.3 Projected Security Margin Valuation
To calculate the Projected Security Margin Valuation we will take the closing price of the Security (at Trade Date of the Margin Call Report).
For Fixed Income Securities we will project forward the valuation by adjusting the value to include the additional day(s) Accrued Interest.
The difference in the Previous Security Margin as we project forward will be the Accrued Interest on the Security.
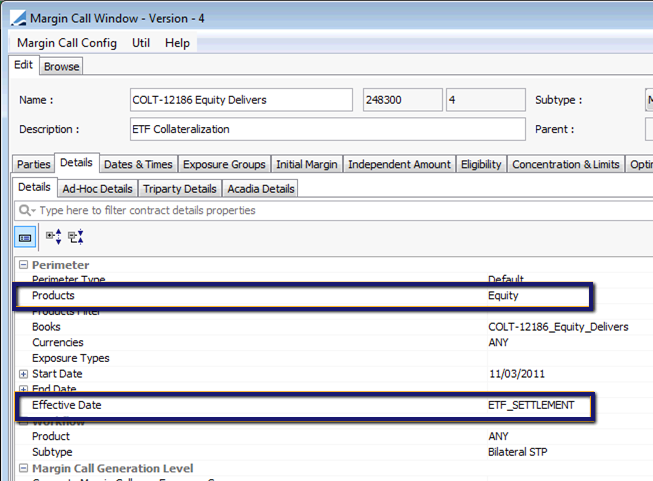
17. Collateralization of ETFs
The Collateral module supports the collateralization of equity and fixed income trades which serve as an underlying for ETF deals.
17.1 MARGIN_CALL_PRICER_MEASURE
When an equity trade is part of an ETF bundle, the Margin_Call pricer measure applies the following logic. The Bundle Type on the equity trade must be in the ETFBundleType domain.
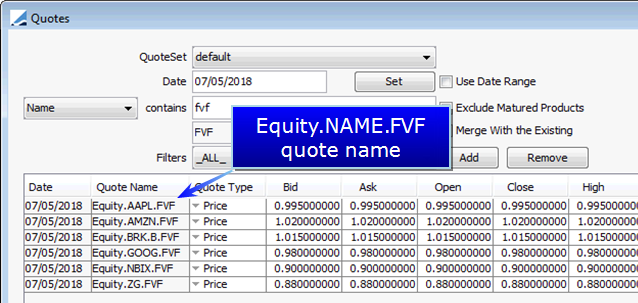
| • | For Equity Buys, the calculation is Unsettled Qty*Current Price* FV Factor (where FV Factor is a quote associated with the underlying security). The naming scheme for FV Factor is Equity.NAME.FVF and the quote type is Price. |
| • | For Equity Sells, the calculation is Settled QTY*Current Price*FV Factor (where FV Factor is a quote associated with the underlying security). The naming scheme for FV Factor is Equity.NAME.FVF and the quote type is Price. |
This is only for trades which have an underlying transfer which settles before the ETF’s actual settle date. Therefore, the system will look for the Equity sell transfer’s settlement status, where the current date is greater than or equal to the ETF trade’s actual settlement date. If the transfer is settled, then the pricer measure will be computed.
For Fixed Income trades, as there is no FV factor quote, the margin call pricer measure is the nominal * dirty price of the asset.
17.2 ETF SETTLEMENT Effective Date
The EFT SETTLEMENT Effective Date Type on the Details panel of the Margin Call contract must be selected to apply the EFT logic in the Margin_Call pricer measure. The logic applied is also different for Equity Buys vs. Equity Sells. Equity Buys are included only if they have not settled. Equity Sells are included which have settled prior to the ETF's actual settle date.
17.3 ETF Reference Keyword
A trade keyword called ETF Reference identifies unique bundle Ids on underlying trades in the contract for which the Margin Call is generated.

NOTE: Equity and Bond trades in a bundle will calculate a margin call even if their settle dates are the same as the unitized fund. Transfers of the unitized fund should not be settled for the margin call to be calculated.
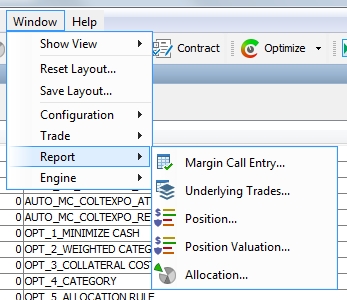
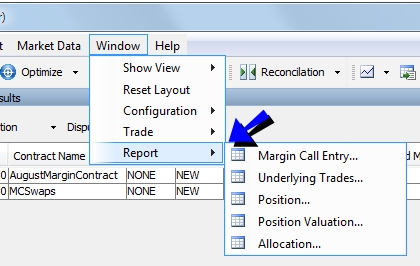
18. Collateral Reports
There are five stand-alone reports available for generation through Collateral Manager. The five reports are compatible with the REPORT scheduled task. To select the desired report, select Window > Report. These reports are currently only available through the Collateral Manager window.
Similar to how a user can filter Margin Call contracts in Collateral Manager using a Contract Filter, users can also use a Contract Filter on the report windows.
Note: There is an additional Collateral report available called MarginCallForward. This report displays collateral forward exposure. You may generate this report either through the REPORT scheduled task, or you may add the link reporting.ReportWindow$MarginCallForward directly to the Reports menu using Main Entry Customizer.
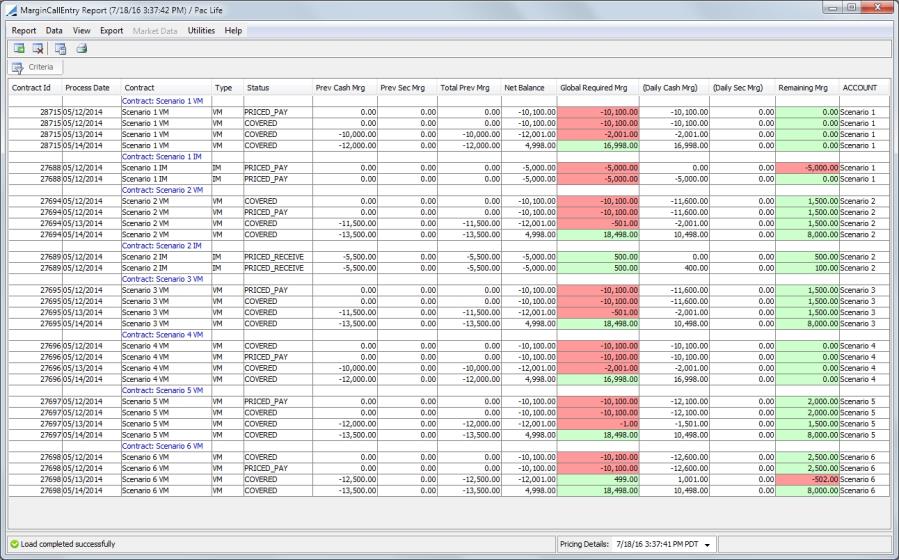
18.1 Margin Call Entry (report type MarginCallEntry)
This is a report of all of the changes that have been made to the contracts
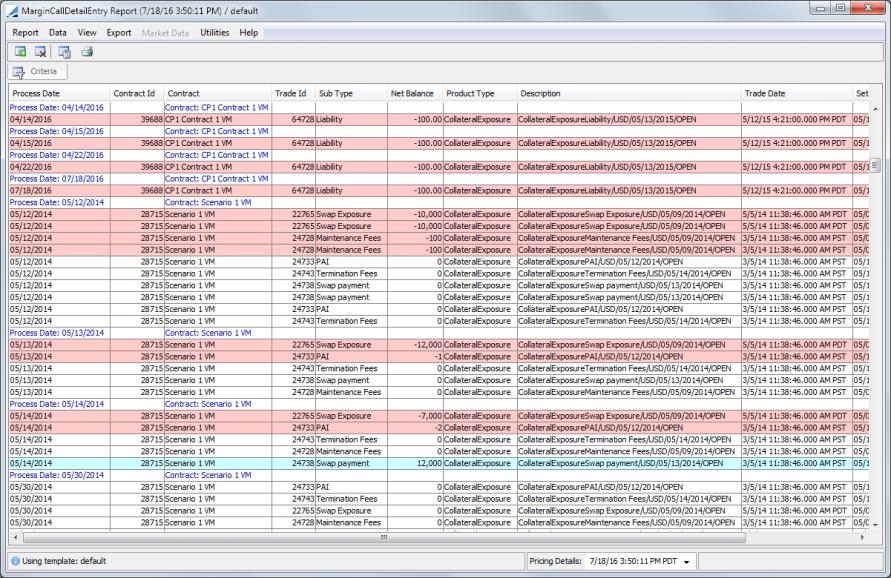
18.2 Underlying Trades (report type MarginCallDetailEntry)
This report displays all of the underlying trades for the selected contracts.
18.3 Position (report type MarginCallPositionEntry)
The Position report displays collateral positions held across the contracts as of the collateral allocation date.
For Triparty positions, first generate MARGIN_CALL positions from the pledge trades generated by the MT569 integrated on top of the Triparty Exposure trade.
18.4 Position Valuation (report type MarginCallPositionValuation)
This report displays the margin call positions and their MTM valuation as of the report date.
Zero positions are not displayed in the Margin Call Position Valuation report unless there is a movement today which caused the position to go to zero.
Daily movements are put into the Margin Call Position Entry report, rather than just the daily balances. If there is a daily movement and the daily balance is zero, the zero position row is displayed in the above scenario only. Therefore, on the following day, nothing is displayed for this position since the position is zero and there is no movement on that day.
For Triparty positions, first generate MARGIN_CALL positions from the pledge trades generated by the MT569 integrated on top of the Triparty Exposure trade.
18.5 Allocation (report type MarginCallAllocationEntry)
This displays the allocations made for the contracts.

18.6 Concentration Limit (report type MarginCallConcentrationEntry)
Used to monitor concentration breaches.
When a Collateral report is generated, it queries the database based on the designated criteria.
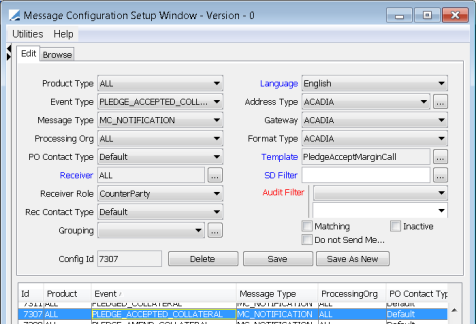
19. Generating a Margin Call Statement
When a margin call is saved, the system can generate a statement provided a message configuration has been setup. You also need to select the Send Statement checkbox in the Dates & Times panel of the margin call contract.
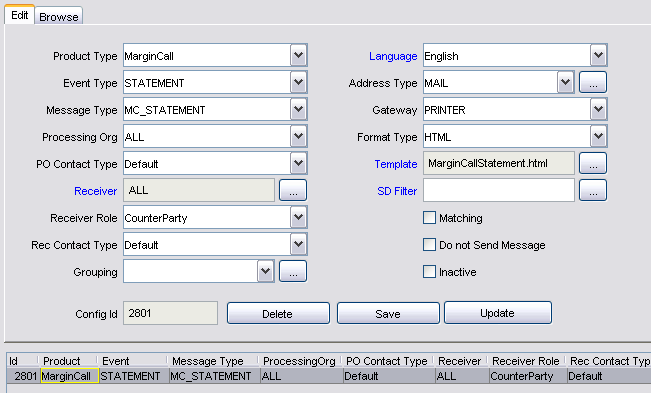
First, add the value MC_STATEMENT to the messageType domain.
Then, define a message configuration for this message type. From the Calypso Navigator, select Configuration > Messages
& Matching > Message Set-up (menu action refdata.AdviceSetupWindow) as shown
below.
Margin call statements will appear in the Task Station under the Messages panel as well as in the Message report. Double-click the message to view the actual statement.
Note that this statement uses a default template, and that this template can be customized as applicable. From Calypso Navigator, select Help > Message Template Keywords for information on customizing message templates.
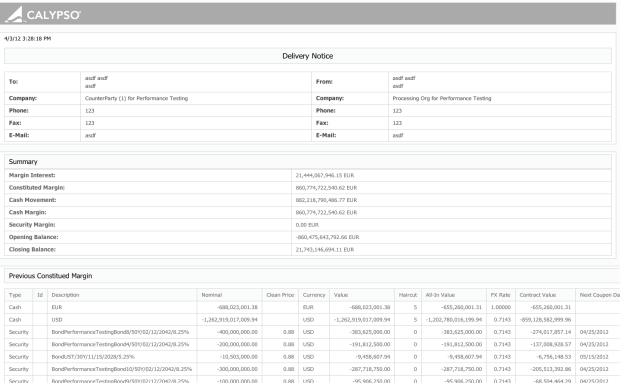
| » | Any column available in the Margin Call Entry Report can be included in a statement using the following pattern: |
|REPORT#NameOfColumn|
(An example of this is in the default statement in CollateralStatement.html)
| » | For summaries (Interest, Allocations, Positions, Underlyings), you are able to use the report template directly. An example of the format for an Allocation summary is: |
|ALLOCATIONS#NameOfReportTemplate|
| » | If a report template is not set or does not exist, the system uses the one defined in the Collateral Context. |
20. Show Menu
The following menu items are contained in the Show menu.
|
Menu Items |
Description |
|
Default Selection |
To select the item that you want to display when you double-click a contract. |
|
Default Selection for Template |
To select the item that you want to display when you double-click a contract using the template loaded. |
|
Contract |
To bring up the margin call contract. |
|
Allocation |
Displays the Allocation window. |
21. Margin Call Menu
The following menu items are contained in the Margin Call menu.
|
Menu Items |
Description |
|
Load |
Loads all available margin call contracts based on the selected criteria. |
|
Price |
Calculates the margin call requirements (same as When margin calls have already been computed for the process date, select this to indicate that margin calls will be updated. |
|
Reprice |
Allows you to reprice from scratch. |
|
Allocate |
Opens the Allocation window to allow the user to enter security margin calls and cash margin in multiple currencies. See Constituting a Margin for details. |
|
Optimize |
Optimizes the margin call, based on the Optimizer selected. |
|
Save |
Saves the margin calls that have been calculated for a given contract. |
 icon).
22. Additional Scheduled Tasks
22.1 VM_CASH_OFFSET
Some variation margin components are pass-through payments which need to paid or received but not collateralized. The VM_CASH_OFFSET scheduled task allows margin call positions to be reversed which are related to any margin call which covers specific non-Swap Exposure variation margin components such as PAI, Maintenance Fees, Termination Fees, Swap Payments, etc….
The task attributes for this scheduled task are:
| • | Template – Specify a Collateral Manager Template |
| • | Collateral Context – If a Collateral Context is not specified in the selected Template, you may specify one here. If there is a Collateral Context in both the Template and in this field of the scheduled task, this field overrides what is in the Template. |
| • | Collateral Exposure Trade Filter – Select a trade filter for the Collateral Exposure trades |
Once the scheduled task has found the relevant PL_MARKS linked to the applicable Collateral Exposure Trades (CET), a margin call trade is generated for each applicable CET. The value of each margin call trade is the inverse of the PL_MARK. (For example, if the PL_MARK for a CET is -5,000 then the scheduled task will generate a margin call trade for +5,000.)
Each generated margin call trade will have a trade keyword called VM_CASH_OFFSET with a value of true as well as a trade keyword called CET_Subtype which references the CET product subtype.
If the scheduled task is run more than once per day, the existing margin call trades will be amended.
22.2 COLLATERAL_DISTRIBUTION
The COLLATERAL_DISTRIBUTION scheduled task moves assets between contracts. The result of running this scheduled task is the generation of a trade type called CollateralDistribution, which facilitates the movement of collateral between contracts.
When the scheduled task is run, applicable contracts are loaded and priced in memory to determine which contracts have excess collateral and which have a deficit. It then performs the allocations in memory and generates collateral distribution trades to move assets from long contracts to the linked contracts which are short and accept eligible collateral from the long contract.
The attributes for this scheduled task are:
| • | Template - Specify a Collateral Manager Template. The order of the contracts to give assets is based on this template. |
| • | Collateral Context - If a Collateral Context is not specified in the selected Template, you may specify one here. If there is a Collateral Context in both the Template and in this field of the scheduled task, this field overrides what is in the Template. |
| • | Price Method - Select to Price or Reprice |
| • | Optimization - A specific optimization configuration must be selected. One in which the Optimization Type is Allocation and the Solver is Allocation-rule. Three optimization constraints are required on this Optimization configuration: Collateral-Distribution, Required-Margin and Eligibility |
| • | Sweeping Type - This is the type of excess sweeping being done. The options are: |
| – | Move Excess to Deficit: moves excess collateral to linked contracts that have a deficit |
| – | Sweep All Deficit: All deficit of the net position in base currency is moved from the first linked contract, such that the source contract will have 0 GRM |
| – | Sweep All Excess: All remaining excess of net position in base currency is moved to the first linked contract, such that the source contract will have 0 GRM. |
| • | Native CCY VM to Native CCY IM Sweeping - Restricts sweeping of cash between exposure groups if the base currencies of the variation margin and initial margin do not match. |
No report is generated from the running of the scheduled task. To view output, load the collateral distribution trades in the Trade Browser. Two keywords are added to the trades, SourceConfigId, which is the contract Id of the contract giving the asset, and DestinationConfigId, which is the contract Id of the contract receiving the asset.
It is possible to use this scheduled task to sweep from Master to Exposure Group and Exposure Group to Exposure Group.
22.3 EOD_SEC_MARGINCALL_VALUATION
In Calypso, the publication of the NPV of a margin call agreement is the net value. For some disclosure purposes, the value needs to also be recorded per ISIN. The Position Valuation report can be used with this scheduled task to publish the NPV per security and margin call agreement.
The EOD_SEC_MARGINCALL_VALUATION scheduled task uses a Position Valuation Report to publish the position valuation so that the accounting engine can generate entries.
The scheduled requires only a pricing environment. It contains two attributes:
| • | Collateral Config Level (optional) – possible values are Master and Exposure Group |
| • | Position Type (mandatory) – possible values are THEORETICAL, EXPECTED, ACTUAL, NOT_SETTLED and ROLLED_INTEREST |
When launched, the scheduled task loads a Position Valuation Report using the Config Level, Position Type and Processing Org fields from the scheduled task configuration. The Underlying Type is automatically security. The Valuation Date and Pricing Environment of the scheduled task are the ones used for the report.
The accounting event MARGIN_SECURITY_POSITION is used. It is based on MARGIN_SECURITY. The trigger event is POSITION_VALUATION_MARGIN.
Postings are generated on the previous event.
22.4 COLLATERAL_TREND
The COLLATERAL_TREND scheduled task can track data over a period of time and supply the information to populate Trend widgets in the Collateral WebUI dashboard. This scheduled task will run overnight and will collect margin call contract data on a daily basis.
The scheduled task has two attributes:
| • | Run for back dated(mandatory) - possible values are true and false. |
| • | Number of Back Days(optional) - enter the number of days. |