Defining Top-down Benchmarks
This document describes how to create a top-down benchmark using the Top-down Configuration and Benchmark windows.
A top-down benchmark uses sectors, rather than existing products.
The general process for configuring a top-down benchmark is the following:
Step 1 – Specify the criteria.
Step 2 – Specify the indicators.
Step 3 – Define a top-down hierarchy.
Step 4 – Define a benchmark of type "Top-down" which uses the top-down hierarchy.
These steps are further described below.
1. Configuring a Top-down Hierarchy
From the Calypso Navigator, navigate to Configuration > Asset Management > Top-down (menu action am.topdown.TopDownConfigurationWindow) to create a top-down hierarchy.
1.1 Specifying Criteria
Select the Criteria panel to specify the columns that will be used as criteria in the hierarchy. These will be the groupings you can select from when defining the hierarchy.
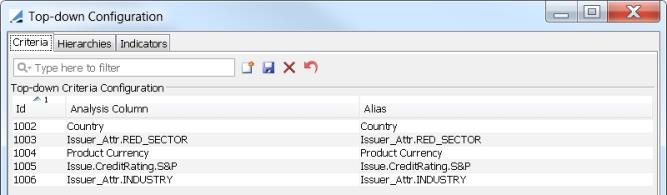
| » | Click |
| » | Click in the Analysis Column cell and select the column to be used as a criterion. |
The columns available are based on the Benchmark analyses that have been configured, and their columns loaded in PWS.
 See Benchmark Analysis for details on configuring a Benchmark analysis.
See Columns in Portfolio Workstation for details on loading columns.
Note that cloned columns are not supported in top-down benchmarks.
| » | Click in the Alias cell and rename the column with an alias if desired. |
| » | Repeat the above steps to add as many criteria as needed. |
| » | Click |
1.2 Specifying Indicators
Select the Indicators panel to specify the measures that will be used as indicators in the hierarchy.
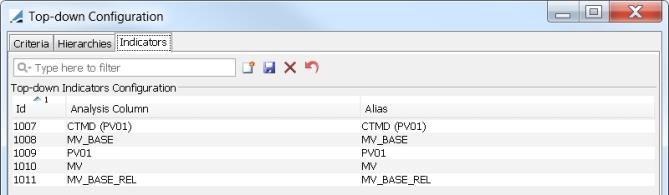
| » | Click |
| » | Click in the Analysis Column cell and select the pricer measure or risk measure to be used as an indicator. |
The measures available are based on the Pricing configuration used by the Benchmark analyses that have been configured, and their columns loaded in PWS.
See Benchmark Analysis for details on configuring a Benchmark analysis.
See Columns in Portfolio Workstation for details on loading columns.
| » | Click in the Alias cell and rename the measure with an alias if desired. |
| » | Repeat the above steps to add as many indicators as needed. |
| » | Click |
1.3 Defining a Hierarchy
Select the Hierarchies panel to define the top-down hierarchy.
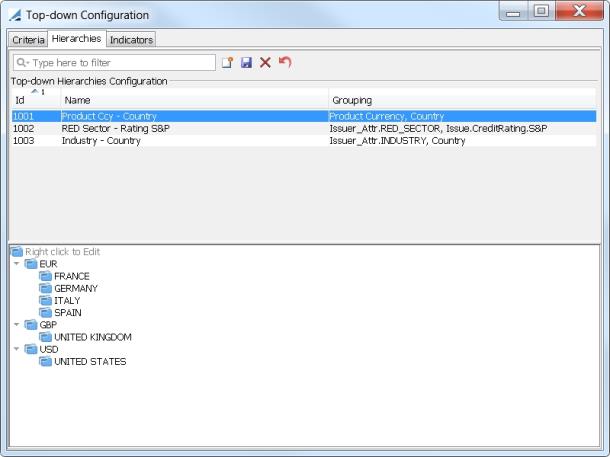
| » | Click |
| » | Click in the Name cell and give the hierarchy a name. |
| » | Click in the Grouping cell and select the desired criteria in the desired order. |
The groupings available are the columns that were added on the Criteria panel.
| » | Click |
| » | Select the hierarchy in the upper half of the panel. In the lower half of the panel, right-click |
Repeat this step to add as many root nodes as needed.
| » | Select a root node, right-click |
Repeat this process, adding as many nodes and sub-nodes as needed. A node of the final grouping type is a leaf node and no further sub-nodes can be added to it.
| » | After adding just one or two levels, you can complete the hierarchy via CSV if desired by using the scheduled task AM_TOPDOWN_RECORD_IMPORT in Incremental mode. |
See Updating a Top-down Benchmark via Scheduled Task for details.
2. Configuring a Top-down Benchmark
Once you have defined a top-down hierarchy, you can configure a top-down benchmark.
From the Calypso Navigator, navigate to Configuration > Asset Management > Benchmark.
Definition Panel
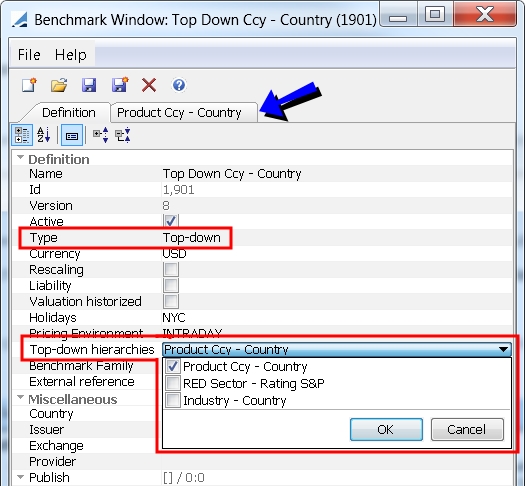
| » | From the "Type" field, select "Top-down". |
| » | From the "Top-down hierarchies" field, select one or more top-down hierarchies. A panel is added for each hierarchy selected. |
The hierarchies available are those that were defined on the Hierarchies panel of the Top-down Configuration window.
| » | Complete the other fields on the Definition panel as needed. |
See Defining Benchmarks for details on the other fields.
Note that the name should not contain "/" or any other characters which are not allowed in CSV file names.
| » | Select the panel named for the top-down hierarchy to define the benchmark composition as described in the next section. |
Top-down Hierarchy Panel
A panel is added for each of the top-down hierarchies that were selected in the Definition panel. The name of the panel is the name of the top-down hierarchy.
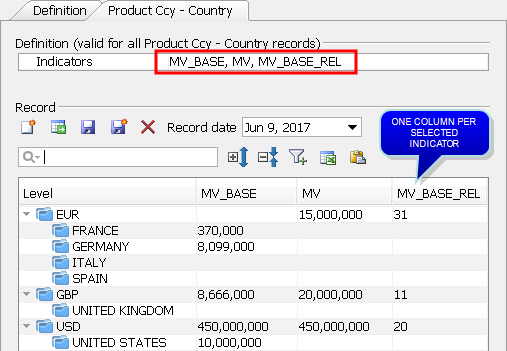
| » | From the "Indicators" field, select the measures to be used as indicators. |
The measures available are those that were added to the Indicators panel of the Top-down Configuration window.
| » | Click |
| » | Click |
| » | Enter values for the indicators. You do not need to enter values for every indicator. You can copy and paste values from Excel. |
You can enter values at the leaf level, the top level, or both. If values are entered at the leaf level, they will be aggregated by PWS to compute the top level. If values are entered at the top level, they take precedence over the aggregate values of the leaves.
| » | Click |
Repeat as needed to add more records.
3. Amending a Top-down Benchmark
You can export a top-down benchmark record as a CSV file. This file can then be modified and used to amend the top-down benchmark record and the top-down hierarchy.
Top-down benchmark records can be amended manually using copy and paste functionality, or using a scheduled task.
Top-down hierarchies can be amended using a scheduled task.
3.1 Exporting a Top-down Benchmark Record
| » | From the Benchmark window, click |
| » | Select the panel for the desired top-down hierarchy. |
| » | Select the desired record date from the drop down calendar. The dates that do not have records are grayed out. |
| » | Click <TopDownBenchmarkName>_<HierarchyName>_<RecordDate>.csv |
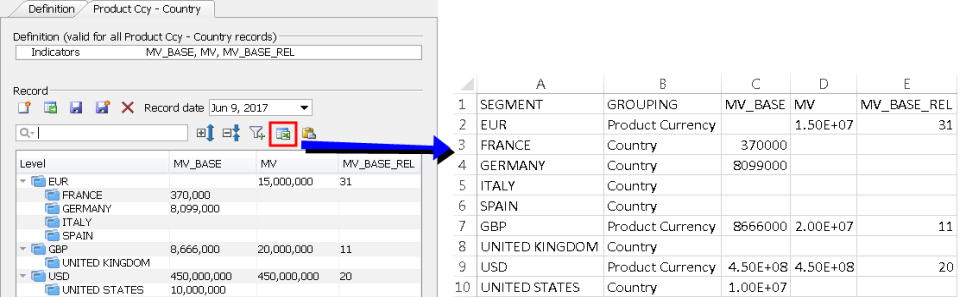
| – | The segments are the node names as defined in the top-down hierarchy. |
| – | The groupings are the criteria names as defined in the top-down hierarchy. |
| – | The other columns correspond to the selected indicators. |
3.2 Manually Updating a Record via Copy & Paste
When using the copy and paste method, the input must comply with the existing top-down hierarchy. It only allows updating values for existing indicators on existing nodes.
| » | Open the exported CSV file for the desired record. |
| » | Modify the indicator values as needed. |
| » | Copy all of the cells, including the headers, and click |
3.3 Updating a Top-down Benchmark via Scheduled Task
The scheduled task AM_TOPDOWN_RECORD_IMPORT can be used to amend a top-down benchmark record, and the top-down hierarchy itself.
| » | Open the exported CSV file for the desired record. |
| » | Modify the hierarchy as needed. Make sure to respect the grouping types, and the segment names must match exactly the labels of the outputs. |
| » | Modify the indicators as needed. |
| » | Create two folders, one for the CSV files to be processed, and another that the files will be moved to once processed. The scheduled task automatically moves the files after they have been processed to prevent processing the same file multiple times. |
| » | Run the scheduled task AM_TOPDOWN_RECORD_IMPORT. It is described below. |
Scheduled Task AM_TOPDOWN_RECORD_IMPORT
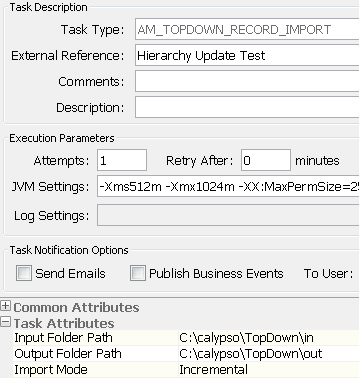
Task Attributes:
| • | Input Folder Path – The path of the folder containing the CSV files to be processed. The folder can contain multiple files. |
| • | Output Folder Path – The path of the folder to which the files will be moved once processed. |
| • | Import Mode – Select the import mode. |
| – | Compliant: The input must comply with the existing top-down hierarchy. It only allows updating values for existing indicators on existing nodes. |
| – | Incremental: The input will overwrite the existing top-down hierarchy. Select Incremental if you have modified the hierarchy. |