Data Auditing
The system runs in Audit mode: any change to any data is stored to the database, and versioning is applied to the modified data so that users can compare different versions of data. In particular, it allows reconstructing trades as they existed at a particular point in time.
The version number of data is only incremented if the data has actually been modified. If you save a data multiple times without making any change, the version number will remain the same.
Changes to trade data are saved individually for each version, and changes to other types of data are saved by version.
Audit Mode
The Audit mode only applies to classes specified in the classAuditMode domain. You can remove a given class from that domain as applicable using Calypso Navigator > Configuration > System > Domain Values (menu action refdata.DomainValueWindow) to disable the Audit mode for that class.
Restricted Audit Views
You can also restrict a particular group from viewing audit data:
| » | Add one or more audit classes (see the classAuditMode domain) to restrict to the auditReportRestrictable domain using Calypso Navigator > Configuration > System > Domain Values (menu action refdata.DomainValueWindow). |
| » | On the Group Access tab of the Access Window, select the group to have the viewing restriction. |
| » | Select "Audit Report Restriction" under the Access label. |
| » | Click Add Read Only. |
| » | From the dialog, select the audit classes that the chosen group may not view. Use the arrow buttons to move items between panes. |
| » | Click OK to accept the selection or click Cancel to discard your changes. |
| » | Click Save on the Access Window. |
Audit Quote Schemes
Note that different audit schemes can be set up for Quotes. In the domain classAuditMode, you can choose between the following values:
| • | QuoteValue: Default behavior – Audit is only triggered when a CLOSE quote is modified. |
| • | QuoteValue and QuoteValue_InsertDelete – Audit is triggered when a CLOSE quote is added, modified, or removed. |
| • | QuoteValue and QuoteValue_AllInstances – Audit is triggered when any quote is modified (unless QUOTE_AUDIT_CLOSE_B is true, in which case only CLOSE quotes are audited). |
| • | QuoteValue, QuoteValue_InsertDelete, and QuoteValue_InsertDelete – Audit is triggered when any quote is added, modified, or removed (unless QUOTE_AUDIT_CLOSE_B is true, in which case only CLOSE quotes are audited). |
 Refer to the Calypso Developer's Guide for information on making a class auditable.
Note that to disable the Audit mode for the whole system, you just need to clear the Audit checkbox in any of the above-mentioned applications.
1. Trade Audit Report
The Trade Audit Report displays trades based on the user permissions. A user can only view those trades for which he has permission. This requires no additional configuration.
To audit new and modified data, choose Calypso Navigator > Reports > Audit > Trade Audit (menu action reporting.ReportWindow$TradeAudit).
| » | Begin by choosing search criteria. You can specify the Trade ID, choose a Trade Filter, Bundle, User Group, or enter a Start/End Date range, as well as choose specific Trade Actions to exclude from the report. |
| » | Then click |
You can double-click a row to view the corresponding version of the object.
Example: You have 7 versions of a Trade in Audit, and version 5 has three modifications. When you double-click one of the version 5 changes, the system will undo all of version 6 changes and all of version 7 changes, and will only undo the selected change in version 5.
| » | Click |
| » | Click |
Or click ![]() to expand the Criteria or Buttons areas.
to expand the Criteria or Buttons areas.
| » | Choose Help > Menu Item for details on the menus. |
![]() To view a report of Today's audit entries when using the Scheduled Task report, define a template having the following tenors:
To view a report of Today's audit entries when using the Scheduled Task report, define a template having the following tenors:
| • | Start Date Tenor: -0D |
| • | End Date Tenor: +0D |
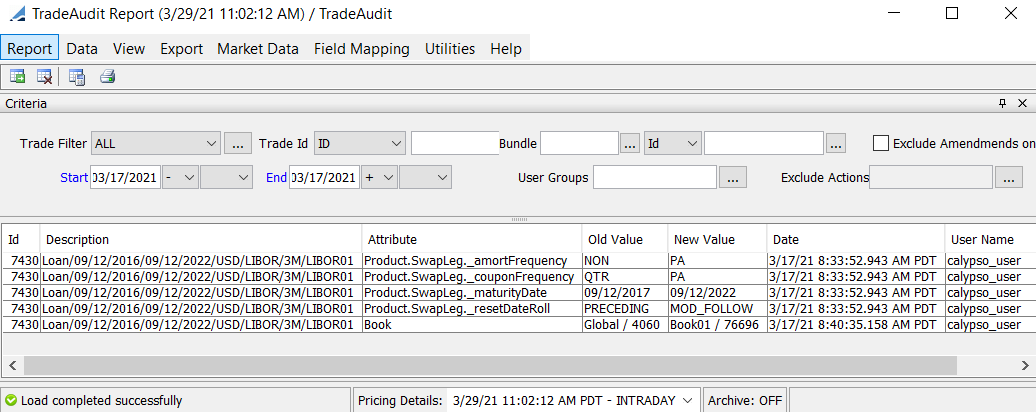
Trade Audit Report
Adding Attributes
Ⓘ [NOTE: To show all results, do not select any mapping attribute. If some mapping attributes are selected, only the results for those attributes are shown]
| » | Choose Field Mapping > Configure Attributes to access the Select Attributes Chooser. |
Use the arrow buttons to move fields between the "Available" and "Selected" pane. The fields in the "Selected" pane appear as columns in your Trade Audit Report:
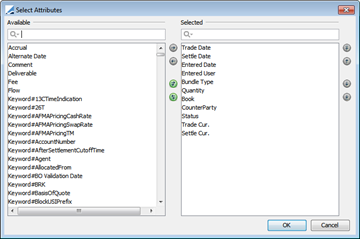
Click OK when you are done selecting fields.
| » | You can use the Audit Mappings Window to map the internal Calypso column name to a user-friendly version for use in the report. Select Field Mappings > View Mappings to open the Audit Mappings Window. Note that you can add field mappings specific to a Product Family/Product Type by defining a mapping using a Product Name and Product Type. |
To add a new Mapping, enter the Display Name for use in the Report, add the Audit Field Name, and optionally, enter a Product Family and Product Type if this mapping is for a specific Product Family/Type. Click Add to add the new row to the table. Click Save to save the new entry.
You can also remove an existing row by selecting it and then clicking Remove.
Click Close to exit the window.
Adding Unmapped Fields
You can select Field Mappings > Add Unmapped Fields to add an unmapped field to the report. From the Unmapped Fields window:
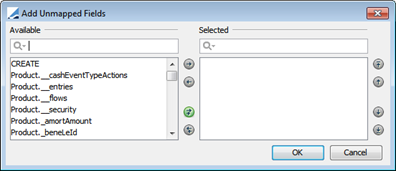
Select a field from the "Available" pane and then use the arrow buttons to move the field to the "Selected" pane. Click OK to save and close the window.
2. Audit Report
To audit new and modified data, choose Calypso Navigator > Reports > Audit > Audit Report (menu action reporting.ReportWindow$Audit).
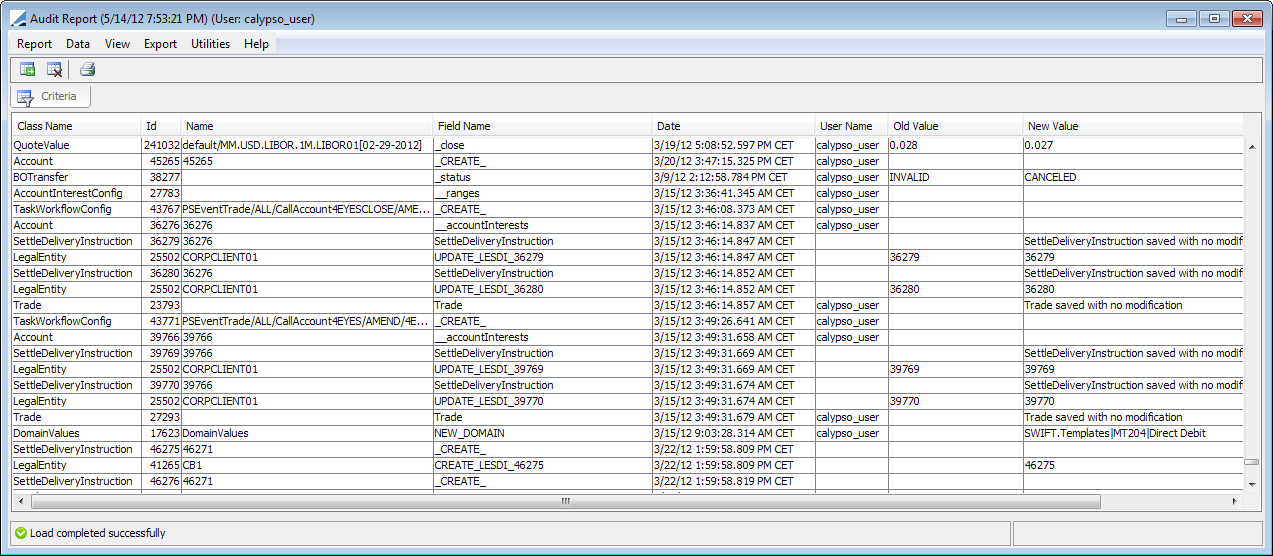
Ⓘ [NOTE: The columns of this picture have been configured. Sort columns, subheadings and subtotals have to be explicitly specified - See Help > Menu Item for details]
| » | Select the type of audit data you wish to load from the Type field, or ALL. You can also specify an entity id as applicable (for example, trade id, legal entity id, etc). Select a user name from the User Name field, and enter start and end dates as applicable. |
| » | Then click |
You can double-click a row to view the corresponding version of the object.
For example, you have 7 versions of a Trade in Audit, and version 5 has three modifications. When you double-click one of the version 5 changes, the system will undo all of version 6 changes and all of version 7 changes, and will only undo the selected change in version 5.
| » | Click |
| » | Click |
Or click ![]() to expand the Criteria or Buttons areas.
to expand the Criteria or Buttons areas.
| » | Choose Help > Menu Item for details on the menus. |
NOTE: To view a report of Today's audit entries when using the Scheduled Task report, define a template having the following tenors:
| • | Start Date Tenor: -0D |
| • | End Date Tenor: +0D |
3. Limiting BOAudit Report Results
In a high-volume implementation, the number of records returned by the BOAudit Report can cause the system to appear frozen. To limit the number of records that are returned to a user or group, follow the procedure below:
See "Max.BOAudit" under Creating and Editing Users to verify that the Max.BOAudit setting is available. If not, create the entry as explained in that section.
| » | On the Access Window's Users tab, select a user. |
| » | Click Permission Attributes. |
| » | In the dialog, double-click in the Value column next to "Max.BOAudit" and then enter the maximum number of BOAudit records to return. |
| » | Click Close. |
| » | To save the setting for a single user, click Save on the Users tab. |
If after saving to a specific user, you wish to apply that setting to an entire group, click Apply to Group, then select the group(s). Click OK to apply the "Max.BOAudit" value to the entire group or Cancel to abandon the group change.