Capturing Structured Product Trades
This document describes how to combine multiple products into a single trade using the Structured Product worksheet. This allows capturing and pricing all the products as a single unit.
Important Notes
| • | FX Options are not supported in Structured Products |
| • | The following Exchange Traded products are not supported in Structured Products: |
| – | Future |
| – | FutureOption |
| – | FutureCommodity |
| – | FutureBond |
| – | FutureMM |
| – | FutureEquityIndex |
| • | The following FX products are supported provided you create a Trade Window Config as described below. |
| – | FX Forward |
| – | FX NDF |
| – | FX Swap |
| – | FX NDF Swap |
Trade Window Config
You can create a Trade Window Config from the Calypso Navigator using Configuration > User Access Control > Trade Window.
Example for FX:

| » | Set the class name "dealStation.DealStation$FX#FX_Deal_Station" for the product types FX, FXForward, FXNDF, and FXSwap. |
| » | Then associate the Trade Window Config name with the user in the User Defaults. |

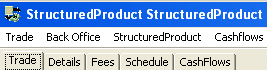
1. Structured Product Trades
Choose Trade > Structured Product to bring up the trade window.
|
Structured Products Quick Reference
- Enter trade details in the Trade panel - You can tie the structured product to an option using the Schedule panel - For defining break clauses, choose Structured Product > Cash Settle Info - Click Price to price the trade - Hit F5 to save the trade Market Data Requirements Each product that makes up the structured product has its own market data requirements as indicated in its own trade worksheet. You can choose Pricing Env > Check to check if all required pricing data are available in the Pricing Environment. Trade Lifecycle - If the structured product is associated with an exercise schedule, you can exercise the trade using Back Office > Exercise - You can mirror the underlying trades of the structured product using Back Office > Mirroring - You can terminate the structured product using Back Office > Terminate - You can reset the floating rates of the structured product from the Calypso Navigator using Trade Lifecycle > Reset > Rate Reset, or using the RATE_RESET scheduled task
|
When you open a Structured Product worksheet, the Trade panel is selected by default.
Entering Trade Details
| » | You can select a template from the Template field to populate the worksheet with default values, and default underlying trades. Then modify as applicable. |
Or you can enter the trade fields directly. They are described below.
To add a new underlying trade, select a product type and click Add. The corresponding worksheet will appear. Enter the details of the underlying trade and choose Trade > Close. The trade will be added to the structured product.
To modify an underlying trade, double-click the trade and its corresponding worksheet will appear. Modify as needed and choose Trade > Close.
Note that the Trade Date is entered in the Details panel.
| » | Proceed to the other panels as applicable. |
You can tie the structured product to an option using the Schedule panel.
 See Associating an Exercise Schedule for details.
You can add fees to both the structured product and underlying trades. To add fees to the underlying trades themselves, add the fees in the Fee panel of the corresponding trade worksheet. The Fees panel of the Structured Product worksheet displays the fees of underlying trades as well as the fees entered at the structured product level. The fees of underlying trades are identified with the External Id column set to the underlying trade’s sub id.

The FEE row corresponds to a fee specified on the first underlying instrument (External Id = 1), while the COMMISSION row corresponds to a fee specified at the structured product level.
Saving a Trade
| » | Hit F5 to save the trade, or choose Trade > Save. |
You can also hit F3 to save the current trade as a new trade, or choose Trade > Save As New.
You can also hit F12 to save the trade using any action available in the workflow, or choose Trade > Save Action. You will be prompted to select an action.
A description will appear in the title bar of the trade worksheet, a trade id will be assigned to the trade, and the status of the trade will be modified according to the workflow configuration.
Pricing a Trade
| » | Click Price to price the trade. |
| » | You can choose Analytics > Solve to bring up the solver. |
Trade Details
|
Fields |
Description |
|
Role/Cpty |
The first two fields of the worksheet identify the trade counterparty. The first field identifies the trade counterparty’s role. The default role is specified using Utilities > Set Default Role. However, you can change it as applicable. You can select a legal entity of specified role from the second field provided you have setup favorite counterparties. You can also type in a character to display the favorite counterparties that start with that character. Favorite counterparties are specified using Utilities > Configure Favorite Counterparties. Otherwise, click ... to select a legal entity of specified role from the Legal Entity Chooser. You can also type [Ctrl-F] to invoke the Legal Entity Chooser, or directly enter a Legal Entity short name. |
|
Book |
Trading book to which the trade belongs. Defaults to the book selected in the User Defaults. You can modify as applicable. You can select a book provided you have setup favorite books. Favorite books are specified using Utilities > Configure Favorite Books. Otherwise, click ... to select a book. The owner of the book (a processing organization) identifies your side of the trade. |
|
Id Ext Ref Int Ref |
Unique identification number of the trade. The trade id is automatically assigned by the system when the trade is saved. You can also display the internal reference of external reference. The default trade reference can be selected in the User Defaults. You can load an existing trade by typing the trade id into this field, and pressing [Enter]. The underlying trades are assigned a sub id. |
|
Type |
The default subtype is StructuredProduct. Click ... to add new subtypes. You can set pricers and market data by subtype. |
|
Status |
Current status of the trade. The status is automatically assigned by the system based on the workflow configuration. The status will change over the lifetime of the trade according to the workflow configuration and the actions performed on the trade. |
|
Template |
You can select a template from the Template field to populate the worksheet with default values. Then modify the fields as applicable. |
|
Trade Currency |
The trade currency defaults to the currency selected in the User Defaults. You can select another currency as needed. |
Underlying Trades Details

| Fields | Description | ||||||
|---|---|---|---|---|---|---|---|
|
Product Type |
Select a product type and click Add. The corresponding trade worksheet will appear. Enter the details of the underlying trade and choose Trade > Close. The trade will be added to the structured product. You can right-click an underlying trade and choose “Configure Product Columns” from the popup menu to configure the display columns. Ⓘ [NOTE: FX Options are not supported in Structured Products] |
||||||
|
Included |
For swaptions and generic options you can check the Included checkbox if the settlement is physical. When checked, swaps created from exercise will be included in the structured product. Note that the following workflow transitions should be configured:
|
2. Associating an Exercise Schedule
You can tie the structured product to an option. Select the Schedule panel to define an option.
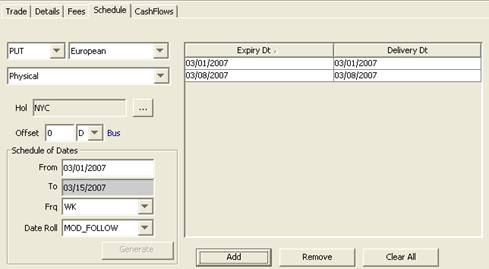
| » | Select PUT or CALL, the option type, and the settlement method. |
| » | Enter From and To dates, select a frequency and click Generate to generate an exercise schedule. |
3. Using Custom Netting
After saving the Structured Product trade, you can use the Trade Netting feature to net transfers into custom groups.
Choose Back Office > Trade Netting to open the Structured Product Netting window.
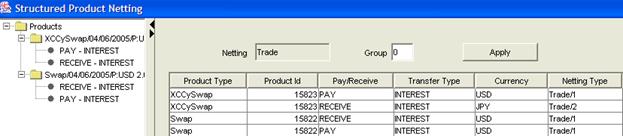
| » | Select the transfers that you want to net together, enter a group number in the Group field, and click Apply. |
Repeat to create additional groups, and close the window. You will be prompted to confirm the netting.
[NOTE: To cancel netting groups, apply the 0 group to the selected transfers]
4. Mirroring a Structured Product
After saving the Structured Product trade, choose Back Office > Mirroring to mirror the underlying trades of the structured product.

| » | Select a mirror book and a mirror trader for the trades you want to mirror. |
| » | Check the Cover checkbox and the Mirror checkbox for the trades you want to mirror, then click Apply to generate the internal trades. |
![]()