Capturing Generic Option Trades
The Generic Option worksheet allows capturing an option trade over the following product types: Asset Swap, Cap Floor, Commodity Swap, Exotic Cap Floor, FRA, Single Swap Leg, and Spread Cap Floor.
Support includes capture of trade properties and cashflow generation - No native pricing is available - There is no risk computation.
This document describes how to capture generic option trades using the Generic Option worksheet.
Choose Trade > Generic Option to bring up the trade window.
|
Generic Options Quick Reference
Market Data Requirements A generic option trade requires a RATE volatility surface. The other required market data depend on the type of the underlying product. You can choose Pricing Env > Check to check if all required pricing data are available in the Pricing Environment. Trade Lifecycle
|
 See also
1. Generic Option Trades
When you open a generic option worksheet, the Trade panel is selected by default.
Entering Trade Details
| » | You can select a template from the Template field to populate the worksheet with default values. Then modify the fields as applicable. |
Or you can enter the trade fields directly. They are described below.
Note that the Trade Date is entered in the Details panel.
| » | Proceed to the other panels as applicable. |
Saving a Trade
| » | Hit F5 to save the trade, or choose Trade > Save. |
You can also hit F3 to save the current trade as a new trade, or choose Trade > Save As New.
You can also hit F12 to save the trade using any action available in the workflow, or choose Trade > Save Action. You will be prompted to select an action.
A description will appear in the title bar of the trade worksheet, a trade id will be assigned to the trade, and the status of the trade will be modified according to the workflow configuration.
Trade Details
|
Fields |
Description |
|
Role/Cpty |
The first two fields of the worksheet identify the trade counterparty. The first field identifies the trade counterparty’s role. The default role is specified using Utilities > Set Default Role. However, you can change it as applicable. You can select a legal entity of specified role from the second field provided you have setup favorite counterparties. You can also type in a character to display the favorite counterparties that start with that character. Favorite counterparties are specified using Utilities > Configure Favorite Counterparties. Otherwise, click ... to select a legal entity of specified role from the Legal Entity Chooser. You can also type [Ctrl-F] to invoke the Legal Entity Chooser, or directly enter a Legal Entity short name. |
|
Book |
Trading book to which the trade belongs. Defaults to the book selected in the User Defaults. You can modify as applicable. You can select a book provided you have setup favorite books. Favorite books are specified using Utilities > Configure Favorite Books. Otherwise, click ... to select a book. The owner of the book (a processing organization) identifies your side of the trade. |
|
Id |
Unique identification number of the trade. The trade id is automatically assigned by the system when the trade is saved. You can also display the internal reference of external reference. The default trade reference can be selected in the User Defaults. You can load an existing trade by typing the trade id into this field, and pressing [Enter]. |
|
Status |
Current status of the trade. The status is automatically assigned by the system based on the workflow configuration. The status will change over the lifetime of the trade according to the workflow configuration and the actions performed on the trade. |
|
Template |
You can select a template from the Template field to populate the worksheet with default values. Then modify the fields as applicable. |
|
Subtype |
The following subtypes are set by the system based on the type of option being captured: American, Bermudan, or European. You can set pricers and market data by subtype. |
Option Details
| Fields | Description | ||||||||||||||||||||||||||||||||||||
|---|---|---|---|---|---|---|---|---|---|---|---|---|---|---|---|---|---|---|---|---|---|---|---|---|---|---|---|---|---|---|---|---|---|---|---|---|---|
|
Product Type |
Select the product type of the underlying product. |
||||||||||||||||||||||||||||||||||||
|
BUY/SELL |
Select BUY or SELL, the direction of the trade from the book’s perspective. |
||||||||||||||||||||||||||||||||||||
|
PUT/CALL |
Select PUT or CALL, the direction of the option from the book’s perspective. |
||||||||||||||||||||||||||||||||||||
|
Settlement Type |
Select Cash or Physical. |
||||||||||||||||||||||||||||||||||||
|
Exercise Type |
Click Premium to define the option premium. It brings up the Premium Calculator window. Help is available from that window. Select the exercise type: European, Bermudan, or American. European The option can only be exercised on the expiration date.
Bermudan The option can be exercised according to a user-defined schedule.
American The option can be exercised within a date range.
|
Underlying Details
The rest of the window depends on the selected product type. Refer to the corresponding trade worksheet for details.
2. Defining an Exercise Schedule
Click Exp/Del Schedule to define the exercise schedule of a Bermudan option.
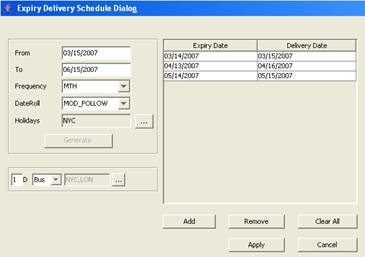
| » | Enter From and To dates, select a frequency, a date roll and holiday calendars. |
| » | Enter a number of lag days to compute the delivery date based on the actual call date. And select Bus if the lag days are business days, or Cal for calendar days. |
| » | Then click Generate to generate a schedule. |
You can also click Add to add specific dates.
| » | Click Apply to save the schedule. |