Manipulating Cashflows
Select the Cashflows panel for generating and displaying the cashflows.
1. Cashflows Panel
The cashflows are generated when you click Price in the Trade panel, or when you choose Cashflows > Generate. The cashflows are not saved unless you customize them. They are generated each time they are required for pricing the trade.
 Click here for a description of most cashflow columns.
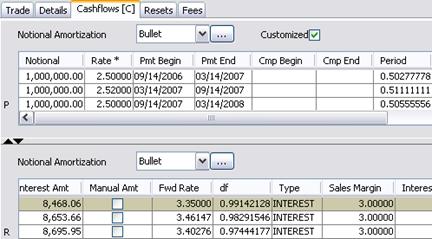
Sample Cashflows panel with Customized Cashflows
| » | Choose Cashflows > Generate to generate the cashflows. The first table displays the cashflows of the pay leg, and the second table displays the cashflows of the receive leg. |
Note that if you have customized the cashflows, you should not generate the cashflows because those columns will be overridden. You should instead choose Cashflows > Recalc.
| » | Check the “Customized” checkbox to modify the cashflows as applicable. [C] will appear next to the label of the Cashflows panel. |
To modify a value, double-click a cell and modify its value as applicable.
A column that contains modified values will show a star to the right of the column heading.
Note that if you do not want modified values to be overridden when the cashflows are re-calculated, you need to lock the corresponding columns. Right-click a modified value and choose “Lock Column” or “Lock All Modified Columns” from the popup menu.
A locked column will show a star to the left of the column heading.
| » | You can select a notional amortization structure and click ... to define its details. |
See Product Details "Amortization Structures" for details.
| » | Right-click any cell in the cashflows to display the Cash Flow Menu. |
Manual Amount
The Manual Amt column is automatically checked when the Pmt Amt is manually modified. It indicates that changing parameters that would normally be used in the calculation (fixed rate, interest start and end dates) will have no effect since the payment amount has been manually set.
Compounding Flows
When you customize compounding flows, the "Compound Interest Amount" is added to "Interest Amount", and set to 0.
Stub Periods
When you customize the cashflows and create a stub period, you can now select the index tenor to interpolate the stub rates on that period.
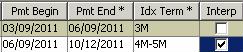
| » | Double-click the "Interp" field – It brings up the InterpIndexTerm dialog. |
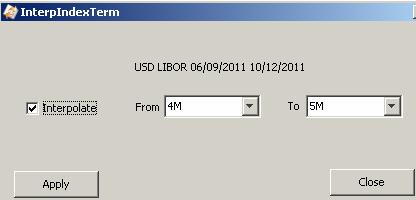
Check the “Interpolate” checkbox and select the interpolation tenors. Then click Apply.
If the system finds a curve for each stub tenor, it will use them to interpolate the stub period, otherwise it uses tenors on the curve of the trade’s tenor forecast curve.
2. Cashflows Menu
All the menu items of the Cashflow menu are described below.
The Cashflow menu is accessible from the menu bar of the trade window, or when you right-click a cashflow.
Ⓘ [NOTE: All menu items described here may not be available for all types of trades because they would not be applicable]
|
Menu Items |
Description |
||||||
|
Generate |
To generate the cashflows. [NOTE: If you have customized the cashflows, you should not choose Generate because the customized columns will be overridden. You should instead choose Recalc] |
||||||
|
Recalc |
When cashflows have been customized, choose Recalc to display the cashflows without overriding customized columns. |
||||||
|
Copy Ctl-C Paste Ctl-V |
To copy and paste into cashflow cells. Select a cell, type [Ctrl+C], then select another cell and type [Ctrl+V]. The content of the first cell will be pasted into the second cell. |
||||||
|
Add Coupon |
To add a cashflow. Right-click a row and choose Add. The selected row will be split between two rows. The first one will be one day long, and the second one will fill the remaining term of the original period. You can edit the periods as applicable. |
||||||
|
Remove Coupon |
To remove a cashflow. Right-click a row and choose Remove. The selected row will be removed. |
||||||
|
Add Compound Period Remove Compound Period |
To add or remove compounding periods. These menu items require customized cashflows, and a compounding trade. Then you can add or remove compounding periods. For example, if the trade compounds monthly, you can add a compounding period midway through the month. |
||||||
|
Scheduler |
To define an amortization schedule for the principal. Right-click one or multiple Notional cells, and choose Scheduler. It will bring up the Scheduler Notional window. You can select a Step-Down, Equal Principal, or Annuity structure.
It will customize the cashflows. |
||||||
|
Mortgage Scheduler |
To define a mortgage schedule for the principal. Right-click one or multiple Notional cells, and choose Mortgage Scheduler. It will bring up the Mortgage Structure window.
It will customize the cashflows. |
||||||
|
Sample Values |
To display the sampling period for resets sampling at a frequency different from the payment period. Right-click a cashflow and choose Sample Values. This brings up the Reset Samples window.
Ⓘ [NOTE: Sample dates may not be available for performance swap trades with Auto Adjust Notional and compounding or averaging on the funding leg] |
||||||
|
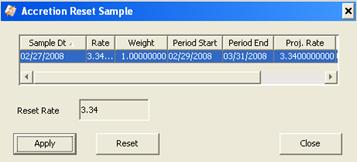
Accretion Sample Values |
Only applies if the principal is amortized using the Accreting amortization structure. To display the sampling period for the Accreting Schedule.
|
||||||
|
Copy Principal |
To copy the principal cashflows from one side of the swap to the other. This is automatic if the swap has actual principal exchange. You can copy the principal structure even if the amortization frequency in the “from side” is different from the coupon frequency in the “to side”. In this case, the amortization frequency will be copied as well. For instance, a side that amortizes semi-annually can be copied to a side that pays monthly and results in a structure that pays monthly and amortizes semi-annually. Choose either “Copy Principal Left->Right” or “Copy Principal Right-> Left”. |
||||||
|
Lock Column |
To lock a customized column. Right-click a customized column and choose Lock Column so that the values will not be overridden when the cashflows are re-calculated. A locked column will show a star to the left of the column heading. Note that cashflows columns which are locked but not modified will cause the corresponding fields to be outlined in blue in the trade worksheet. |
||||||
|
Lock All Modified Columns |
To lock all customized columns. |
||||||
|
Unlock Column |
To unlock a locked column. Right-click a locked column and choose Unlock Column to unlock it. |
||||||
|
Unlock All Columns |
To unlock all locked columns. |
||||||
|
Configure Columns |
To select and organize displayed columns. |
||||||
|
Save Column Config |
To save the column configuration. |
||||||
|
Export to Excel |
To export the cashflows to an Excel xls spreadsheet. |
||||||
| Export to ExcelX |
To export the cashflows to an Excel xlsx spreadsheet. |
||||||
|
Export to HTML |
To export the cashflows to an HTML page. |
||||||
|
Show Consolidated Cashflows |
To bring up the Cashflow Report that displays all the cashflows associated with the trade. |
||||||
| Interest History |
To bring up the Interest History window if applicable. |