Setting User Preferences
Choose Configuration > User Preferences to set user preferences: general defaults, pricer measures, trade events columns, toolbar and display icons.
1. Defaults Panel
Select the "Defaults" panel to make settings for general default values.
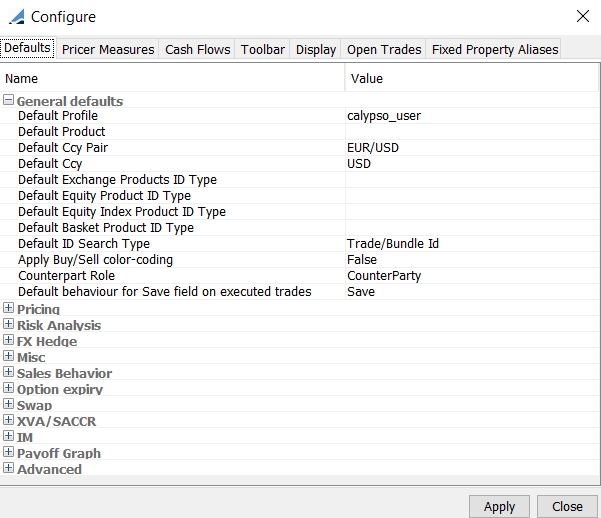
Configure window (Defaults panel)
Step 1 - You can select default values for the following parameters:
General Defaults
| • | "Default Profile" - Select the default profile. |
| • | "Default Ccy Pair" - Select the default currency pair for the pricing sheets. |
| • | "Default Ccy" - Select the default currency for cash legs. |
| • | "Default Exchange Products ID Type" - Select the default security code to be displayed for exchange trade products. |
| • | "Default Bond Product ID Type" - Select the default security code to be displayed for bond product trades. |
| • | "Default Equity Product ID Type" - Select the default security code to be displayed for equity product trades. |
| • | "Default Equity Index Product ID Type" - Select the default security code to be displayed for equity index product trades. |
| • | "Default Basket Product ID Type" - Select the default security code to be displayed for basket product trades. |
| • | "Default ID Search Type" - Select the default ID search type for search fields. |
| • | "Apply Buy/Sell color-coding" - Select "True" to show Buy property in green, and Sell in red. Select "False" for no color-coding. |
| • | "Counterpart Role" - Provides a way to set the default role for the counterparty of a trade. The roles found in the drop-down list are the same as those found in the Legal Entity window. |
| • | "Default behavior for Save field on executed trades" - "Save" for default setting that allows for saving. "Don't Save" for default setting that prevents saving. |
Pricing
| • | "Use Real Time Market Data on startup" - Select True or False. |
| • | "Default Rate Sides" - The following options are available for the default setting: |
| – | Choice - No spread is applied. |
| – | Closing Price - Pricing Sheet uses the close sides of the quote set and the volatility surface to price deals. |
| – | Bid/Ask - Pricing Sheet uses the bid and ask sides of the quote set for spot, forwards, interest rates, and the volatility surface to price deals. |
| – | Bid/Ask Vol - Pricing Sheet uses the bid and ask sides of the volatility surface and the mid values of the quote set to price deals. |
| – | Bid/Ask Spot - Pricing Sheet uses the bid and ask sides of the quote set for spot, and the mid value of the volatility surface and other quotes to price deals. |
| – | Bid/Ask Spot/Fwd - Pricing Sheet uses bid and ask sides of the quote set for spot and forwards, and the mid value of the volatility surface and other quotes to price deals. |
| • | "Default pricing output conventions" - Select the way to display the pricer measures. |
"1-way" to display pricer measures for mid and close quotes (default).
"2-way" to display pricer measures for bid and ask rates, provided you select the Rate Sides "Bid/Ask," "Bid/Ask-Vol," "Bid/Ask-Spot," or "Bid/Ask-Spot/Fwd".
| • | "Default Price Format" - "Ccy1 %", "Ccy2 pips", or "Non-risky". |
| • | "Default Price Rounding (FX Options)" - Enter a value to round to for Vanilla and Barrier trades. It only applies upon pricing. The value is divided by 100 when loaded to a pricing sheet and it relates to pips, e.g. 0.25 is rounded to the nearest quarter pip. If set to 0, no rounding will be applied. |
| • | "Default Price Rounding For Digitals (FX Options)" - Enter a value to round to for Digital and Digital with a Barrier trades. It only applies upon pricing. The value is NOT divided by 100 when loaded, it relates in terms of percentage points, e.g. 0.25 is rounded to the nearest quarter percent. If set to 0, no rounding will be applied. |
NOTE: The recommended setting for both rounding (FX Options and FX Options with Digitals) methods is 0.25.
| • | "Default Rounding Method (FX Options)" - Select a method for default rounding where applicable. |
Neutral Rounding - Rounded to the nearest "Round Price To" setting, with half rounding up to infinity.
Wide Rounding - Rounded to positive infinity. This reduces negative premiums and increases positive premiums.
Narrow Rounding - Rounded to negative infinity. This increases negative premiums and reduces positive premiums.
NOTE: It is recommended that the "Wide Rounding" setting not be used.
| • | Default Decimal Precision (Clean Price / Dirty Price) - Enter the rounding precision for decimals when pricing with clean/dirty price. |
| • | Default Decimal Precision (Yield) - Enter the rounding precision for decimals when pricing with yield. |
| • | Default Decimal Precision (Asset Swap Spread) - Enter the rounding precision for decimals when pricing with spread. |
Risk Analysis
| • | "Always Run Rate Delta Analysis" - True or False. When true, Rate Delta analysis is always run. |
| • | "Rate Delta use Generate dependents" - True or False. When true, dependent curves and volatility surfaces (including forecast curves with underlying discount curves) are generated. When False, the shifts are applied to market data that are needed for pricing only. |
FX Hedge
| • | "Rounding Increment" - This is an integer. Default is 100,000. |
After the hedge notional is calculated, but before the hedge trade is added to the Pricing Sheet, the Notional of the hedge trade is rounded to the nearest multiple of the Rounding Increment, with halves rounded in toward zero.
The currency’s Decimals setting is also taken into account – the Rounding Increment should be multiplied by 10 to the power of 2, minus the Decimals setting for the hedge trade Notional CCY – that is, 10^2-Decimals.
Example: USD typically has a Decimals setting of 2; JPY has a Decimals setting of 0. If the Rounding Increment is set to 100,000, then USDJPY hedge trades with a notional in USD would be rounded to the nearest 100,000 * 10^2-2 = 100,000 dollars; JPYKRW trades with a notional currency of JPY would be rounded to the nearest 100,000 * 10^2-0 = 10,000,000 yen.
Ⓘ [NOTE: If the total hedge Delta is less than half the Rounding Increment, a hedge trade is not created (e.g., when the resulting hedge rounds to zero).]
| • | "Delta Type" - Select either Black-Scholes or Smile. |
| – | Black-Scholes: The hedge notional is calculated using the FX spot Delta Pricing Sheet measure when available. Otherwise, it uses DELTA. |
| – | Smile: The hedge notional is calculated using MOD_DELTA when available. Otherwise, it uses the FX spot Delta Pricing Sheet measure first, or DELTA when FX spot Delta is not available. |
Misc
| • | "Premium Update Mode" - Select the premium to be adjusted when another premium is modified: "Sales Premium" or "Trader Premium". |
See "Premium Update Mode" below for details.
Sales Behavior
| • | "Sales Fee Ccy" - Select the default sales fee currency. In addition to individual currency codes, the drop-down also provides a blank option that can be selected to avoid overriding the premium currency of FX/FXOption trades where in some cases the two may be different. |
| • | "Sales Fee Date" - Select the default sales fee date: Premium Date or Trade Date. |
| • | "On Sales Fee FX Rate change" - Select "Recalculate Sales Fee" or "Recalculate Sales Premium". |
| • | "Save as Sales Trades by default" - True or False. When True, the trade keyword "ScratchPadTrade" is set to true - This keyword can be used in the workflow configuration to set a specific status. Otherwise, the system assigns the trade status based on the default workflow. |
| • | "Create Upfront Fee" - True or False. When True, the premium fee is automatically included in the trade. |
Option expiry
| • | "Default Expiry Cut" - Select "Use Pricing Sheet Expiry Cut" to use the expiry time zone set below, or "Use Surface Expiry Cut" to use the expiry time zone set on the FX volatility surface. |
| • | "Pricing Sheet Expiry Cut" - Select the expiry time zone as needed (expiry time zones are created from the Calypso Navigator using Configuration > Definitions > Expiry Time Zone). |
| • | "Local Convention Holiday for Expiry Date" - You can select "local" holiday calendars per currency. If a "local" holiday calendar is defined for any currency of the selected currency pair, it will be taken into account when computing the expiration date. |
Swap
| • | Allow Cash Flow Overlapping Period - Default is False. When set to True, it allows cashflow dates to overlap or have gaps. |
| • | Automatically Adjust stubs - Default is False. When set to True, the strategy will automatically adjust stub details corresponding to the Stub Type when making changes to trade timing. Automatic adjustments are supported for Swap, Swaption, and Cap/Floor. |
The setting is initially carried over from the trade window when applicable. But once it is set in User Preferences, the setting becomes independent from the trade window.
| • | Discount - Default is False. When set to True, this enables the Negotiated Price sub-property (under the expandable Notional property) if the payment frequency is for the Swap is ZC. This is the equivalent of selecting "Discount" in the Swap menu of the Swap trade window. |
XVA/SACCR
These properties are used by the XVA and Monte Carlo PFE module to compute XVA and MC PFE measures.
 Please refer to Calypso XVA documentation for XVA setup and usage details.
Please refer to Calypso Monte Carlo PFE documentation for MC PFE setup and usage details.
| • | "Default Mode" |
| • | "Default Credit Spread (5Y)" |
| • | "Default Recovery Rate (%)" |
| • | "XVA Analysis Config" |
| • | "MCPFE Analysis Config" |
| • | "Scenario Set Config" - Base is the default. The incremental gets evaluated against the base run for the selected scenario set. If not selected, the incremental gets evaluated against the base run with no scenario set. |
IM
These properties are used by the Margin Engine to compute Initial Margin on what-if trades.
Please refer to Calypso Margin Engine documentation for complete setup and usage details.
| • | "Default IM Mode" - Select "IM Sheet Mode" or IM Strategy Mode" to enable IM calculations. Sheet mode calculates incremental IM for all strategies on the active sheet collectively. Strategy mode calculates incremental IM for all strategies independently. |
If "Default IM Mode" = Off, there is no IM computation.
| • | "CCP/CB Pricer Measure Display" |
| • | "Default CCP/Clearing Broker" |
Payoff Graph
These properties are used to configure the Payoff Chart default settings.
| • | "Graph Limit (Percent)" – The entered value is used to calculate the lower and upper limits of the underlying (x-axis) for the graph plot. A typical value is around 20 to 30 percent. |
| • | "Include Premium" - True/False. The default setting to either include or exclude premium/fees in the graph. True to include fees by default. |
| • | "Buy/Sell Lock" - True/False. If True, the Buy/Sell Direction drop-down in the graph window is disabled and locked in the default setting described below. |
| • | "Buy/Sell Direction" - Same As Pricing Sheet/Opposite To Pricing Sheet. This can be used to set the default direction of the graph. If "Buy/Sell Lock" above is set to False, the direction can still be changed manually using the drop-down in the chart window. |
Advanced
| • | "Use Dispatcher" - Select a dispatcher to use for grid calculation. |
See Setting Up Distributed Processing for details.
| • | "Copy Allocations while Performing Copy Operations" - When On, child trades are copied when trades with allocations are copied. Otherwise, only the parent trades are copied. |
| • | "Allocated Trade Loading Style" - Choose how to load allocated trades in the Pricing Sheet. Can be set to: |
| – | Trade Style - Displays previous version of trade so that the notional and fees appear as they do on the original trade. |
| – | Report Style - Displays the current version of the trade (as they appear in the database) with 0 values for notional and fees. |
| • | "Always use Bulk Termination Window" - Set to True to default to the Bulk Termination window. If set to False and a single trade is selected for termination, the Single Trade Termination window will appear. If False and multiple trades are selected for termination, Bulk Termination window will appear. If False and a single FX product is selected for termination, the FX Termination window will appear. |
| • | Default Listed Product Strategy - Select Specific or Generic. |
| – | For Specific, you can capture listed derivatives trades using specific strategies based on the type of the listed derivatives: Future Bond, Future MM, Future Option Bond, etc. |
| – | For Generic, you can capture listed derivatives trades using the strategies Future (for Future trades) or Option (for Future Option and ETO trades). It is mandatory to select Generic for ETD Clearing. |
| • | "Cowbell" - More or Less. Not Used. |
Step 2 - Click Apply to set the preferences.
Premium Update Mode
When Sales Premium (SP) is not computed (no sales fee), there is no premium update requirement.
Trader Premium (TP) = Customer Premium (CP).
When Sales Premium is computed:
| • | CP = TP + SP (Sell) |
| • | CP = TP – SP (Buy) |
The Premium Update Mode setting determines which premium is adjusted when another premium (TP, SP, CP) is modified.
| • | If Premium Update Mode = Sales Premium, Sales Premium is adjusted when Trader Premium is modified (and Customer Premium is not adjusted), or Customer Premium is modified (and Trader Premium is not adjusted). |
If Sales Premium is modified, Customer Premium is adjusted.
| • | If Premium Update Mode = Trader Premium, Trader Premium is adjusted when Customer Premium is modified (and Sales Premium is not adjusted), or Sales Premium is modified (and Customer Premium is not adjusted). |
If Trader Premium is modified, Customer Premium is adjusted.
2. Pricer Measures Panel
Select the Pricer Measures panel to select which pricer measures you want to display.
Ⓘ [NOTE: Only the pricer measures defined in domain "PricingSheetMeasures" are available for selection - You can add pricer measures to that domain as needed.
Ⓘ The following pricer measures are not supported in the Pricing Sheet: CA_NOTIONAL, CA_QUANTITY, CA_PV, CA_COST]
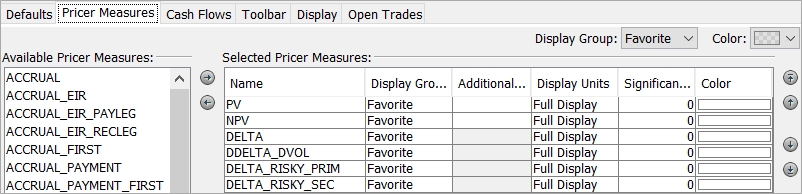
Configure window (Pricer Measures panel)
Step 1 - Select a pricer measure from the left-hand side, and click ![]() to make it available for computing.
to make it available for computing.
Step 2 - Set the following parameters as applicable:
| • | "Display Group" - You can group multiple pricer measures together into a display group and then either show or hide the group of measures in strategy legs. Choose which groups of pricer measures you want to display by clicking |
You can add display groups to the domain "PricingSheetPricerMeasureDisplayGroups" as needed.
| • | "Additional Currencies" - By default, the pricer measures are computed based on the risky currency defined in the currency pair - However, you can select additional currencies in which you want to compute the pricer measures. |
| • | "Display Units" - Set to display the value precision in the selected measure. Set to "Full Display", "Integers", "K (thousands)", "M (millions)", "B (billions)". |
| • | "Significant Figures" - Set number of digits displayed by the measure. |
| • | "Color" - Double-click the color bar to pick a color for the pricer measure's background. |
Step 3 - Click Apply when you are done.
Summing Pricer Measures Across Asset Classes
To allow pricer measures to be summed across asset classes, add them to the domain “PricingSheetMeasures.CrossAssetSummable”.
FX Spot Delta
The pricer measure “FX Spot Delta” is only available in the pricing sheet.
It shows the total amount of FX Delta needed to Spot Hedge (Delta Hedge as of Spot Date) the trade. This is potentially different from the DELTA pricer measure because of the effect of any FX Delta incurred by the fees.
3. Cash Flows Panel
Select the Cash Flows panel to select which columns you want to display in the Trade Cash Flows panel.
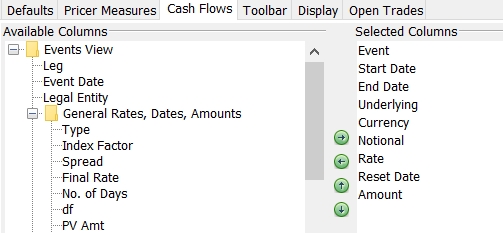
Configure window (Events panel)
Step 1 - Select a column from the left-hand side, and click ![]() to make it available for display.
to make it available for display.
Step 2 - Click Apply when you are done.
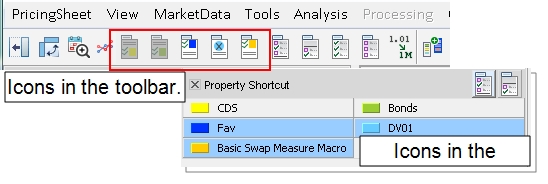
4. Toolbar Panel
Select the icons that appear on the Pricing Sheet toolbar. Some icons will have a shortcut configured.
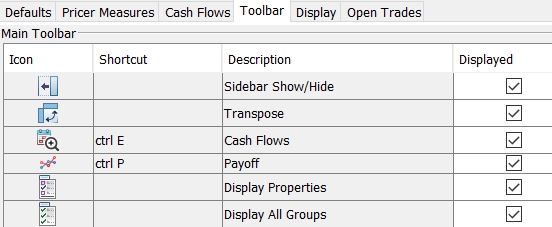
Configure window (Toolbar panel)
Step 1 - For each icon, select the "Displayed" checkbox to display the icon in the toolbar, or clear the checkbox to remove the icon from the toolbar.
| – | The "Shortcut" column shows shortcut keys available for a particular icon. |
| – | For the "Copy - Close Out" and "Copy - Back To Back" icons, the drop-down lists beside the descriptions provide a way to set the default action for the icon, such as "Copy Add" or "Copy Reverse." |

These preferred actions persist on the Toolbar when the Pricing Sheet is open, although other actions remain available for selection by using the down arrow beside the icon.
For details on these actions, see Adding and Removing Trades.
Step 2 - Click Apply when you are done.
5. Display Panel
You can configure custom icons that allow for toggling a display group of properties or pricer measures in the pricing sheet. The Macro option for the icon allows for toggling multiple display groups of properties or pricer measures.
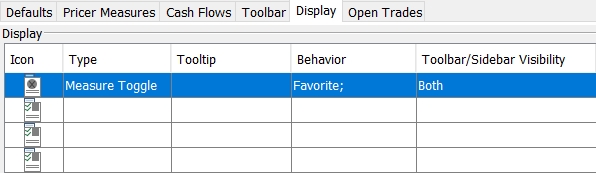
Configure window (Display Panel)
Step 1 - Configure an icon. A user can specify a color for the icon by clicking the icon in the first column and using the arrow to open the color palette.
Step 2 - Select a function for the icon: Measure Toggle, Measure Macro, Property Toggle, Property Macro.
| • | Measure Toggle - This function is used for toggling a display group of pricer measures. |
| • | Measure Macro - This function is used for toggling multiple display groups of pricer measures at once. |
| • | Property Toggle - This function is used for toggling a display group of properties. |
| • | Property Macro - This function is used for toggling multiple display groups of properties at once. |
Step 3 - Enter a free-form Tooltip message that will appear when hovering the cursor over the icon.
Step 4 - In the Behavior column, select a display group or groups to associate with the icon. When either the Property Macro or Measure Macro function is selected, you can choose more than one display group to toggle. For either of the Toggle functions, select only one display group.
For properties, you can add display groups to the domain "PricingSheetPropertyDisplayGroups", and for pricer measures you can add display groups to the domain "PricingSheetPricerMeasureDisplayGroups". These domain values determine which display groups are available as options in the Behavior column.
Step 5 - Specify whether the icon appears in the toolbar, the sidebar, or both.
Step 6 - Click Apply when you are done.
6. Open Trades Panel
Select the Open Trades panel to select how trades are opened, and if the user is prompted upon the opening of trades.
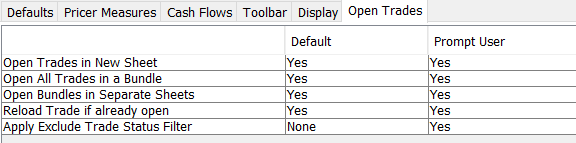
Configure window (Open Trades Panel)
Step 1 - In the "Default" column:
| • | "Open Trades in a New Sheet" - Select "Yes" to open trades in a new tab. Select "No" to open trades in the current tab. |
| • | "Open All Trades in a Bundle" - Select "Yes" to load all trades in the bundle. Select "No" to load only the trades specified. |
| • | "Open Bundles in Separate Sheets" - Select "Yes" to open each bundle in a new separate tab. Select "No" to open all trades in the current tab. |
| • | "Reload Trade if already open" - Select "Yes" to reload currently opened trades. Select "No" to display a list of currently opened trades without reloading. |
| • | "Apply Exclude Trade Status Filter" - Click to select trade statuses to filter out of being loaded into the Pricing Sheet. |
Select a trade status from the left-hand side, and click ![]() to exclude trades with that status from being loaded into the Pricing Sheet.
to exclude trades with that status from being loaded into the Pricing Sheet.
Select "None" to load all trades, regardless of status.
Click OK when finished.
Step 2 - In the "Prompt User" column, select "Yes" to prompt the user with a message asking if they want to perform the action. Select "No" to apply the value in the "Default" column without prompting the user.
Step 3 - Click Apply when you are done.