Product Menu
Each trade worksheet has a product specific menu "Product Type".
All the menu items of the product specific menus are described below.
Ⓘ [NOTE: All menu items described here may not be available for all types of trades because they would not be applicable]
|
Menu Items |
Description |
|||||||||
|
Premium Fee Calculator |
Applies to swaption and cap floor trades. The premium fee is calculated according to the swap schedule when the trade is priced. However, you can modify the premium fee using the Premium Calculator window. Help is available from that window. |
|||||||||
|
Price (F4) |
To price the trade.
|
|||||||||
|
Switch Pay/Rec |
To switch the direction of the trade between pay and receive. |
|||||||||
|
Configure Results |
To configure the pricer measures to be displayed in the Results panel. You will be prompted to select pricer measures. Pricer measures are the outputs of the pricing routines. |
|||||||||
|
Save Result Config |
To save the pricer measures configuration. |
|||||||||
|
Re-order Pricing Parameters |
To order the display of the pricing parameters in the Pricing Params panel. |
|||||||||
|
Save Parameters Order |
To save the pricing parameters display. |
|||||||||
|
Save As Template |
To save the trade as a template. You will be prompted to enter a template name and specify whether the template is private or public. Other users will not be able to use private templates. |
|||||||||
|
Delete Template |
To delete a template. You will be prompted to select a template. Only the user who created a template (whether it is public or private) can delete it. You can also delete templates from the Calypso Navigator using Utilities > Maintenance > Monitoring > Clean-up > Clean-up Database > Products panel.
|
|||||||||
|
Custom Product Data |
To open a custom product window provided custom product data are specified, and a custom product window is implemented for this type of product.
|
|||||||||
|
Save Panel Directions |
Saves the direction signs located in the middle of the worksheet. You can double-click a sign to toggle between: >> Copy to the right panel. << Copy to the left panel. --- Turn off copying. |
|||||||||
|
Termination Dates |
This menu item is outdated. You should use Cash Settle Info instead. |
|||||||||
|
Cash Settle Info |
To specify a termination schedule. It brings up the Cash Settlement window. Help is available from that window. |
|||||||||
|
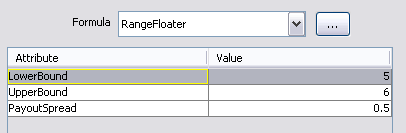
Payout Formula (Left) Payout Formula (Right) |
This feature has been replaced with the definition of exotic structures for most products. However, an example is shown below. To set a payment formula on the left leg, or on the right leg. Out-of-the-box, the RangeFloater formula is available. It allows defining an embedded option. RangeFloater Example You can set a payout spread that occurs if the floating rate is within a defined range. If LIBOR is between 5% and 6%, then the rate actually used for fixing is LIBOR + 0.5%.
For information on implementing custom payout formulas, refer to the Calypso Developer’s Guide. |
|||||||||
|
Show Fixed Rate in Basis Points |
Applies to CRD Trades. This menu item operates as a checkbox. Check to display the fixed rate as basis points. Otherwise, the fixed rate is percentage. |
|||||||||
|
Show Premium in Basis Points |
Applies to CRD Option Trades. This menu item operates as a checkbox. Check to display the option’s premium fee as basis points. Otherwise, the option’s premium fee is an amount. |
|||||||||
|
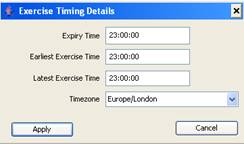
Exercise Timing Details |
Applies to CRD Option Trades. To set the expiration time. It brings up the Exercise Timing Details window.
|
|||||||||
|
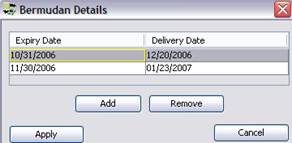
Bermudan Details |
Applies to CRD Option Trades. To set the expiration schedule for Bermudan options.
|
|||||||||
|
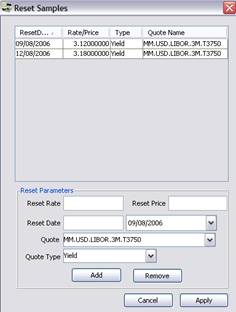
Specific Resets |
To enter price fixings and rate resets specific to the current trade. The resets defined here are not used by other trades. It brings up the Reset Samples window.
The rates will appear in the corresponding cashflows, and the Manual Reset checkbox will appear checked. |
|||||||||
|
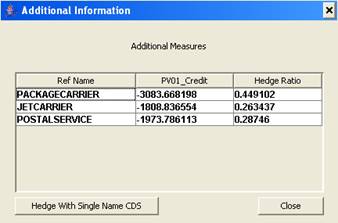
PV01_Credit per name |
Applies to CRD Trades. To display PV01_CREDIT for each name in the basket. This is obtained by perturbing each credit curve separately by 1bp. Ⓘ [NOTE: The pricing parameter PER_REF_NAME should be set to true, and the pricer measure PV01_CREDIT should be selected under Product Menu > Configure Results]
You can also bring up this window when you double-click the pricer measure PV01_CREDIT in the results panel of the pricing area.
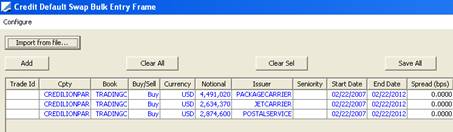
Click Hedge With Single Name CDS to enter credit default swap hedge trades for each issuer in the basket. It brings up the Credit Default Swap Bulk Entry Frame.
|
|||||||||
|
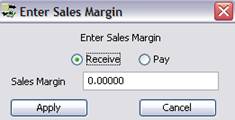
Enter Sales Margin |
To enter a sales margin, as a percentage of the original principal of the trade. It brings up the Enter Sales Margin window.
The sales margin appears to the right of the principal amount.
The columns Sales Margin, Interest Amt (Sales Margin) and Disc. Interest Amt (Sales Margin) can be added to the cashflows. They are calculated provided the pricer measure SALES_NPV is added to the pricing results.
The pricer measures SALES_CASH, and TRADER_NPV also reflect the sales margin. |
|||||||||
|
Automatically Adjusting Stub |
This menu item operates as a radio button. Cannot be selected if “Warn Before Adjusting Stub” or “No Stub Adjusting” is selected. Click to automatically create stub periods without warning when changes to the trade require stub periods. You can override stub period settings in the Product Details window. Help is available from that window with complete details on stub periods. |
|||||||||
|
Warn Before Adjusting Stub |
This menu item operates as a radio button. Cannot be selected if “Automatically Adjusting Stub” or “No Stub Adjusting” is selected. You will be prompted to create stub periods when changes to the trade require stub periods. You can override stub period settings in the Product Details window. Help is available from that window with complete details on stub periods. |
|||||||||
|
No Stub Adjusting |
This menu item operates as a radio button. Cannot be selected if “Warn Before Adjusting Stub” or “Automatically Adjusting Stub” is selected. This is the default setting. The system will not create the stub periods even when changes to the trade require stub periods. You can define stub period settings in the Product Details window. Help is available from that window with complete details on stub periods. |
|||||||||
|
Allow Overlapping Periods |
This menu item operates as a checkbox. This applies when cashflows are customized. If checked, trades can have overlapping cashflows (Pmt Begin date of next period can be before Pmt End date of previous period - or vice versa), or gaps in accrual (Pmt Begin date of next period can be after Pmt End date of previous period).
In this example, the first two periods are overlapping, and there is a gap between the last two periods. If not checked, trades cannot have overlapping cashflows, or gaps in accrual. If Pmt End date of prior period is modified, then Pmt Begin date of next period is modified accordingly. |
|||||||||
|
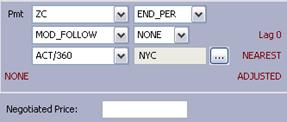
Discount |
This menu item operates as a checkbox. Check to identify Brazilian OIS swap trades on a discount basis. If checked, and if the payment frequency is set to ZC (zero coupon), the field Negotiated Price will appear.
When you enter a negotiated price, the principal is updated according to the following formulas: PV = FV / (1 + Fixed Rate) ^ Period for exponential interest PV = FV / (1 + Fixed Rate x Period) for simple interest where Period = (Swap Start, Start End, Fixed Leg Pay Daycount) In other words, PV + Interest from Fixed Leg Cashflow = FV. |
 See
See