Rate Reset
![]() Download PDF - Rate Reset and Price Fixing
Download PDF - Rate Reset and Price Fixing
The Rate Reset window allows resetting floating rates. This is a two-step process:
| • | You first review and enter the reset rates |
| • | Then you apply the rates to the corresponding flows |
You can also use the RATE_RESET scheduled task.
Contents
- Resetting Flexible and Chooser Cap Floors
1. Resetting a Rate
From the Calypso Navigator, navigate to Trade Lifecycle > Reset > Rate Reset (menu action reporting.RateResetFrame).
When you open the Rate Reset window, the Trade Resets panel is selected by default. It allows setting rates for trades that require rate reset.
To set reset rates rate indices regardless of whether it is used in a trade or not, select the All Resets panel.
 See Resetting All Rates for details.
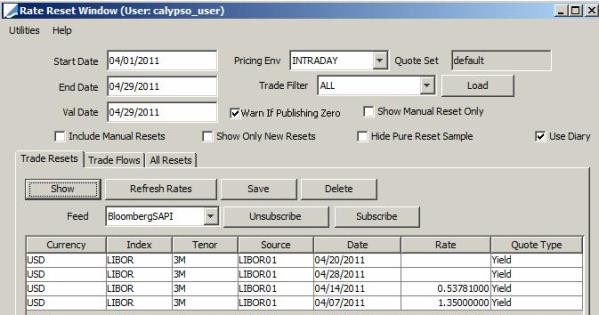
| » | Enter selection criteria and click Load to load trades that require rate reset during the selected period. You would typically load the trades that require rate reset today. |
Note that when the first reset is set on a trade, the corresponding cashflow will not appear in the Rate Reset window.
"Use Diary" option - See "Using the Diary Engine" below for details.
The following indicators apply to flows displayed in the Trade Flows panel:
| – | “Warn If Publishing Zero” – Check to get a warning upon publishing rates set to 0. Uncheck otherwise. |
| – | “Show Manual Reset Only” – Check to display only flows that were reset manually in the trade windows (customized cashflow). In order to display manual resets, you also need to check “Include Manual Resets”. Uncheck otherwise. |
| – | "Use Fallback Rates" - Set to true to use fallback rates on the Fallback Observation Date for Libor trades that will not be migrated by the Libor cessation date - It only applies if the rate index is defined with IndexCalculator = FallbackISDA. Please refer to Calypso Getting Started documentation for complete details on setting up the rate index for fallback pricing and resetting. |
The checkboxes Show Manual Reset Only, Include Manual Resets, and Use Diary should be unchecked when Use Fallback Rates is checked. When Use Fallback Rates is checked, the All Resets tab is disabled.
| – | “Include Manual Resets” – Check to display flows that were reset manually in the trade windows (customized cashflow) in addition to flows that need reset. Uncheck otherwise. |
| – | “Show Only New Resets” – Check to display only flows that have not yet been reset. |
| – | “Hide Pure Reset Sample” – Check to only display simple flows and not compounded flows. Uncheck otherwise. |
| » | Click Show to display the rates that need to be reset. |
If the rates are already populated, they will appear. You can click Refresh Rates to get the latest rates.
To subscribe to a source feed, click Subscribe. The rates will be populated accordingly.
Or you can enter the rates directly.
| » | Click Save to save the rates. |
The rates can be viewed in the trades’ cashflows.
![]()
Using the Diary Engine
The Diary engine allows recording trade lifecycle events such as rate resets for all the trades in the system.
If the Diary engine is configured to subscribe to trade events, the "Use Diary" checkbox is checked by default. In that case, the system only loads trades that have diary entries, for optimization purposes. This requires the Diary engine to be running.
See Trade Diary for details on running the Diary engine.
You can clear the checkbox if you do not want to use the Diary engine.
2. Applying a Reset Rate
Select the Trade Flows panel and click Show to display the actual flows that need reset.
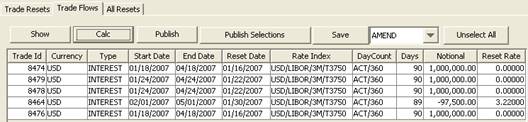
Ⓘ [NOTE: Trade flows highlighted in gray, correspond to customized trade flows]

| » | Click Calc to apply the rates to the flows. The rate amount will be calculated. |
For a specific reset, or a manual reset, the rate is retrieved from the trade.
| » | Click Publish to update the corresponding transfers. |
The system publishes RATE_RESET events. The Transfer engine subscribes to these events to modify the corresponding transfers (make sure that the step PENDING - AMEND - PENDING is configured in the transfer workflow). The Message engine subscribes to these events to generate Rate Reset notices (provided message configurations are defined). The Accounting engine subscribe to these events to generate rate reset postings.
You can also select a set of flows and click Publish Selections.
When the environment property CHECK_SAME_USER_RATE_RESET_PUBLISH is set to true, a user is not allowed to publish a rate that he or she has saved. Another user must publish the rates.
[NOTE: The Save button and action are used for terminating conditional trades only. This applies to flexible and chooser cap floors once they reach their number of uses – See Resetting Flexible and Chooser Cap Floors for details]
3. Resetting Flexible and Chooser Cap Floors
3.1 Flexible Cap Floor
When resetting a flexible cap floor, you will notice that the Exercise box is checked by default, and you should keep it this way. As long as the number of uses is not reached, the Terminable column indicates “No”.
![]()
| » | Publish the rates, then select an action (AMEND, UPDATE, or a custom action) and click Save. The number of uses will be updated on the trade. |
After the number of uses has been reached, the Terminable column will indicate “Yes”.
![]()
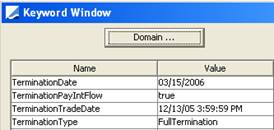
| » | After you have published the rates, select an action (AMEND, UPDATE, or a custom action) and click Save to terminate the cap floor. The trade will move to status TERMINATED and the termination keywords will be populated. |
3.2 Chooser Cap Floor
When resetting a chooser cap floor, you can decide if you want to use the cap floor or not. As long as the number of uses is not reached, the Terminable column indicates “No”.
![]()
| » | Publish the rates. If you want to exercise the cap floor, check the Exercise checkbox, select an action (AMEND, UPDATE, or a custom action) and click Save. The number of uses will be updated on the trade. |
![]()
After the number of uses has been reached, the Terminable column will indicate “Yes”.
![]()
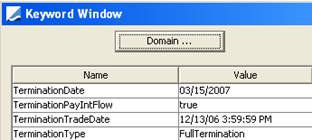
| » | Publish the rates. If you want to exercise the cap floor, check the Exercise checkbox, select an action (AMEND, UPDATE, or a custom action) and click Save. The trade will move to status TERMINATED and the termination keywords will be populated. |
4. Resetting all Rates
To reset or review all rates defined in the system, regardless of whether they are used in trades or not, select the All Resets panel.
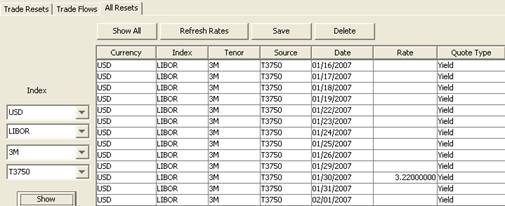
| » | Select a rate index from the Index field, and click Show. You can enter the rate for every day within the selected period. |
| » | You can also click Show All to display all rate indices defined in the system. |
5. Utilities Menu
The menu items of the Utilities menu are described below.
|
Menu Items |
Description |
|
Configure Columns |
To open the Configure Columns window that allows you to select what columns you want to display, and to specify the order in which you want to display the columns. |
|
Configure Sort |
To open the Selector window that allows you to select sort columns and the sort order. Only columns that have been selected for display can be used for sorting. |
|
Sort |
To sort according to the selected sort configuration. |
|
Export to HTML |
To export the panel currently selected to an HTML file. |
|
Export to Excel |
To export the panel currently selected to an Excel file. |
|
|
To print the panel currently selected. |
|
Print Landscape |
To print the panel currently selected. |
|
Ensure Postings Loaded |
This menu item operates as a checkbox. Check to ensure that all postings for the selected trades are pre-loaded in the Data Server so that the accounting matching process is faster. This only applies if you generate postings for RATE_RESET events. |
|
Close |
To close the Rate Reset window. |
|
Secondary Market Processing |
This menu item operates as a checkbox. Check to enable processing for secondary market products. Rate reset is done by position rather than by trade. A PSEventCARateReset is generated per position. The flows in the Trade Flows panel correspond to positions. Otherwise, secondary market products will be reset trade by trade. |