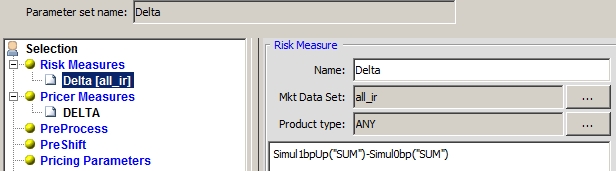
Scenario - Risk Measures
A set of risk measures (parameter set) is a collection of risk measures, associated with perturbation rules and a market data set.
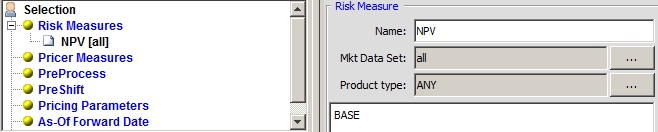
The Risk Measures panel will appear as shown below.
1. Selection > Risk Measures
Displays custom risk measures defined in the Risk Measure panel.
| » | Enter a risk measure name in the Name field. |
| » | Select a market data set from the Mkt Data Set field. |
| » | Select a list of product types from the Product type field, or ANY for all product types. |
| » | Click Editor to display the Scenario Calculator dialog that allows you to specify the calculation formula. See below for details. |
| » | Click Test to parse the calculation formula to check if it is valid. |
| » | Click Apply to add the risk measure to the risk measure set. The risk measure will appear under Selection > Risk Measures. |
The calculation formula of a risk measure is a simple linear combination of perturbation rules.
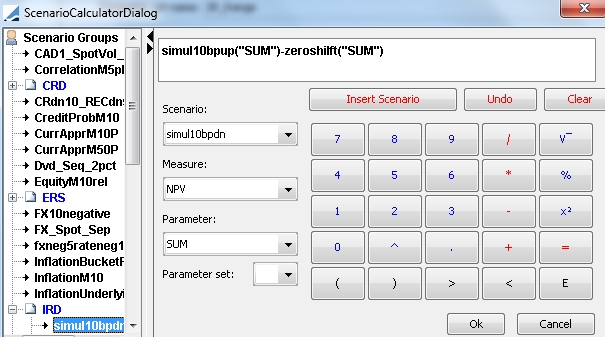
| » | Select a perturbation rule from the Scenario field. Then click Insert Scenario. |
| » | You can then add operators and constant values to the calculation formula using the keypad, and more perturbation rules as applicable. See below for details. |
| » | Click OK when you are done. |
Ⓘ [NOTE: Although the BASE measure is an option, it is highly recommended to manually create and use a “zero shift” rule instead. This is to get rid of any market data inconsistencies that could pollute the results]
Sample Zero Shift
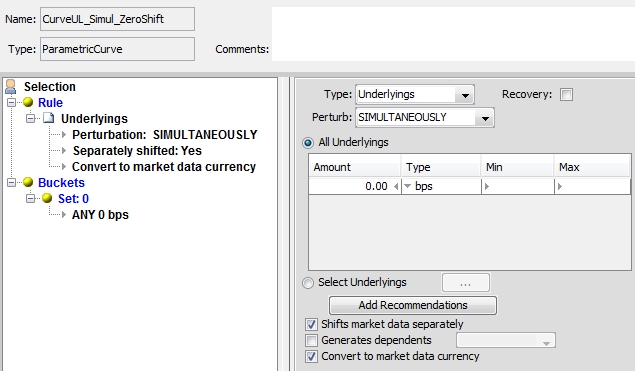
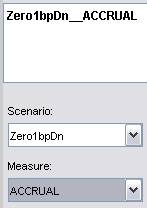
By default, the perturbation rule is applied to the NPV pricer measure, but you can select another pricer measure from the Measure field as applicable.
For example, if you want to apply a perturbation rule to the ACCRUAL measure, it will appear as shown below.
Whether a perturbation rule uses Sequential or Simultaneous, generation has implications on the risk measure definition. An operation like PR1_NPV - PR1_NPV returns a scalar for the simultaneous case. For the sequential case, the operation is in vector rather than in scalar space. In other words, the risk measure (Vector [PR1_NPV] - Vector [PR2_NPV]) will calculate the difference in NPVs element-wise between PR1 and PR2. Any operation would be applied on an element-by-element basis (*, /, log, etc.). The output would be a risk measure with the same dimensionality as the perturbation scenario NPV vectors. If the scenario NPV vectors don't have the same dimensionality, it is considered an error condition.
Whether a perturbation rule uses Sequential or Simultaneous generation also has implications for the risk analysis output. For the sequential case, there will be n columns per risk measure, instead of one, or n columns per perturbation scenario (per pricer measure).
The following fields only apply to curve perturbation rules and date perturbation rules, and depend on how the perturbation rule is defined.
| • | “Parameter” specifies how the rule should be applied: |
| – | “?”: Sequentially - You will get 1 risk value for each shifted point. |
| – | “SUM”: Simultaneously - All points will be shifted simultaneously to produce 1 risk value. |
| • | “Parameter Set” specifies which set of perturbations you want to use in case you have defined multiple sets in the perturbation rule. |
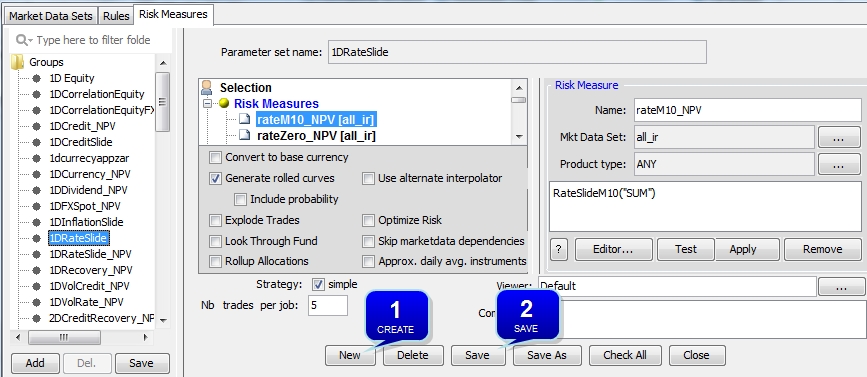
Sample sequential rule with multiple sets:
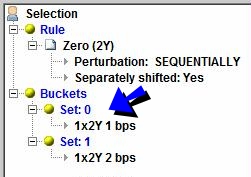
"Set: 0" will shift the market data by 1bps, and "Set: 1" will shift the market data by 2bps.
Ⓘ [NOTE: To define a Delta risk measure for a Cumulative curve perturbation, you must utilize both the aforementioned “Parameter” and “Parameter Set” fields. In this case, you must specify the current shift (“?”,0) minus the previous shift (“?”,1). Example: CurveUL_1bp(“?”,0)-CurveUL_1bp(“?”,1)]
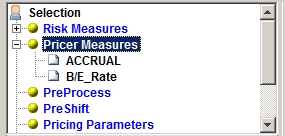
2. Selection > Pricer Measures
Allows you to add standard pricer measures to the output. For example, pricer measures that are used in the computation of the risk measures to view the intermediary results.
| » | Right-click the "Pricer Measures" label, and choose "Pricer Measures" from the popup menu to add out-of-the-box pricer measures to the scenario output. You will be prompted to select pricer measures. |
Custom Pricer Measures
NOTE: Custom Pricer Measures which require market data in addition to what is already managed by the Pricer are not supported (e.g. ACCURAL_BO_BASE, VEGA_BASE). Any “Base” conversions can be configured to occur at report level.
3. Selection > PreProcess
Listed products (example Future Money Market – Calypso product FutureMM) are priced typically from market quotes. However, there is a need to compute risk on these products versus the same market data as OTC trades, in order to aggregate the risk, verify the hedge, or explain the P&L. For example, with a book of IR Swaps hedged with Futures, it is important that the risk of the Futures is computed on the same curve as the Swaps so that the hedge can be verified.
The listed products can be priced either from the direct quotes or theoretically (i.e. price FutureMM from swap curve). In the context of risk, one could price them theoretically and therefore produce the needed risk. However, that approach leads to prices that are inconsistent with the market (direct quotes).
The preferred approach in Calypso is to compute a Pricer Measure that captures the gap between the market price and the theoretical price. This measure is stored and then used as an additional input when pricing theoretically during the risk process. In case of no shift (i.e. 0bp on rates), one can find the market price again.
This approach is called Pre Processing. It must be defined manually in Scenario Editor.
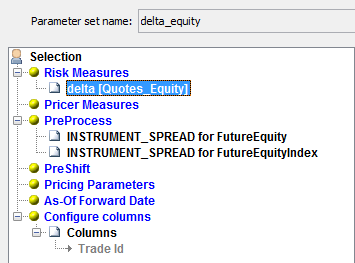
To define a PreProcessing for Product and Pricer combinations in Scenario Editor:
| » | Right-click the "PreProcess" label and choose "PreProcess" from the popup menu. You can define the Pricer Measure by Product Type or by product SubType. |
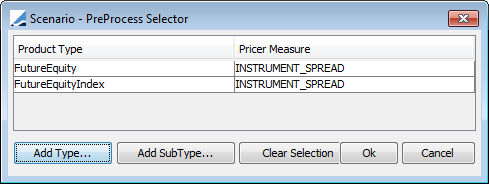
Click Add Type to define the Pricer Measure by Product Type. You will be prompted to select a Product Type and a Pricer Measure.
Click Add SubType to define the Pricer Measure by product SubType. You will be prompted to select a product SubType and a Pricer Measure.
The Pricer Measures will be calculated and used as additional inputs to price the products, therefore allowing the computation of various sensitivities for products priced from quotes.
Then click OK.
Recommended Settings
The pricing parameters listed below must be set to true in order for the pre-processing to take effect.
|
PRODUCT_NAME |
PRICER_PARAMS |
PRICER_MEASURE |
|---|---|---|
|
Bond |
BOND_FROM_QUOTE |
INSTRUMENT_SPREAD |
|
BondAssetBacked |
BOND_FROM_QUOTE |
INSTRUMENT_SPREAD |
|
BondBrady |
BOND_FROM_QUOTE |
INSTRUMENT_SPREAD |
|
BondFRN |
BOND_FROM_QUOTE |
INSTRUMENT_SPREAD |
|
BondMMDiscount |
MMKT_FROM_QUOTE |
INSTRUMENT_SPREAD |
|
BondMMDiscountAUD |
MMKT_FROM_QUOTE |
INSTRUMENT_SPREAD |
|
BondMMInterest |
MMKT_FROM_QUOTE |
INSTRUMENT_SPREAD |
|
BondOption |
BOND_FROM_QUOTE |
PLXG |
|
ETOEquity |
NPV_FROM_QUOTE |
VOLATILITY_SPREAD |
|
ETOEquityIndex |
NPV_FROM_QUOTE |
VOLATILITY_SPREAD |
|
FutureBond |
FUTURE_FROM_QUOTE |
INSTRUMENT_SPREAD |
|
FutureCommodity |
FUTURE_FROM_QUOTE |
INSTRUMENT_SPREAD |
|
FutureDividend |
FUTURE_FROM_QUOTE |
INSTRUMENT_SPREAD |
|
FutureEquity |
FUTURE_FROM_QUOTE |
INSTRUMENT_SPREAD |
|
FutureEquityIndex |
FUTURE_FROM_QUOTE |
INSTRUMENT_SPREAD |
|
FutureMM |
FUTURE_FROM_QUOTE |
INSTRUMENT_SPREAD |
|
FutureOptionBond |
NPV_FROM_QUOTE |
VOLATILITY_SPREAD |
|
FutureOptionDividend |
NPV_FROM_QUOTE |
IMPLIEDVOLATILITY |
|
FutureOptionEquity |
NPV_FROM_QUOTE |
VOLATILITY_SPREAD |
|
FutureOptionEquityIndex |
NPV_FROM_QUOTE |
VOLATILITY_SPREAD |
|
FutureOptionMM |
NPV_FROM_QUOTE |
VOLATILITY_SPREAD |
|
PerformanceSwap |
BOND_FROM_QUOTE |
INSTRUMENT_SPREAD |
|
Warrant |
NPV_FROM_QUOTE |
VOLATILITY_SPREAD |
4. Selection > PreShift
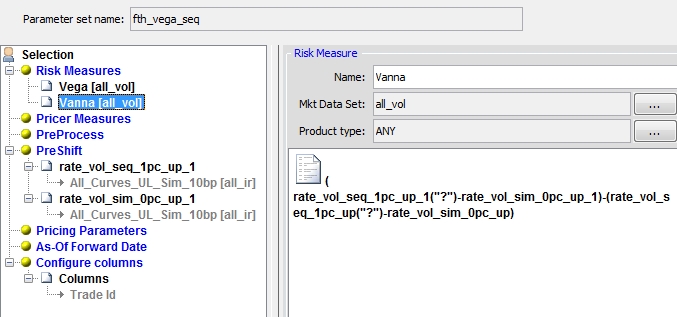
You can specify pre-shift rules in the case you have to apply multiple shifts to the market data (Vanna calculation for example). A pre-shift can be applied prior to the execution of another rule.
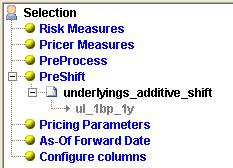
| » | Right-click the "PreShift" label and choose "PreShift". The PreShift Selector will appear as shown below. |

Click Add. You will be prompted to select a rule and its preshift rule. You can also select a different market data set for the preshift rule, or __DEFAULT__ to use the same market data set as the rule.
Then click OK.
Example
Pre-shift is especially useful for computations involving second order cross sensitivity. In the example below, Vanna will be derived by calculating the change of Vega after a shift of curves.
Start with the risk measure Vega.
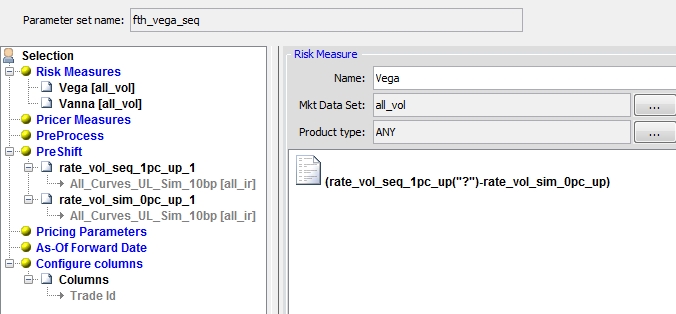
Then compute Vanna by calculating the difference between one Vega with preshift and one Vega without preshift.
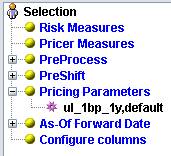
5. Selection > Pricing Parameters
You can add a set of pricing parameters for a given rule. Before pricing the rule, the attached parameter set will be merged with the current parameter set of the pricing environment used for pricing.
If there is any conflict, the pricing parameters of the attached parameter set override the pricing parameters of the pricing environment.
| » | Right-click the "Pricing Parameters" label and choose "Add Pricing Parameters". The Pricing Parameter Set Selector will appear as shown below. |
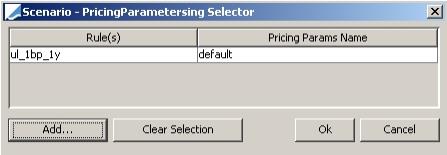
Click Add. You will be prompted to select a rule and a pricing parameter set.
Then click OK.
6. Selection > As-Of Forward Date
This can be used in conjunction with pre-shift rules only. The As-Of Forward component of Scenario will shift the val date for evaluating the pre-shift rule by the tenor specified. Therefore, the new val date for the analysis will be Val Date + Tenor in As-of Forward.
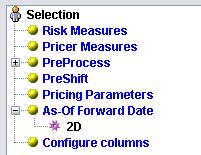
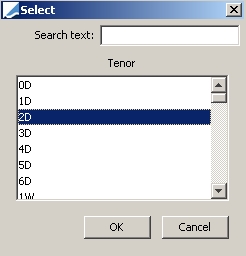
| » | Right-click the "As-Of Forward Date" label and choose "Set Tenor". You will be prompted to select a tenor. |
7. Selection > Configure Columns > Set Columns
You can predefine which columns and aggregation levels you want to display.
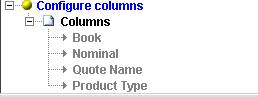
| » | Right-click the "Configure Columns" label and choose "Set Columns". The Configure Columns dialog will appear as shown below. |
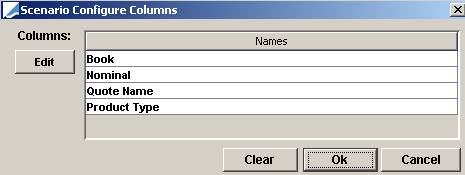
Click Edit under Columns to add columns. You will be prompted to select columns. Note that the columns here only correspond to trade-related columns. When the environment property SCENARIO_ALL_COLUMN_NAMES is False, no column will be available for selection here. You will only be able to see SCENARIO_MEASURES and RISK_MEASURES in the report.
Click Edit under Aggregation to add aggregation levels. You will be prompted to select aggregation levels.
Then click OK .
8. Additional Settings
You can specify the following settings on the risk measure set.
|
Fields |
Description |
||||||
|
Convert to base currency |
Check this box to convert all the measures to the base currency. |
||||||
|
Generate rolled curves |
Check this box to generate rolled curves. When generating rolled curves, you have the option to include probability curves by checking the "Include probability" box.
|
||||||
| Use alternate interpolator |
If you are using spline interpolators for pricing (MonotoneConvex, Spline, LogSpline) that use the whole curve for interpolation, you can select linear interpolators for the risk computations to use only two consecutive points for interpolation. Check “Use alternate interpolator” to use the interpolator defined in domain “riskAlternateCurveInterpolator” for interpolation, typically InterpolatorLinear or InterpolatorLogLinear (default value). |
||||||
| Discrete Measures |
Check this box to designate a Scenario Parameter as containing Discrete Measures to be used in Pricing Analysis. Please note, Discrete Measures can only be checked if:
Ⓘ [NOTE: It is recommended that no more than 10 Risk Measures be used in a Scenario Parameter Set. Performance should be assessed on a case-by-case basis as every Risk Measure has unique processing requirements.] |
||||||
|
Explode Trades |
Check this box to break down structured trades into their individual components. This feature is also customizable at the API level. |
||||||
|
Optimize Risk |
Checking this will merge similar trades into one for processing the risk measures, then split again for display- therefore improving the processing time. This is customizable and extendable through API. Default core implementation includes CDS, CDSIndex, CDSIndexTranche. |
||||||
|
Look Through Fund |
Not used. |
||||||
| Skip market data dependencies |
When checked, the scenario rule is only applied to market data that are needed for pricing. Ⓘ [NOTE: It does not apply if “Generates dependents” is set, and should be unchecked in that case] |
||||||
| Approx. daily avg. instruments |
Check to use an approximation when generating curves with BasisGlobal that use daily average swap underlyings, in order to improve performance. |
||||||
|
Rollup Allocations |
Select this checkbox so that the results are displayed for block trades with rolled up notional (i.e. the original block size). Child trades are filtered out of the analysis. |
||||||
|
Viewer |
The default viewer is Default which corresponds to " |
||||||
|
Comments |
Free form comment. |

Ⓘ [NOTE: In order to avoid conflicts when using a set of trades using different rule types on the dispatcher, use SCENARIO_SKIP_RISK_ATTRIBUTES set to "true". The Scenario Viewer will not display rule-specific columns]
9. Distributed Processing Mode
The following setting only applies when you are running the scenario analyses in distributed mode.
|
Fields |
Description |
|
Strategy / Nb trades per job |
Parameter used for dispatching the analysis in distributed mode. We recommend testing with 300, and tune as applicable. When Strategy is clear, you can enter the number of rules per job instead of the number of trades per job. In this case, you must set the environment property SCENARIO_DISPATCH_PER_RULE_TRADES_LIMIT to limit the number of trades per rule - Default value is 100 (Cannot exceed 1000). Ⓘ [NOTE: For volatility rules, you cannot use the number of rules per job - You can only use the number of trades per job. Default number of trades per job is 500.] |
10. Sample Sets of Risk Measures
Using Scenarios, the following types of scenarios can be quickly set up.
Delta Sensitivity - Simultaneous Shift
Delta Sensitivity - Sequential Shift
Delta Sensitivity - Cumulative Shift

Gamma Sensitivity
Simple NPV - For Simple NPV, you can use BASE - This is the only case where we recommend using it.