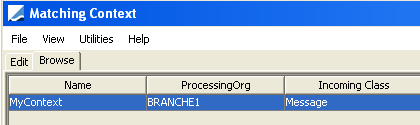
Matching Context
A Matching Context is used for defining matching parameters between incoming messages (message coming from outside of the Calypso system) with outgoing items (items generated by the Calypso system).
If the incoming messages are eligible for matching within a Matching Context, the MatchableBuilderEngine creates a Matchable item containing the matching information necessary for this item to go through the matching process, in particular the Matching Keys.
The MatchingEngine subscribes to Matchable items and tries to automatically process them, depending on the matching criteria defined in the associated context. The MatchingEngine applies the workflow actions associated with the matching context.
The Matching Manager keeps track of matched and unmatched items and allows performing manual processes.
 See Matching Manager for details.
1. Sample Matching Context
From the Calypso Navigator, navigate to Configuration > Messages & Matching > Matching (menu action "refdata.MatchingContextConfigurationWindow") to bring up the Matching Context window.
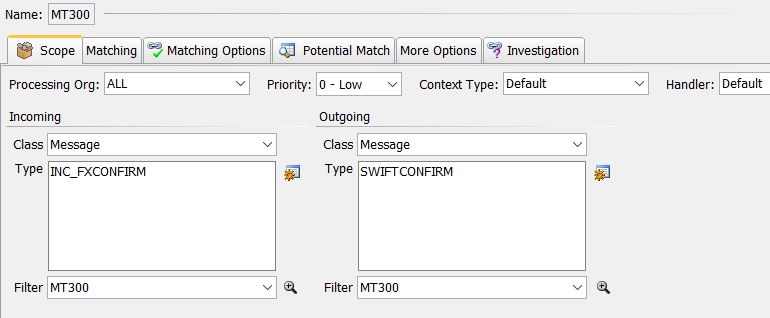
Matching Context window
The Matching Context identifies which type of incoming message can be matched with which type of outgoing item, under which conditions (matching keys), and which actions can be applied to the items (if any).
It also allows specifying preferences for the Matching Manager.
2. Creating a Matching Context
| » | Click |
| » | Enter the fields in the various panels as described below. |
Depending on the selected matching handler, the panels will be different.
| » | Then click Apply to save the matching context. |
For the context types Dynamic and ThreeWayBroker, a Schema button appears at the bottom of the Scope panel after you save the matching context. Click Schema to generate the XML file "MatchingSchemaBaseDynamic.xml" that contains enrichment data for these contexts (the enrichment data are the selected matching keys).
You need to add this file to Execute SQL and run Execute SQL to create the corresponding enrichment data in the database. This applies any time the Schema button appears (after modifying the context for example).
Ⓘ [NOTE: It is not supported to change the context type of an existing matching context to Dynamic or ThreeWayBroker. These context types can only be set on new contexts]
2.1 Scope Panel
Matching Context window - Scope panel
| » | Enter the fields described below to define the matching context. |
General Fields Details
|
Fields |
Description |
||||||||||||||||||||||||||||||||||||
|
Name |
Displays the matching context name. |
||||||||||||||||||||||||||||||||||||
|
Processing Org |
Select the processing organizations to which the matching context applies. |
||||||||||||||||||||||||||||||||||||
|
Priority |
Select the priority of the matching context as needed. This would apply only if multiple matching contexts were defined for the same message types with different priorities. The matching contexts would be applied in order of priority starting with the highest priority. |
||||||||||||||||||||||||||||||||||||
|
Context Type |
The context type allows defining which fields can be selected as matching keys. Out-of-the-box, you can select Default, Dynamic, Paper, or ThreeWayBroker. You should select Default unless otherwise instructed for specific matching scenarios. Customization Capabilities You can customize the following:
DefaultKeyRetriever is used if no custom class is implemented.
DefaultMatchableBuilder is used if no custom class is implemented.
MatchableSQL is used if no custom class is implemented. |
||||||||||||||||||||||||||||||||||||
|
Handler |
The matching handler allows implementing the matching logic. Out-of-the-box, the following matching handlers are available:
Customization Capabilities You can customize the following:
DefaultMatchingHandler is used if no custom class is implemented.
DefaultMatchingHandlerConfigurationPanel is used if no custom class is implemented.
DefaultMatchingHandlerAdapter is used if no custom class is implemented.
DefaultStatusRetriever is used if no custom class is implemented. |
Incoming and Outgoing Details
|
Fields |
Description |
|||||||||
|
Class |
Select the class to which the matching context applies - These are workflow classes so the list depends on which workflows are configured on your system.
|
|||||||||
|
Type |
Click
|
|||||||||
|
Filter |
Select a static data filter to limit the scope of the matching context. Once a static data filter is selected, you can click |
 to bring up the Static Data Filter window.
Incoming message types must be defined in the domain "incomingType" as follows:
Value = <message type>
Comment = <incoming message type>
The incoming message type is used to configure the incoming message workflow - Multiple incoming messages may use the same incoming message workflow.
Example for MT300 message type:
Value = MT300
Comment = INC_FXCONFIRM
2.2 Matching Panel / Keys Panel
It is mandatory to define matching keys.
For the Tracking matching handler, this panel is called "Keys", and only allows selecting matching keys.
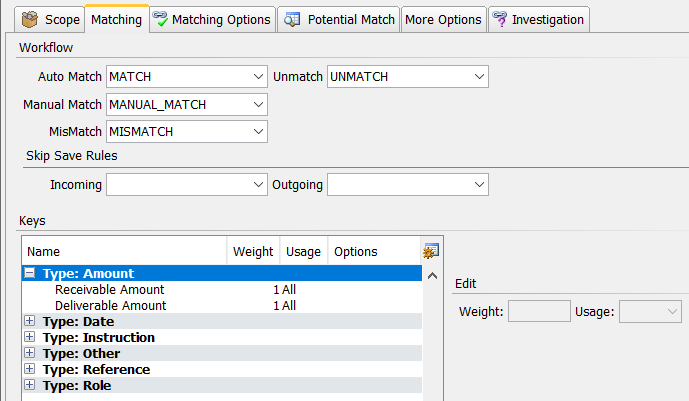
Matching Context window - Matching panel
| » | Enter the fields described below as needed - Some fields may not be appear based on the matching handler selected in the General panel. |
Workflow Details
The Matching panel allows defining what workflow actions to apply, based on the matching results. These actions must be defined on the incoming and outgoing workflows.
Ⓘ [IMPORTANT NOTE: In order for the incoming items and outgoing items to be eligible for matching, they need to be in a status that allows the selected workflow actions to be applied. For example, if an incoming message is in status VERIFIED and the workflow contains the transition ACKED - MATCH - MATCHED, the incoming message will not be eligible for matching, and a matchable item will not be created for that incoming message. In order for the incoming message to be eligible for matching in this example, it would need to be in ACKED status]
|
Fields |
Description |
|
Auto Match |
Select the action to be applied in case an automatic matching is found. |
|
Unmatch |
Select the action to be applied in case the user rejects a manual match or a mismatch. |
|
MisMatch |
Select the action to be applied in case an automatic matching is not found. |
|
Manual Match |
Select the action to be applied in case the user performs a manual match. |
Skip Save Rules
The Matching panel allows defining messages to which the actions do not be apply.
|
Fields |
Description |
|
Incoming |
Select a static data filter that identifies incoming messages to which the actions do not apply. |
|
Outgoing |
Select a static data filter that identifies outgoing messages to which the actions do not apply. |
Keys
The matching keys are the fields of the incoming message that need to match the fields of the outgoing item in order for a matching to occur.
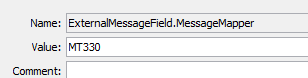
To obtain matching keys for a given type of message, you need to make sure that the type of message is defined in domain "ExternalMessageField.MessageMapper".
Example for MT330 message type:
| » | Click |
The keys available for selection are displayed for each type of incoming message.
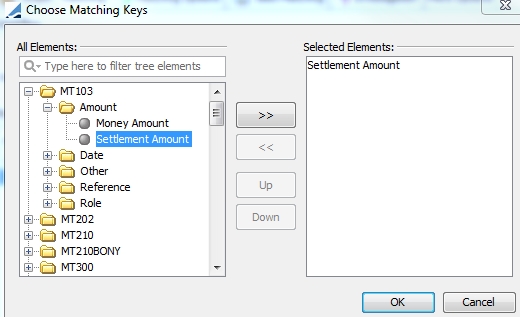
Select keys as needed then click OK.
For the Agent Reference matching keys, the system will look at all account attributes XferAgentAccount, XferAgentAccount.1, XferAgentAccount.2, etc. to find a matching reference.
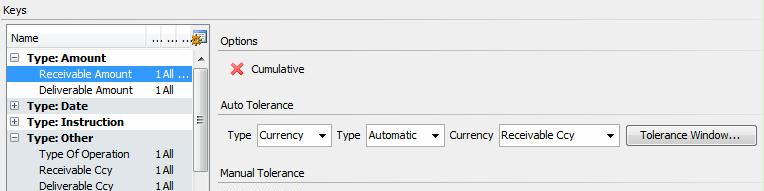
Once the matching keys are selected, you can define additional parameters.
|
Fields |
Description |
||||||
|
Weight |
The weight is the coefficient applied to the matching key in the calculation of the matching score. |
||||||
|
Usage |
The usage indicates whether the key applies to Auto matching, Manual matching, All or None. |
||||||
|
Alias |
The alias can be defined on String and Instruction keys by default. It can also be defined on the matching keys set in the domain “MatchingContext.Key.Aliasable“ has been added. The alias allows mapping the incoming value of a specific key into a Calypso value. Check the Alias checkbox, and bring up the Matching Alias window to define an alias using Configuration > Messages & Matching > Matching Alias (menu action For example, an agent code which is different between the incoming message and the Calypso value.
Matching Alias Configuration window Authorizing Matching Aliases In order for the Authorization mode to apply to matching aliases, you need to add “MatchingAlias” to the domain “classAuthMode”. |
||||||
|
Allow Mismatch |
Only applies to amount keys and date keys, or to keys defined with an alias (provided they are defined in the domain "MatchingContext.Key.Aliasable"). When a matching key is eligible for mismatch:
The “Allow Mismatch” option is ignored when Tolerance is set to OptionalReference for reference keys. |
||||||
|
Cumulative |
Only applies to Amount keys. Only applies to manual matching. When checked, the amounts will be added when you select multiple matchable items in the Matching Manager. This is useful when matching one or multiple incoming items with one or multiple outgoing items. |
||||||
|
Tolerance |
See below. |

Tolerance
Tolerance can be defined on Amount and Date keys.
You can specify a tolerance for automatic matching, and one for manual matching.
| • | Date Tolerance |
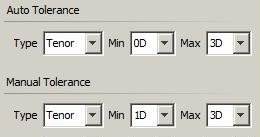
In this example, messages are automatically matched if the value dates are identical, and can be manually matched if the difference is between one and two days.
| • | Amount Tolerance |
You can set the amount tolerance as unit amounts, unit amounts per million, percentage, or currency (in this case, the tolerance is defined by currency and legal entity).
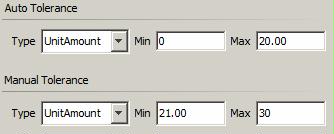
In this example, messages are automatically matched if the money amounts differ by less than 20, and can be manually matched if the difference is between 21 and 30.
For the Currency amount type, you need to select if the tolerance applies to automatic matching or manual matching, and to which currency key, then click Tolerance Window to define the tolerance. See Legal Entity Tolerance below.
Whenever a money amount is imported into the matchable object, the system creates two matching keys: one containing the amount and one containing the currency for the selected amount. For example, for the "Receivable Amount", you want to use the "Receivable Ccy".
| • | Reference Tolerance |
On some reference matching keys, you can set the tolerance to:
| – | IgnoreReceiptReference - This matching key is not tested on receipts, only on payments. Select the corresponding amount. |
| – | OptionalReference - This tolerance accepts a match even if the Related Reference does not match but it impacts the matching score: |
If both keys are empty or have the same values, the keys are matched.
If a key is empty on one side and has a value on the other side, the keys are matched.
If both keys do not have the same values, there is no match.
| – | AlwaysTrueReference - Always returns "Match" (i.e., the score is equal to the weight of the key). It should only be used for the UTI key as a manual tolerance. It allows matching if key is empty on one side and has a value on the other side. |
| • | BICInstruction |
The BICInstruction tolerance can be set on "Instruction" fields like “PO Receiving Agent” and “PO Receiving Agent Code”. It does not apply to “Instruction” fields like “PO Receiving Agent Account” and “PO Receiving Agent Code Type”.
It allows matching "<BICCode>" with "<BICCode> + XXX" - Example "BANKFRPP" and "BANKFRPPXXX" for the selected instruction.
To enable this, you need to add the domain "MatchingContext.Instruction.Tolerance" with value "BICInstruction".
| • | BICRole |
The BICRole tolerance can be set on "Role" fields. It allows matching "<BICCode>" with "<BICCode> + XXX" - Example "BANKFRPP" and "BANKFRPPXXX" for the selected role.
To enable this, you need to add the domain "MatchingContext.Role.Tolerance" with value "BICRole".
2.3 Legal Entity Tolerance
You can define settlement tolerance on legal entities of role Agent and ProcessingOrg for the matching of incoming payment messages and transfers. The tolerance specified on the agent of a message if any, takes precedence over the tolerance specified on the processing organization.
From the Calypso Navigator, navigate to Configuration > Legal Data > Entities. Select a legal entity and click Tolerance, or click Tolerance Window from the Matching Context - Matching panel.
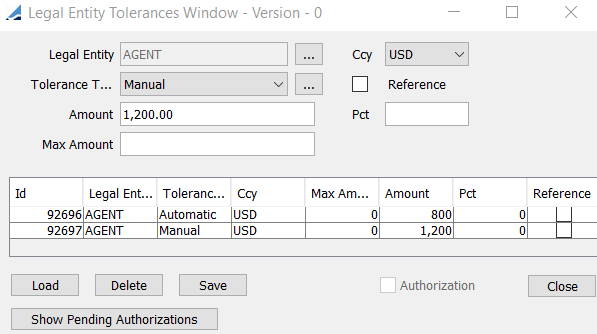
The Tolerance window allows defining the amount or % of tolerance that can be applied automatically or manually when trying to match an incoming payment message with a Calypso transfer.
When defined as Automatic, the tolerance is applied when the system automatically matches incoming payment messages - When defined as Manual, the tolerance is applied when the user tries to manually match incoming payment messages using the Security Matching window. Both can be defined for the same legal entity to allow different levels of tolerance for automatic matching and manual matching.
You can specify the tolerance for a specific currency or for any currency.
| • | If you specify the tolerance for ANY currency, it can only be defined as a %. |
| • | If you specify the tolerance for a specific currency, it can be defined as an amount or a %. |
The Reference checkbox only applies if a specific currency has been selected. If unchecked, the amount/percentage only applies to settlement amounts expressed in the specified currency. If checked, the amount/percentage is applied to any settlement amount converted to the specified currency using today’s FX rate.
You can also specify the maximum transfer amount for which the tolerance applies. When specified, if the transfer amount is above the maximum amount, there is no tolerance.
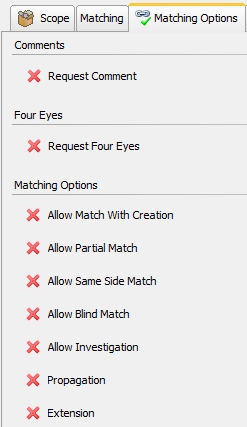
2.4 Matching Options
The Matching Options panel allows specifying options for manual matching. When an item is unmatched after the automatic matching process has been performed, multiple options can be enabled in the Matching Manager to process the unmatched items.
Matching Context window - Matching Options panel
| » | Check the options described below as needed. |
Matching Options Details
|
Fields |
Description |
|||||||||||||||||||||||||||
|
Request Comment |
Check to make the comment field mandatory when the user performs a Manual Match / Force Match / Blind Match. A dialog pops up to have the user enter the comment for a given matching. Uncheck to make the comment field not mandatory while performing Force Match / Blind Match / Manual Match. A dialog pops up with the comment field as optional to enter the comment for a given matching. |
|||||||||||||||||||||||||||
| Request Four Eyes |
Ⓘ [NOTE: This only applies to Confirmation matching] Check to activate 4 eyes validation: When the user applies a "manual match", "blind match" or "propose" for a mismatched item in the Matching Monitor, the messages move to status Proposed, and must be authorized. If you check Request Different User, another user must authorize the proposed matching. The user who authorizes the proposed matching needs the access permission AuthoriseMatchingProposal. |
|||||||||||||||||||||||||||
|
Allow Match With Creation |
This applies when an incoming item cannot be matched to any outgoing item, and the outgoing item is a transfer. Check to allow the display of a "Match With Creation" button in the Matching Manager. The "Match With Creation" button allows creating a simple transfer to match the incoming item, if no outgoing item is found. When checked, you can select the following information.
Available configurations are defined in the domain "MatchingContext.MatchWithCreation.ConfigName".
You can select the amount (deliverable or receivable), the account, the currency, and the settlement date. These parameters need to be part of the matching keys. When you click "Match With Creation" in the Matching Manager, you can define a list of favorite transfer types.
Apply Trade Action to Transfers You can use the trade workflow rule ApplyTradeActionOnTransfers to apply the trade action on the associated transfers, provided the same action is defined in both workflows. Sample Trade workflow
Sample Transfer workflow
When ACCEPT is applied on the trade, ACCEPT is also applied on the associated transfers through the rule ApplyTradeActionOnTransfers. |
|||||||||||||||||||||||||||
|
Allow Partial Match |
Check to enable manual partial matching when only part of the incoming item has been confirmed. You can select one of the following configurations for partial matching. Available configurations are defined in the domain "MatchingContext.PartialMatch.ConfigName". BrokerOrder Applies to Orders integration. You can select the amount (deliverable or receivable), and the currency. This configuration has the following behavior.
There is a column "Is PartialMatch" in the Matching Manager that indicates that an item is partially matched. The amount defined as partially matchable shows the remaining amount to be matched. CashSettlement Applies to MT940 integration. You can select the amount (deliverable or receivable), the account, the currency, and the settlement date. These parameters need to be part of the matching keys. This configuration has the following behavior:
You can check the "WriteOff Mode" checkbox so that if the difference between the incoming and outgoing amounts is within the specified tolerance, a transfer is created for the difference with status WRITE_OFF. The flow type is take from domain “flowTypeWriteOff”.
|
|||||||||||||||||||||||||||
|
Allow Same side Match |
Check to enable manual matching of incoming items together, or outgoing items together, provided all matching keys are the same, and the sum of cumulative amounts is zero. You can select whether it is allowed on incoming items, outgoing items, or both. |
|||||||||||||||||||||||||||
|
Allow Blind Match |
Check to enable manual matching of any item together. There is no matching key checking. This should only be used for confirmations (like FAX confirmations for example). |
|||||||||||||||||||||||||||
|
Allow Investigation |
Check to enable the investigation function in the Investigation panel. The investigation function allows marking unmatched items "Under Investigation" for further investigation before additional processing. You can select the configuration: CashSettlement (MT940 integration), or Confirmation. Available configurations are defined in the domain "MatchingContext.Investigation.ConfigName". Allow With Creation "Allow with Creation" is similar to "Allow Match with Creation". It creates a simple transfer of type "POSITION_ADJUSTMENT" for the difference between the expected outgoing amount and the incoming amount to match the incoming amount. This transfer however only impacts the theoretical inventory position and does not generate any postings.
|
|||||||||||||||||||||||||||
|
Propagation |
Check as needed and select a Config Name. Available configurations are defined in the domain "MatchingContext.Propagation.ConfigName". The following Config Names are available. CashSettlement or Forecast This only applies when the outgoing item is a transfer, and it does not apply if "Match With Creation" is checked, or if "WriteOff Mode" is checked. Check to propagate the amount / date of the incoming item to the Real Settle Amount / Settlement Date of the outgoing item, if the amount / date is within the tolerance. You can select the configuration: CashSettlement (MT940 integration), or Forecast (Forecasted MT940 integration). Available configurations are defined in the domain "MatchingContext.Propagation.ConfigName". You can choose to apply the propagation to the amount, the date, or both.
UTI To propagate UTI keywords. You can select the action to be applied. Default action is UPDATE.
|
|||||||||||||||||||||||||||
|
Extension |
Check to enable additional options. Currently, you can select the configuration: AutoMatchOneToMany. Available configurations are defined in the domain "MatchingContext.Extension.ConfigName".
Ⓘ [NOTE: This option applies to automatic matching, not manual matching] |
2.5 Tracking Panel
The Tracking panel only applies to the matching handler "Tracking". There is no matching, and no action to apply. You only need to select the status codes you want to track.
Then you can define cut off options, and a rating scheme.
![]()
Matching Context window - Tracking panel
| » | Enter the fields described below as needed. |
Status Details
| » | Select the incoming and outgoing status codes to be tracked. |
Non Matchable Visibility Details
See Cut Off Details under More Options Panel for details.
Rating and Constraint Details
See Potential Match Panel for details.
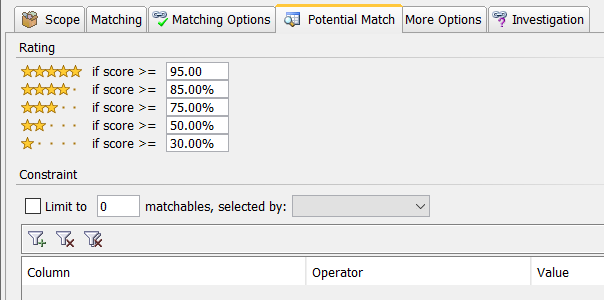
2.6 Potential Match Panel
The Potential Match panel allows associating a rating with the matching score. The rating will be displayed in the Matching Manager.
The matching score is computed as Sum (Matching Key Score) / Sum (Key Weight).
The score for individual keys is computed as:
| • | Amount keys |
| – | If within tolerance: from 100% to 90% of the Weight depending on the difference |
| – | If out of tolerance: from 60 % to 0% = Weight * 60% * (1 - diff / outgoing amount), diff = incoming amount – outgoing amount - tolerance |
| • | Date keys: |
| – | If within tolerance: from 100% to 90% of the Weight depending on the difference |
| – | If out of tolerance: |
If less than 21 days off tolerance: linear from 60% to 6% of the weight
If more than 21 days: Weight * 60% * 2.1 / diff, diff = incoming date – outgoing date - tolerance
| • | Other keys |
| – | 0 if not matched |
| – | Weight if matched |
Matching Context window - Potential Match panel
| » | Enter the fields described below as needed. |
Rating Details
|
Fields |
Description |
|
Score |
Enter the matching score corresponding to each rating. |
Constraints Details
|
Fields |
Description |
|
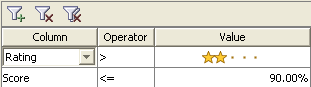
Limit |
Check the Limit checkbox, and enter the maximum number of matchable items to display for the Potential Match search in the adjacent field. You can click
In this example, you only want to display matchable items that have a rating greater than 2, and for which the score is smaller than 90%. |
2.7 More Options Panel
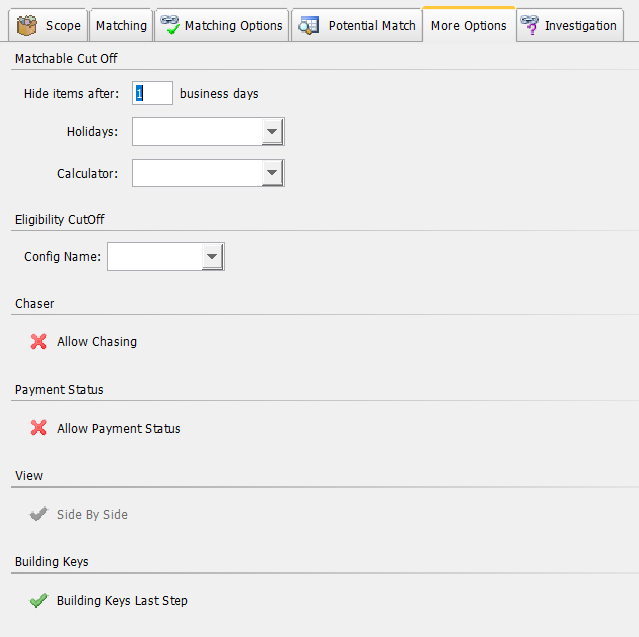
Matching Context window - More Options panel
| » | Set the options described below as needed. |
Matchable Cut Off Details
|
Fields |
Description |
|||||||||
|
Hide items after |
Enter the number of business days after which you do not want to display matched items in the Matching Manager. |
|||||||||
|
Holidays |
Select the holiday calendars to determine business days. |
|||||||||
|
Calculator |
Select a cut off calculator. Out-of-the-box, the following calculators are available:
Ⓘ [NOTE: This only applies to matched items. Incoming and outgoing items in matchable or mismatched statuses (e.g. alleged, acked, unmatched) will stay in the Matching Manager as long as they are not matched] |
Eligibility CutOff Details
|
Fields |
Description |
|
Config Name |
Select CashSettlement for intraday payment integration to automatically clean unreconciled items intraday once the statement for that specific account/date has been received and processed by the system. Available configurations are defined in the domain "MatchingContext.EligibilityCutOff.ConfigName".
|
Chaser Details
|
Fields |
Description |
|
Allow Chasing |
Check to allow the generation of chaser messages from the Matching Manager. |
Payment Status Details
|
Fields |
Description |
|
Allow Payment Status |
Check to allow the generation of pacs.002 messages from the Matching Manager for incoming pacs.008 / pacs.009 CBPR messages.
|
View Details
|
Fields |
Description |
|
Side By Side |
Check to display the messages side by side from the Matching Manager. |
Building Keys Details
|
Fields |
Description |
|
Build Keys Last Step |
Check to build the Matching keys before saving the matchable items. |
2.8 Investigation Panel
The Investigation panel allows setting options for the Investigation panel of the Matching Manager.
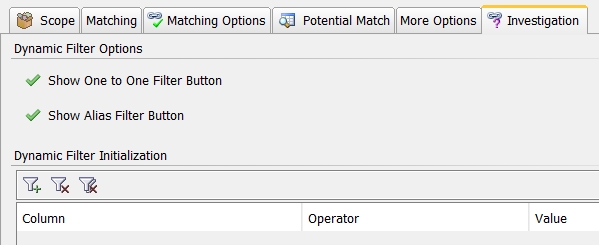
Matching Context window - Investigation panel
| » | Enter the fields described below as needed. |
Dynamic Filter Details
|
Fields |
Description |
||||||
|---|---|---|---|---|---|---|---|
|
Show One to One Filter Button |
Check to display the one to one filter button in the Investigation panel of the Matching Manager. |
||||||
|
Show Alias Filter Button |
Check to display the alias filter button in the Investigation panel of the Matching Manager. |
||||||
|
Dynamic Filter Authorization |
You can click Two criteria are currently available:
|
3. Modifying a Matching Context
| » | Select File > Load to load all matching contexts, then select a matching context from the Contexts tree. |
| » | Modify as needed then click Apply. |
4. Deleting a Matching Context
| » | Select File > Load to load all matching contexts, then select a matching context from the Contexts tree. |
| » | Click
|
5. File Menu
The menu items of the File menu are described below.
|
Menu Items |
Description |
|
Load |
To load all matching contexts. |
|
Save |
To save the matching context currently selected. |
|
Compare to Current |
Not currently available. |
|
Close |
To close the Matching Context window. |
6. View Menu
The menu items of the View menu are described below.
|
Menu Items |
Description |
|
Show Context Type Tree |
This menu item operates as a checkbox. Check to display the list of contexts by processing org and context type. |
|
Show Context Handler Tree |
This menu item operates as a checkbox. Check to display the list of contexts by processing org and context handler. |
|
Show Object Type Tree |
This menu item operates as a checkbox. Check to display the list of contexts by processing org and item type. |
|
Show Table |
This menu item operates as a checkbox. Check to display the list of contexts in a tabular fashion. A Browse panel will appear to display the existing contexts.
|
7. Utilities Menu
The menu items of the Utilities menu are described below.
|
Menu Items |
Description |
|
Handler Name |
To add a matching handler name. Ⓘ [NOTE: Refer to customization capabilities above for determining which custom classes should be implemented] |
|
Context Type |
To add a context type. Ⓘ [NOTE: Refer to customization capabilities above for determining which custom classes should be implemented] |
|
Calculator Type |
To add a cut off calculator. Ⓘ [NOTE: The calculator class |
|
Context Priority |
Enter the priority (integer). If you want the priority to be displayed with a label, you can add the label as a comment in the domain “MatchingContext.Priority”. |
|
Predefined Matchable Comments |
The comments defined here can be selected in the Matching Manager. |
|
Static Data Filter |
To bring up the Static Data Filter window. |