Report Menu Items
This document describes menu items common to all reports.
Notes:
| • | Report templates can be configured to define search criteria and result columns. A report template applies to a given type of report. |
| • | Table views can be configured to define the report layout (zebra striping). A table view can be used across multiple report types. |
Individual reports are described under Help > <report type> Report.
1. Read-only Data Server
All reports can be executed by the read-only data server
provided they are added to the "roDSFunction" domain as "<report_type>Report" such as: "MessageReport", "TransferReport", "PostingReport", etc.
Report types are defined in the “REPORT.Types” domain.
Refer to the Calypso Installation and Configuration Guide (”Running the Calypso Installer”) for information on installing a Read-Only Data Server.
2. Report Menu Customization
A number of reports are not available from the menu by default. These reports list various types of static data defined in the system such as accounts, bonds, books, holiday calendars, SDIs, and user defaults.
In the User Defaults report, it is possible to show all users (even those who do not have user defaults) by choosing User Type = ANY.
They can be added to the menu using Utilities > Main Entry Customizer
(menu action reporting.ReportWindow$<report
type> or ReportWindow$<report_type>#NAME) where <report_type> comes from the “REPORT.Types” domain, and NAME is a template name. The menu item name, which is user-defined, should reflect the report type and template name as well, as in the example shown below.
![]()
Note that you need to save your configuration and restart the Calypso Navigator in order for the changes to take effect.
3. Start Date and End Date
Enter a start date and an end date when applicable to filter the report results. You will generally be able to select the type of date that the start and end dates represent (trade date, settlement date, etc.).
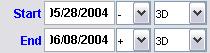
| » | You can double-click the Start and End label to display the current date. |
| » | You can also specify tenors for the start and end dates to run the report using relative dates. The tenors apply to the current date. Select the + and - signs and the tenors from the adjacent fields as applicable. Next time you run the report, it will apply the same tenors to the new current date. |
You can specify if the tenors are business days or calendar days according to a holiday calendar. Choose Data > Set Holidays to specify a holiday calendar. Then choose Data > Calendar > Calendar to indicate that the tenors are calendar days, or choose Data > Calendar > Business to indicate that the tenors are business days.
For example, if you run a report on Friday with calendar days, and enter +2D in the end tenor, the report will include the activity of the weekend.
| » | You can also run the reports according to a date rule. |
Add the date rules you want to use for reporting purposes to the domain "DateRuleReportTemplate", then select the date rule from the tenor field in the reports.
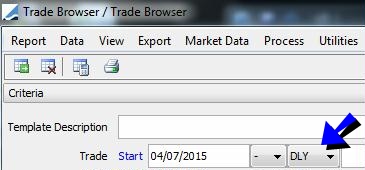
In this example, the DLY date rule was created and added to the domain "DateRuleReportTemplate".
Date rules are defined using Configuration > Definitions > Date Schedule Definitions > Date Rules.
Ⓘ [NOTE: To load an object in the future, you need to set the Valuation Date in the future as well when available, in addition to the end date]
4. Pricing Environment and Valuation Date
In most reports, you can select a pricing environment and valuation date at the bottom of the report window.

By default, the pricing details are current:
| • | The pricing environment (if needed) defaults to the one set in the User Defaults |
| • | The valuation date is the current date and time |
You can click the down arrow to change the default values.
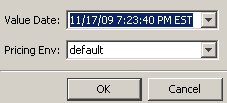
Ⓘ [NOTE: The Pricing Env field will not appear if the report does not need a pricing environment]
| » | You can change the value date as needed. The following shortcuts can be used: |
| – | Ctrl+N = Current date and time (You can enter this shortcut directly in the Pricing Details field) |
| – | Ctr+E = Current data and EOD time - Example 11/17/09 11:59:59 PM EST (You can enter this shortcut directly in the Pricing Details field) |
| – | 5pm = Current date and 5pm |
| – | 1w = Current date + 1 week and current time |
| – | 1w 5pm = Current date + 1 week and 5pm |
If the value date is not a business day (with respect to the holiday calendar set in the User Defaults), the background turns pink.
| » | You can change the pricing environment as needed. |
Ⓘ [NOTE: To load an object in the future, you need to set the Valuation Date in the future as well when available, in addition to the end date]
5. Printing a Report
Click ![]() to print a report.
to print a report.
You can specify the location of the MSoffice HTML printer application "msohmed.exe" in domain “MSOfficeDirectory”, so that the system looks for the application in that directory.
If it is not specified or the file is not there, the system looks for the application in <program_files>\Microsoft Office, and in the user home directory.
Note that for the Pivot view and the Aggregation view, the print icon is disabled. You can use [Ctrl+P] or [Ctrl+L] to print the report, or you can export the report to Excel [Ctrl+O] and print it from there.
You can also specify the Print command for HTML documents in the environment property HTMLFILE_PRINT_CMD. Please refer to Calypso Environment Properties documentation for complete details.
6. Counting the Number of Objects
You can select a template, and click ![]() to display the number of objects that will be loaded from the database, before loading the report.
to display the number of objects that will be loaded from the database, before loading the report.
7. Fonts
The following components can be configured using Utilities > System > Resources.
| • | For Calypso Table view: SUBHEADING_NAME, TOTAL, SUBTOTAL, and DATA. |
| • | For Calypso Tree Table view: SUBHEADING_NAME, and DATA. |
| • | For Calypso HTML view: HEADING, SUBHEADING_NAME, SUBHEADING_VALUE, TOTAL, SUBTOTAL, and DATA. |
8. Report Menu
The menu items of the Report menu are described below.
|
Menu Items |
Description |
|
New Report |
To clear the current search criteria / templates. |
|
Load |
To load the data corresponding to the search criteria / templates and display the report results. |
|
Refresh |
To refresh the report results. |
|
Include Archive |
This menu item is not available in all reports. It operates as a checkbox. When checked, the report also includes items from the archive, if any. Otherwise, the report only includes non archived items. |
|
Save as Template |
To save the current search criteria and column configuration as a template. You will be prompted to enter a template name and to specify whether the template is public or private. Ⓘ [NOTE: You can enter a description for the template in the "Template Description" field before saving the template] A user is only able to use public report templates, or private report templates that the user has created. Private report template names appear in gray. Note that you can also view and edit report templates using Configuration > Reporting & Risk > Report Templates. |
|
Load Template |
To load search criteria from a template. You will be prompted to enter a template name. You can only load public templates or private templates that you have created. |
|
Delete Template |
To delete a template. You will be prompted to enter a template name. You can only delete templates that you have created. |
|
Set Default Template |
To save the current search criteria and column configuration as the default template. You will be prompted to enter a template name and to specify whether the template is public or private. A user is only able to use public report templates or private report templates that the user has created. Private report template names appear in gray. Note that you can also view and edit report templates using Configuration > Reporting & Risk > Report Templates. The default template will be loaded by default when you open the report. |
|
Load Default Template |
To load the default template. |
|
Close |
To close the report window. |
9. Data Menu
The menu items of the Data menu are described below.
|
Menu Items |
Description |
||||||||||||
|
Configure Columns |
To open the Selector window that allows you to select what columns you want to display, and to specify the order in which you want to display the columns. Column names are grouped by broad categories.
|
||||||||||||
|
Configure Sort |
To open the Choose sort column window that allows you to select sort columns and the sort order. Only columns that have been selected for display can be used for sorting.
|
||||||||||||
|
Configure Grouping |
Only applicable when sort columns have been specified. To open the Choose Subheadings window that allows you to select subheadings among the sort columns. |
||||||||||||
|
Subtotals > Configure Subtotals |
Only applicable when sort columns have been specified. To open the Choose Subtotals window that allows you to select columns for which you want to compute subtotals. The subtotals can be configured on any column but the subtotals will be computed at the grouping levels. Ⓘ [NOTE: In order for the subtotals to be properly computed, the columns selected for sorting and the columns selected for grouping must be in the same order] |
||||||||||||
|
Subtotals > Configure Functions |
Only applicable when subtotals have been specified. To open the Subtotal Functions window that allows you to specify what function to use to compute the subtotals. By default, the Sum function is used but you can select from Average, Constant, Count, Maximum, Minimum, or WeightedAverage. Constant takes the first non null-value and sets it at the aggregation level. For WeightedAverage, select the column by which to weight the average. Only columns displayed in the report can be selected.
If those functions are not available, you can add them to the domain "REPORT.Functions". You can also add custom functions. Refer to the Calypso Developer’s Guide for details. Sample Weighted Average To illustrate the calculations, take the following scenario: Trade 1: Fee Nominal = 1,000,000; Fee Rate = 5 Trade 2: Fee Nominal = 1,000,000; Fee Rate = 5 Trade 3: Fee Nominal = 10,000,000; Fee Rate = 4 The simple average of the Fee Rates would be: (5+5+4) / 3 = 4.667 Weighting the average by the Fee Nominal will give the following result: [(1M*5) + (1M*5) + (10M*4)] / (1M + 1M + 10M) = 4.167 |
||||||||||||
|
Totals > Configure Totals |
To open the Choose Totals window that allows you to select columns for which you want to compute totals. The totals will appear at the bottom of the report. |
||||||||||||
|
Totals > Configure Functions |
Only applicable when totals have been specified. To open the Total Functions window that allows you to specify what function to use to compute the totals. By default, the Sum function is used but you can select from Average, Constant, Count, Maximum, Minimum, or WeightedAverage. Constant takes the first non null-value and sets it at the aggregation level. For WeightedAverage, select the column by which to weight the average. Only columns displayed in the report can be selected.
If those functions are not available, you can add them to the domain "REPORT.Functions". You can also add custom functions. Refer to the Calypso Developer’s Guide for details. |
||||||||||||
|
Configure Totals Formatting |
Only applicable when subtotals or totals have been specified. To open the “Totals and Subtotals Formats” dialog that allows you to specify the number of decimal places and the format of negative numbers.
|
||||||||||||
|
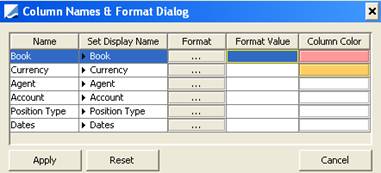
Set Column Names |
To open the Report Column Names window that allows customizing the column names.
The formatting of negative numbers set here overrides the default format set in the environment property NEGATIVE_AMOUNT_DISPLAY, if any.
|
||||||||||||
|
Set Report Title |
To set a custom report title. You will be prompted to enter a report title. The report title will appear on the report window. |
||||||||||||
|
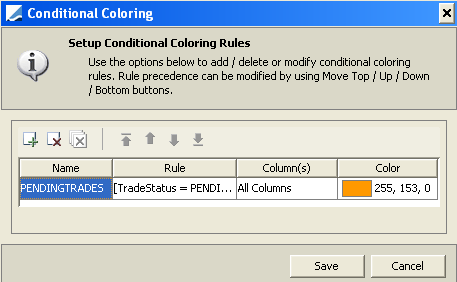
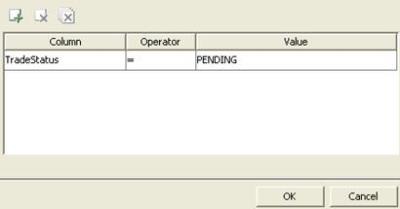
Set Conditional Colors |
To set color coding on rows or on individual cells. You will be prompted to define rules and select colors.
Click In this example, the rule will apply to all trades with STATUS = PENDING.
|
||||||||||||
|
Set Holidays |
To select holiday calendars for the start and end dates of the report. |
||||||||||||
|
Calendar |
To specify whether the start and end dates are calendar days (choose Calendar > Calendar) or business days (choose Calendar > Business). |
||||||||||||
|
Clear All Table Filters |
To clear filters specified at the column level.
|
||||||||||||
|
Auto Load |
This menu item operates as a checkbox. Check to automatically load the results for the default template, if specified, when the report is opened. This is particularly useful for reports that are automatically opened when the Calypso Navigator is started, as specified in the window layout.
|
||||||||||||
|
Explode Trade |
This menu item operates as a checkbox. Check to display separate rows in the report for components of a trade. For example, the report has separate rows for the near leg and far leg of an FX Swap trade. |
||||||||||||
|
Invert to Pair Pos Ref |
This menu item operates as a checkbox. Check to convert all trades to the position reference currency pair. This applies to trades that were captured using the inverse currency pair. The report will show only one position for the currency pair. Otherwise, the report will show positions in reference currency pair and in inverse currency pairs. |
 See
See
10. View Menu
The menu items of the View menu are described below.
|
Menu Items |
Description |
||||||||||||||||||||||||
|
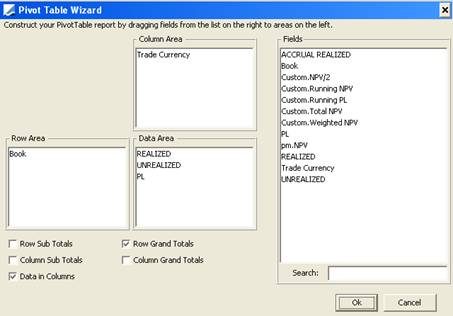
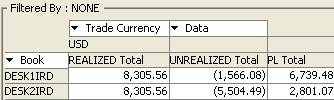
Set Table > Pivot |
To specify aggregations across rows and columns. The Pivot Table Wizard will appear. Note that the Fields area only contains columns that have been selected for display using Data > Configure Columns.
Columns Sample Output
Rows Sample Output
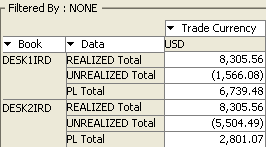
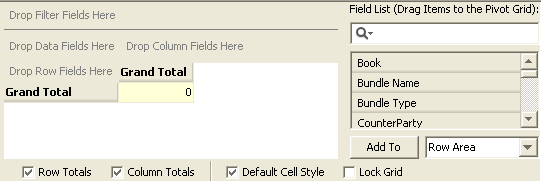
Jide Pivot Grid Instead of using the Pivot Table wizard, you can use the Jide Pivot Grid (shown below) – For this, you need to set the environment property USE_JIDE_PIVOT_GRID to true.
You just need to drag and drop fields from the right-hand side to the appropriate area on the left. This type of pivot table supports in particular export to Excel (Ctrl+O) as a pivot table. When you use the Jide Pivot Grid (USE_JIDE_PIVOT_GRID=True), you can add report types to the domain “ReportTypeUsingCalypsoPivotTable”. These reports will use the Calypso Pivot and not the Jide Pivot, even though you have elected to use the Jide Pivot by default. You can find the available report types in the domain “REPORT.Types” – Example: Trade, Message, Transfer, etc. |
||||||||||||||||||||||||
| Set Table > Table |
To display the results in a standard table. |
||||||||||||||||||||||||
|
Set Table > Aggregation |
To display the row aggregation based on the selected subheadings. Subheadings are selected using Data > Configure Grouping. |
||||||||||||||||||||||||
|
Views > Table > Load View |
To load the color configuration and table configuration from a table view. You will be prompted to select a table view. |
||||||||||||||||||||||||
|
Views > Table > Save View |
To save the current color configuration and table configuration as a table view. You will be prompted to enter a table view name. |
||||||||||||||||||||||||
|
Views > Table > Delete View |
To delete a table view. You will be prompted to select a table view. |
||||||||||||||||||||||||
|
Views > Table > Set Default View |
To save the current color configuration and table configuration as the default table view. You will be prompted to enter a table view name. The default table view will be loaded by default when you open the report. |
||||||||||||||||||||||||
|
Views > Table > Use Zebra Striping |
This menu item operates as a checkbox. Check to display every other row in a different color, or clear otherwise. The colors are actually set using View > Views > Table > Set Report Color Values. |
||||||||||||||||||||||||
|
Views > Table > Use Update Colors |
This menu item operates as a checkbox. Check to use the Edit color for manually modified prices, and the Up and Down colors when the pricing sheet is running in real-time. The colors are actually set using View > Views > Table > Set Report Color Values. This checkbox currently applies to the Fixed Income Workstation only. If “Use Update Colors” is checked:
If “Use Update Colors” is not checked:
|
||||||||||||||||||||||||
|
Views > Table > Set Report Color Values |
To open the Report Colors dialog that allows setting colors for the following items:
|
||||||||||||||||||||||||
|
Views > Table > Set Fixed Columns |
You will be prompted to enter the number of columns that should stay static when scrolling horizontally. |
||||||||||||||||||||||||
|
Views > HTML > Set View |
To select an HTML view to be used when you export the results to HTML. You will be prompted to select a view name. Note that most reports offer a default view that you can modify. |
||||||||||||||||||||||||
|
Views > HTML > Unset View |
To unselect the selected view. The default HTML view will be used when you export the results to HTML. |
||||||||||||||||||||||||
|
Views > HTML > Configure View |
To configure an HTML view. The HTML Report View Configuration window will appear.
HTML templates come from the domain “REPORT.Templates”.
The default HTML template is You can create an HTML template using a number of keywords. The list of Report Template Keywords are available under Help > Report Template Keywords.
Ⓘ [NOTE: Changes to resources have to be re-deployed to your application servers. Please refer to the Calypso Installation Guide for details] |
||||||||||||||||||||||||
|
Views > HTML > Delete View |
To delete an HTML view. You will be prompted to select a view name. |
||||||||||||||||||||||||
| Show Frame > Book Hierarchy |
This menu item operates as a checkbox. Check to display the Book Hierarchy panel, or uncheck to hide it. The Book Hierarchy panel allows filtering by book hierarchy. |
||||||||||||||||||||||||
| Show Frame > Criteria |
This menu item operates as a checkbox. Check to display search criteria, or uncheck to hide search criteria. |
||||||||||||||||||||||||
| Show Frame > Progress |
This menu item operates as a checkbox. Check to display the Progress panel, or uncheck to hide it. The Progress panel displays log information. |
||||||||||||||||||||||||
| Show Frame > Layout |
You can save the layout of the window, load an existing layout, or reset the layout, as needed. |
11. Export Menu
The menu items of the Export menu are described below.
|
Menu Items |
Description |
||||||
|
HTML |
To export the results to an HTML page using the selected HTML template. You can use the environment property DOCUMENT_FONT to determine the character font. It is Arial by default. By default, the HTML contains template information. You can set environment property GENERATE_HTML_PARAMS to false to remove template information from the HTML. |
||||||
|
Excel |
Only available if environment property ENABLE_DEPRECATED_EXCEL_EXPORT = true. To export the results to an Excel spreadsheet (.xls format). Ⓘ [NOTE: The character encoding defaults to UTF-8 – You need to set the environment property DOCUMENT_CHAR_ENCODING to a different value to use a different character encoding. It is however recommended to use UTF-8] You can use the environment properties EXPORT_DATETIME_PATTERN and EXPORT_DATE_PATTERN to format the date and time in Excel. Examples:
You can also use the environment property DOCUMENT_FONT to determine the character font. It is Arial by default. |
||||||
| ExcelX |
To export the results to an Excel spreadsheet (.xlsx format) and color the document header in grey. |
||||||
|
CSV |
To export the results to a text file. |
||||||
|
|
To export the results to a PDF file. You can use the environment property PDF_DOCUMENT_FONT to set the font name to be used for PDF generation. Default is Helvetica. Please refer to Calypso Environment Properties documentation for details. You can use the environment property PDF_TEMP_FILE_CHOOSE_PATH to choose the location of the PDF file. When set to true, the user can choose the location of the PDF file. It is false by default, in which case the PDF files are stored under You can define the number of columns to display on 1 page in the PDF export in environment property PDF_EXPORT_REPORT_MAX_COLUMNS. It defaults to 5 if not set. By default, the PDF creates pages in A4 format. PDF settings are defined in the file resources/com/calypso/templates/xhtml2fo.xsl. This file applies to all PDF exports (reports and advice documents). You can customize the PDF settings for advice documents in a file called resources/com/calypso/templates/<template_name>.xsl. You can customize the PDF settings for report in a file called resources/com/calypso/templates/report.xsl. You can modify the following settings: <xsl:param name="page-width">auto</xsl:param> <xsl:param name="page-height">auto</xsl:param> <xsl:param name="page-margin-top">0.7in</xsl:param> <xsl:param name="page-margin-bottom">0.7in</xsl:param> <xsl:param name="page-margin-left">0.5in</xsl:param> <xsl:param name="page-margin-right">0.5in</xsl:param> By default, the PDF contains template information. You can set environment property GENERATE_PDF_PARAMS to false to remove template information from the PDF. By default, the PDF contains report information (report type, valuation date, etc.). You can set environment property GENERATE_PDF_HEADER to false to remove report information from the PDF. |
||||||
|
IOK |
This function is no longer supported. |
12. Market Data Menu
The Market Data menu only appears if a pricing environment is needed by the report.
The menu items of the Market Data menu are described below.
|
Menu Items |
Description |
||||||
|
Pricing Env |
Opens the Pricing Env window. |
||||||
|
Reload |
Reloads the Pricing Env currently selected: definition and market data as of the current valuation date and time. |
||||||
|
Check |
Opens the Checking Pricing Env window that checks if all required market data are available in the Pricing Env. This window shows missing quotes, missing pricers, and missing market data items (curves and surfaces).
|
||||||
|
Quotes |
Displays all quotes currently used to compute the results. |
||||||
|
Check Past Resets |
Checks if reset rates are specified for past resets. |
13. Utilities Menu
The menu items of the Utilities menu are described below.
|
Menu Items |
Description |
||||||||||||
|
Export Template |
To export the current template to an XML file, so that it can be imported into another Calypso environment. You will be prompted to select a report type, a report template, and enter an XML file name. This feature should mainly be used for layout configuration, and not for search criteria. If the template contains specific search criteria like a specific legal entity, you have to make sure that the same legal entity exists in the environment where you will import the template. Otherwise, the import will not work. |
||||||||||||
|
Import Template |
To import a template from an XML file. You will be prompted to select an XML file. |
||||||||||||
|
Export View |
To export a table view or an HTML view to an XML file, so that it can be imported into another Calypso environment. MIME types hare handled using Configuration > Messages & Matching > MIME Types.
|
||||||||||||
|
Import View |
To import a table view or an HTML view from an XML file. You will be prompted to select an XML file. |
14. Popup Menu
A popup menu appears when you right-click a row on a report. The menu items of the popup menu are described below.
|
Menu Items |
Description |
|
Configure Columns Configure Sort Configure Grouping Subtotals Totals Configure Totals Formatting Set Column Names Set Conditional Colors Set Holidays Calendar Clear All Table Filters |
See Data Menu. |
|
Use Zebra Striping Set Report Color Values Set Fixed Columns |
See View Menu. |
|
Action > action |
To apply an action to the selected row. The available actions depend upon the workflow and the status of the selected row. |
|
Show > Default Selection |
To specify what item will be shown by default when you double-click a row. You will be prompted to select between different items based on the type of report (trade, transfer, posting, message, audit, etc.). |
|
Show > item |
To display an item related to the selected row (trade, transfer, posting, message, audit, etc.). The list of available items is based on the type of report. |
|
Process |
A Process submenu or <report type> submenu is available for certain reports. See the report-specific sections for details. |
15. Selecting a Row / Cell
By default, when you click a row in the report results, it selects the whole row.
If you add the report type to the domain “REPORT.CellSelection”, cells are selected instead of rows, and can be copied / pasted.
16. Drilldown Capability
When you double-click a row in a report, the item selected under Popup menu > Show > Default Selection will appear.
You can also choose Show > item from the popup menu to display an item related to the selected row (trade, transfer, posting, message, audit, etc.).
The list of available items is based on the type of report.
17. Column Filters
When you right-click a column heading, you can specify filtering on the column. For example, you want to display only PENDING trades. So you set a filter on the Trade Status column.
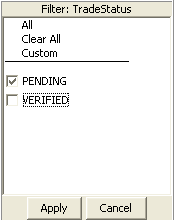
Once a filter has been set, (F) will appear in the column heading as shown.

You can clear all filters specified at the column level using Data > Clear All Table Filters.
Ⓘ [NOTE: If the report type is added to the domain "disableReportTableFiltering", column filtering will be disabled – Report types are defied in the domain “REPORT.Types” – The following reports CANNOT be removed from domain "disableReportTableFiltering": Account, FundStrategy, IndustryHierarchy, LegalEntity, Strategy, and StrategyAttribute, but you can add more reports to that domain]