Generating Account Fees
The Cash Management activity requires invoicing of Nostro / Client accounts:
| • | Management Fees relating to account transactions |
| • | Management Fees on account positions |
Account Fees Flow
Account billing events are generated by the scheduled task ACCOUNT_BILLING based on actual account positions and account billing configurations. The Billing engine subscribes to account billing events to generate account management fees (billing trades) based on billing grids and fee billing rules.

Viewing Billing Trades
 You can view billing trades using the Billing Fee Report.
Before you Begin
An account can generate fees if the account has the “Billing” checkbox checked.
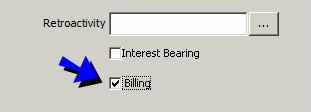
Sample account definition
The ACCOUNT_BILLING scheduled task will only process accounts for which the Billing checkbox is checked.
You can set a default book for billing trades in the legal entity attribute "FUNDING BOOK" of the legal entity that pays / receives the fee (broker, counterparty, agent, etc.).
Billing Trade Workflow
Billing trades follow the standard trade workflow. However, make sure that the AMEND action is available, as new billing fees will be added to the same trade during the billing period, and the billing trade will therefore be amended. Also, it is recommended to move the billing trade to a status that can no longer be amended at the end of he billing period.
Authorizing Billing Grids
In order for the Authorization mode to apply to billing grids, you need to add “BillingGrid” to the domain “classAuthMode”.
1. Defining a Billing Grid
The billing grid allows automating the fee calculation for accounts.
From the Calypso Navigator, navigate to Configuration > Fees, Haircuts & Margin Calls > Fee Set Up (menu action refdata.FeeSetUpWindow), and select the Billing Grid panel.
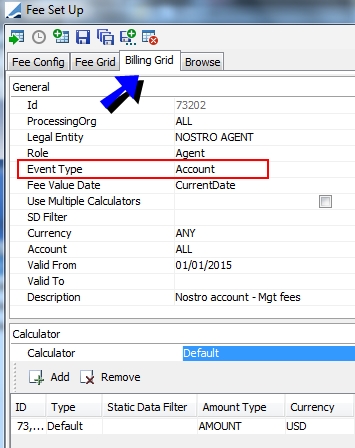
Sample billing grid for account fee
| » | Enter the fee application criteria as needed and select the event type for which the fee will be generated: Account (account management) or MaintenanceTrade (account transaction) |
Enter the validity dates of the grid - They apply to the selected "Fee Value Date" of the related object.
The “Fee Value Date” determines which date on the billing event should be used to select the Billing Grid, the Billing Rule, and to set the value date on the billing trade.
By default, it can be set to the following values: CurrentDate (Today), or CustomDate (if the Fee Value Date of the billing event has been customized) – You can add more types of dates to the domain “billingAccount.feeValueDates”.
Fill in the Description field to describe the grid. This field is mandatory.
You can check "Use Multiple Calculators" to generate a fee for each applicable calculator. Otherwise, a fee is generated only for the first applicable calculator.
| » | Select a calculator (Default or FeeConfig), and click Add to define the calculator. |
| – | For the Default calculator, the fee will be computed based on the amount defined here. |
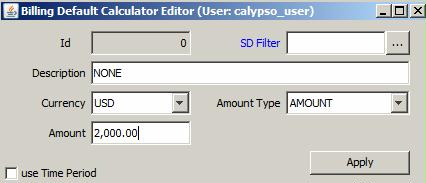
Enter a description and an amount. The amount can be signed: "-" means the PO pays the fees, "+" means the PO receives the fee.
You can check "use Time Period" to select a date rule to generate the fee.
Then click Apply.
| – | For the FeeConfig calculator, the fee will be computed based on the fee defined in the Fee Config panel. |
See Defining Account Fees for details on defining invoice fees.
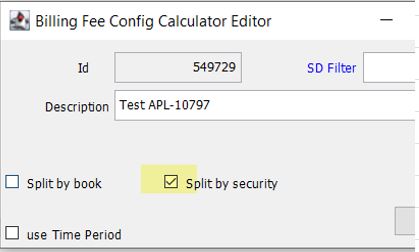
You can check the "Split by book" checkbox to allocate the fees to the original books, and click Apply.
You can check the "Split by security" checkbox to allocate the fees based on the security which is split by each security, and click Apply.
| » | Save the billing grid. |
Note that if the Authorization mode is enabled, an authorized user must approve your entry.
2. Defining Account Fees
The Fee Config panel of the Fee Set Up window allows defining fees for the FeeConfig calculator in the context of billing fees. When the FeeConfig calculator is set on the Billing Grid, the fee config is used to compute the fee.
2.1 Fee Definition
Define the fee using Configuration > Fees, Haircuts, & Margin Calls > Fee Definition (menu action trading.FeeDefinitionWindow).
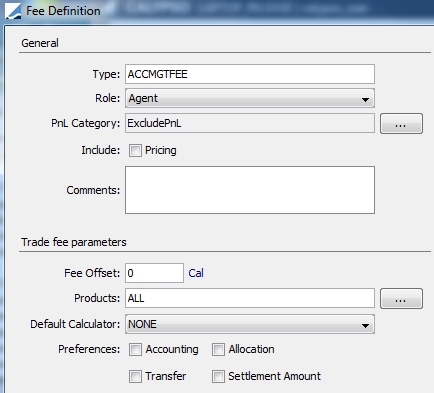
Make sure that you set the proper role. It should be Agent or Client.
2.2 Fee Definition
From the Calypso Navigator, navigate to Configuration > Fees, Haircuts, & Margin Calls > Fee Set Up (menu action refdata.FeeSetUpWindow) to open the Fee Configuration window.
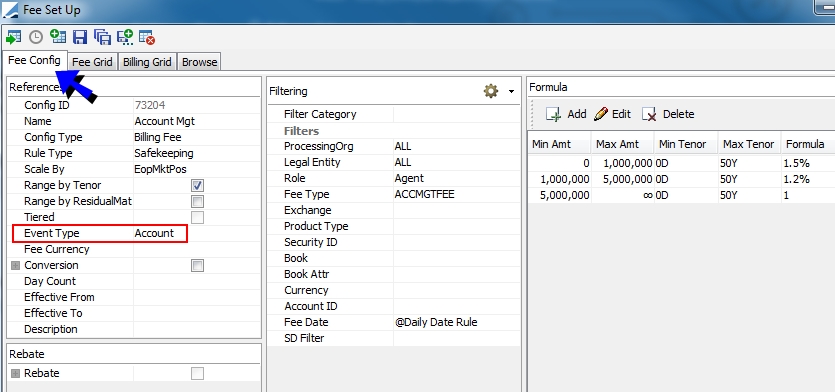
Sample account fee config
| » | Enter a configuration name and set the fee parameters as needed. They are described below. |
| » | Then click Add to add an entry to the fee. It brings up the Formula Definition dialog. It is described below. |
| » | Click  to save the configuration. The configuration will be used when the FeeConfig calculator is set on a Billing Grid, based on the selected filters. to save the configuration. The configuration will be used when the FeeConfig calculator is set on a Billing Grid, based on the selected filters. |
Note that if the Authorization mode is enabled, an authorized user must approve your entry.
You can also click  to bring up the Browse panel for loading existing configurations.
References
These parameters are used to compute the fee.
| Fields | Description | |||||||||||||||
|---|---|---|---|---|---|---|---|---|---|---|---|---|---|---|---|---|
|
Config ID |
ID of the configuration given by the system upon saving. |
|||||||||||||||
|
Name |
Enter a configuration name. |
|||||||||||||||
|
Config Type |
Select "Billing Fee" to generate invoice fees. |
|||||||||||||||
|
Rule Type |
Select the reference amount unit:
Ⓘ [NOTE: These rules only apply to account management fees generated by the ACCOUNT_BILLING scheduled task on inventory positions] |
|||||||||||||||
|
Scale By |
Select the reference amount of the fee:
|
|||||||||||||||
| Range by Tenor |
Check to set the fee range by tenor, or clear to set the fee range by number of days. |
|||||||||||||||
| Range by ResidualMat |
Check to set the fee range by residual maturity, or clear to set the fee range by product. |
|||||||||||||||
|
Tiered |
Only applies to Maintenance fees. Check to indicate that the reference amount is distributed over the range, rather than applied to the absolute range. For example, you have the following range:
The reference amount is 7,000.
|
|||||||||||||||
|
Event Type |
Select the event type:
Ⓘ [NOTE: MaintenanceTrade events are only generated in the context of the Clearing module - They rely on trade keywords specified in the Clearing module - Refer to Calypso Clearing documentation for details] |
|||||||||||||||
|
Fee currency |
You can select a fee currency, or leave empty for ANY. |
|||||||||||||||
| Conversion |
Check if you want to convert the fee using the FX rate at the end of the billing cycle. It is converted using the fee date FX rate otherwise. For computing the converted fee at the end of the billing cycle, you need to run the scheduled task EOD_REBATE_FEE.
Select the pricing environment for loading the FX rates. If not set, the pricing environment defined in the Billing engine will be used. |
|||||||||||||||
| Day Count |
Select a daycount as needed. |
|||||||||||||||
|
Effective From |
Enter the effective start date of the configuration. |
|||||||||||||||
|
Effective To |
Enter the effective end date of the configuration (optional). |
|||||||||||||||
|
Description |
Enter a free form description as needed. |
Rebate
Not applicable for account fees.
Filtering
These parameters are used to determine the conditions of application of the fee. You can use pre-defined filtering criteria, or a filter template.
Pre-defined criteria:
| Fields | Description |
|---|---|
|
Processing Org |
Select a processing organization as needed, or ALL. |
|
Legal Entity |
Select a legal entity of specified role, or ALL. |
|
Role |
Select a role. |
|
Fee Type |
Enter the fee type - The fee type must be defined in the Fee Definition window. |
|
Exchange |
Select one or multiple exchanges (legal entity of role MarketPlace), or leave empty for ALL. |
|
Product Type |
Select one or multiple product types, or leave empty for ALL. |
|
Security ID |
Enter one or multiple product IDs (separated by commas), or leave empty for ALL. |
|
Book |
Select one or multiple books, or leave empty for ALL. |
|
Book Attr |
Select one or multiple book attribute / attribute value, or leave empty for ALL. |
|
Currency |
Select one or multiple currencies, or leave empty for ALL. |
|
Account ID |
Only applies to account management fees. |
|
Fee Date |
Only applies to account management fees. |
|
Calc Period End Date |
It is a Date Rule only applies to Rule Type: Safekeeping and CashSafekeeping. When populated, the amount is computed from the previous date before the current value date. |
|
SD Filter |
Select a static data filter as needed, or leave empty. |
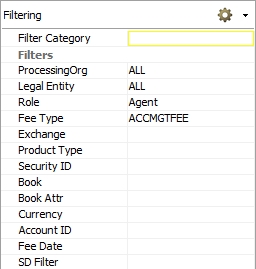
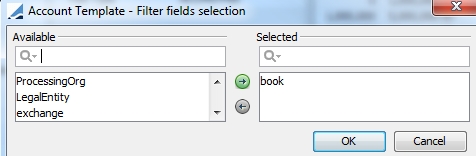
Filter template:
| » | To add a new filter template, choose |
| » | Then choose |
| Fields | Description |
|---|---|
|
Filter Category |
Select a filter template previously created. |
|
Role |
Select a role. |
|
Fee Type |
Enter the fee type - The fee type must be defined in the Fee Definition window. |
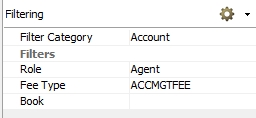
|
Filter Template Criteria |
Select the values for the filter criteria defined in the filter template. In this example, the filter template contains the filter criteria Book. |
Formula Definition
Click Add to bring up the Formula Definition dialog.
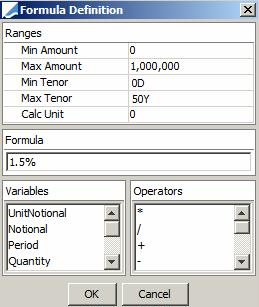
Sample formula
| » | Enter the parameters to define the ranges of the fee. They are described below. |
| » | You can type in the formula, or double-click variables and operators to add them to the formula. Only the displayed variables and operators can be used in the formula. |
| » | Click OK when you are done. |
| Fields | Description |
|---|---|
|
Min Amount Max Amount |
Enter the minimum and maximum amounts of the range. It refers to the reference amount defined by the Rule Type and Scale By parameters: Count, Notional, AvgMktPos, or EopMktPos. No value is considered as 0 for the minimum amount, and infinite for the maximum amount. The minimum amount is inclusive. The maximum amount is non inclusive. |
|
Min Tenor Max Tenor Min Days Max Days |
You can also select a minimum tenor and a maximum tenor to scale the fee rates by product maturity ("Range by ResidualMat" is not checked), or by residual maturity ("Range by ResidualMat" is checked). Ⓘ [NOTE: For products without maturity date, the fee rates are scaled by settlement date instead] The minimum tenor is inclusive. The maximum tenor is non inclusive. If "Range by Tenor" is not checked, you can enter a number of days instead of selecting a tenor. |
|
Calc Unit |
Enter a calculation unit when defining a fee expressed as an amount per unit. For example 2 per million of notional: Calc Unit = 1000000 and Formula = 2*UnitNotional. |
|
Variables |
You can use the following variables in the formula depending on the selected reference amount: Quantity, Price, ContractSize, FaceValue, UnitNotional, Notional, ConvNotional (Trade Notional converted to fee currency), Markup, Count, AvgMktPos, EopMktPos, CumulPos. AvgMktPos only takes business days into account. The Markup allows setting a markup percentage per legal entity. You can define the legal entity attribute "Client Markup" and set a markup percentage on the attribute. For example, Client Markup = 120 for 120%. The Markup variable in the formula will be multiplied by 120%. The CumulPos is the cumulated balance from the business days of calculation period start date until current value date, quoted at current value date. |
|
Operators |
You can use the following operators in the formula: Subtract(-), Multiply (*), Add (+), Divide (/), Absolute Value, Max, Min, Round, Round Up, Round Down. Ⓘ [NOTE: If the fee is always paid, the formula should be defined as an absolute value] |
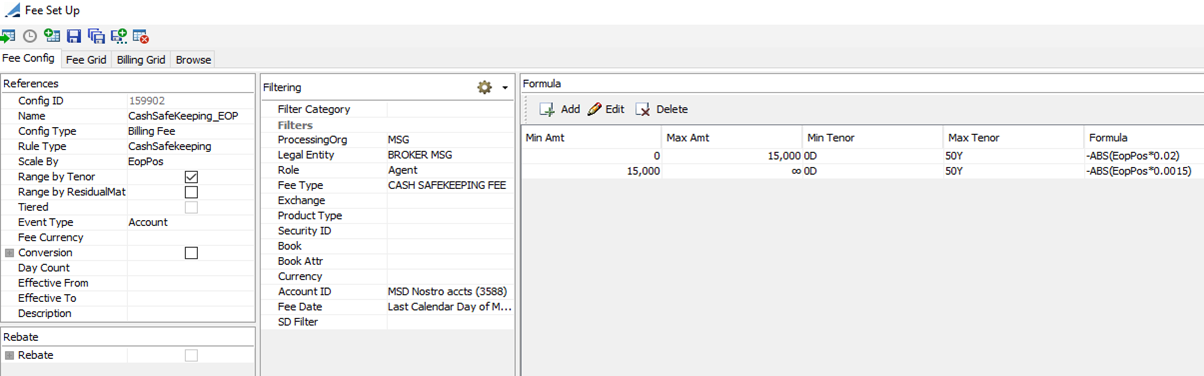
Sample Fee Config for Cash Position
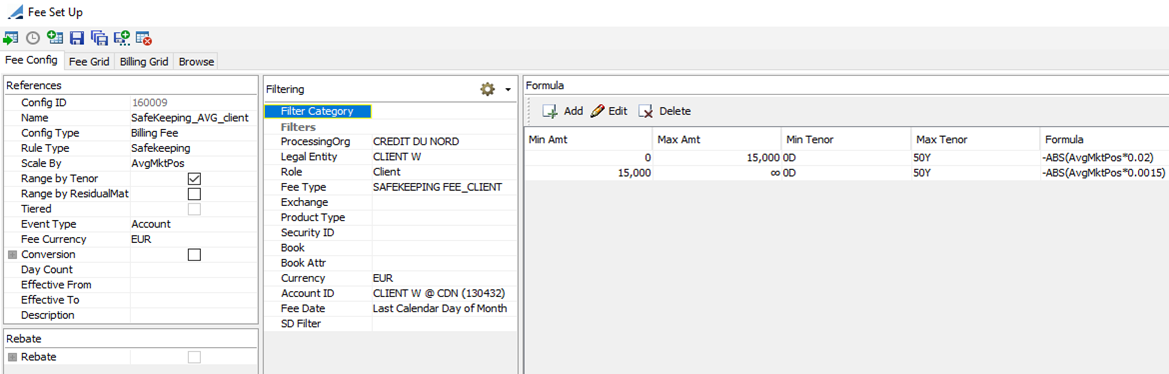
Sample Fee Config for Client Position
3. Defining a Fee Billing Rule
The billing rule allows defining the billing frequency, and a billing threshold if needed.
Define the Billing rules using Configuration > Fees, Haircuts & Margin Calls > Fee
Billing Rule from the Calypso Navigator (menu action refdata.FeeBillingRuleWindow).
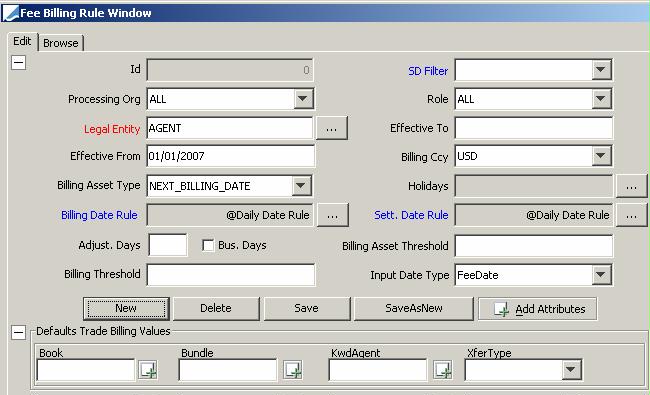
Sample billing rule for account fee
| » | Enter the following fields: |
| – | Select a legal entity, or double-click the Legal Entity label to set the legal entity to ALL. |
| – | Select the same role as in the billing grid. |
| – | Select the billing currency or ANY. |
| – | Select the billing date rule to determine the billing frequency. |
| – | Select the settlement date rule to determine the settlement frequency of the fee. |
| – | Select the transfer type of the billing trade as needed. If not set, the transfer type is set to INTEREST. Note that transfer types are defined in domain “flowType”. |
Ⓘ [NOTE: If the attribute EntryType is set, and the Default Transfer Type is not set, the transfer type defaults to the EntryType]
| » | You also need to define the following attributes - This only applies if you have selected the FeeConfig calculator in the Billing Grid. |
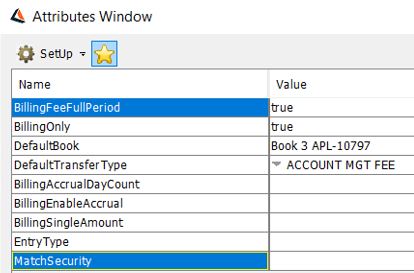
| – | BillingOnly - Set to True so that it is only used for billing trades. |
| – | EntryType - Set to the fee type ,"ACCMGTFEE" for example. |
| – | XferByBook - Set to True to create a transfer by book. |
| – | BillingFeeFullPeriod - Set to True to have a single billing fee. |
| – | MatchSecurity - Set to True to create a new billing trade when the Security Id is different. This is applicable only when 'split by security' is selected. |
| » | Save the billing rule. |
4. Generating Account Fees
The Billing engine is used to generate the billing fees.
4.1 Billing Engine Configuration
The Billing engine is configured in the Engine Manager of Web Admin: event subscription and engine parameters.
You may need to add this engine if it is not available for configuration: Create a new engine called BillingEngine, with class name com.calypso.engine.billing.BillingEngine.
The Billing engine can subscribe to the following events: PSEventAccountBilling and PSEventMaintenanceTrade – This type of event is generated by the ACCOUNT_BILLING scheduled task for accounts that have the Billing checkbox checked.
The behavior of the Billing engine may be modified with the following engine parameters.
If a parameter is not available for setup, you can register it in the domain "engineParam".
|
Parameters |
Description |
|
BILLING_NOAMEND_EXCEPTION |
True or false. Default is true. When set to false, no exception is generated when the AMEND action is not available on the workflow of the existing Billing trade. |
|
IGNORE_ACTION |
Comma-separated list of trade actions to be ignored by the engine. |
|
MAX_BATCH_EVENT |
Maximum number of persistent events loaded at one time by an engine in batch mode. The engine will load events in MAX_BATCH_EVENT chunks until all events are processed. Persistent events received after MAX_QUEUE_SIZE is reached will be processed in batch mode. Allows controlling engine memory usage, therefore improving the performance. |
|
MAX_QUEUE_SIZE |
Maximum number of events buffered on an engine event queue. When this number is exceeded, real time events are discarded and the engine restarts based on the restart timer (TIMEOUT_RESTART), in order to process the unprocessed persistent events using batch mode. This parameter can be useful for controlling the engine’s memory usage. If not set, the default value for this parameter is no limit on queue size. Allows controlling engine memory usage, therefore improving the performance. |
|
PricingEnv |
Pricing environment used by the engine. If not set, the default Pricing Environment of the user running the engine will be used. |
|
TIMEOUT_RESTART |
Number of seconds to wait before an engine restarts after MAX_QUEUE_SIZE has been reached. The default value is 3600 seconds (1 hour). |
4.2 Starting the Billing Engine
The Billing engine can be started from the Engine Manager in Web Admin.
Please refer to Calypso Web Admin documentation for complete details.
4.3 Generating Account Billing Events and Billing Fees
Account billing events and trade maintenance events are generated by the scheduled task ACCOUNT_BILLING.
From the Calypso Navigator, navigate to Configuration > Scheduled Tasks (menu action scheduling.ScheduledTaskListWindow), and select the type ACCOUNT_BILLING.
Select a trade filter, a user, a pricing environment, and a processing organization.
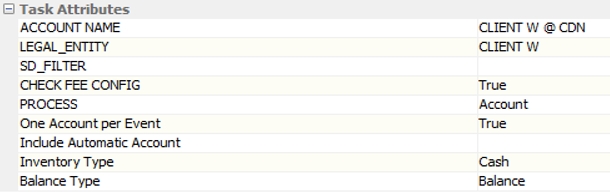
| » | Enter the attributes below as applicable: |
| – | ACCOUNT NAME – Enter the account name to reduce the scope of the Scheduled Task or leave blank. |
| – | LEGAL_ENTITY – Enter the Legal Entity short name to reduce the scope of the Scheduled Task or leave blank. |
| – | SD_FILTER – Select a specific SD Filter to reduce the scope of the Scheduled Task. Note that this SD Filter currently works only if you specify data directly related to the account definition. |
| – | CHECK FEE CONFIG - Select true to check if you have specified fee configuration for account fees, or false otherwise. |
| – | PROCESS - Only applies if CHECK FEE CONFIG is true - Select Account to generate account billing events, or Maintenance Trade to generate trade maintenance events. |
| – | Inventory Type - Select Cash or Security. |
For Cash, the fee should have Rule Type = CashSafekeeping.
| – | Balance Type - Enter the balance type as needed. |
| » | Save and run the scheduled task. |
Ⓘ [IMPORTANT NOTE: The Billing engine should be running in order for the billing fees to be generated]
From the Calypso Navigator, navigate to Processing > Accounting Operations > Billing > Trade > Open to view billing trades. It opens the trade selector. Click Show Trades to view all billing trades. Double-click a trade to view its details.
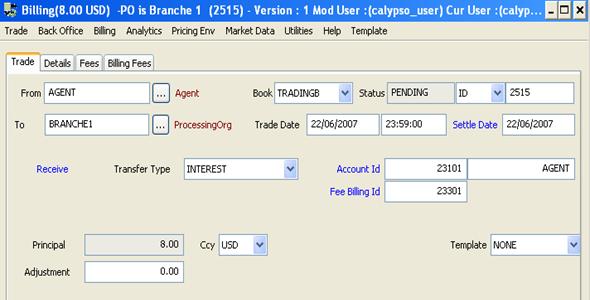
You can view the details of the fees in the Billing Fees panel.
4.4 Conversion Process
Conversion entries are generated using the scheduled task EOD_REBATE_FEE .
The conversion process converts the fee using the FX rate at the end of the billing cycle.
The scheduled task EOD_REBATE_FEE must be run daily. It retrieves the billing trades for which the end date falls on the scheduled task valuation date.
The system creates new billing entries of type REBATE to book the difference between the billing fee amount originally computed and the billing fee amount computed at the end of the period, once the actual FX rate is known. There is one REBATE billing entry per trading book.
You can set the book attribute "Rebate Book" on the book of the original billing trade to book the rebate fee in the rebate book. If this book attribute is not set, the rebate fee is booked in the same book as the original billing trade.

Sample EOD_REBATE_FEE scheduled task setup
You need to set the following attributes:
| • | Contract Fee = False. |
| • | Process = Conversion |
| • | APPLY ACTION - It is possible to specify the action to be applied in the scheduled task. For example, the billing trade could stay in PENDING status during the billing period and move to VERIFIED status once the rebate is computed, if any. This could be achieved by setting the action to AUTHORIZE for example. |
| • | LegalEntity - You can enter a legal entity ID as needed. |