Capturing Customer Transfers
The Customer Transfer trade window allows capturing trades on call accounts.
Call Accounts are defined in the Account window.
 See Defining Call Accounts for details.
You can capture a customer transfer trade from the Account window for a call account, by clicking Customer Transfer. You can also add the Customer Transfer trade window to the menu using the menu action trading.TradeCustomerXferWindow.
1. Before you Begin
Default Customer Transfer Window
The Customer Transfer window is not the default trade window for customers transfers.
To define this window as the default window for customer transfers, you need to add the following to your trade window configuration using Configuration > User Access Control > Trade Window from the Calypso Navigator.
Load your trade window configuration, or create one if you don't have any.
Add an entry for Product Type = CustomerTransfer, Product Sub Type = ALL, and Complete Class Name = trading.TradeCustomerXferWindow.
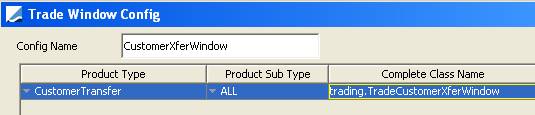
Save the trade window configuration, and associate it with your Calypso user name under Configuration > User Access Control > User Defaults in the Trade Window Config field.
This way, when you open a customer transfer trade from a Trade Browser or any other report, it will bring up the Customer Transfer window instead of the default window.
Access Permissions
The following panels are controlled by access permissions:
| • | ViewCustXferPoSettlementPanel - Permission to display the PO Settlement Details panel |
| • | ViewCustXferXCCYPanel - Permission to display the Xccy Details panel. |
| • | ViewCustXferAdditionalPanel - Permission to the Additional Details panel |
Clearing the Customer Transfer Window upon Saving
You have the option to clear the Customer Transfer window after a trade is saved so that no unwanted modification can be applied.
To activate this option, navigate to Configuration > User Access Control > User Defaults from the Calypso Navigator, and check "Clear Trade After Save".
2. Sample Customer Transfer Trade
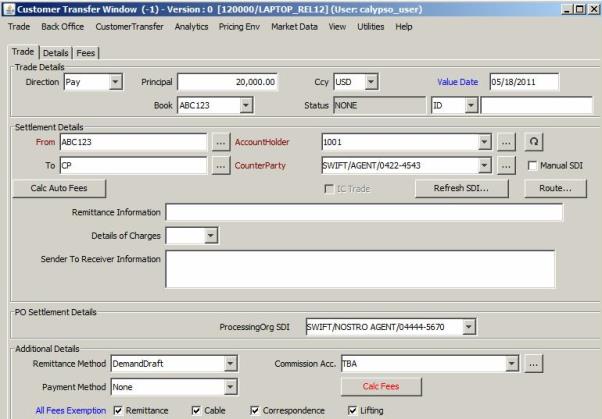
| » | Enter the fields described below, then proceed to the other panels as needed. |
| » | Choose Trade > Save to save the trade (or hit F5). |
| » | You can display and hide panels using the View menu items. |
Fields Details - Trade Details
| Fields | Description | ||||||
|---|---|---|---|---|---|---|---|
|
Direction |
Pay or Receive.
The "client" role is the role set in domain "AccountHolderRole". |
||||||
|
Principal |
Enter the amount to be transferred. The Principal is the default transfer amount. You can set the transfer amount to the calculated settlement amount (including fees) by setting Value = CalcSettlementAmount in the domain “CustomerTransfer.TransferAmount”. |
||||||
|
Ccy |
Displays the account currency. |
||||||
|
Value Date |
Enter the theoretical Settlement Date of the transfer. If you double-click the Value Date label, the date defaults to Trade Date + Currency Spot Days. If you want to allow settlement on a non-business day, add the product type CustomerTransfer to the domain "AllowNonBusinessSettleDate". |
||||||
|
Book |
It displays the trading book associated with the call account and cannot be modified. |
||||||
|
Status |
Displays the current status of the trade. The status is automatically assigned by the system based on the workflow configuration. The status will change over the lifetime of the trade according to the workflow configuration and the actions performed on the trade. |
||||||
|
ID Ext Ref Int Ref |
Unique identification number of the trade. The trade id is automatically assigned by the system when the trade is saved. You can load an existing trade by typing the trade id into this field, and pressing [Enter]. You can also display the internal reference of external reference. The default trade reference to be displayed can be selected in the User Defaults. The internal reference and external reference can be set in the Details panel of the trade. |
Fields Details - Settlement Details
| Fields | Descirption | ||||||||||||
|---|---|---|---|---|---|---|---|---|---|---|---|---|---|
|
From / To "client" |
The From / To labels and roles are set based on the trade direction.
The "client" role is the role set in domain "AccountHolderRole". |
||||||||||||
|
"client" SDI |
Displays the list of valid call account SDIs for:
SDIs are displayed according to the following logic:
Additional Functions You can click ... to bring up the SDI window. You can click You can click Refresh SDI to update the list of valid SDIs. You can click Route to display the SDI Route between the PO and the CounterParty for the Nostro Transfer. |
||||||||||||
|
To / From (Counterparty) |
The To / From labels and roles are set based on the trade direction. They are opposite to the "client" directions. If a manual SDI is used to settle that transfer, the counterparty is taken from the manual SDI's beneficiary. |
||||||||||||
|
(Counterparty) SDI |
Displays TBA by default. To display the list of valid SDIs for the counterparty, you need to set Comment = false for Value = CUST_XFER_TBA_BENEFICIARY in domain "AccountSetup". SDIs are displayed according to the following logic:
Additional Functions You can click ... to bring up the SDI window. You can click Refresh SDI to update the list of valid SDIs. You can click Route to display the SDI Route between the PO and the CounterParty for the Nostro Transfer. |
||||||||||||
|
Manual SDI |
You can check "Manual SDI" to define a manual SDI for that trade, if the counterparty is not yet defined in the system, and/or specific settlement instructions should be used. The following information will be taken from the manual SDI: counterparty (manual SDI's beneficiary), remittance information, details of charges, and sender to receiver information. It brings up the Cash Manual SDI window. Ⓘ [NOTE: The Cash Manual SDI window requires some setup before it can be used]
|
||||||||||||
|
Remittance Information |
This field defaults to the counterparty's SDI attribute "Remittance_Information". You can add it to the domain "sdiAttribute" if not available for selection. Then you will be able to populate a value for that attribute by going on the counterparty's SDI. This information can be modified as applicable. It is stored in the transfer attribute "RemittanceInfo", and populates Tag 70 in the MT103 message triggered by the transfer. If a manual SDI is used to settle that transfer, the system will use the Remittance Information from the manual SDI instead. |
||||||||||||
|
Details of Charges |
This field defaults to the counterparty's SDI attribute "Details_Of_Charges". You can add it to the domain "sdiAttribute" if not available for selection. Then you will be able to populate a value for that attribute by going on the counterparty's SDI. This information can be modified as applicable. It is stored in the transfer attribute "ChargeInfo", and populates Tag 71A in the MT103 message triggered by the transfer. If a manual SDI is used to settle that transfer, the system will use the Details of Charges from the manual SDI instead. |
||||||||||||
|
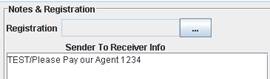
Sender to Receiver Information |
This field defaults to the counterparty's SDI "Notes & Registration" field, as shown below:
The possible values must be stored in domains "MT202CodeTag72" and "MT103CodeTag72". This information can be modified as applicable. It is stored in the transfer attribute "SenderInfo", and populates Tag 72 in the MT103 (or MT202) message triggered by the transfer. If a manual SDI is used to settle that transfer, the system will use the Sender to Receiver Information from the manual SDI instead. |
Fields Details - PO Settlement Details
| Fields | Description |
|---|---|
|
ProcessingOrg SDI |
If this panel is not displayed, the system will default the PO SDI based on trade details (counterparty SDI, currency, priority, etc.) using the standard Calypso algorithm. If displayed, it allows a user to select a ProcessingOrg SDI different from the default proposed by the system for the Nostro Transfer associated with the Customer Transfer. If the domain "AccountSetup" contains Value = CUST_XFER_CHECK_PO_SDI and Comment = true, only SDIs associated with the selected Book’s PO are available for selection. |
Fields Details - Xccy Details
This panel should be used only if the settlement currency is different from the trade currency.
| Fields | Description |
|---|---|
|
Settle Method |
Defaults to "Same Ccy": settlement currency = trade currency. You can also select FX or CONT. FX The settlement currency is different from the trade currency and the FX rate is retrieved from an FX rate definition. Select the settlement currency and the FX rate definition. FX rate definitions are created using Configuration > Foreign Exchange > FX Rate Definitions from the Calypso Navigator. CONT The settlement currency is different from the trade currency and the FX rate is manually entered or retrieved from an existing FX trade. Select the settlement currency and enter the FX rate. You can also select an FX trade and the FX rate will be retrieved from that trade. The trade should be an FX Forward with the client as counterparty. |
Fields Details - Additional Details
These fields are used to compute fees in the context of wire transfers.
The following fees must be setup: REMITTANCE, CABLE, CORRESPONDANCE, and LIFTING, with the CounterParty role and the CustomerTransfer default calculator. Fees are defined using Configuration > Fees, Haircuts, & Margin Calls > Fee Definition from the Calypso Navigator.
You can click Calc Fees to compute the fees when the information is entered. The fees are added to the Fees panel as shown in the example below.

| Fields | Description |
|---|---|
|
Remittance Method |
Select the remittance method to be confirmed in paper messages: "DemandDraft", "MailTransfer", "TelegraphicTransfer", "Repayment", "IntradayRepayment". The CABLE fee will only be calculated for TelegraphicTransfer. Available values come from domain "remittanceType". |
|
Commission Acc. |
Select the SDI to be used for the fees. |
|
Payment Method |
Select the payment method to be confirmed in paper messages: "None", “Advice and Pay”, or “Pay on Application” to indicate when the fees will be paid. |
|
All Fees Exemption |
By default, all fees are exempted, see “All Fees Exempted”. Clear any of the fee checkboxes to compute the corresponding fee. You can also double-click the “All Fees Exemption” label to clear all checkboxes. |
Fields Details - Main Keywords
If you want to display trade keywords in this panel, you need to add the trade keywords to domain "PanelMainKeywords" provided they are also defined in domain "tradeKeyword".

3. Pricing a Customer Transfer
Click Price to price the trade.
You can display the following pricer measures using Customer Transfer > Configure Results.
| • | ACCRUAL_IB: Accrual on the Call Account - Based on Interest Bearing trade created for that account/period - Does not take into account the current customer transfer trade. |
| • | THEO_POS: Theoretical Position on the Call Account selected for that trade. This comes from the inventory position computed by the Inventory engine for that Account. It does not take the new movement when not saved yet, and takes it into account as soon as it is saved. This pricer measure can also be displayed in the Trade Browser for a call account. |
| • | ACTUAL_POS: Actual Balance on this Call Account. This comes from the inventory position computed by the Inventory engine for that Account. It does not take into account the movement (the Actual Position depends on transfer statuses set in domains "transferFailedStatus" OR "transferSettledStatus"). This pricer measure can also be displayed in the Trade Browser for a call account. |
| • | FWD_POS: Expected Theoretical balance on this call account. We have a difference between the forward and the theoretical position in case the customer transfer trade has not been saved yet. This difference equals the principal of the customer transfer trade not yet saved. Once saved, THEO_POS = FWD_POS. |
4. Generating Transfers
A Customer Transfer trade on a Call Account generates two transfers: a client transfer and a Nostro transfer.
![]()
In the BO Browser the "NostroFlag" checkbox allows viewing only the Nostro transfers. It is checked by default.
You can change the default value by setting environment property TRADECUSTOMERXFERWINDOW_BOBROWSER_NOSTROCHECK = false. In this case, the NostroFlag checkbox is unchecked by default.
See Defining Call Accounts for information on settlement and delivery instructions requirements.
Client Transfer
One client transfer between the call account and the processing org - It uses the client SDIs associated with the call account upon saving for the role defined in domain "AccountHolderRole", and the settlement method defined in domain "AccountSettleMethod" (or Direct if not set), and the corresponding SDIs on the processing org.
The client transfer is used to:
| • | Impact the Client inventory position computed by the Inventory engine |
| • | Maintain an Accounting Balance by Call Account for Asset/Liability and Reclassification postings |
| • | Trigger the Account Statements |
| • | Check the limits on Call Accounts |
| • | Generate Interest Bearing Trades by Call Account at Book Level, the Call Account being attached to a Book. |
Sample client inventory position:

Nostro Transfer
One Nostro transfer between the processing org and the trade's counterparty (the client or a third party).
| • | When the payment is done from Customer1/DDA-CallAccount1 held internally by the PO to Customer1/Account2 also hold internally by the PO (internal transfer of money from one account to another one held at PO) – Customer1 being a LE defined with the Role Customer (in our example) and CounterParty – the system will match the Internal PO SDI (bearing the PO Nostro) with the Internal SDI defined for the customer but with the Role CounterParty, that SDI not having any DDA set on it. Please note that the “Internal” CounterParty SDI is created with SDI description = Call Account Name/Id. |
| • | When the payment is done from Customer1/DDA-CallAccount1 held internally by the PO to Customer1/Account3 hold by another Agent (different from the PO), the system will match the “External” (SWIFT/…) settle method PO SDI with the External (same Settle Method SWIFT/…) defined for the CounterParty, that SDI not having any DDA set on it. |
| • | When the payment is done from Customer1/DDA-CallAccount1 held internally by the PO to a ThirdParty, the system will match the “External” (SWIFT/…) settle method PO SDI with the External (same Settle Method SWIFT/…) defined for the CounterParty, that SDI not having any DDA set on it. See Case 3 below. Most of time, in this cases, the user will have to set a Manual SDI directly from the CustomerTransfer Trade Screen/Flag Manual SDI, the ThirdParty settlement instructions not being already saved in Calypso as standard SDI. For more details regarding Manual SDI, please look at the Manual SDI section of that document. |
The Nostro transfer is used to:
| • | Trigger Payment Messages (MT202/103/210) |
| • | Impact the Nostro inventory position computed by the Inventory engine |
| • | Settlement postings for the processing org |
Nostro Only
In order to only display the Nostro impact of a Customer Transfer trade on a Call Account, the checkbox "NostroFlag" has been added to the Filter window of the Transfers panel in BO Browser for Customer Transfer trades.
To view the DDA transfer attached to a Customer Transfer, you need to clear the "NostroFlag" checkbox. This transfer is shown from the PO viewpoint (convention used is PAY PO = RECEIVE CLIENT and vice-versa) as stated below:
4.1 Impact on InventoryPosition
The inventory position filters the PO view of the Client position. Thus, you will see:
| • | The Nostro Position (triggered by the Nostro transfer attached to the Customer Transfer) when using the Position Type = Internal. |
| • | The Client Position (triggered by the DDA Transfer attached to the Customer Transfer) when using the Position Type = Client. |
4.2 Task Station
There are different configuration possibilities to view transfers in the Task Station, depending on which exceptions should be monitored.
Using the Task Internal Reference
In order to isolate DDA Transfers from the Task Station (considering a user only monitors by default the Nostro transfers) you could add a specific tab in the Task Station to isolate the tasks related to DDA transfers. This tab may be needed for some users (tab will be set for their Task Station configuration) and hidden for others using the task internal reference function available to define the Task Station layout.
To do so, define the following filters:
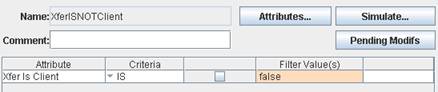
Then From the Calypso Navigator, navigate to Configuration > Workflow > Task Internal Reference and define the following task internal ref:

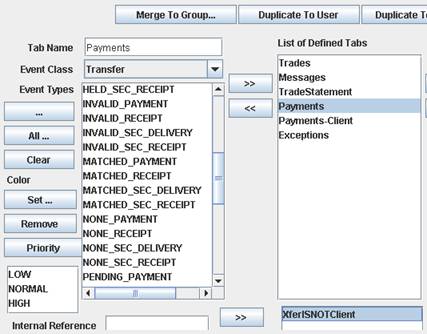
Then, go to the Task Station > Configure > User Config and define one panel for NOSTRO Payments (XferISNOTClient) and one panel for DDA Payments (XferISClient).
To do so, first name your tab (Payments), choose the Event Class = Transfer, select the Transfer statuses to be taken and enter in the Internal Reference text field the name of the Static Data Field XferISNOTClient set in the Task Internal Reference and use >> to select only these transfers in that tab, as shown below:
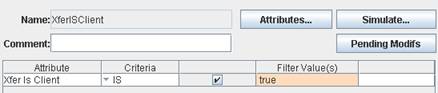
Then redo the same sequence for DDA transfers, selecting in the Internal Reference field of the Task Station the Static Data Filter XferISClient, as shown below:
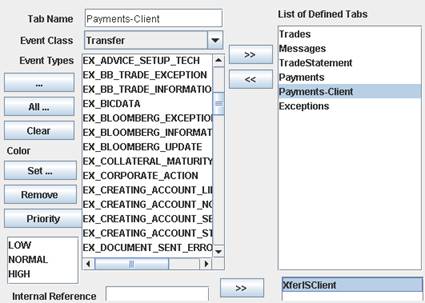
The result of such a configuration is to show exceptions/tasks related to Nostro transfers in the Payments tab of the Task Station and the exceptions/tasks related to the DDA transfers in the Payments-Client. If some group of users must not checked anything on DDA transfers, the best would be to display only the tab Payments for this group.
Using the Transfer Workflow
Another possibility to filter the DDA transfer related tasks in the Task Station is to avoid creating task for this type of transfer by defining a specific workflow for DDA transfers without any task required on the related actions. This is feasible using the transfer workflow subtype, DDA transfer being identified by the system as "XferIsClient".
To do so, you would need to refer to the same Static Data Filters XferISClient and XferISNOTClient defined above.
Then, go to the domain values and select the domain XferWorkflowType. Add the transfer workflow subtypes referring to your SD Filter, matching the SD Filter name: XferISClient and XferISNOTClient as shown below:
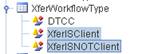

Then, come back to your Transfer workflow and define:
| • | A workflow for NOSTRO Transfers (referring to the Transfer SubType XferISNOTClient): |

| • | A workflow for DDA Transfers (no task) referring to the Transfer SubType XferIsClient: |

Applying Actions to DDA Transfers
You can use the transfer workflow rule "SettleLinkedDDA" to automatically apply the action SETTLE on the DDA Transfer of a customer transfer trade when the NOSTRO Transfer attached to that Trade moves to SETTLE.
| • | If you are using one global transfer workflow for DDA and Nostro, put that rule on the SETTLE action of your global transfer workflow. |
| • | If you are using one transfer workflow for NOSTRO (XferISNOTClient) and another one for DDA (XferISClient), add that rule on the SETTLE Action of your NOSTRO Transfer workflow (for example). |
Alternatively, you can use the LifeCycle engine to automatically apply the following actions applied to the NOSTRO Transfer to the DDA Transfer: Settle, Unsettle, Split, Unsplit, PartialSettle.
See Generating Transfers for information on the LifeCycle engine.
SetAccountMvtDate Workflow Rule
This rule sets the "last movement date" on an account, each time the account is debited / credited. This rule can be set on the SETTLE action in the DDA transfer workflow.
It is used by the Dormant process to determine if an account is active or dormant.
Additional TAGS Update
You can configure the UPDATE_TAGS action to modify the additional tags (70-71-72).
Set up the transition VERIFIED - UPDATE_TAGS - VERIFIED on the NOSTRO transfer workflow. This action will bring up the following window:
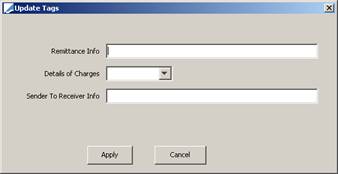
The fields are filled in with default values (if any) coming from the counterparty standard SDI. Modify the default values as needed and click Apply. The values are saved as XferAttributes and used in the payment message. If a user applies the action UPDATE_TAGS again, then the default values are the one stored as XferAttributes.
5. Generating Penalty Fees
You can automatically generate penalty fees on customer transfer trades if the account holder does not give enough notice days when withdrawing cash from a call account.
5.1 PENALTY_FEE Definition
Define first the PENALTY_FEE in the fee definition window.
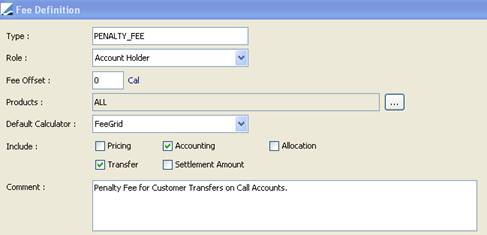
You need to use the FeeGrid calculator and define a fee grid as follows.
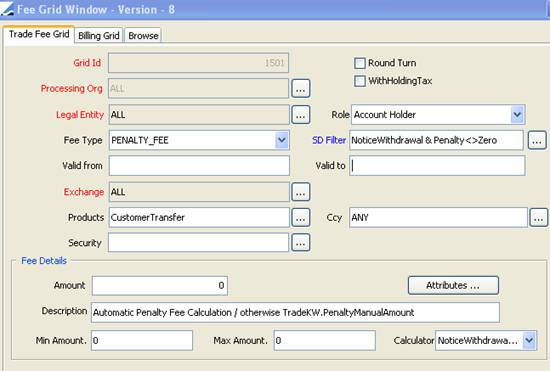
You need to use the NoticeWithdrawalPenalty calculator.
5.2 Fee Generation
The PENALTY_FEE will be generated if the trade workflow rule AutomaticFees is set on the NEW action of the Customer Transfer trades.
The fee calculator NoticeWithdrawalPenalty checks if enough notice days have been given by the account holder (provided the notice days are set on the call account). If not, it retrieves the trade keyword "Penalty_ManualAmount" if any, and sets this amount on the PENALTY_FEE, else the amount is the one returned by the below formula. In any case, the value date of the fee is the value date of the withdrawal and the beneficiary is the Processing Org.
Formula: Penalty amount = Withdrawal amount * ((Notice Days - [ValueDate - TradeDate])/ CcyDayCount ) * Account Interest Rate.