Viewing Balances
You can view the results of balance computations using Reports > Accounting Reports > Account
Balance (menu action reporting.ReportWindow$Balance).
The Account Balance report shows the account balances of accounts that allow balance generation ("Balance" checkbox checked, and balance frequency specified).
Account balances are calculated using the BALANCE scheduled task based on the postings generated by the accounting engine, or using the Balance engine.
 See Computing Balances for details.
You can also view posting details between balances using Reports > Accounting Reports > Balance Activity.
See Balance Activity Report for details.
The date of the account balance will depend on the balance frequency.
1. Sample Balance Report
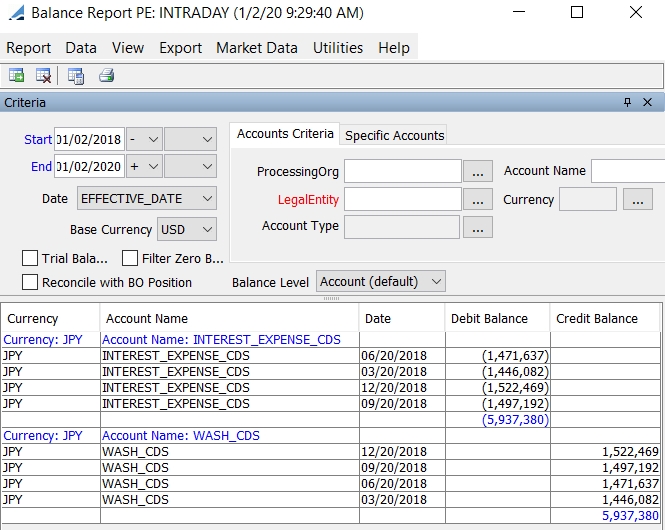
Ⓘ [NOTE: The columns of this picture have been configured. Sort columns, subheadings and subtotals have to be explicitly specified. See Help > Menu Items for details]
| » | You can change the pricing details at the bottom of the window - By default, the pricing environment comes from the User Defaults, and the valuation date is the current date and time. |
| » | You can check / uncheck View > Show Frame > Criteria to display / hide the search criteria. |
| » | Specify
search criteria as applicable and click |
Date - The effective date corresponds to the effective date of the balance (based on the balance frequency), and the booking date correspond to the date when the Balance scheduled task was actually executed.
You can select specific accounts using the Specific Accounts panel.
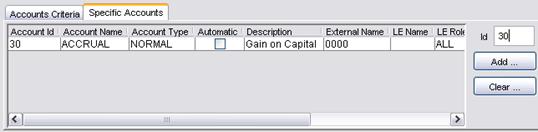
| – | You can enter an account id, or click Add to display the Account report that allows you to load accounts based on user-defined criteria. |
| – | You can select accounts based on account criteria using the Accounts Criteria panel. Note that when specific accounts are specified, account criteria will be ignored. |
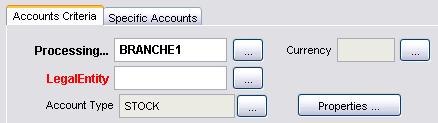
You can click Properties to specify search criteria on automatic account properties.
| – | Check the “Trial Balance” checkbox to show a balance for every day during the selected period. |
| » | Check the “Filter Zero Bal” checkbox to hide zero balances. |
| » | You can choose Report > Include Archive to include archived postings. |
| » | You can select a template and click |
| » | You can click |
Note that for the Pivot view and the Aggregation view, the print icon is disabled.
You can use [Ctrl+P] or [Ctrl+L] to print the report, or you can export the report to Excel and print it from there.
The column Account Name ID shows the account name and ID.

1.1 Balance at Trade Level
By default, the balance is shown at account level.
You can select the "Trade" or "Leg Direction" balance level to view the balance at the trade level / leg direction level.
In that case, additional search criteria become available.
The Trade Criteria panel allows selecting a trade filter:

The Specific Trades panel allows selecting individual trades.

Sample results by trade ID:

To view the balance per trade, you should add the Trade Id column to the display.
To view the balance per leg direction, you should add the Leg Direction column to the display - This only applies to FX swaps.
1.2 Balance Sign
By default credit account balances are displayed as positive values, and debit account balances are displayed as negative values.
In the event that debit account balances are required to be displayed as positive values and credit account balances to be displayed as negative values, the environment property USE_CREDIT_POSTING_AS_NEGATIVE (set to true) now applies to the balance report.
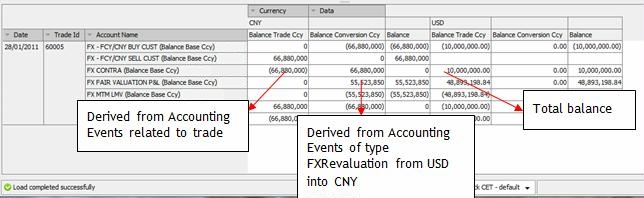
1.3 Balances in Base Currency
It is now possible to separate the balance coming from trade related activity and the balance coming from revaluation/conversion activity.
You need to select the columns Balance Trade Ccy and Balance Conversion Ccy.
| • | Balance Trade Ccy shows balance activity coming from accounting events related to the trade/transfer. |
| • | Balance Conversion Ccy shows balance activity coming from the FXRevaluation/FXTranslation processes as well as any other conversion processes. |
At the postings level, distinction to determine which postings will contribute to the Balance Trade Ccy and which to the Balance Conversion Ccy is made via the posting attribute ORIGINAL_CCY. All postings with this attribute set to the original currency (before conversion) will contribute to the Balance Conversion Ccy. This posting attribute is only set when then engine parameter CALC_BALANCE_POSITION_FXAMOUNTS is set to true.
Example of FX Spot trade where Base/Function Ccy = CNY
| • | Trade Date: 28 Jan 2011 |
| • | Settle Date: 01 Mar 2011 |
| • | Buy Ccy/Amount: USD 1,000,000 |
| • | Sell Ccy/Amount: CNY 66,880,00 |
| • | Rate 6.680 |
1.4 FX Spot Base Ccy Conversion
You can use the columns"Balance Conversion Ccy From <currency>" to breakdown conversion balances by originating contributing currencies. This is referred to as the breakdown of FX amounts.
These columns are dynamically created based on the availability of these amounts.
These amounts are computed by the following accounting events, when the engine parameter CALC_BALANCE_POSITION_FXAMOUNTS is set to true
| • | MTM_FX_PAY, MTM_FX_REC |
| • | REALIZED_PL_REC REALIZED_PL_PAY |
These accounting events need to be setup with the pricer measures NPV_FX_QUOTE and NPV_FX_BASE where NPV_FX_QUOTE is always for the secondary/quoted currency in the Currency pair and NPV_FX_BASE is always for the primary currency in the Currency pair.
The sum of these columns will be equal to "Balance Conversion Ccy".
2. Account Balance Report Results
You can click any column heading to sort the results based on that column.
You can right-click any row to invoke the functions of the report menus. Choose Help > Menu Items for details.
In order to generate the following types of reports, you need to define a hierarchy of accounts.
See Accounting Setup for Account
Balance for details.
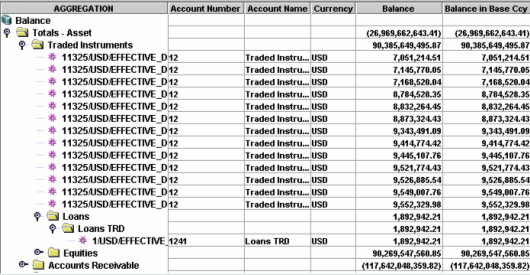
2.1 Balance Sheet
In order to view a Balance Sheet, the following configuration should be done.
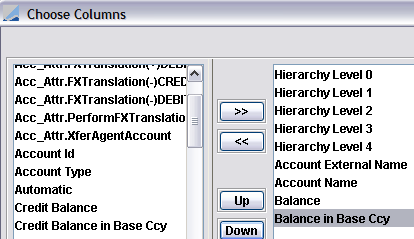
1. Choose Data > Configure Columns and select the following columns.
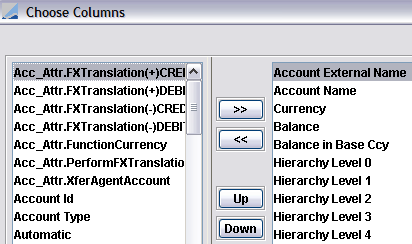
The hierarchy levels will reflect the account hierarchy that you have specified.
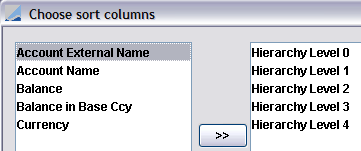
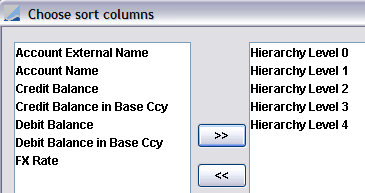
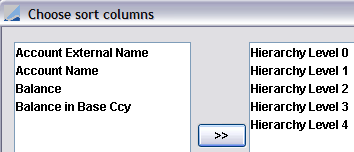
2. Choose Data > Configure Sort and select the following sort columns.
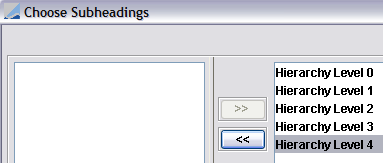
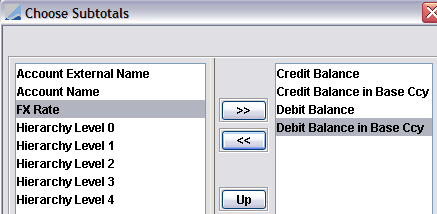
3. Choose Data > Configure SubHeadings and choose the following subheadings.
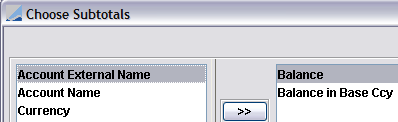
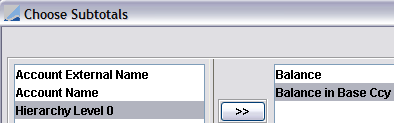
4. Choose Data > Configure Subtotals and choose the following subtotals.
5. You can also customize the column headings and the report title as applicable using Data > Set Column Names and Data > Set Report Title.
6. Choose View > Set Table > Aggregation to enable the aggregation feature.
7. Choose Report > Save As Template to save the configuration as a template. You will be prompted to enter a template name.
8. Run the report, it will appear as in the example shown below.
2.2 Trial Balance
In order to view a Trial Balance, the following configuration should be done.
1. Choose Data > Configure Columns and select the following columns.
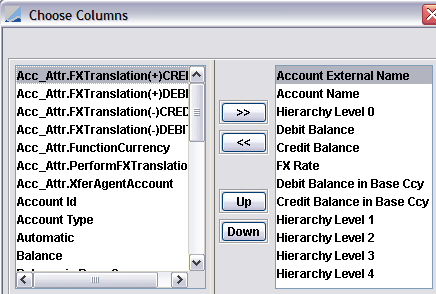
The hierarchy levels will reflect the account hierarchy that you have specified.
2. Choose Data > Configure Sort and select the following sort columns.
3. Choose Data > Configure SubHeadings and choose the following subheadings.
4. Choose Data > Configure Subtotals and choose the following subtotals.
5. You can also customize the column headings and the report title as applicable using Data > Set Column Names and Data > Set Report Title.
6. Choose View > Set Table > Aggregation to enable the aggregation feature.
7. Choose Report > Save As Template to save the configuration as a template. You will be prompted to enter a template name.
8. Run the report.
2.3 Income Statement
In order to view an Income Statement, the following configuration should be done.
1. Choose Data > Configure Columnsand select the following columns.
The hierarchy levels will reflect the account hierarchy that you have specified.
2. Choose Data > Configure Sort and select the following sort columns.
3. Choose Data > Configure SubHeadings and choose the following subheadings.
4. Choose Data > Configure Subtotals and choose the following subtotals.
5. You can also customize the column headings and the report title as applicable using Data > Set Column Names and Data > Set Report Title.
6. Choose View > Set Table > Aggregation to enable the aggregation feature.
7. Choose Report > Save As Template to save the configuration as a template. You will be prompted to enter a template name.
8. Run the report.
2.4 Off Balance Sheet
In order to view an Off Balance Sheet, the following configuration should be done.
1. Choose Data > Configure Columns and select the following columns.
The hierarchy levels will reflect the account hierarchy that you have specified.
2. Choose Data > Configure Sort and select the following sort columns.
3. Choose Data > Configure SubHeadings and choose the following subheadings.
4. Choose Data > Configure Subtotals and choose the following subtotals.
5. You can also customize the column headings and the report title as applicable using Data > Set Column Names and Data > Set Report Title.
6. Choose View > Set Table > Aggregation to enable the aggregation feature.
7. Choose Report > Save As Template to save the configuration as a template. You will be prompted to enter a template name.
8. Run the report.
3. Accounting Setup for Account Balance
From the Calypso Navigator, navigate to Configuration > Accounting > Accounts (menu action refdata.AccountFrame) to setup the
accounts as shown below.
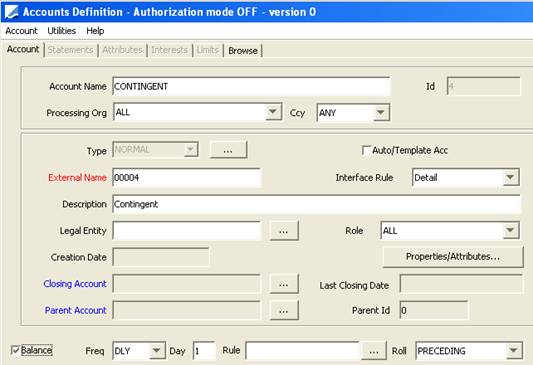
| » | Check the Balance checkbox, and select the balance frequency or click ... to select a date rule. Date rules are created using Configuration > Definitions > Date Rule Definitions. |
| » | Also, to take advantage of the aggregation feature which allows generating reports such as Trial Balance, Balance Sheet, Income Statement, and Off-Balance Sheet, you can create a hierarchy of accounts using the Parent Account field. |
For example, you can create a hierarchy such as:
Assets
| – | Short Term Assets |
Cash Nostro
Cash Nostro Futures
| – | Traded Instruments |
Equities Hedge Funds
Equities Hedge Funds MTM
| – | Accounts Receivable |
Liability
| – | Traded Instruments Short |
Bonds Short
Equities Short
Futures Short
| – | Account Payables |
etc.
For this, create each individual account of the hierarchy (Assets, Short Term Assets, Cash Nostro, Cash Nostro Futures etc.) then setup the hierarchy using the parent account as follows:
The parent account of Cash Nostro is Short Term Assets, the parent account of Cash Nostro Futures is Short Term Assets, the parent account of Short Term Assets is Assets, etc.
Note that parent accounts do not need to generate balances, only the lowest accounts in the hierarchy.
The Account Balance report handles up to ten levels of hierarchy.