Capturing Trade Fees
The Fees panel of a Trade window allows entering fees for the trade. It also shows contract fees that have been automatically computed based on a Fee Grid.
 See Defining Fees for details on defining fee types.
See Defining Automatic Contract Fees for details on setting up automatic fees.
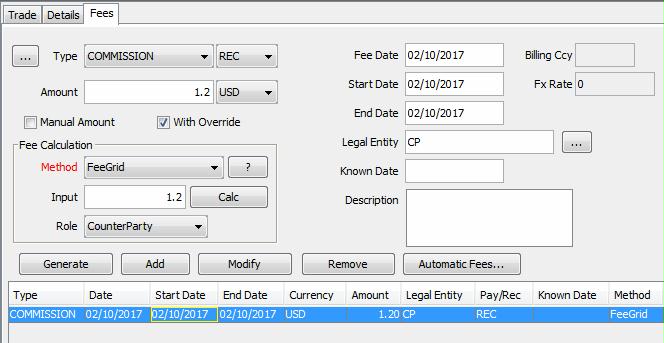
Sample fee capture
A number of fee types are provided out-of-the-box.
| » | Select a fee type from the Type field, or click ... next to the Type field to create a new fee type. The Fee Definition window will appear. |
| – | Select PAY or REC next to the fee type as applicable. This indicates whether the processing org pays or receives the fee to / from the recipient. |
| – | Select the payment currency of the fee from the field next to the Amount field. |
| – | Enter the payment date of the fee in the Fee Date field. |
The fee date defaults to trade date + spot days (from the fee currency) + fee offset (from the fee definition).
For automatic fees, the fee date can be overridden by the attributes of the fee grid.
See Defining Automatic Contract Fees for details on setting up automatic fees.
| – | Select the role of the fee recipient from the Role field, and click ... next to the Legal Entity field to select the fee recipient. You will be prompted to select a legal entity of specified role. |
If the fee LE role is the same as the trade counterparty LE role, when you click Add in the Fees panel, the fee legal entity will default to the trade counterparty, you do not need to select the fee legal entity.
Enter the other fields as applicable. The fee entry depends on the selected method as described below.
| » | Click Add to add a fee row, or click Generate to amortize the fee over a given period. |
When amortizing a fee, you will be prompted to enter a start date, an end date, and an amortization frequency.
Note that the amortization frequency should be at least the coupon frequency.
Click Apply to generate fee rows as applicable.
The PV column represents the fee present value. It will only be populated if the trade is priced, and if FEES_NPV is added to the pricer measures. Note that this currently only applies to interest rate derivatives and credit derivatives.
Ⓘ [NOTE: When the Broker Fee is removed from a trade, the user is prompted to remove the Broker field as well]
Fields Details
|
Fields |
Description |
|
Amount |
Enter the fee amount for a flat fee only (method NONE). Otherwise the amount will be calculated as described below. |
|
Method |
Select a fee calculation method, and enter an input (fee rate for example) as needed. Then click Calc to calculate the fee. Note that the NONE method does not require calculation. When defining a fee type, you can select a default fee calculator. Refer to the Calypso Developer’s Guide for information on adding custom fee calculators. You can click ? for information on a given method. |
|
Start Date End Date |
The Start Date and End Date will be set to the Fee Date unless you choose to amortize the fee over a given period. |
|
Known Date |
Allows you to enter a fee for a given date when you choose to amortize the fee over a given period. Enter a fee with a known date and click Add. A fee row will be added for that date. The known date must be between the start and end date. |
|
Description |
Enter a comment as applicable. |
Automatic Fees Computation
Provided you have configured automatic fees, you can click Automatic Fees to generate the fees before saving the trade.
They will be generated upon saving otherwise.
See Defining Automatic Contract Fees for information on defining automatic fees.
Automatic Fees Override
When viewing automatic fees, you can override the fee amount.
| » | Select an automatic fee and enter the modified amount in the Amount field. Then click Modify. The "Manual Amount" column will appear checked. |
| » | To prevent the fee from being automatically recomputed upon saving the trade, clear the Override column. |
| » | Save the trade. |
Configuring Fee Columns
You can configure the display of the fee columns using Back Office > Configure Fee Columns.