Data Grid for Risk Reports
This Desk Risk distributed cache system is used to improve the performance of Scenario-based Risk Analyses by caching and distributing shifted market data during an analysis run. Each Market Data Item perturbation and generation is only performed one time, cached in a central node, and then loaded again from this cache when required for Pricing by any trades/positions across the various grid calculators.
The following scheduled tasks can be run using the Data Grid:
| • | RISK_ANALYSIS - Automates the execution of an Analysis Set previously defined in the Risk Config to produce a system and/or an exported file. |
The Data Grid currently only supports the Sensitivity and MultiSensitivity reports for the types listed below.
| • | PL_GREEKS_INPUT - Computes first and second order derivatives of all applicable market data for use in Official P&L Explained by Greeks |
Sensitivity
|
Sensitivity Type |
Perturbation Type |
Sensitivity As/Shift Type |
|---|---|---|
|
Rates |
Underlyings |
Sequential/Single Sided |
|
Rates |
Underlyings |
Sequential/Double Sided |
|
Rates |
Underlyings - Includes Underlying Delta |
Sequential/Single Sided |
|
Rates |
Underlyings - Includes Underlying Delta |
Sequential/Double Sided |
|
Rates |
ParRates |
Single Sided |
|
Rates |
ParRates |
Double Sided |
|
Volatility/Rate |
Underlying Instruments |
Sequential |
MultiSensitivity
|
Sensitivity Type |
Perturbation Type |
Sensitivity As/Shift Type |
|---|---|---|
|
Rates |
Underlyings |
Sequential/Single Sided |
|
Rates |
Underlyings |
Sequential/Double Sided |
|
Volatility/Rate |
Underlying Instruments |
Sequential |
|
Data Grid Quick Reference To run a scheduled task on the Data Grid, follow the steps below. Step 1 - Configure the Data Grid. Step 2 - Set the Data Grid environment properties. Step 3 - Configure the reports and the scheduled tasks. Step 4 - Start the Data Grid Node, Dispatcher, Data Grid Enabled Calculators and Scheduler. The steps are described below. |
1. Configure the Data Grid
From the Calypso Navigator, navigate to Configuration > System >Grid Config Editor (menu action grid.GridConfigEditor) to open the Grid Config window.
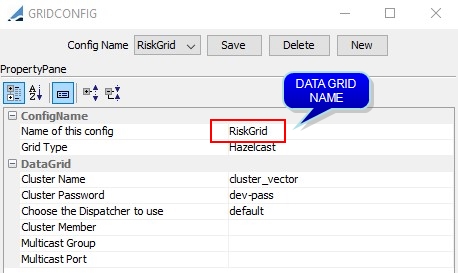
| » | Click New to create a configuration. |
| » | Populate the fields described below as needed and save the configuration. |
|
Fields |
Description |
| Name of this config | Enter the name of the Data Grid. |
|
Grid Type |
Select Hazelcast. |
|
Cluster Name Cluster Password |
Enter a cluster name and cluster password. The cluster members (nodes) and clients having the same cluster configuration (i.e. same cluster name and password) form a private cluster. |
|
Choose the Dispatcher to use |
Select the dispatcher configuration for the Data Grid. Ⓘ [NOTE: You need a dedicated dispatcher configuration for all data grid calculators]
|
| Cluster Member |
Enter a cluster member (optional). If no values are entered the Hazelcast client expects the DataGrid server to be running on the same machine as the client. |
|
Multicast Group |
You can use this field to override the default multicast group IP address. Values can be between 224.0.0.0 and 239.255.255.255. Default value is 224.2.2.3. |
| Multicast Port | You can use this field to override the default multicast socket port which Hazelcast member listens to and uses to send discovery messages. Default value is 54327. |
2. Set the Data Grid Environment Properties
The following environment properties are required to be set prior to running the Data Grid:
datagrid.impl = hazelcast
grid.config = <data grid config name> the name of the Data Grid Config previously defined
Example: grid.config = RiskGrid
3. Configure the Reports and the Scheduled Tasks
3.1 Sensitivity or Multi Sensitivty Report and RISK_ANALYSIS Scheduled Task
Follow the steps below.
Step 1 - Configure the Sensitivity or Multi Sensitivity report with Trades Per Job.
When defining the Sensitivity or Multi Sensitivity parameters in Analysis Designer, set the attribute “Trades Per Job” as needed to determine the number of trades distributed to the calculators.
 See also Product Weighting for more details on the number of trades per job.
Step 2 - Configure an Analysis Set in Risk Config.
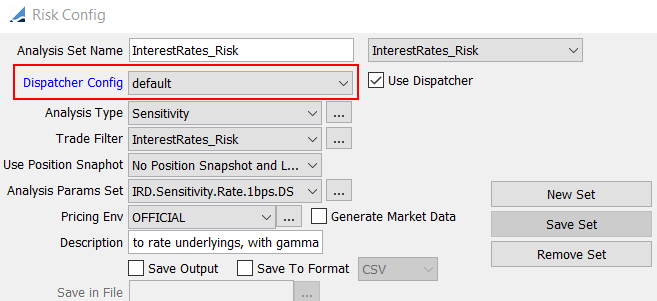
| » | Select the dispatcher config specified in the Data Grid Config. |
Step 3: Configure the scheduled task RISK_ANALYSIS.
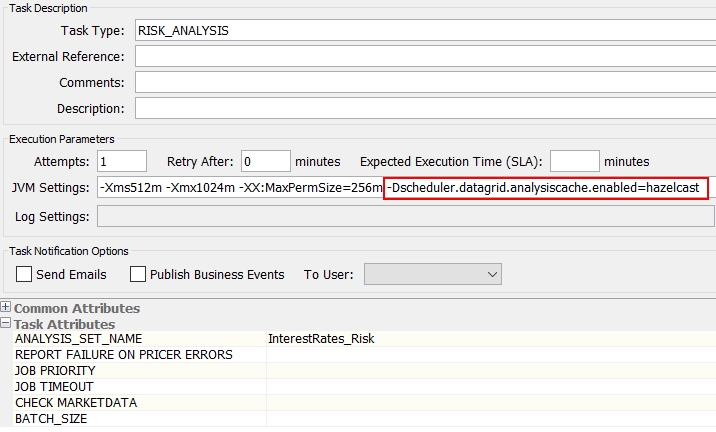
| » | Add the appropriate JVM setting: -Dscheduler.datagrid.analysiscache.enabled=hazelcast |
3.2 PL_GREEKS_INPUT Scheduled Task
Configure the scheduled task PL_GREEKS_INPUT.
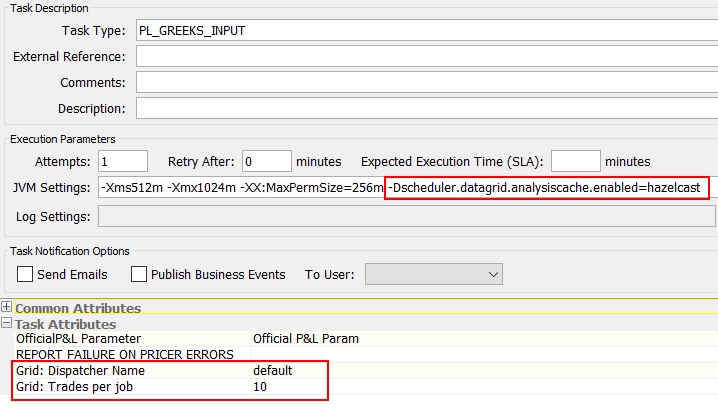
| » | Add the appropriate JVM setting: -Dscheduler.datagrid.analysiscache.enabled=hazelcast |
| » | Select the dispatcher config specified in the Data Grid Config. |
| » | Set the attribute “Trades Per Job” as needed to determine the number of trades distributed to the calculators. |
See also Product Weighting for more details on the number of trades per job.
3.3 Product Weighting
Since different Product Types typically have different computation times, a method is provided for assigning different “weightings” by Product Type. This weighting, as well as the number of trades per job specified in the parameter set, are used for splitting each risk report into the total number of jobs to be dispatched.
For example, if the weighting for Bermudan Swaptions is 10 and there are 50 Bermudan Swaptions in a portfolio, each will count as 10 trades - for a total of 500 “trades.” If the number of trades per job is set to 10, each Bermudan Swaption will be sent individually and it will take a total of 50 jobs to complete the Risk Analysis.
By default, the weightings for European style Swaptions and Cancellable Swaps is 5; Bermudan style Swaptions and Cancellable Swaps is 10.
These values are hardcoded but may be customized using a Calypso API.
Please refer to the Calypso Developer’s Guide for details.
4. Start the Services
The following are the minimum services required to run Risk Reports on the Data Grid. These must be started in the following order:
Step 1 - Start the Data Server (and necessary servers to start the system).
Step 2 - Start the Data Grid Nodes using "<calypso home>/deploylocal/<Environment>/dataGridNode.bat\.sh" or from the Dev Ops Center.
he recommended configuration is three Data Grid nodes per fifty Calculators.
Step 3 - Start the Dispatcher for the configuration specified in the data grid config.
Step 4 - Start the Data Grid Enabled Calculators using "<calypso home>/deploylocal/<Environment>/dataGridEnabledCalculator.bat\.sh" or from the DevOps Center.
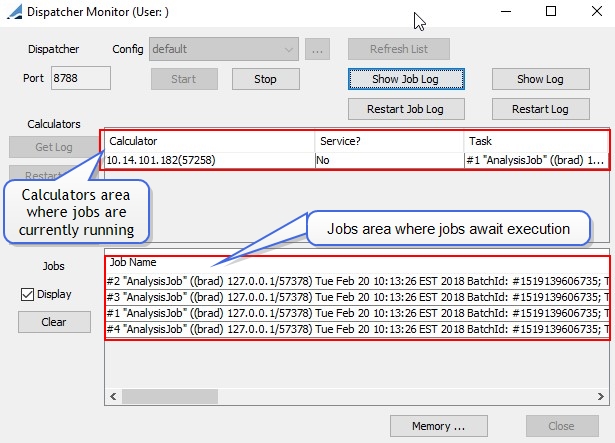
They should appear in the Dispatcher Monitor:
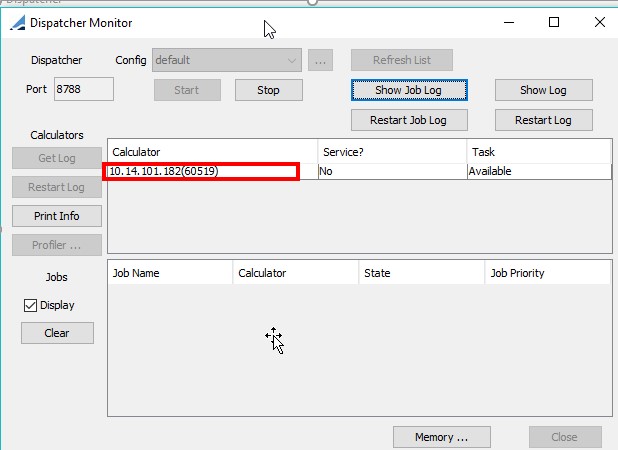
If a Data Grid Enabled Calculator is missing, it could be that:
| • | There is no network connection. |
| • | The Data Grid Enabled Calculator was defined with the wrong port number. |
| • | The Dispatcher Config has the wrong port number. |
If a Data Grid Enabled Calculator uses too much native memory, you can set the following JVM argument in the calculator's properties:
-XX:G1PeriodicGCInterval=30000
The default value is 3600000.
Step 5 - Start the Calypso Scheduler and Risk Server, and run the desired scheduled tasks.
After starting the scheduled tasks, the trades/positions will get sent to the Dispatcher and broken down into separate jobs.
The jobs currently running on a calculator will appear in the top “Calculators” portion of the Dispatcher window under the “Task” field.
The jobs awaiting distribution will appear in the bottom “Jobs” portion of the Dispatcher window until a Calculator has completed its current assignment and is ready to accept a new job.
If necessary, this list can be cleared by clicking Clear.