Generating Chaser Messages
You can generate chaser messages to chase missing or mismatched confirmations, and for unsettled payments (status request). For example, if a confirmation remains in UNMATCHED status for a certain number of days, a chaser message can be generated.
Chaser messages can be automatically generated based on chasing configurations, "Chasing" kick off cut off configurations, and chaser message configurations.
You can manually request the generation of a chaser message from the Matching Manager.
You can request account statements using the SWIFT Statement Request window.
 See Generating Requests for Account Statements for details.
1. Before you Begin
Domain Values
Add the following domain values.
Domain "kickoffDateCalculator"
| • | Value=Chasing |
Domain "MT549MessageTypes"
| • | Value=MT527 - Comment=558 |
| • | Value=MT540 - Comment=548 |
| • | Value=MT541 - Comment=548 |
| • | Value=MT542 - Comment=548 |
| • | Value=MT543 - Comment=548 |
| • | Value=MT565 - Comment=567 |
Domain "MESSAGE.Templates"
| • | Value=chaser.html |
Domain "SWIFT.Templates"
| • | Value=MT399Chasing |
| • | Value=MT599Chasing |
| • | Value=MT549Chasing |
| • | Value=MT699Chasing |
| • | Value=MT399DK |
| • | Value=MT599DK |
| • | Value=MT699DK |
Domain "chaseEventType"
| • | Value = CHASE |
| • | Value = CHASEUTI |
| • | Value = DK |
Engines
The Message engine must subscribe to PSEventChase events to generate chaser messages.
The Task engine must be running in order to process "Chasing" kick off cut off configurations.
2. Defining Chasing Configurations
The chasing configuration allows defining the trigger for the chaser message.
From the Calypso Navigator, navigate to Messages & Matching > Chasing Config (menu action refdata.ChasingConfigWindow) to define chasing configurations.
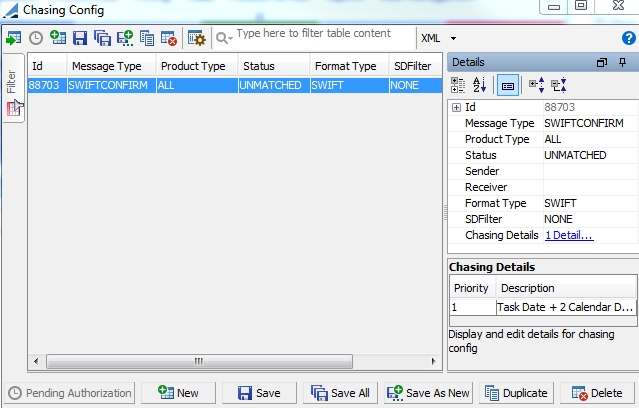
| » | All existing configurations are loaded by default. |
You can filter the list of configurations using the Filter tab as needed.
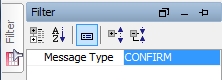
You can select a message type for which chasing configurations are defined.
| » | You can click |
| » | You can export / import configurations to XML files using the XML menu. |
2.1 Creating a Chasing Configuration
| » | Click New to create a new configuration. |
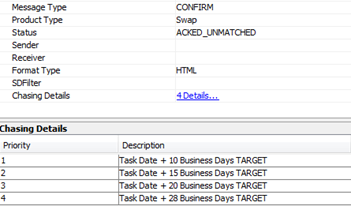
Then select the Details tab and enter the fields described below as applicable.
| » | Click Save to save your changes. |
Note that if the Authorization mode is enabled, an authorized user must approve your entry.
|
Fields |
Description |
|
Id |
Automatic ID given by the system upon saving. |
| Message Type | Select the message type for which you want to generate a chaser message, or ALL for all message types. |
| Product Type |
Select a product type, or ALL for all product types. |
| Status |
Select the status of the message for which you want to generate a chaser message, or ALL for all status codes. |
| Sender |
Select a sender, or none for all senders. |
| Receiver |
Select a receiver, or none for all receivers. |
| Format Type |
Select the format type of the message for which you want to generate a chaser message, or ALL for all format types. |
| SDFilter |
Select a static data filter as needed. |
| Chasing Details |
Click Details to determine the triggers to generate the chaser messages. See below for details. |
Specifying Chasing Details

| » | Click New to create new configuration details to trigger the generation of a chaser message. |
Then select the Details panel and enter the fields described below as applicable.
You can set an absolute time if you check the “Absolute” checkbox, or a relative time from the reference date time if you check the "Time Lag" checkbox.
| » | Click Validate to save your changes. |
| » | Make sure to save the chasing configuration. |
|
Fields |
Description |
|
Priority |
Enter the priority in case there are multiple configuration details. 1 is the highest priority. You can for example generate a chaser message after 2 days and another one after 1 additional day. |
| Reference Time |
Select a reference date time. |
| Days Lag | You can check Days Lag to take into account a number of days lag. |
| Lag Days |
Mandatory when when Days Lag is checked. Enter the number of days to be added to the reference date time if Days Lag is checked. |
| Cal/Bus | Select Calendar for a number of calendar days, or Business for a number of business days, if Days Lag is checked. |
| Holiday | Select the holiday calendar to determine business days if Business is selected. |
| Absolute | You can check Absolute to set an absolute time. |
| Absolute Hour |
Enter the absolute hour if Absolute is checked. |
| Absolute Minute |
Enter the absolute minutes if Absolute is checked. |
| Time zone | Select the timezone to determine the absolute time. |
| Time Lag | You can check Time Lag to set a relative time from the reference date time. |
| Time Lag Hour |
Enter the relative number of hours if Time Lag is checked. Expressed in 24 hour format. |
| Time Lag Minute |
Enter the relative number of minutes if Time Lag is checked. |
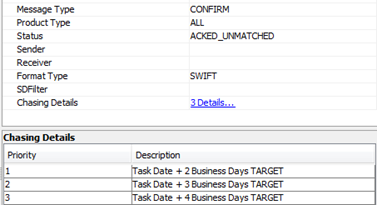
2.2 Best Practices for Confirmations
ISDA has defined the below as Best Practices for Confirmations of OTC Derivatives:
Electronic based confirmations

This could be setup as follows for SWIFT Confirmations:
Paper based confirmations
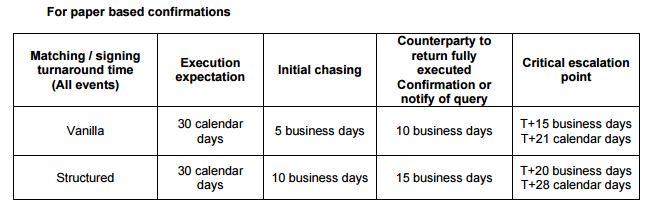
This could be setup as follows for Paper Confirmations of Vanilla products:
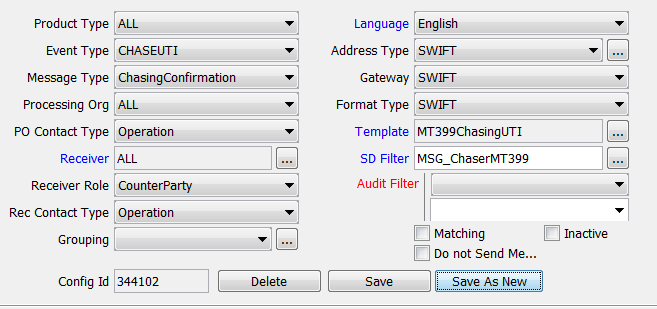
3. Chaser Message Setup
From the Calypso Navigator, navigate to Messages & Matching > Message Set-up (menu action refdata.AdviceSetupWindow) to setup the chaser message.

| » | Select the event type "CHASE". You can add it to the domain "eventType" if not available for selection. |
| » | Select the message type "CHASE". You can add it to the domain "messageType" if not available for selection. |
| » | Select the other fields as needed and save the setup. |
The following templates are available depending on the original message:
| – | HTML Confirmation - chaser.html |
| – | SWIFT Confirmation - MT599Chasing (chaser message for securities) |
| – | SWIFT Confirmation - MT699Chasing (chaser message for commodities) |
| – | SWIFT Confirmation - MT399Chasing (chaser message for other products) |
| – | SWIFT Payment - MT549Chasing (chaser message for payment - request for status) |
The message attributes "Linked Message Template" and "Linked Message Type" can be used in static data filters to drive the template selection.
Example:

4. Message Workflows
4.1 CHASE Message Workflow
| Orig Status | Action | Resulting Status | Use STP | Rules | Static Data Filter |
|---|---|---|---|---|---|
| ACKED | PROCESS | PROCESSED | true | ||
| ACKED | SUPERCEDE | DISCARDED | false | ||
| NACKED | CANCEL | CANCELED | false | ||
| NACKED | REMOVE | DISCARDED | false | ||
| NACKED | SUPERCEDE | DISCARDED | false | ||
| NONE | NEW | PENDING | false | ||
| PENDING | AUTHORIZE | VERIFIED | true | ||
| PROCESSED | UPDATE | PROCESSED | false | SetChaserDetails | |
| SENT | ACK | ACKED | false | SetChaserDetails | |
| SENT | AUTO_ACK | ACKED | true | SetChaserDetails | |
| SENT | MANUAL_ACK | ACKED | false | SetChaserDetails | |
| SENT | MANUAL_NACK | NACKED | false | ||
| SENT | NACK | NACKED | false | ||
| SENT | SUPERCEDE | DISCARDED | false | ||
| TO_BE_SENT | CANCEL | CANCELED | false | ||
| TO_BE_SENT | RESEND | TO_BE_SENT | false | ||
| TO_BE_SENT | SEND | SENT | false | ||
| TO_BE_SENT | SUPERCEDE | DISCARDED | false | ||
| VERIFIED | TO_SEND | TO_BE_SENT | true |
The rule SetChaserDetails sets the message attributes LastChaserMsgId and LastChaserSentDate on the original message with information from the chaser message. If the attributes can be set, it applies the action specified in the rule parameters (or UPDATE if not set) to the original message. The action must be defined in the workflow of the original message.
Add static data filters as needed.
4.2 Message Workflow of the Original Message
This applies whether the original message is a confirmation or a payment message. These show only additional setup requirements.
Automatic Chasing
| Orig Status | Action | Resulting Status | Use STP | Rules |
|---|---|---|---|---|
| UNMATCHED | CHASE | UNMATCHED | true | CheckKickOff, GenerateChaseEvent |
| MATCHED | UNMATCH | UNMATCHED | false | SetChasing |
| UNMATCHED | MATCH | MATCHED | false | UpdateLinkedMessage |
| ACKED | UPDATE (action specified in SetChaserDetails) | ACKED | false |
Step 1 - A transition must be added for the status that may require an automatic chaser message. For example: UNMATCHED - CHASE - UNMATCHED to chase from the UNMATCHED status.
This transition must have the following characteristics:

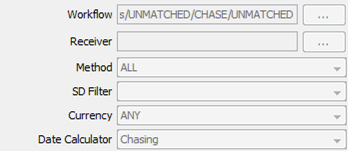
| • | Use STP = Checked |
| • | Use Kick Off / Cut Off = Checked |
| • | Rules = CheckKickOff, GenerateChaseEvent |
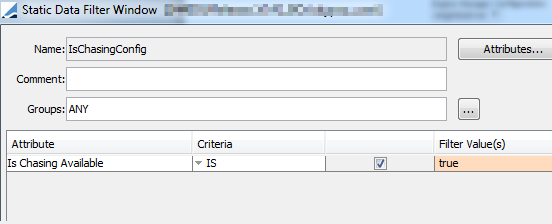
| • | Static Data Filter = IsChasingConfig |
The rule GenerateChaseEvent generates a PSEventChase that will be consumed by the Message engine to generate the chaser message, according to the Chaser Message Setup configuration; it will also set the message attribute ChasingOrderId with the number of generated chaser messages.
A Kick Off / Cut Off Configuration should be set on this Transition with Date Calculator = Chasing so that the kickoff is based on the Chasing Configuration Details (the settings of the Kick Off / Cur Off Configuration are not used).
Step 2 - You need to add the rule SetChasing on the transition before the UNMATCHED status (for example MATCH - UNMATCH - UNMATCHED). It sets the applicable Chasing Configuration if any on the message attribute ChasingConfigId.
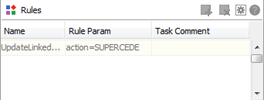
Step 3 - You need to add the rule UpdateLinkedMessage on the transitions after the UNMATCHED status as applicable (for example UNMATCHED - MATCH - MATCHED).
It applies the action specified in the Rule Param field to the linked chaser message to indicate that the chaser message is no longer needed.
Rule Param: action=SUPERCEDE
Manual Chasing
A transition must be added for the status that may require a manual chaser message. For example: UNMATCHED - MAN_CHASE - UNMATCHED to chase from the UNMATCHED status.
This transition must have the following characteristics:
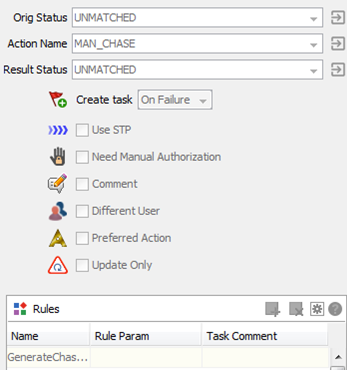
The rule GenerateChaseEvent generates a PSEventChase that will be consumed by the Message engine to generate the chaser message, according to the Chaser Message Setup configuration; it will also set the message attribute ChasingOrderId with the number of generated chaser messages.
5. Matching Manager
5.1 Unmatched Chasing
From an Unmatched Outgoing Message, a chaser message can be sent by choosing Matching > Chaser > CHASE from the popup menu.
The related chaser messages can be displayed from the Matchable Object by choosing Matching > Show > Chaser Activity from the popup menu.

5.2 Mismatched Chasing
You can also generate a “Mismatched” chaser message, by selecting an Incoming message and an Outgoing message that could match and by choosing Matching > Chaser > CHASE from the popup menu.
In this case, the following message attributes are set on the chaser message as needed:
| • | CntpRef: Counterparty reference for incoming messages coming from the counterparty |
| • | PORef: PO reference for outgoing external messages |
| • | RelatedRef: Broker reference for broker messages |
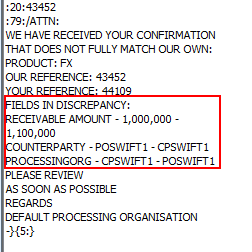
| • | Mismatched Reason: Fields in discrepancy between the Incoming and the Outgoing messages. |

These fields are displayed in the chaser message:
5.3 Alleged Message Rejection (DK)
You can reject an unknown Alleged Message with a DK (“Don’t Know”) message.
Message Setup Requirements
The following message template are provided:
| • | MT599DK for securities |
| • | MT699DK for commodities |
| • | MT399DK for other products |
The DK workflow should be similar to the CHASE workflow.
Generating a DK Message
The DK message can be generated by selecting an Incoming message and by choosing Matching > Chaser > DK from the popup menu.
The message attribute CntpRef of the rejected message is set on the DK message.
An action can be applied to the rejected message provided it is set in the domain "MessageDKApplyAction", and has a corresponding transition on the workflow of the rejected message.
Example:
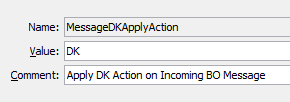
The DK action would be applied to the rejected message in that case.
To send a DK message even if the incoming message does not have a sender, you need to add the following domain:
| • | Domain = ManualPartyName |
| • | Value = DK |
| • | Comment = Short name of a dummy legal entity |
A contact must be defined for the dummy legal entity.
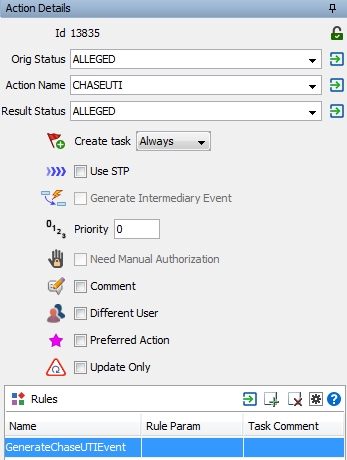
5.4 Request for UTI Reference
You can request a UTI reference for an incoming confirmation using an action associated with the message rule GenerateChaseUTIEvent.
Domain Values
Domain "eventType" - Add value CHASEUTI
Domain "workflowRuleMessage" - Add value GenerateChaseUTIEvent
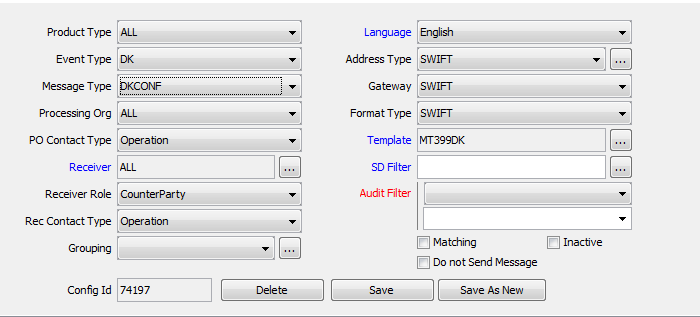
Message Setup
Incoming Confirmation Workflow
Add an action with message rule GenerateChaseUTIEvent where needed in the incoming confirmation workflow.
Example on ALLEGED status.
Generating a Request for UTI Reference
The CHASEUTI message can be generated by selecting an Incoming Confirmation in the Matching Manager and by choosing Matching > Chaser > CHASEUTI from the popup menu, or by applying the action CHASEUTI to an Incoming confirmation from the Message report.