Configuring a Market Data Server
From the Calypso Navigator, navigate to Configuration > Market Data > Market Data Server to configure a Market Data Server.
Check the "Edit Mode" box to create or edit a configuration.
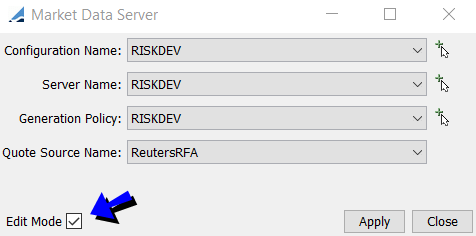
Market Data Server Configuration - Edit Mode
You can now create the various components of the Market Data Server configuration as described below.
Then click Apply when you are done to save your modifications.
1. Configuration Name
To start a new configuration, click  . You can also select an existing configuration and modify as needed.

Set Configuration Name
| » | Click New. You will be prompted to enter a name for the configuration. |
By default, the configuration name should be a Risk Server name. It will be needed when starting the Risk Server.
| » | Then click Save. |
2. Server Configuration
Click to display the server details.

Set Server Name
| » | Click New. You will be prompted to enter a server name. |
| » | Click Save. |
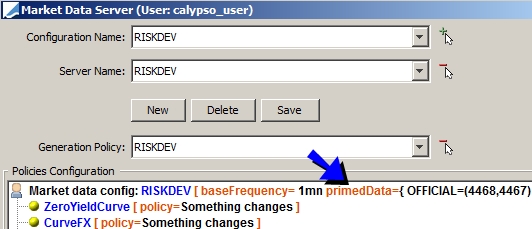
3. Generation Policy
You then need to configure which market data are distributed in real-time by the market data server, and how.
By default, ALL quotes are distributed in real-time by the market data server, whether they are coming from a live-feed source, or saved manually in the system. For curves and surfaces however, you need to configure a generation policy for each type of data. If you do not specify a generation policy, the corresponding market data will not be regenerated and distributed in real-time, the market data server will load the market data from the database.
Click to display the generation policy details.
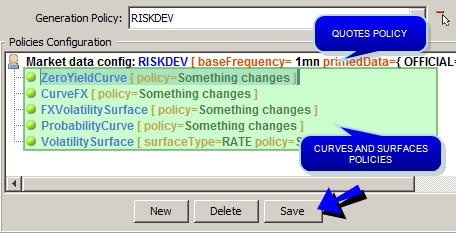
Define Generation Policy
| » | Click New. You will be prompted to enter a name for the policy configuration. |
| » | To add a generation policy for a type of curve of surface, right-click the "Market data config" label, and choose "Add/Update Policy". |
 See Adding a Generation Policy for details.
| » | You can enforce market data consistency, and set the update frequency for the quotes - It defaults to 1 minute. Right-click the "Market data config" label, and choose "Set options". |
See Setting Options for details.
| » | (Optional) - You can define primed market data that will be pre-loaded in the Market Data Server without having to wait for a client application to request them. Right-click the "Market data config" label, and choose "Set primed data". |
See Setting Primed Market Data for details.
| » | (Optional) - You can set a list of pricing environment that should not be updated in real-time. Right-click the "Market data config" label, and choose "Set non-realtime PE". |
See Setting Non Real-Time Pricing Environments for details.
| » | Click Save if you make any change to save the generation policy. |
3.1 Adding a Generation Policy
Right-click the "Market data config" label, and choose "Add/Update Policy". It brings up the "Add/Update policy" dialog.
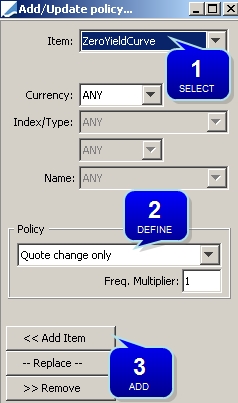
Add/Update Policy
Step 1 - Select the type of market data for which you want to define a generation policy.
By default, the generation policy applies to all curves or surfaces of the selected type, but you can restrict the scope using the selection crtieria.
Step 2 - Select the generation policy:
| • | "Something changes" - If anything changes on the market data (definition or quotes), the market data server regenerates and distributes the market data. |
| • | "Quote change only" - The market data server regenerates and distributes the market data only if the underlying quotes change. |
| • | "Underlying change only" - The market data server regenerates and distributes the market data only if the underlying instruments have been modified. |
You can also enter a frequency multiplier to override the base frequency for the current market data. For example, if you set the frequency multiplier to 10, and the base frequency is 1 minute, the current market data will be updated every 10 minutes.
Step 3 - Click Add Item to add the policy to the policy configuration.
You can also click Replace when you are updating an existing policy.
Make sure to click Save in the Generation Policy area to save the policy configuration.
3.2 Setting Options
Right-click the "Market data config" label, and choose "Set options". It brings up the "Options" dialog.
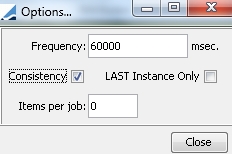
Set Options
| » | Enter the options as needed - They are described below. |
| » | Make sure to click Save in the Generation Policy area to save the policy configuration. |
| Fields | Description |
|---|---|
|
Frequency |
Enter the update frequency in milliseconds. |
|
Consistency |
Check “Consistency” to update related market data when the current market data is updated. For example, when checked for probability curves, a probability curve will be updated if the underlying riskless curve is updated. Ⓘ [NOTE: It is strongly recommended to check the Consistency checkbox in order to enforce market data consistency] |
|
LAST Instance Only |
If checked, this option will have the effect of ignoring all feed quote updates except the ones used for the “LAST” market data instance (i.e. BID and ASK quotes). Technical note: This “filtering” only applies to quotes received from a live-feed source and not to quotes saved into the system. If a quote is saved into the system (manually, or through the SAVE_QUOTES scheduled task), or if a curve or surface is modified, the market data server will pick up this change and make it available to all of relevant subscribers regardless of the market data instance being used. The INSTANCE_TYPE pricing parameter impacts this option. When the instance type is CLOSE and "Last Instance Only" is checked, then there will be no subscription to real-time updates. If "Last Instance Only" is not checked, then real-time updates proceed for any value of INSTANCE_TYPE. |
|
Items per job |
If you are using a dispatcher configuration to distribute the load of regenerating the market data to multiple processors, you need to specify the number of items per processor. The number of items per job is the number of curves and surfaces that will be regenerated by a given processor. Even if the same base curve is needed to regenerate all the curves and surfaces, multiple jobs will be created based on this setting. |
3.3 Setting Primed Market Data
Primed market data are pre-loaded in the Market Data Server without having to wait for a client application to request them, and are therefore readily available.
Right-click the "Market data config" label, and choose "Set primed data". It brings up the "MktDataItem Chooser" dialog.
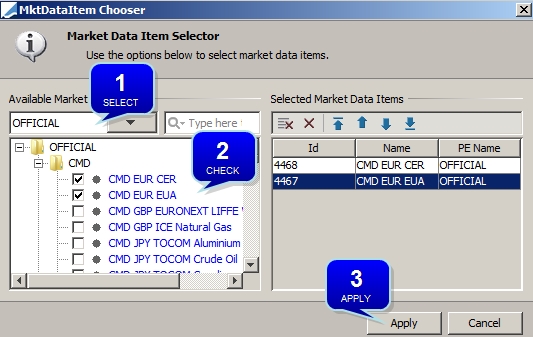
Set Primed Data
Step 1 - Select a pricing environment.
Step 2 - Click Apply.
The primed data are displayed in the policy configuration.
Check the market data that you want to prime.
Step 3 - Make sure to click Save to save the policy configuration.
3.4 Setting Non Real-Time Pricing Environments
Ⓘ [NOTE: This option is only available if the environment property MDS_SET_NON_REALTIME_PE is set to "true"]
Right-click the "Market data config" label, and choose "Set non-realtime PE".
You will be prompted to select a list of pricing environments.
These pricing environments will not be updated in real-time by the Market Data Server. This only applies to Trade windows and the Trade Blotter.
4. Quote Source Name
Select the live-feed source from the Quote Source Name drop-down menu.
See Configuring a Live-Feed Source for details on setting up a feed source.
What's Next?
You need to start the Market Data Server in order to distribute real-time updates.