Capturing Brazilian Swap Trades
Brazilian swap trades are swap trades on the Brazilian currency:
| • | Fixed / DI |
| • | Inflation / DI |
| • | PTAX / DI |
| • | Forward Start Notional Adjustment Cross Currency Swap |
| • | Brazilian Reset Swap |
|
Brazilian Swaps Quick Reference
|
Daycount Convention
Interest accrues using the Business/Business daycount convention BU/252. The daycount fraction is the number of business days in the period divided by 252. To determine business days, it uses are set on the trade.
1. Fixed / DI Swap Trades
1.1 DI Rate Index
From the Calypso Navigator, choose Configuration > Interest Rates > Rate Index Definitions to define the rate indices.
The DI rate index is the most significant index in Brazil. The interest calculation associated with this rate index is commonly exponentially compounded unlike most other currencies.
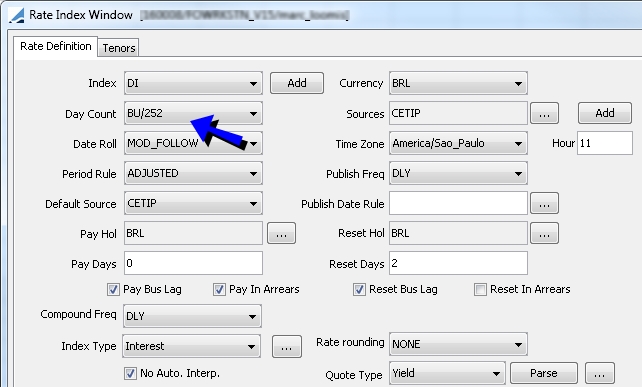
| » | Select the daycount convention BU/252. |
| » | Click Attributes and set the following attributes. |
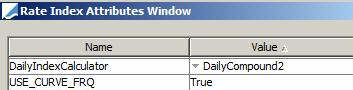
DailyIndexCalculator = DailyCompound2
USE_CURVE_FRQ = True
| » | Click Save to save your changes. |
| » | Then select the Tenors panel to define a 1D tenor for the rate index, and click Save to save your changes. |
1.2 Defining DI Curves
Define a standard zero curve on DI futures.
If you choose BU/252 as the daycount on the Zero Curve Window (Points tab), then interpolation will use only business days as the time axis. The holiday calendar used to determine business days is that specified on the curve window (Definition tab). Typically with this daycount one uses the Frequency "PA", also defined on the curve window Points tab.
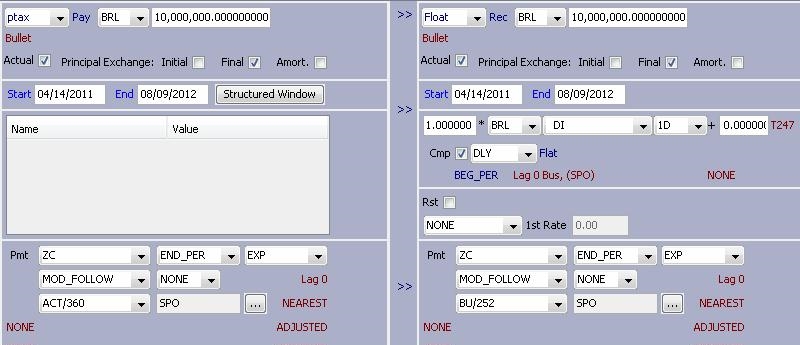
1.3 Sample Fixed/DI Trade
Choose Trade > Interest Rates > Swap to open the Swap worksheet, from the Calypso Navigator or from the Trade Blotter.
A Brazilian swap on the DI rate index is averaging daily, and has exponential interest calculation.
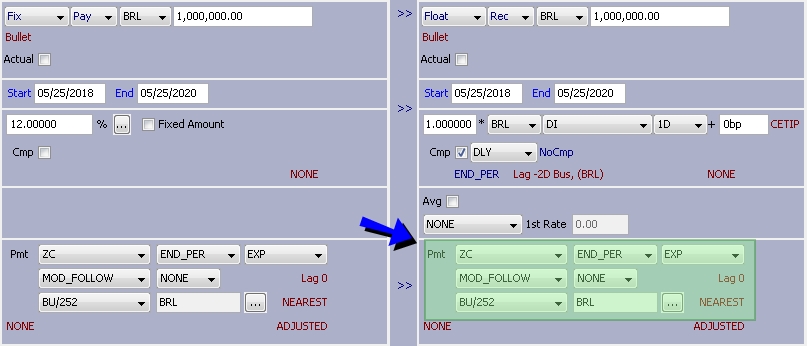
| » | Select the daily compounding frequency. |
| » | Select EXP in the payment details for exponential interest calculation. |
| » | Select the daycount convention BU/252. |
| » | For overnight swap trades on a discount basis, check the menu item Swap > Discount. If the payment frequency is set to ZC, the field Negotiated Price will appear at the bottom of the window. |
When you enter a value in that field, the principal of the legs will be updated according to the following formulas:
PV = FV / (1 + Fixed Rate) ^ Period for exponential interest
PV = FV / (1 + Fixed Rate x Period) for simple interest where Period = (Swap Start, Start End, Fixed Leg Pay Daycount)
i.e. PV + Interest from Fixed Leg Cashflow = FV.
Cashflows
Select the Cashflows panel for displaying the cashflows.
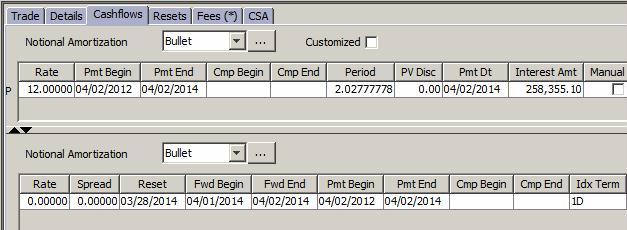
| » | Right-click a cashflow and choose Sample Values to display the compounding periods. It brings up the Reset Samples window. |
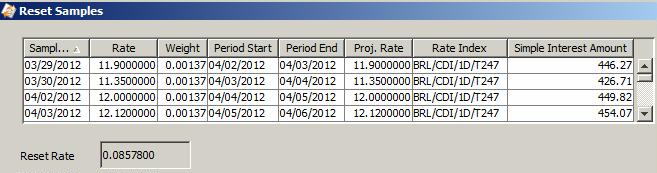
You can click Apply to compute the reset rate over the period, and click Reset to set the rate on the selected cashflow.
2. Inflation Swap Trades
Swap trades based on inflation rates IGP-M and IPCA against DI.
2.1 IGP-M Rate Index
From the Calypso Navigator, choose Configuration > Interest Rates > Rate Index Definitions to define the rate indices.
IGP-M is based on the ANDIMA rate for pro-rating. First create the ANDIMA rate index so that it can be selected in the IGP-M rate index attributes.
ANDIMA Rate Index
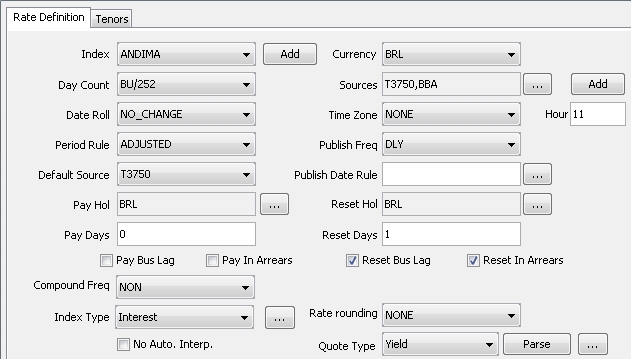
| » | Index Type is "Interest." |
| » | Set a 0D tenor for the rate index. |
IGP-M Index
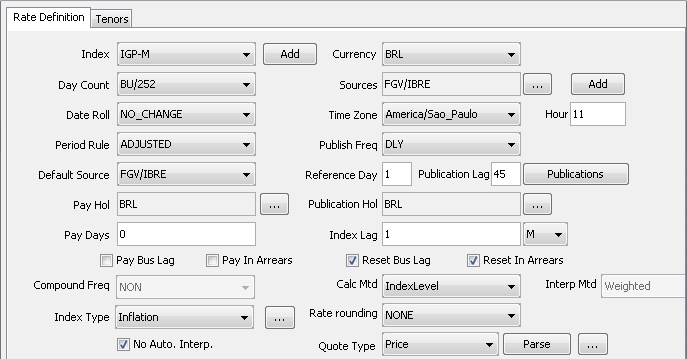
| » | Select the Inflation index type, and set the inflation characteristics. |
| » | Click Attributes and set the following attributes. |
IndexCalculator = InflationIndexKerkhof
If you want to force known inflation values to always use the IndexLevel logic, use IndexCalculator = InflationIndexBRL instead. The calculation method should remain “Interpolated”, but this index calculator will ensure that known inflation values are not interpolated between two IGPM fixings.
VariationIndex = ANDIMA (the name of the ANDIMA rate index)

| » | Click Save to save your changes. |
| » | Then select the Tenors panel to define a 0D for the rate index, and click Save to save your changes. |
2.2 IPCA Rate Index
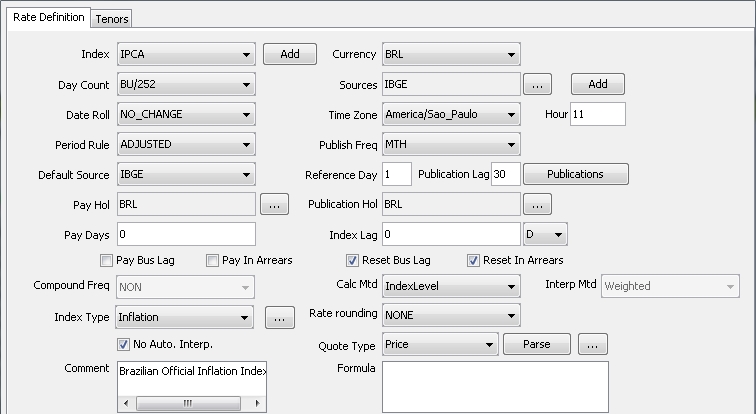
| » | Select the Inflation index type, and set the inflation characteristics. |
| » | Click Attributes and set the following attributes. |
IndexCalculator = InflationIndexKerkhof
| » | Click Save to save your changes. |
| » | Then select the Tenors panel to define a 0D for the rate index, and click Save to save your changes. |
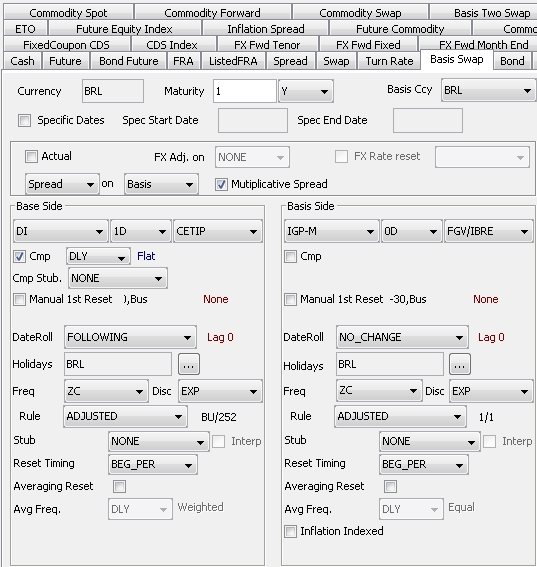
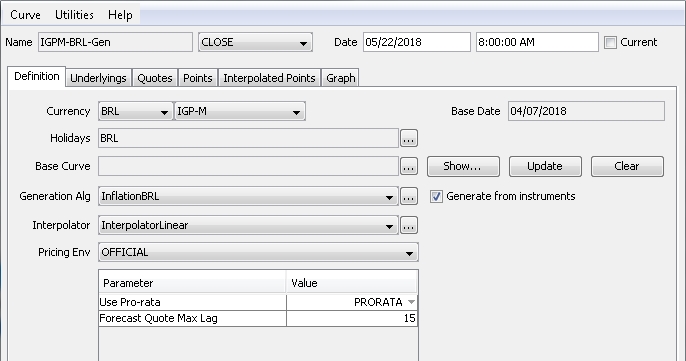
2.3 Defining Inflation Curves
The inflation curve is generated off basis swaps with multiplicative spread.
Sample Underlying Instrument
Sample Curve Definition
2.4 Sample Inflation Trade
Choose Trade > Interest Rates > Swap to open the Swap worksheet, from the Calypso Navigator or from the Trade Blotter.
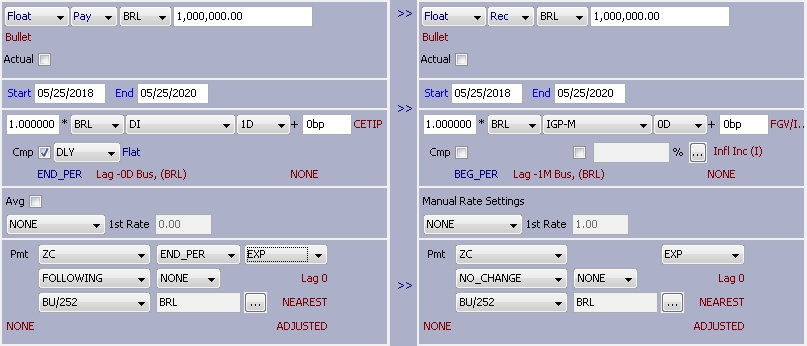
| » | You can define a schedule for the inflation rate - The inflation is multiplied by the rate in the schedule. |
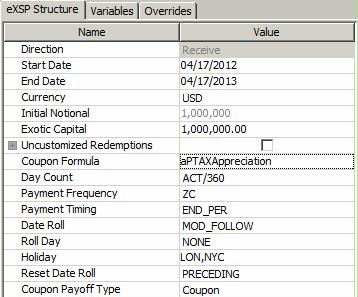
3. PTAX Swap Trades
Cross-currency USD / BRL swap trade with currency appreciation. PTAX is defined an FX Rate Definition between the USD and BRL.
The appreciation of the currency is determined using an exotic leg.
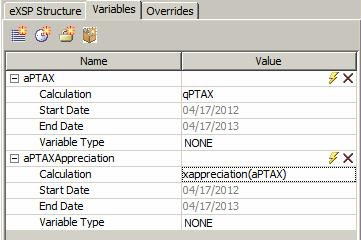
Exotic Structure
You need to define the following variables:
Sample Trade
4. Forward Start Notional Adjustment Cross Currency Swap Trades
A standard feature of Brazilian cross currency swaps is to define a forward start and adjust the notional of one of the legs based on the FX rate on the forward swap Start Date. On a USD/BRL cross currency swap, this feature allows participants to hedge a forward USD amount by fixing the USD notional and updating the BRL notional at the swap’s Start Date. Between the Trade Date and the swap’s Start Date, on which the BRL notional is fixed, the valuation of the forward starting cross currency swap is based on a projected FX rate.
This notional adjust feature can be used on any cross currency swap, including non deliverable cross currency swaps. When the feature is selected, the product Subtype becomes "NotionalAdj." Adjustments can be made on either the Pay or Rec leg notional.
Point to Trade > Interest Rates > Swap to open the Swap worksheet, from the Calypso Navigator or from the Trade Blotter.
The Forward Start Notional Adjustment feature can be selected at the top of the swap worksheet. The trade is marked No Fwd Start Adjustment by default.
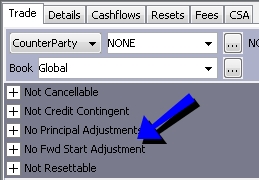
Click + to view the Fwd Start Notional Adjustment details.

| » | Select the Fwd Start Notional Adjustment checkbox to enable a forward start for the cross currency swap, then enter details. Details are described below. |
| » | Once the forward start details are set, configure the swap trade as described in Capturing Swap Trades. |
4.1 Forward Start Notional Adjustment Details
| Fields | Description | ||||||
|---|---|---|---|---|---|---|---|
| Pay/Rec | Select either Pay or Rec to determine which leg will have the notional adjustment. | ||||||
| FX Reset |
Select the FX Reset to be used to fix the notional.
|
||||||
| Reset Lag | You can override the reset lag and holiday schedule by selecting the Reset Lag checkbox and making changes. | ||||||
| Intermediate Ccy |
Select the Intermediate Ccy checkbox to enable the intermediate currency list, FX Reset, and Reset Lag checkbox to the right. You can then select a third currency to calculate the FX Rate for the notional adjustment.
|


4.2 About FX Resets
The FX Reset is required for the forward start notional adjustment. From the Trade Date to the Start Date the notional adjust leg will have a notional that varies according to fluctuations in the exchange rate. The notional, therefore, is re-calculated any time the trade is priced.
| » | The FX Reset(s) required for the notional adjustment is displayed on the trade window's Reset tab. Click Load Resets to show all resets associated with the trade. |
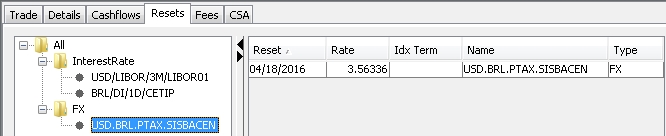
 For further details on the trade window Resets tab, see "Displaying Resets" in the Front Office Tools documentation.
| » | On the FX rate fixing date, you can use either the FX Rate Reset Window or the FX_RATE_RESET scheduled task to set the FX reset fixing for the swap. |
For further details on using the FX Rate Reset Window, see "FX Rate Reset" in the Trade Lifecycle documentation.
For further details on scheduled tasks, see the Scheduled Tasks documentation.
| – | On the FX reset fixing date, the notional will be fixed on the trade by applying the RATERESET action. Ensure that this action is available for the appropriate trade status using trade workflows. |
See "Workflow Configuration" in the Workflow and Task Station documentation for details on trade workflows.
| – | Once the FX reset fixes the notional on the adjustable leg, the trade becomes a regular cross currency swap. |
4.3 Projected Notional Amount
All cashflows are calculated off of the projected notional amount. After pricing the trade, the pricer measure CUR_NOTIONAL_REC/PAY displays the projected notional amount.

| » | Select the Results panel in the bottom of the trade window to see the CUR_NOTIONAL_REC/PAY measures. |
TIP: You can double-click the CUR_NOTIONAL_REC/PAY pricer measure result to open the PricerMeasure Viewer window, which shows the FX Reset Date, The FX Reset Name, and the projected FX Reset Rate being used to calculate the adjusted notional.
Additionally, once the trade has been priced, you can use this projected FX Rate as the initial rate on the swap trade by simply typing the letter "f" in the FX Rate field at the top of the trade window and pressing Enter. The rate is automatically populated.
| » | You can also add columns to any of the trade reports - such as the Trade Browser and Trade Blotter - to show the currency and original notional of the adjusted leg. |

| – | Fwd Start Notional Adj Leg Currency: shows the currency of the notional adjusted leg. |
| – | Fwd Start Adj Leg Original Notional: shows the original notional of the leg before any adjustment. |
5. Brazilian Reset Swap
A Brazilian Reset Swap is a swap that includes a reset trigger condition such as a Cap, Floor, or Collar on the NPV of the swap or one or more reset dates. If any of the trigger conditions are met, the designated resetting party has the option to reset the swap. The term “reset” is defined as terminating a reset swap once a trigger condition is met and booking a new reset swap, which copies the terms of the terminated reset swap with changes to certain trade criteria such as notional, index factor, and spread.
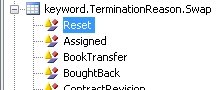
To enable the Reset feature for termination, create the domain “keyword.TerminationReason.Swap” and add the Reset value to that domain. Note that domain values are case sensitive.
Point to Trade > Interest Rates > Swap to open the Swap worksheet, from the Calypso Navigator or from the Trade Blotter.
The Resettable feature can be selected at the top of the swap worksheet. The trade is marked Not Resettable by default.
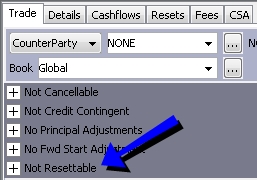
Click + to view the Resettable Swap details.

| » | Select the Resettable checkbox to enable a reset swap, then enter details. Detail options are described below. |
| » | Once the resettable details are set, configure the swap trade as described in Capturing Swap Trades. |
| » | The reset process involves performing a manual termination. To terminate an individual trade, point to Back Office > Terminate... in the trade window. To terminate multiple trades, point to Trade Lifecycle >Termination > Terminate from Calypso Navigator to open the Termination action report. Help is available in both windows. |
5.1 Reset Swap Details
| Fields | Description | |||||||||||||||
|---|---|---|---|---|---|---|---|---|---|---|---|---|---|---|---|---|
| Reset Barrier Type | Select a trigger type for the swap: None, Cap, Floor, Collar. | |||||||||||||||
| MTM Upper Barrier | Enter the limit for the mark-to-market (MTM) upper barrier. This box is enabled when the Reset Barrier Type is set to either Cap or Collar. | |||||||||||||||
| MTM Lower Barrier | Enter the limit for the mark-to-market lower barrier. This box is enabled when the Reset Barrier Type is set to either Floor or Collar. | |||||||||||||||
| Barrier Currency | Select the trade currency. When a barrier is set, both the MTM and the barrier will be converted to the base currency defined by the pricing environment. | |||||||||||||||
| Use Reset Dates |
Select the checkbox to generate a schedule of one or more reset dates.
|
|||||||||||||||
| Check Barriers on Reset Dates Only | Enabled when both barrier and date conditions are specified. When selected, the barriers will only be monitored on the designated reset dates. | |||||||||||||||
| Resetting Party |
Select Processing Org, Counterparty, or Mutual. Ⓘ [NOTE: This setting is for informational purposes only and does not impact trade behavior.] |

5.2 Resettable Swap Monitor Report
The Resettable Swap Monitor Report can be run to show which trades fall inside or outside barriers for all reset swap trades. The report can be run on the fly or by using a scheduled task.
From Calypso Navigator point to Reports > Resettable Swap Monitor Report (menu action reporting.ReportWindow$ResetProduct) to open the Position Valuation Report window.
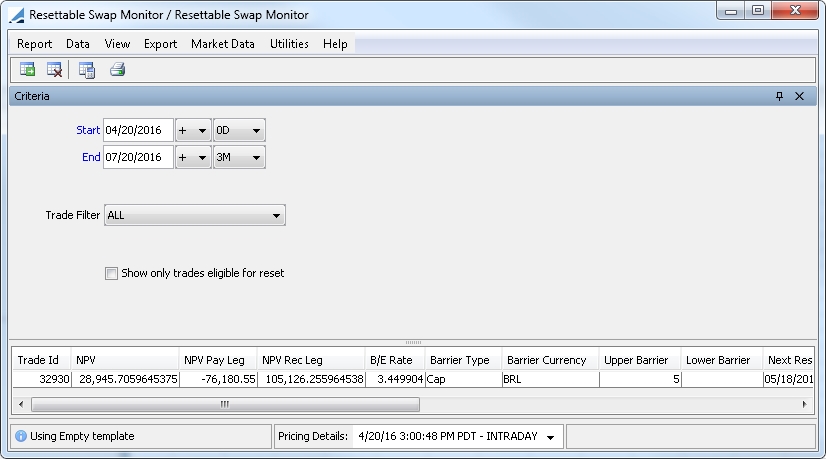
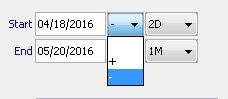
| » | Specify the start and end of barriers to be included in the search. You can add dates manually in the date fields and manipulate them with other control features, or use the control features alone to set the start and end limits. |
| – | When populating dates using the control features, date settings are based on the valuation date entered in Pricing Details (see below). |
| – | Enter a tenor from the list. Selecting "0D" adds the valuation date set in the Pricing Details. Other tenors deviate the indicated span of time from the valuation date. |
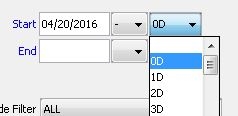
| – | You can further manipulate the date using the +/- signs. |
| » | You can select a trade filter to narrow results. |
| » | You can limit results to only those trades that are eligible for reset by selecting the checkbox. |
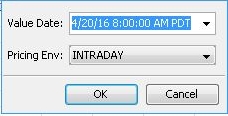
| » | Specify the pricing environment and valuation date at the bottom of the report window. |

By default, the pricing details are current:
| – | The pricing environment defaults to the one set in the User Defaults. |
| – | The valuation date is the current date and time. |
You can click the down arrow to change the default values.
| » | Click  to load the report and view results. to load the report and view results. |
| » | You can click |
| » | You can select a template and click  to display the number of objects that will be loaded from the database before loading the report. to display the number of objects that will be loaded from the database before loading the report. |
| » | You can click  to print the report results. to print the report results. |
Configuring Columns
To select which elements and measures appear in the report, point to Data > Configure Columns to open the Configure Columns window.
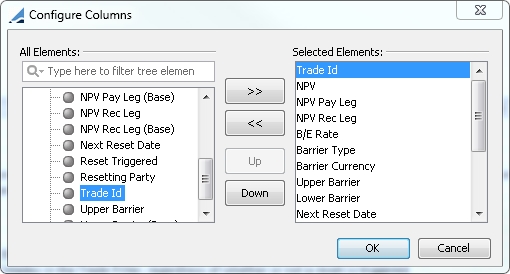
| » | Move elements to the Selected Elements field and click the OK button to show those columns in the report. |
| » | To save the search and column configuration as a template, point to Report > Save as Template. Point to Report > Load Template to open a configuration in the report window. |
| » | Confirm search criteria and click to load the associated results. |
6. Brazilian Date Rule Conventions
You can generate dates based on a TJLP or TR date rule.
6.1 TJLP
From Calypso Navigator, navigate to Configuration > Definitions > Date Schedule Definitions > Date Rules to define Date Rules.
Please refer to Calypso Defining Date Rules documentation for more information on how to create date rules.
You need to define the following variables for a rate reset date rule:
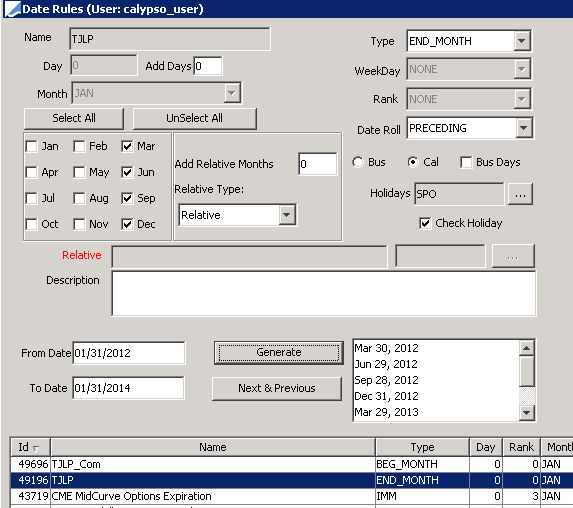
TJLP reset date rule
You need to define the following variables for a compound date rule:
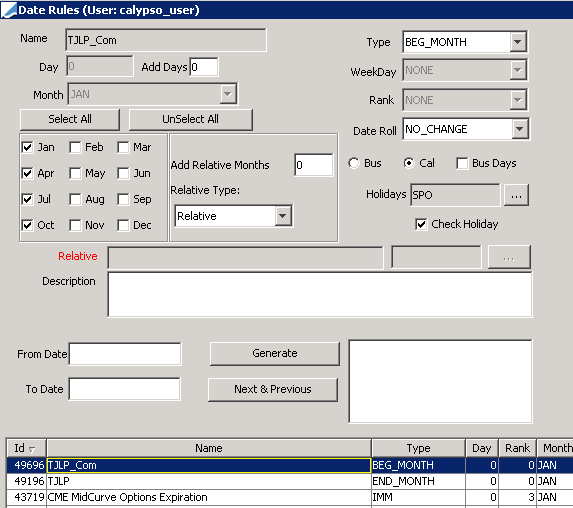
TJLP compound date rule
TJLP Rate Index
From the Calypso Navigator, choose Configuration > Interest Rates > Rate Index Definitions to define the rate index.
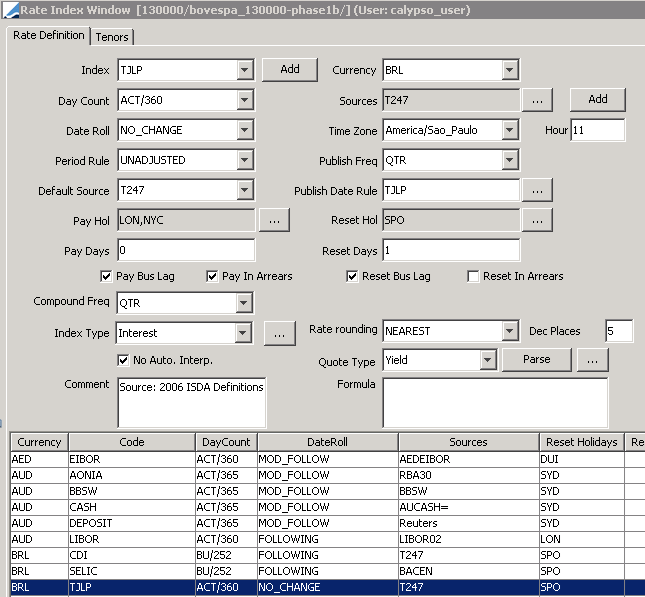
| » | Click Attributes and set the following attributes. |
CompoundDateRule= TJLP_Com
ResetDateRule = TJLP
UseResetDateRulePrior = true (this sets the "Prior" checkbox to checked in the trade date rule product details window.)
| » | Click Save to save your changes. |
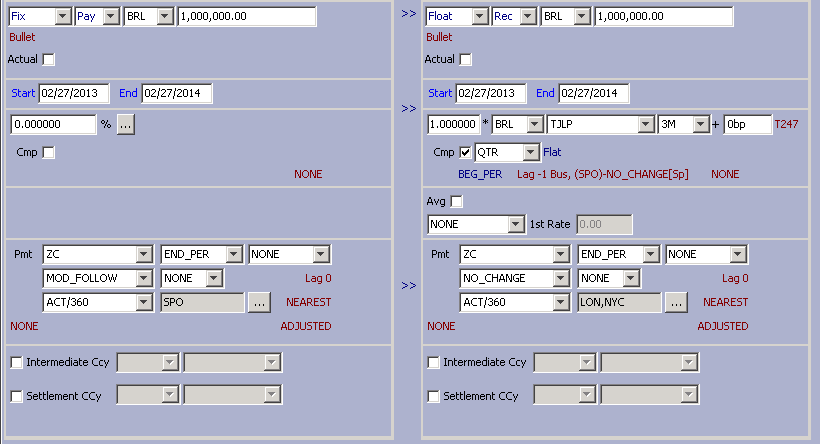
Sample Trade
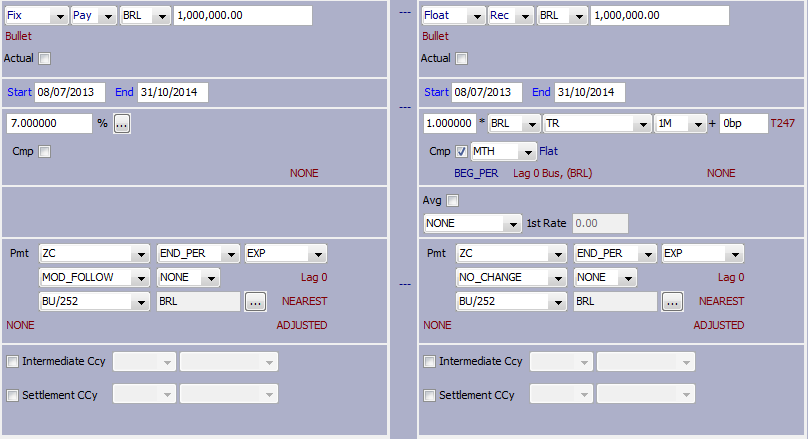
6.2 TR
You can structure compounding periods to comply with the convention of “TR” the Brazilian Savings Interest Rate.
TR Rate Index
From the Calypso Navigator, choose Configuration > Interest Rates > Rate Index Definitions to define the rate index.
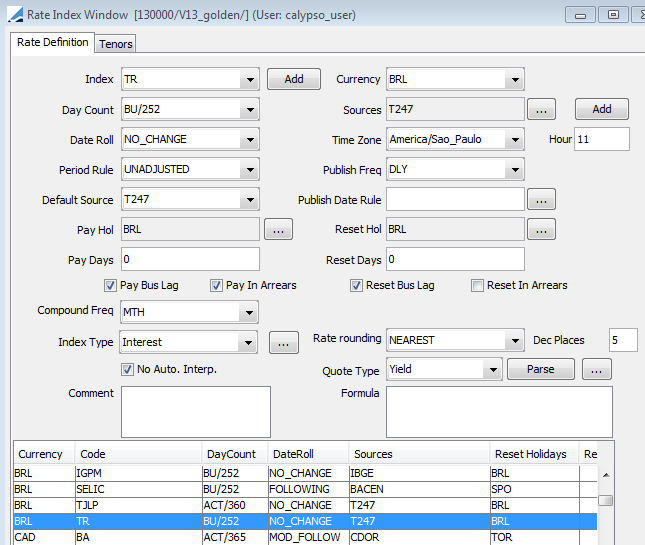
| » | Click Attributes and set the following attributes. |
USE_TR_DATE_RULE = True
| » | Click Save to save your changes. |
Sample Trade