Defining Legal Entity Contacts
Contacts represent departments or individuals within an organization. Contact information such as addresses, member ids, etc. is used for back office operations (generation of messages and payments).
You need to specify contacts on sender legal entities, and on receiver legal entities.
From the Calypso Navigator, navigate to Configuration > Legal Data > Contact Personnel to define contacts.
1. Creating a Contact
| » | Click New to create a contact, and enter the fields described below. |
The contact is identified by the contact type throughout the system. If the same physical person has multiple roles in an organization, you can create multiple contact entries for the same person by changing the contact type.
Note that you can create only one contact for a given combination of Legal Entity, Role, Product, Contact Type, and Processing Org.
| » | Then click Save to save your changes. |
You can also click Save As New to save the legal entity as a new legal entity. You will be prompted to enter a new short name.
Note that if the Authorization mode is enabled, an authorized user must approve your entry.
Fields Details
|
Fields |
Description |
||||||
|
Legal Entity |
Click ... to select the legal entity to which the contact belongs. |
||||||
|
Role |
Select a legal entity role, or ALL. |
||||||
|
Product |
Click ... to select a product type, or ALL. The product type can be a group of products. See Configuration > Product > Group (menu action |
||||||
|
Contact Type |
Select a contact type or ALL. You can click ... to add contact types. |
||||||
|
Processing Org |
Select the processing organization or ALL. You can double-click the Processing Org label to set it to ALL. |
||||||
|
Effective From Effective To |
Enter the validity period of the contact (optional). NOTE: When using the Effective From and Effective To dates for "expiring" old contacts and using the new one, please make sure that the contact type is the same as the contact type in the Message Set-up window, otherwise INVALID messages will be created. |
||||||
|
Static Data Filter |
Click ... to select a static data filter to restrict the usage of the contact (optional). The static data filter is used for contact selection during the generation of messages but does not apply to contact selection when processing incoming messages. |
||||||
|
Contact Id |
Unique id number given by the system when the contact is saved. |
||||||
|
Trade Keyword |
You can enter a trade keyword value for the trade keyword defined in the domain “leContactTradeKeyword”. This allows an additional criteria to determine the LE Contact. This is optional. |
||||||
|
Last Name First Name |
Enter the last name and first of a physical person if applicable. |
||||||
|
Title |
Enter the title of a person / department if applicable. |
||||||
|
Address City State Zip Code |
Enter the mailing address of the contact. It can be used when generating messages and payments. The Address field may contain multiple lines. |
||||||
|
Address Type |
Select the type of address (like Home, Office, etc.). Address types are defined in the domain "AddressType". |
||||||
|
Country |
Select the contact’s country. |
||||||
|
Phone Telex Fax |
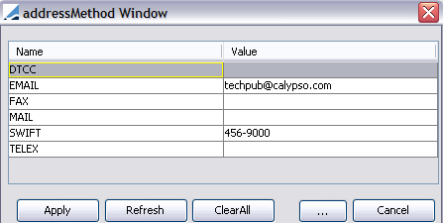
Enter the information that you will need for message and payment generation. This information can also be specified by clicking ... next to the Codes field. You can also specify additional information there. These codes are defined in the domain "addressMethod". You can select the code that appears by default be setting Comment = default in the "addressMethod" field for the code of your choice.
Ⓘ [NOTE: If you want to specify a list of possible values for a given code, create the domain “addressMethod.<code>”, and add the values to that domain - The name is case sensitive] Non Connected BIC If you set the code NON_CONNECTED_BIC = true, the BIC code specified in the Swift field corresponds to a non connected BIC code (passive participant), and follows specific constraints in Swift messages. |
||||||
|
Swift |
You can enter the SWIFT BIC code manually, or click ... to select a SWIFT BIC code from the BIC directory. It can be imported using the scheduled task SWIFT_BIC_IMPORT. If you enter the SWIFT BIC code manually, and the environment property CHECK_BIC_DATA is set to true, the system will check that the code is valid. |
||||||
|
External Ref |
Enter an external reference as needed. |
||||||
|
Comment |
Enter a comment if desired. |
Access Permissions
To set access permissions per contact, set the comment of the attribute to "allowAccessPermission" in domain "contactType".
Example:
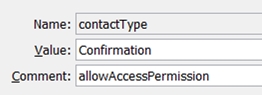
Sample access permission on contact type
It creates the access functions CreateLEContact#Confirmation and RemoveLEContact#Confirmation. You can then grant read/write access or read-only access to these functions in Access Permissions.
It also creates the access function AuthorizeLegalContact#Confirmation.
2. Modifying a Contact
| » | Click Load to load the contacts for a given legal entity. You will be prompted to select a legal entity. |
You can modify the fields as applicable.
| » | Then click Save to save your changes. |
Note that if the Authorization mode is enabled, an authorized user must approve your entry.
3. Loading Valid Contacts
You can set the "Valid On" date at the bottom of the screen to only load contacts valid on or after that date - Based on the Effective From and Effective To dates.
4. Validating a Contact
When you modify a contact, you can check if the contact is used and needs to be modified in existing messages.
| » | Click Load to load the contacts for a given legal entity. You will be prompted to select a legal entity. |
| » | Then click Validate Contact to check if the contact needs to be updated in existing messages. You will be prompted to select a message status to be checked. |
A message report will display messages for which the contact needs to be modified.
You can choose Process > Update Messages to apply the action UPDATE on the selected messages.
If the contact was modified, the action UPDATE will set the status of the message to INVALID. You will have to create new valid contacts and apply action FIX to verify the messages manually.
If the modification on the contact was minor, the action UPDATE will set the current address code and contact type on the message. The message will remain in its original status with the necessary updates.
The following workflow transitions need to be added in the message workflow:
| – | <STATUS> - UPDATE - <STATUS> (workflow rule ApplyDefaultContact) |
| – | <STATUS> - UPDATE - INVALID (workflow rule CheckCorrectContact) |
5. Deleting a Contact
| » | Click Load to load the contacts for a given legal entity. You will be prompted to select a legal entity. |
| » | Then select a contact and click Delete. If the contact is used in configuration data, you will not be able to delete it. |
Note that if the Authorization mode is enabled, an authorized user must approve your entry.
6. Displaying Pending Authorizations
| » | Click Show Auth to display any contact pending authorization. This only applies if the Authorization mode is enabled. |
7. Utilities Menu
The menu items of the Utilities menu are described below.
| Menu Items | Description |
|---|---|
|
Search |
Allows you to find a contact using various criteria, including codes. |
|
Search by Method |
Allows you to search for a contact by code. For example, to find a contact by its SWIFT code, choose SWIFT and enter the code value. |
|
Exit |
Closes the window. |