Warrant Product Definition
Prior to trading a Warrant or Certificate, you need to create the product in the Warrant/Certificate window.
Warrant Types
| • | CBBC: A CBBC warrant (or Callable Bull Bear Contract) is a warrant with a barrier usually different from the strike. The CBBC is knocked out if the barrier is triggered, and the final reference price is determined by taking the low or the high of two consecutive trading sessions (depends on potential market disruption events). The underlying can be an equity or an equity index and the CBBC is settled in cash or physically. It is possible to store quotes computed during the two sessions following the barrier triggering. |
| • | Currency Warrant: The underlying is an currency pair. At expiry, if the warrant is in the money, the holder is only able to exercise into cash. |
| • | Exotic Warrant: Generic Warrant |
| • | Index Warrant: The underlying is an equity index. At expiry, if the warrant is in the money, the holder is only able to exercise into cash. |
| • | Installment Warrant: An Installment Warrant is a European warrant with an embedded call or put option. At expiry, if the warrant is in the money, the holder is able to exercise into cash or shares, depending on the terms of the warrant. Regular dividends are passed to the holder of the warrant (dividend pass through) in cash. For Installment Warrants with the checkbox "Dividends Passed Through" selected, a corporate action CASH/DIVIDEND will be created on the dividend ex-date. [NOTE: This only applies to Installment Warrants with an Equity as the underlying.] The dividends are inputted in Calypso as regular corporate action dividends on an equity, and there is a corresponding impact on the equity dividend schedule. |
| • | International Warrant: At expiry, if the warrant is in the money, the holder will receive a stock different than the underlying. |
| • | Investment Warrant: Usually, there is a low strike, long maturity, and no barrier. At expiry, if the warrant is in the money, the holder is able to exercise into cash or shares. |
| • | MINI: A MINI is a barrier warrant with no expiry delivery cash in case of knock out. The warrant strike and barrier level are recomputed daily. The initial strike and level are captured on the warrant product. If the barrier is triggered, the holder can sell back the MINI to the issuer during the stop loss period, which starts at the stop loss date and usually ends one business later (or more, depending of the buy back period tenor set on the warrant). On the period end date, the final reference price (stop loss termination reference price) is determined. |
| • | Trading Warrant: At expiry, if in the money, the holder is able to exercise into cash or shares (depending on the terms of the warrant). |
1. Defining a Warrant or a Certificate
From Calypso Navigator choose Configuration > Equity > Warrant/Certificate to open the window as shown below.
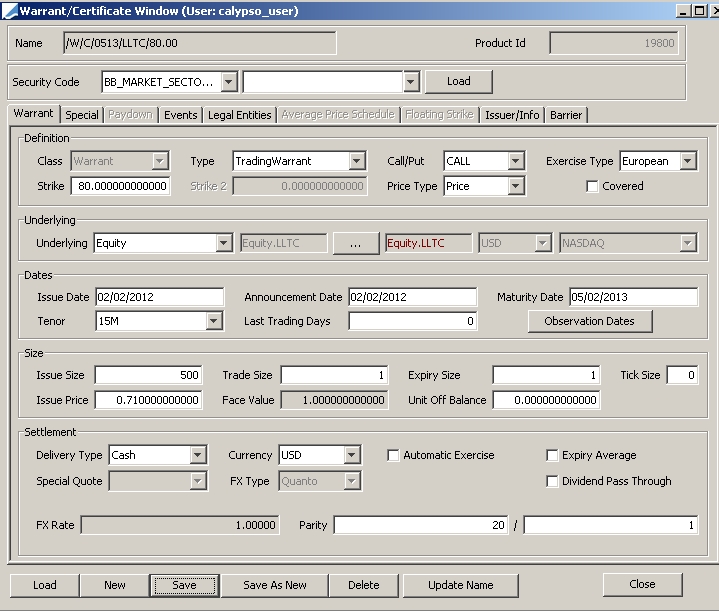
Sample Warrant Definition
| » | To load an existing Warrant or Certificate, select a product code from the Security Code list, and enter the actual code value in the adjacent field as shown below. |

Then click Load to load the corresponding product.
You can also click Load at the bottom of the window to open the Product Chooser window. Help is available from that window.
Otherwise, click New and enter the fields in the product panel and other panels as applicable. The fields are described below.
| » | Click Save to save your changes. You will be prompted to enter a product name. |
You can also click Save As New to save the product as a new Warrant or Certificate. You will be prompted to enter a new name.
You can click Update Name to modify the product’s name. You will be prompted to enter a new name.
Fields Details
|
Fields |
Description |
|
Name |
Name given by the user when the Warrant or Certificate is saved. |
|
Product Id |
Unique id given by the system when the Warrant or Certificate is saved. |
|
Class |
Select a product class: Warrant or Certificate. The class cannot be changed once the product is saved. |
|
Type |
Options for Warrant: CBBC, Capped, CurrencyWarrant, Exotic, IndexWarrant, InstalmentWarrant, InternationalWarrant, InvestmentWarrant, MINI, Quantofixe, Quantovar, TradingWarrant, or Vanilla. By default, the field type is set to "TradingWarrant". For Certificate, the only option is Exotic. |
|
Call/Put |
Select CALL or PUT. This field is available only for Warrants. |
|
Exercise Type |
Select a type of exercise: American, European, or Bermudan. |
|
Strike |
Enter the Warrant strike. This field is available only for Warrants. The value represents the exercise price. |
|
Strike 2 |
This field is available only for Capped Warrants. The Strike 2 value represents the cap level. |
|
Price Type |
Select the type of price: Price, PriceC, or CleanPrice. |
|
Covered |
Available for Warrants (expect Exotic, Quantofixe, Quantovar, and Vanilla). The checkbox indicates whether or not the warrant is covered. A covered warrant, unlike a regular warrant, is issued by a financial institution and not the company that issued the underlying security. Usually the underlying shares are placed in a trust. [NOTE: No processing is associated with this field; it is just for information.] |
|
Underlying Type |
Select the type of underlying product. For Currency Warrants, the underlying must be a currency pair. |
|
Underlying Product |
If the underlying product is managed in Calypso, click ... and select a product with the Product Chooser window. Following the selection, the code and description are displayed. For the products not managed in Calypso, the description must be entered by the user. This field is editable if the underlying product type belongs to the domain Warrant.UnderlyingEditable or Certificate.UnderlyingEditable. |
|
Underlying Description |
For the products managed in Calypso, a double-click on the underlying description opens the window of the related product. |
|
Underlying Currency |
This field is editable only for the products not managed in Calypso. For the others, this field displays the currency of the underlying product. |
|
Underlying Exchange |
This field is editable only for the products not managed in Calypso, or products that have no exchange place (e.g. FX, Basket). For the others, this field displays the exchange place of the underlying product. |
|
Issue Date |
Enter the issue date. |
|
Announcement Date |
Enter the Announcement date. |
|
Maturity Date |
Fixed maturity date. For open end maturity warrants, such as MINI, this field is not mandatory. |
|
Tenor |
Maturity date expressed as Tenor relative to the issue date. |
|
Last Trading Days |
Number of days prior to Maturity Date in which the warrant is no longer traded. |
|
Buy-Back Period |
Only applies to MINI. When a MINI is knocked out, the issuer can buy back the MINI during the buy-back period. The period starts at the knock out date and usually last several business days. The warrant can only be sold to the issuer at the Remaining value, which is calculated as: Remaining Value = (Stop Loss Termination Price - Current Price) / Conversion Price |
|
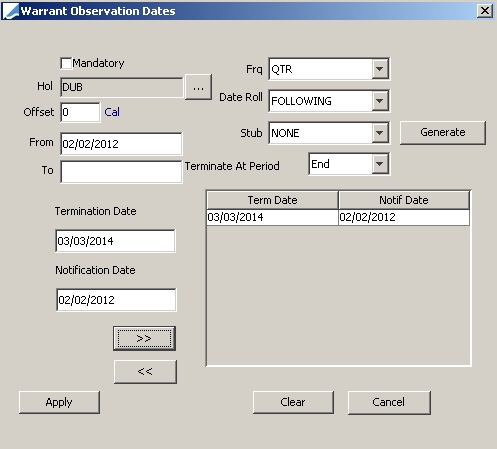
Observation Dates |
Click Observation Dates to enter the different notification and maturity dates. This screen allows generating a range of dates depending on a frequency. It also allows adding specific dates. All these dates will appear in the Trade Diary report.
|
|
Issue Size |
Enter the total face amount of the issue. |
|
Trade Size |
Enter the minimum nominal tradable. Default value = 1. |
|
Expiry Size |
Enter the expiry size. Default value = 1. |
|
Tick Size |
Enter the nominal tradable beyond the minimum trading size. Default value = 0. |
|
Issue Price |
Enter the issue price. |
|
Face Value |
This field is only editable if the Price Type is "PriceC" or "CleanPrice". Enter the price with the variable nominal. Default value = 1. |
|
Unit Off Balance |
Enter the face value variation. Only used for warrants that have a nominal different from the face value. |
|
Delivery Type |
Select the delivery type in case of exercise/assignment of the product. The options include Cash, Mix, Not Known, and Physical. The default value is Cash. [NOTE: For International Warrants, the Delivery Type field defaults to "Physical".] |
|
Currency |
Select the settlement currency. The default is the underlying currency. [NOTE: For International Warrants, the Currency field defaults to the currency of the “Underlying to deliver”.] |
|
Automatic Exercise |
Tick the checkbox for products eligible for automatic expiry / exercise / knock out by dedicated scheduled task. |
|
Expiry Average |
Tick the checkbox to use an average price as the final reference level. If the box is ticked, the Average Price Schedule tab will be enabled. |
|
Special Quote |
Instead of using the final closing price or an average final price, a warrant can use a special quote as the final reference level. At expiry / exercise, the warrant is settled against the special quote. |
|
FX Type |
Available for Currency Warrant, Index Warrant, International Warrant, and Trading Warrant. Field can only be selected if the Settlement currency is different than the Underlying currency. Select Quanto or Compo. |
|
Underlying to deliver |
Only available for International Warrants. Specify the equity to deliver if the warrant is "in the money" at expiry. |
|
Dividend Pass Through |
Tick the checkbox if the warrant is eligible for ordinary dividends, in which case, the corporate action module will generate a CASH Dividend CA. |
|
FX Rate or FX Reset |
For Quanto, enter an FX Rate. For Compo, select an FX Reset. |
|
Parity |
Select the quantity of warrant to exercise (From) to obtain a quantity of underlying (To). |
2. Specifying Special characteristics
Select the Special panel to capture additional characteristics.
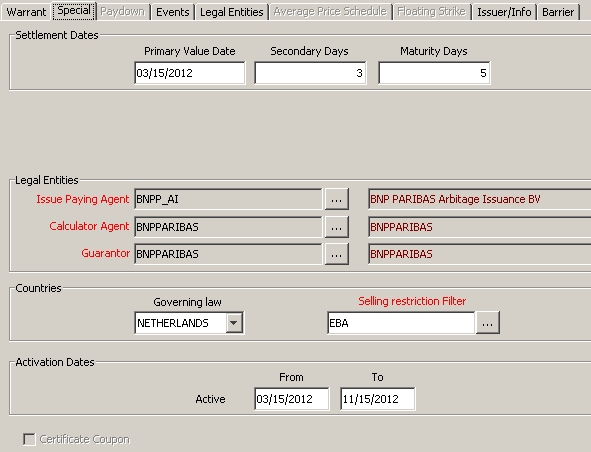
Warrants/Certificate window - Special panel
| » | Enter the fields described below as needed. |
Fields Details
|
Fields |
Description |
|
Primary Value Date |
Enter the settlement date for trades on the Primary/Grey Markets. If the field is left blank, the settlement date of the Primary trades will be the Issue Date. |
|
Secondary Days |
Number of days to calculate the settlement date of trades on the Secondary Market. Don’t forget to setup calendar(s) on the Market Place. |
|
Maturity Days |
Number of days to calculate the settlement date of trades generated at maturity. |
|
Issue Paying Agent |
Name of the Issue Paying Agent for a new issue. The agent should be previously created as a Legal Entity with the role IPA. The Issue Paying Agent will be used for issuance trades. Double-click on the Issue Paying Agent description displayed in red to open the Legal Entity screen. |
|
Calculator Agent |
Name of the Calculator Agent for events. It should be previously created as a Legal Entity with the role Calc_Agent. Only for information at the moment. Double-click on the Calculator Agent description displayed in red to open the Legal Entity screen. |
|
Guarantor |
Name of the Guarantor. It should be previously created as a Legal Entity with the role Guarantor. Double-click on the Guarantor description displayed in red to open the Legal Entity screen. |
|
Governing Law |
Select the country in which the product issued belongs. |
|
Selling Restriction Filter |
Enter here a Static Data Filter. The goal is to have a workflow rule which will alert the user in case of trades with a non-allowed counterparty. Click ... to select a Static Data Filter. Click the heading of this field to create a new Static Data Filter or to modify an existing Static Data Filter. |
|
Active From … To … |
Range of dates when the product can be used in the system. |
|
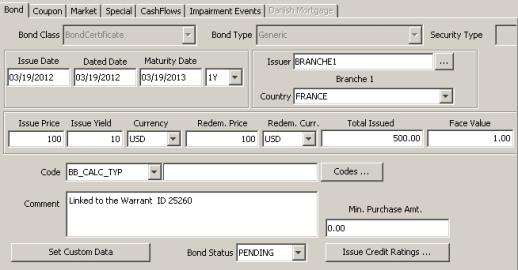
Certificate Coupon |
Tick this checkbox to capture the coupon characteristics. It is editable only for Certificates. Then, click ... to open a new screen. The coupon characteristics will be captured as a bond (with a dedicated class = BondCertificate) linked to the Certificate. The main fields are initialized (Issue Date, Dated Date, Maturity Date, Total Issued, Face Value, Issuer, Country) and the Comment displays the Name and the Id of the Certificate.
Help is available from that window. |
3. Applying Changes through the Paydown Tab
Select the Paydown tab to create, edit, and remove Face Value variation.
[NOTE: The Paydown functionality can only be applied to certificates.]
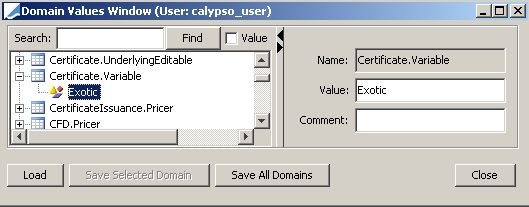
To enable the functionality, you must add the following domain values:
| • | Warrant.Variable |
| • | Certificate.Variable |
The subtypes listed under the domain can have a variable face value.
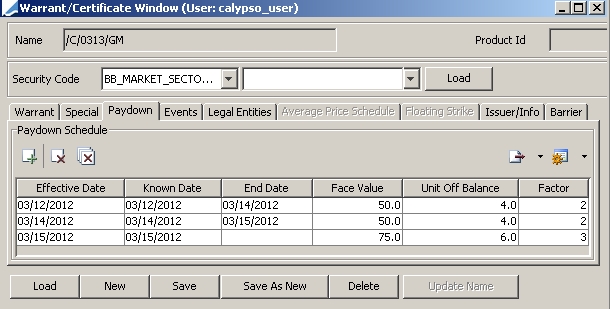
Warrants/Certificate window - Paydown panel
| » | Click  to bring up the Warrant Paydown window. to bring up the Warrant Paydown window. |
Specify the Effective Date (application date) and Factor Change. The Face Value and Unit Off Balance will be calculated automatically.
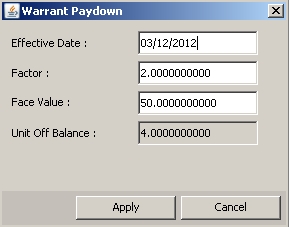
Click Apply to update the Paydown Schedule and return to the Paydown panel.
| » | Click  to configure columns, reset configurations to default, or save configurations. to configure columns, reset configurations to default, or save configurations. |
| » | Click  to export to HTML, Excel, or CSV. to export to HTML, Excel, or CSV. |
4. Displaying Events
Select the Event panel to display all events in the life of the product.
| • | The first part of the screen displays the Corporate Actions and all other events: Exercise, Assignment, Expiry, Barrier Deactivation. |
| • | The second part displays the events on the Issuance product: Issuance, Mark-up, Mark-Down. |
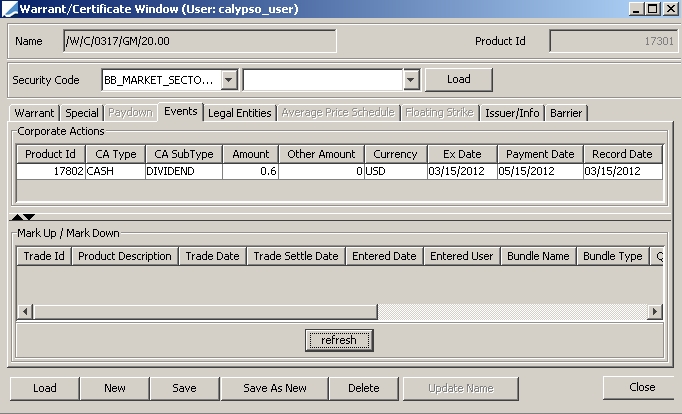
Warrants/Certificate window - Events panel
5. Specifying Legal Entities
Select the Legal Entities panel to specify product codes by legal entity as shown below.
Warrants/Certificate window - Legal Entities panel
You can use this panel to specify, for example, specific product codes by market place.
| » | Click to add a legal entity, then select a role, a legal entity, a security code (product code), and enter a product code value. Repeat as needed. |
| » | Click Save to save your changes. |
6. Specifying Average Price Schedule
Warrants can be settled using an average price calculation as the final reference level. The Average Price Schedule tab is used to specify the dates to include in the computation, usually the 5 days prior to the maturity date.
The Holidays Field defaults to the holiday calendar associated with the selected underlying.
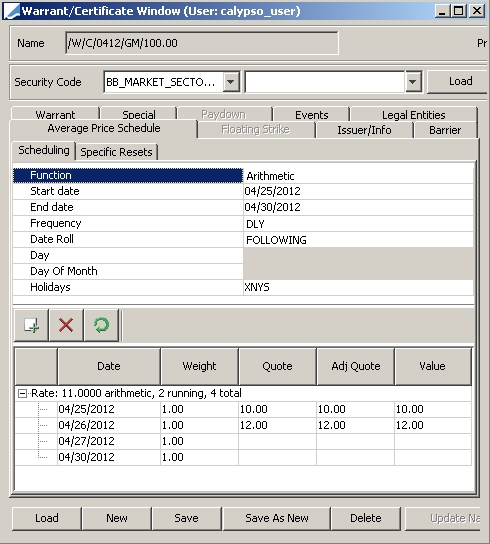
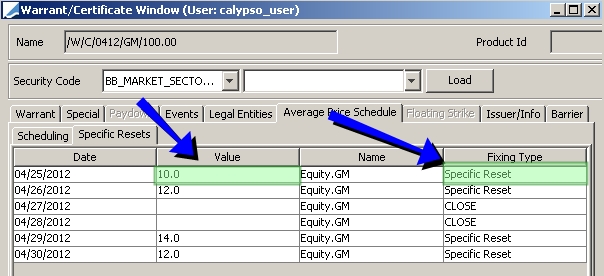
The fixing on the last days can be overridden by the Specific Reset tab.
7. Displaying Floating Strike
[NOTE: Functionality only applicable for MINI warrants.]
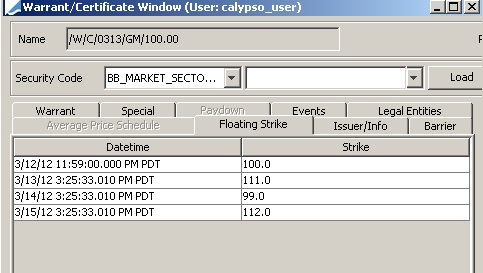
| » | Right-click inside the Floating Strike panel to add a row. |
| » | Specify the Date and time along with corresponding strike price. |
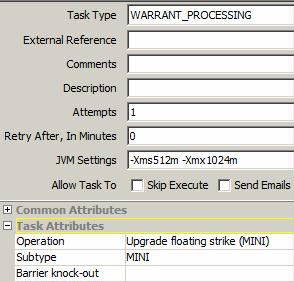
The WARRANT_PROCESSING scheduled task can be used to automatically copy the MINI strikes to the Floating tab of the MINI warrant.
8. Specifying Issuer
Select the Issuer/Info panel to specify the Issuer and related information.

|
Fields |
Description |
|
Exchange |
Select the exchange where the product is issued. |
|
Issuer |
Choose the Issuer. |
|
Codification |
Select a Product Code. |
|
Codes |
Click Codes to specify code values using the Code Window. |
|
Status |
Select a status for the product. |
|
Comment |
Enter a comment as applicable. |
|
Templates |
Click Templates to select a template operation. |
|
Attributes |
Click Attributes to bring up the Attributes Window. |
9. Defining Barriers
Select the Barrier tab to define the barrier attributes.

|
Fields |
Description |
|
Has Barrier |
Tick the checkbox if the warrant has a barrier. |
|
Type |
Select IN or OUT. |
|
Direction |
Select UP or DOWN. |
|
Level |
Enter an absolute value to represent the barrier level. For simple knock out warrants, the barrier level is usually equal to the strike price. |
|
Monitoring |
Select CLOSING or CONTINUOUS. CLOSING is set as the default. In terms of processing, the monitoring type does not impact the settlement. |
9.1 CBBC Barriers
For CBBC warrants, the barrier level can be different from the strike price. An external system is responsible for notifying the Calypso system when a barrier is triggered. The external system will publish the high/low prices and the CBBC call level will be monitored against them. If the CBBC barrier is triggered, the valuation period is separated into two consecutive trading sessions (assuming there are no market disruption events), during which the high/low of each session is published. One special quote for each session is created, published, and used for CBBC settlement.
When computing the knockout settlement amount, the final reference level will be determined as follows:
| • | For bull CBBC, the final reference level is the lowest of the two special quotes. |
| • | For bear CBBC, the final reference level is the highest of the two special quotes. |
The session quotes are named: XXXX.SQ.Session1 and XXXXX.SQ.Session2 where XXXX is the Warrant name.

9.2 MINI Barriers
The barrier level is a stop-loss to protect against a negative MINI price. The level is recomputed daily and published by the issuer prior to the open of each day.
The initial strike and level are captured on the warrant product.
The daily strike is stored as a quote named XXXX.STRIKE and the daily barrier level as XXXX.STOPLOSS where XXXXX is the warrant name.
