Trading Warrants and Certificates
Choose Trade > Equity > Warrant/Certificate to open the Warrant Trade window, as shown below, from Calypso Navigator or from a Trade Blotter.
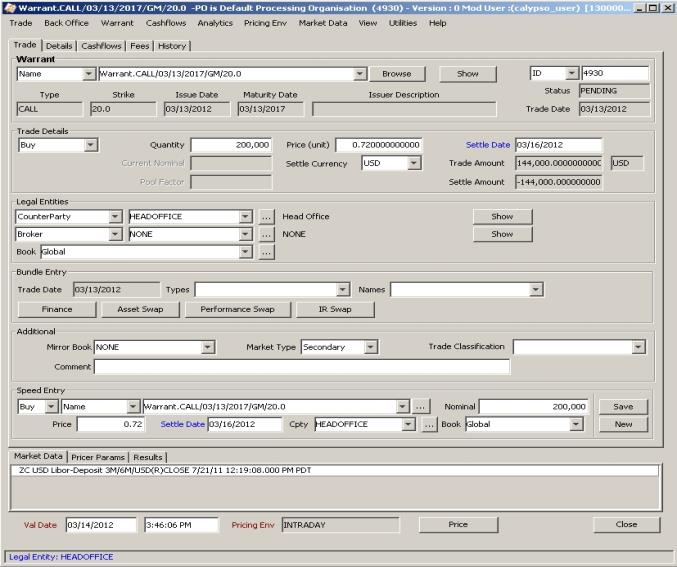
Sample Warrant Trade
The Trade panel is selected by default.
To enter a Warrant or Certificate trade, you can enter trade details or use the speed entry panel. In any case, you can load a template to populate the fields of the Trade panel.
Loading a Trade Template
| » | Hit F10 to load a Warrant trade template. You will be prompted to select a template name. |
Entering Trade Details
You can select what areas of the Trade panel you want to display. This is particularly useful if you have loaded a template and only want to modify certain areas of the trade.
| » | To select areas of the Trade panel for display, choose the View menu. All menu items operate as checkboxes. Check all the menu items corresponding to the areas you want to display. |
Then modify the corresponding fields described below.
Note that the Trade Date is entered in the Details panel.
| » | Proceed to the other panels as applicable. |
| » | Then hit F5 to save the trade or choose Trade > Save. |
You can also hit F12 to save a trade using any action available in the workflow, or choose Trade > Save Action. You will be prompted to select an action.
Using the Speed Entry Panel
| » | Choose the View menu, and check the “Speed Entry Panel Only” menu item. The Speed Entry Panel will appear. It allows specifying the trade direction, the security, the book, the nominal, the trade price, the settlement date, and the counterparty. The fields are described below. |
Then click Save to save the trade.
You can use the other menu items of the View menu to configure the layout of the Warrant window.
Pricing
| » | Click Price to price a trade. A warrant requires a discount curve and a quote. |
Financing
| » | Once a trade has been saved, you can choose Warrant > Finance Trade to enter a related repo trade. If the Warrant belongs to a bundle, the repo trade will be added to the bundle as well. |
You can also click Finance in the Bundle Entry area.
|
Fields |
Description |
|||||||||
|
Warrant Details |
||||||||||
|
Product Code Product Description |
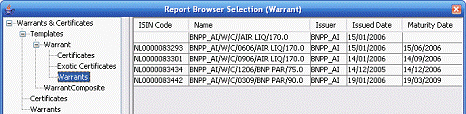
You can select the product using one of the following methods. Once you have selected a Warrant or a Certificate, the value of the alternative product code is displayed in the field adjacent to the Browse button. The alternative product code in specified in the attributes of the User Defaults. You can click Show to view the details of the selected product. Product Code Selection Select a product code and type in a few characters of the code value in the adjacent field. The products that satisfy the request will be displayed as shown below.
The product code defaults to the security code specified in Calypso Navigator > Configuration > User Access Control > User Defaults. You can specify as many product codes as applicable. If the environment property USE_SUBSTRING_IN_BOND_NAME_QUERY is True, it will search anywhere in the product name. Otherwise, it will only search from the start of the product name. If you have specified a quick entry template, the search will look into the products of the quick entry template. Browser Selection Click Browse to select a product from a user-defined product browser as shown below.
|
|||||||||
|
Id |
Unique identification number of the trade. The trade id is automatically assigned by the system when the trade is saved. You can load an existing trade by typing into this field the trade id, the external reference or the internal reference. |
|||||||||
|
Status |
Current status of the trade. The status is automatically assigned by the system based on the workflow configuration. The status will change over the lifetime of the trade according to the workflow configuration and the actions performed on the trade. |
|||||||||
|
Product Characteristics |
Once the product is selected, the main characteristics of the product are displayed: – Type (Call/Put) – Strike – Issue Date – Maturity Date – Issuer Description |
|||||||||
|
Trade Date |
The Trade Date is displayed from the Details panel. |
|||||||||
|
Trade Details |
||||||||||
|
Buy / Sell |
Select Buy or Sell as applicable to indicate the direction of the trade from the book’s perspective. You can switch between Buy and Sell using the space bar. |
|||||||||
|
Quantity |
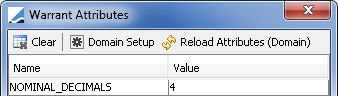
Enter the quantity of warrants to trade. You can adjust the number of decimals, up to 8, using the attribute NOMINAL_DECIMALS. Default is 2. Warrant attributes are defined at the product level - On the Issuer/Info panel, click Attributes.
|
|||||||||
|
Price |
Enter the price negotiated. |
|||||||||
|
Settle Date |
On Primary/Gray Markets (i.e., if the Trade Date is before the Issue Date of the product), the settlement date defaults to the Primary Value Date specified in the product. On Secondary Market, the settlement date defaults to the trade date + the number of settle days specified in the product. The settlement date uses the holiday calendar of the product's market place to identify business days. If you change the trade date, double-click the Settle Date label to update the settlement date accordingly. |
|||||||||
|
Current Nominal |
Currently not used. |
|||||||||
|
Settle Currency |
The settlement currency defaults to the product's currency. Modify as applicable. |
|||||||||
|
Trade Amount |
Calculated from the quantity and price. The adjacent field displays the product’s currency. |
|||||||||
|
Pool Factor |
Currently not used. |
|||||||||
|
Currency Quote |
This field is enabled if the Settle Currency is different from the product’s currency. Click the currency pair to obtain the last known quote. The adjacent field displays whether the quote Multiplies or Divides the trade amount. Modify as applicable. |
|||||||||
|
Settle Amount |
Calculated from the Trade Amount and the Currency Quote. |
|||||||||
|
Legal Entities |
||||||||||
|
Legal Entity |
The trade counterparty will control the settlement and delivery instructions of the trade. The first field identifies the legal entity role. The default role is specified using Utilities > Set Default Role. However, you can change it as applicable. You can select a legal entity of specified role from the second field, provided you have setup favorite counterparties. Otherwise, click ... to select a legal entity of specified role from the Legal Entity Chooser. You can also type Ctrl+F to invoke the Legal Entity Chooser, or directly enter a Legal Entity short name. You can choose Utilities > Selected CounterParty Info to show the Legal Entities Window for the selected trade counterparty, or click Show. |
|||||||||
|
Broker |
The first field identifies the legal entity role. The default role is Broker. Click ... to select the broker in the Legal Entity Chooser, or enter the legal entity short name in the field. Click Show to open the Legal Entity window for the selected trade broker. |
|||||||||
|
Book |
Trading book to which the trade belongs. Defaults to the book selected in Calypso Navigator > Configuration > User Access Control > User Defaults. You can modify as applicable. You can select a book you that have setup as favorite books in Utilities > Configure favorite booksor by clicking .... The processing organization of the book identifies the processing organization of the trade. |
|||||||||
|
Bundle Entry Bundles are created using Calypso Navigator > Configuration > Books & Bundles > Trade Bundle. You can finance the trade, capture an asset swap, capture a performance swap, or capture an IR swap by clicking the corresponding button. |
||||||||||
|
Trade Date |
The Trade Date is displayed from the Details panel. |
|||||||||
|
Types |
You can select a bundle type. |
|||||||||
|
Names |
You can select a bundle. |
|||||||||
|
Finance |
Click Finance to enter a related repo trade. If the product belongs to a bundle, the repo trade will be added to the bundle as well. |
|||||||||
|
Additional |
||||||||||
|
Mirror Book |
Select a mirror book if you want to mirror the current trade. You can select the mirror trader from the Details panel. A mirror trade will be saved with the current trade to the selected book, and you can view the mirror trade id from the Details panel. Do not forget that this functionality doesn’t handle the mirroring with the issuance product which is managed with a workflow rule. See Workflow: Mirroring. |
|||||||||
|
Market Type |
Defaults to the market type selected in Calypso Navigator > Configuration > User Access Control > User Defaults. You can modify as applicable. Market types are created in the Warrant.marketType domain. If this domain does not exist, the values belong to the marketType domain. |
|||||||||
|
Trade Classification |
You can select a classification for the trade as applicable. This classification is for informational purposes only. It is stored in the trade keyword "TradeClassification", and available values can be set in domain keyword.TradeClassification. It can be used in filters to filter trades for various processes, and can be viewed in reports throughout the system. |
|||||||||
|
Comment |
Enter a free-form comment as applicable. |
|||||||||