Premium Details
The premium can be paid/received as a single payment or according to a payment schedule. You can also select a fixed coupon payment option.
Single Payment
|
Fields |
Description |
|
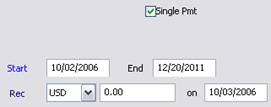
Single Pmt |
Check the “Single Pmt” checkbox to make the premium a single payment. |
|
Start End |
Enter the start and end dates of the trade. When saving a trade template, in order for the maturity date to yield the next/nearest IMM date, enter the end date as {n}YC, not {n}Y, example 10YC for 10 years. |
|
Rec/Pay |
Direction of the premium payment. It is set based on the direction of the trade.
Select the currency from the adjacent field. It defaults to the currency selected in the User Defaults. Enter the premium amount in the adjacent field. You can use shortcuts, for example enter “10m” for 10,000,000. |
|
on |
Enter the payment date of the premium. |
Payment Schedule
|
Fields |
Description |
||||||||||||
|
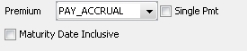
Premium |
Select how the premium payments are made:
|
||||||||||||
|
Single Pmt |
Uncheck the “Single Pmt” checkbox to define a payment schedule. |
||||||||||||
|
Guaranteed |
Only applies to basket CDS trades. When checked, in the case of partial termination, the premium notional does not change. Guarantees the notional. |
||||||||||||
|
Maturity Date Inclusive |
Check to add an extra day to the last period. |
||||||||||||
|
FX Rate |
Only applies to cross currency trades. The FX rate between the protection leg and the premium leg is populated, however you can change it as needed. |
||||||||||||
|
Fix/Float |
Select Fix to define a fixed leg, or Float to define a floating leg.
|
||||||||||||
|
Rec/Pay |
Direction of the premium payments. It is set based on the direction of the trade.
Select the currency from the adjacent field. It defaults to the currency selected in the User Defaults. Enter the principal amount in the adjacent field. You can use shortcuts, for example enter “10m” for 10,000,000. |
||||||||||||
|
Bullet |
Double-click the Bullet label to define the amortization structure of the principal. It brings up the Product Detail window. You can set amortization details in the Amortization and Accrual panel. Help is available from that window. |
||||||||||||
|
Funding Type |
Select the payment type.
For funded CDS Nth Loss trades, when a credit event occurs, there is no settlement fee but there is a principal reduction in the amount of the loss.
|
||||||||||||
|
Start/End |
Enter the start and end dates of the payment schedule. |


Fixed Premium / Leg
|
Fields |
Description |
|||||||||||||||
|---|---|---|---|---|---|---|---|---|---|---|---|---|---|---|---|---|
|
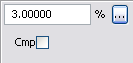
Rate |
Enter the fixed interest rate in percentage. The number of decimals defaults to the rate decimals specified in the User Defaults, up to 8 decimals. Note that you can enter the rate in basis point if you check the menu item Credit Default Swap > Show Fixed Rate in Basis Points. You can also click ... to define a fixed rate schedule, and specify the payment details.
You can also click
|
|||||||||||||||
|
Cmp |
Check the Cmp checkbox to enable interest compounding.
There is no compounding otherwise. |
Floating Premium / Leg
|
Fields |
Description |
||||||||||||||||||||||||
|---|---|---|---|---|---|---|---|---|---|---|---|---|---|---|---|---|---|---|---|---|---|---|---|---|---|
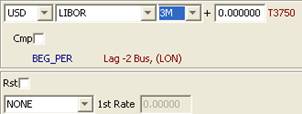
|
Reference Index |
Select the reference index. The reference index is defined by a currency, rate index, tenor and source. The currency and rate index default to the currency and default index selected in User Defaults. The tenor and source default to the first tenor and source available for that rate index. Rate indices are created using Calypso Navigator > Configuration > Interest Rates > Rate Index Definitions. You can modify the default values as needed. You can enter a spread over the rate value in the field adjacent to the tenor. If you double-click the source label (T3750 in this example), it brings up the Product Detail window. You can define a spread schedule in the Index and Resets panel. Help is available from that window. |
||||||||||||||||||||||||
|
Cmp |
Check the Cmp checkbox to enable interest compounding.
There is no compounding otherwise. |
||||||||||||||||||||||||
|
END_PER/BEG_PER |
Double-click the END_PER label to switch to BEG_PER as needed:
|
||||||||||||||||||||||||
|
Lag |
Double-click the Lag label to define the lag between the actual reset date and the beginning or end of the reset period. It brings up the Product Detail window. You can set lag details in the Index and Resets panel. Help is available from that window. |
||||||||||||||||||||||||
|
Rst |
Check the Rst checkbox to sample resets at a frequency different from the payment frequency. Otherwise, the resets are sampled at the payment frequency.
Weight Double-click the Equal label to toggle between:
Duration Double-click the Match label to toggle between:
Ⓘ [NOTE: The effective day of the resets only applies to weekly and monthly sampling (weekly: day of the week, monthly: day of the month)] |
||||||||||||||||||||||||
|
NONE / 1st Rate |
Select “1st Rate” to set the rate for the first reset period if known.
Otherwise, the rate will be set through the reset process. |
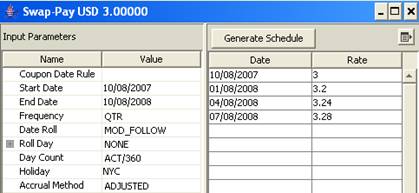
Payment Details

The payment details allow generating the cashflows.
|
Fields |
Description |
|||||||||||||||
|---|---|---|---|---|---|---|---|---|---|---|---|---|---|---|---|---|
|
Pmt |
Select the payment frequency. You can also select a date rule to determine the payment dates and the interest dates. Double-click the “Lag 0” label. It brings up the Product Detail window. You can select payment and coupon date rules in the Date Rules panel. Help is available from that window. |
|||||||||||||||
|
END_PER/BEG_PER |
Select END_PER if the payment occurs at the end of the payment period, or BEG_PER if the payment occurs at the beginning of the payment period. END_PER Select EXP or ACC for an exponential interest calculation from the adjacent field, or select NONE otherwise. ACC only appears if the floating rate is an inflation rate. Interest = Notional * ((1 + Rate)^t[n] - 1).
BEG_PER You can select one of the following discount methods from the adjacent field.
|
|||||||||||||||
|
Date Roll |
Select the date roll convention to roll the payment dates when they fall on business days. The payment calendar is used to determine business days. Date roll conventions are described under Calypso Navigator > Help > Date Roll Conventions. |
|||||||||||||||
|
Roll Day |
Select a date roll adjustment.
|
|||||||||||||||
|
Lag |
Double-click the “Lag 0” label to specify the number of days between the interest date and the payment date. It brings up the Product Detail window. You can set payment lag details in the Date Rules panel. Help is available from that window. |
|||||||||||||||
|
Daycount |
Select the day count convention to determine the number of days in the payment periods. Daycount conventions are described under Calypso Navigator > Help > Day-Count Conventions. |
|||||||||||||||
|
Payment Calendar |
Click ... to select payment calendars. They are used to determine business days. |
|||||||||||||||
|
NEAREST (rounding method) |
Double-click the NEAREST label to define the rounding method. It brings up the Product Detail window. You can set rounding details in the Rounding panel. Help is available from that window. |
|||||||||||||||
|
NONE (stub periods) |
Double-click the NONE label to define stub periods It brings up the Product Detail window. You can set stub details in the Stub Periods panel. Help is available from that window. |
|||||||||||||||
|
ADJUSTED (accrual period) |
Double-click the ADJUSTED label to define how the accrual period is adjusted on non-business days. It brings up the Product Detail window. You can set accrual details in the Amortization and Accrual panel. Help is available from that window. |
Premium Cap Floor Details
This does not apply to CDS Loans.

The premium payments can be capped. Only appears for Floating Premiums.
|
Fields |
Description |
||||||||||||
|---|---|---|---|---|---|---|---|---|---|---|---|---|---|
|
Type |
Select the type of cap floor: Cap, Floor, or Collar. |
||||||||||||
|
Exclude 1st Period |
Check the “Exclude First” checkbox to exclude the first caplet from the cashflows. |
||||||||||||
|
Strike |
Only appears for trade types Cap and Floor.
Enter the strike rate. You can also click ... to define a strike schedule.
Or select the schedule frequency from the Frq field.
|
||||||||||||
|
Upper Lower |
Only appears for trade type Collar.
You can also click ... to define a lower schedule, and an upper schedule. |
||||||||||||
|
Digital |
Check the Digital checkbox to specify payoff details.
However, you can enter variable digital factors for some or all caplets in the trade. In the Cashflows panel, check the Customized checkbox, and edit the Payoff Factor(%) column for each individual caplet. The payoff for a digital caplet will be calculated as follows: If Reset Rate > Strike, payoff = Notional * Period * Factor (Payoff Spread). Otherwise, payoff = Zero.
|
