Credit Market Data Window
The Credit Market Data window allows viewing current spreads, and capturing trades.
Choose Calypso Navigator > Market Data > Credit Curves > Credit Market Data.
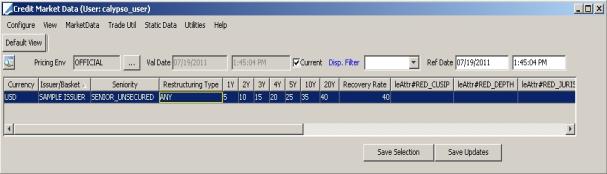
Credit Market Data Window
The window displays all credit curves for the selected pricing environment.
| » | Click ... next to the Pricing Env field to select a pricing environment. If no user default is set, the Market Data server will be used to automatically load data in the CMD window. You can load a pre-saved trade filter or filter set to the CMD window by clicking Configure > Load Config. |
Current filter and filter set can be viewed by hovering over the ![]() button. Clicking this button will allow you to add extra criteria to the filter or filter set.
button. Clicking this button will allow you to add extra criteria to the filter or filter set.
A filter set can be created based on Issuer, Currency and Issuer Attributes - Region and Sector. All associated curves will be added to the loaded filter.
Check the Current checkbox to use the current valuation date, or clear the Current checkbox and enter a valuation date as applicable.
The underlying CDS quotes can be edited directly in the table and saved using the Save Updates button.
You can right-click a curve and a popup menu will appear. The menu items are described below.
When you select Ref Date and press enter, it will select all the rows and calculate the changes for all the issuers.
| » | To capture a CDS trade over a given issuer, right-click a tenor column on the corresponding curve and choose Buy Protection or Sell Protection from the popup menu. It brings up the Credit Default Swap worksheet or the Pricing Sheet. You can choose which window the system will default to using Calypso Navigator > Configuration > User Access Control > Trade Window. Help is available from those windows. |
The trade can be created using a default template if you have selected one from Trade Util > Configure Default Template. A trade will not open in the Pricing Sheet without a configured template set to default.
Trades can be populated with default settlement information if specified using Calypso Navigator > Configuration > Credit Derivatives > CDS Settlement Matrix.
Popup Menu Details
The menu items of the popup menu are described below.
|
Menu Items |
Description |
|
Buy Protection Sell Protection |
To enter a trade for the selected curve / tenor. The trade can be created using a default template if you have selected one from Trade Util > Configure Default Template. If you have configured a default template then also the trade gets Trader/Sales names from user defaults. Trades can be populated with default settlement information if specified using Calypso Navigator > Configuration > Credit Derivatives > CDS Settlement Matrix. |
|
Shift Spreads |
|
|
Copy Formula |
Select a formula cell to copy. |
|
Paste Formula |
Select a formula to paste. |
|
Generate |
|
|
Curve Underlyings |
Opens Curve Underlyings window. Help is available from that window. |
|
Open in Curve Window |
Displays the selected curve in the Curve Window. Help is available from that window. |
|
Set Dependency |
This allows you to quickly base a Dependent curve off a Base curve. For example, say you have the following curves: FORD_SU, FORD_SECD, FORD_SUB, FORD_LT2, FORD_T1, and FORD_UT2. In Credit Market Data, you can select FORD_SECD and choose Set Dependency. Now you can specify the Base curve as FORD_SU and after that specify the spread in additive or multiplicative fashion. |
|
Graph Multiple Curves |
Opens the Curves Util window to show the current spreads in the Graph.
|
|
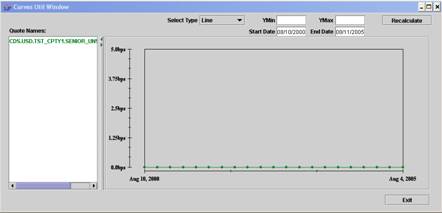
Graph Historical Spreads |
Opens the Curves Util window to show the historical spread of the 5 year point on a graph. The user can select the start date and end date to see the graph.
|
|
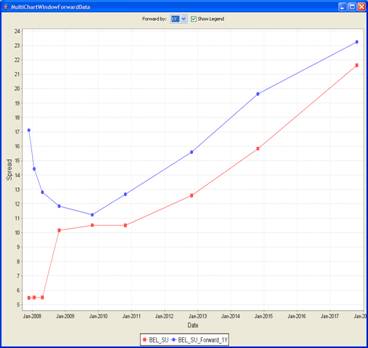
Graph Forward Spread |
Opens the Multi Chart Window Forward Data to display the curves with different forward tenors, and comparison of the forward curves with spot curve.
You can also customize the look of the graph by changing the text format or color. The graph can be printed or saved as an image file. |
|
Calculate Tenor Changes |
Calculates the changes of tenor for the selected rows. |
|
Clone Curve |
Create a new curve based on the selected curve. You will be prompted to select an issuer and a seniority level. The application automatically generates a name for the curve using the format: <Currency>_<IssuerShortName>_<Seniority>_<RestructuringCode> The new curve appears in the Credit Market Data window. The system automatically adds the curve to the pricer configuration associated with the selected pricing environment. |
 See
See 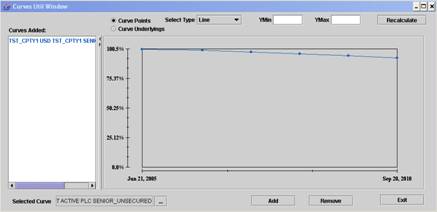
1. Configure Menu
The menu items of the Configure menu are described below.
|
Menu Items |
Description |
|||
|
Configure Columns |
Click this to get a complete list of configurable columns such as issuer name, seniority, rating values, user, quotes for underlying instruments (e.g. CDS), etc. |
|||
|
Configure Sort |
Opens Sort Columns window to allow you to rearrange the columns display. |
|||
|
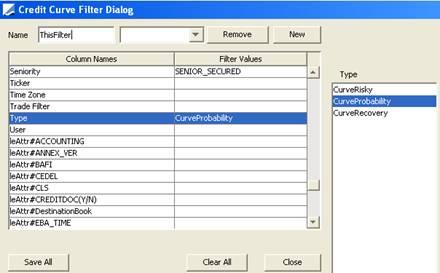
Configure Filter |
Opens the Credit Curve Filter Dialog which allows filtering which market data you want to display. Click on a row to add filter values from the relevant list which will appear to the right of the table.
|
|||
|
Configure Tree |
Allows you to configure columns of the tree view. |
|||
|
Public |
This checkbox menu item lets you specify whether the template configuration is public or private. Saving a public template in the Credit Market Data window will give other users access to those templates. A private template will be accessible only by logging in as the user who created that template in the first place. Access to non-private templates can be defined in the Group Access panel of the Access Permissions window (Calypso Navigator > Configuration > User Access Control > Access Permissions window).
|
|||
|
Configure ROD |
This function is no longer supported. |
|||
|
Define Columns |
For defining custom columns.
|
|||
|
Save Config |
You can configure your columns, sort order and filter and save the configuration under a name. |
|||
|
Load Config |
Loads a previously saved configuration of column/sort/filter combinations. |
|||
|
Delete Config |
Deletes a previously saved configuration of column/sort/filter combinations. |
|||
|
Close |
Closes the Credit Market Data window. |

2. View Menu
The menu items of the View menu are described below.
|
Menu Items |
Description |
||||||||||||
|
Enable Tree View |
This checkbox enables a Tree View as the default setting. |
||||||||||||
|
Configure Columns Names |
Use this to define a sort order to sort by multiple columns. To sort by any single column, double-click on the column header. |
||||||||||||
|
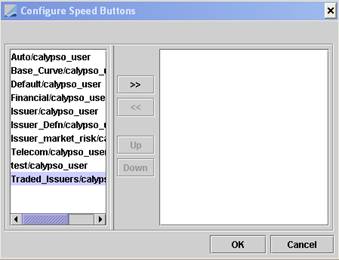
Configure Speed Buttons |
Select which speed buttons should appear in the Credit Market Data window.
They will appear along the top of the window.
|
||||||||||||
|
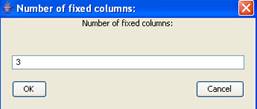
Set Fixed Columns |
Enter the number of fixed columns.
For example, if you enter 3, then the first 3 columns in the credit curves blotter remain fixed when you scroll.
|
||||||||||||
|
Adjust Tables |
If you resize the Credit Market Data window, choose this function to adjust the credit curves table. |
||||||||||||
|
Spread Display |
Select one of the following modes for viewing and editing quotes. The curve must be set with the LAST instance or the pricing parameter use_bid_ask must be set to true.
The Mid is the average (ask, bid). Spread = Ask - Bid. If you change the spread, the mid stays constant and: New Ask = Mid + Spread / 2 New Bid = Mid - Spread / 2 |
||||||||||||
|
Set Fee Precision |
Enter the fee precision. |
||||||||||||
|
Set Spread Precision |
Enter the spread precision. It will round to Nearest. |
||||||||||||
|
Set Recovery Rate Precision |
Enter the recovery rate precision. |
||||||||||||
|
Sort |
Sorts according to your sort configuration. |


3. Market Data Menu
The menu items of the Market Data menu are described below.
|
Menu Items |
Description |
|
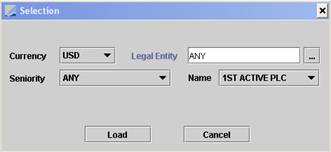
Add Curve |
When you select Add Curve, the Choose Value Dialog window opens to let you add an existing curve to the credit curve blotter/credit market data window (PricerConfig). Select the curve type and click OK. This will open the Selection window. Set the parameters to load the existing curve.
Ⓘ [NOTE: The curve will also be added to the pricer configuration of the selected pricing environment] |
|
Remove Curve |
Select a row and then select Remove Curve from the Market Data menu to remove an existing curve from the credit curve blotter/credit market data window. Ⓘ [NOTE: The curve will also be removed from the pricer configuration of the selected pricing environment] |
|
Save as CLOSE |
A separate instance of the curve will be saved with Instance_type = 'Close'. For example, the trader may be looking at the Instance_Type = 'Last' in the Credit Market data. But when using Save as Close, the curve will be saved as Instance_type = 'Close', which can be used for End of Day revaluations. |
|
PricingEnv |
Opens Pricing Environment window. |
|
Refresh |
Updates window with latest changes. |
|
Refresh Quotes |
Updates selected curves. |
|
Save Quotes |
Saves quotes from the selected curve to the quote set. |
|
Propagate |
Propagates selected curve. |
|
Retain Curve Shape |
Check this option to retain the curve shape. This allows you to change a cell, but update the entire row by the same factor. For example, if the 5y point is 65, and it is updated to 67, it will update all other points by the same factor 67/65. |
|
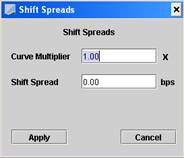
Shift Spreads |
Lets you select curves to apply shift. These can be set dynamically.
|
|
Set Dependency |
This allows you to quickly base a Dependent curve off a Base curve. For example, say you have the following curves: FORD_SU, FORD_SECD, FORD_SUB, FORD_LT2, FORD_T1, and FORD_UT2. In Credit Market Data, you can select FORD_SECD and choose Set Dependency. Now you can specify the Base curve as FORD_SU and after that specify the spread in additive or multiplicative fashion. |
|
Toggle Distressed/Non-Distressed |
Applies to curves with “Has Upfront Fee” checked in the CDS curve underlying instrument. Choose this menu item to toggle whether the curve is running with the spread or running with the spread + upfront fee. The application highlights the curve when a change occurs. You can include the column “Has Upfront” in the blotter to see whether the curve includes the upfront fee. |
4. Trade Util Menu
The menu items of the Trade Utility menu are described below.
|
Menu Items |
Description |
|
Configure Default Template |
To set a default trade template. You will be prompted to select a default template. |
|
Configure Quick Entry |
Lets you configure the CDS Quick Entry window.
The default is When you right-click a curve and choose Buy Protection or Sell Protection, the selected quick entry window will appear instead of the trade worksheet. |
|
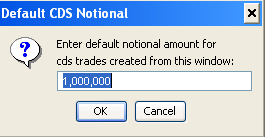
CDS Default Notional |
Enter the default notional amount that will be used when you right-click a curve and choose Buy Protection or Sell Protection.
|

5. Static Data Menu
The Static Data menu items are described below.
|
Menu Items |
Description |
|
Add Issuer |
Opens the Legal Entity window to let you add an Issuer. Online help is available in this window. |
|
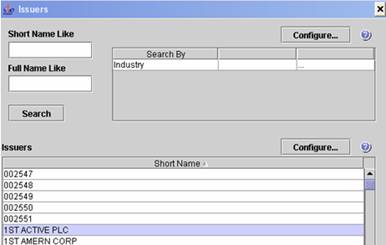
Issuer List |
Opens Issuers window to let you search for an Issuer. Enter the name of the issuer, hit [Enter] to see the whole list, or enter the first letter of the name of the issuer to see all issuers beginning with that letter. Use the Configure button to define a list of issuer attributes which can be used to filter the results.
|
6. Utilities Menu
The Utilities menu items are described below.
|
Menu Items |
Description |
|
RealTime |
Check this if you wish to be notified of changes to the market data you have in your blotter. When curves that are in your blotter get updated in the database, the corresponding rows will turn yellow and show the updated values. |
|
Spread Trigger Rule |
Enter the percentage of spread movement that should trigger a warning. |
|
Recovery Trigger Rule |
Enter the percentage of recovery movement that should trigger a warning. |
|
Export to Excel |
Exports the credit curve blotter data to Excel. Ⓘ [NOTE: You can use the shortcut [Ctrl+O] to export the data to Excel] |
|
Export to Omniscope |
Not currently supported. |
|
Show Log Progress |
To monitor the progress of loading the curves. Shows the total number of curves and loading curves in multiple steps. |
|
Formula Help |
Explains how to enter a formula for different tenors directly in their definition cells. |
7. Creating Tickers
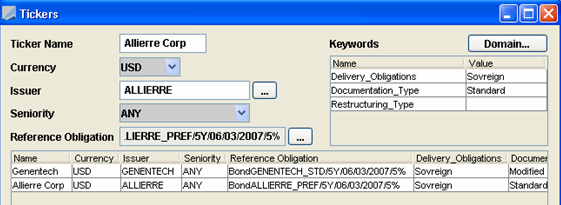
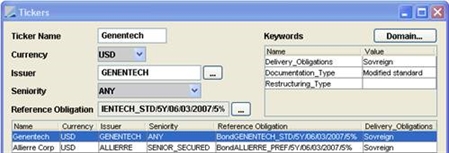
Tickers are used to represent the credit risk of curves. Credit curves can be created and associated to credit-based trades using a ticker. Tickers can also be used to associate an issuer with multiple credit curves. They are defined by a combination of reference entity (issuer), currency, seniority and optionally a reference obligation (e.g. a Bond).
Choose Static Data > Tickers to create tickers.
| » | Click Load to load existing tickers. |
| » | Click New in the Tickers window to clear all fields in preparation for creating new tickers, and enter the fields described below. |
| » | Click Save to save the current ticker definition. |
Fields Details
|
Fields |
Description |
|---|---|
|
Ticker Name |
Type the name of the new ticker. |
|
Currency |
Select the currency of the entity (e.g. curve) that this ticker will be associated with. |
|
Issuer |
Select the name of the Issuer that this ticker will reference. |
|
Seniority |
Select the seniority of the reference obligation. |
|
Reference Obligation |
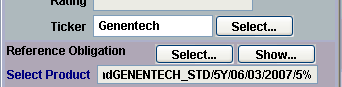
Opens the Product Chooser window to permit selection of a default reference obligation to be associated with the ticker. When a ticker with a reference obligation is applied to credit market data or credit-based trades, the reference obligation associated with the ticker serves as the default reference obligation of the curve or trade. The reference obligation of a credit curve, associated through the assignment of a ticker:
The reference obligation of a trade, associated through the assignment of a ticker:
The reference obligation as assigned through a ticker may be overridden on a trade through the Reference Obligation Select button. |
|
Keywords (Domain…) |
Click the Domain button to open the Ticker Keyword Domain window for the addition of new Ticker Keywords.
|
|
Keywords |
Double-click within the Value field next to a keyword enter a value for the keyword.
At the Credit Market Data window, you can view the keywords in the table. Choose Credit Market Data > Configure Columns to add and position the keyword and Ticker columns in the table. |

7.1 Ticker Keywords
When a ticker with keyword values is applied to credit market data, the keyword values appear on the credit market item in the Credit Market Data window. In the example below, the ticker keywords ‘Delivery_Obligations’ and ‘Documentation_Type’ have been set to the values ‘Sovereign’ and ‘Standard’ respectively for the ticker applied to the credit market data item with Id 1206.
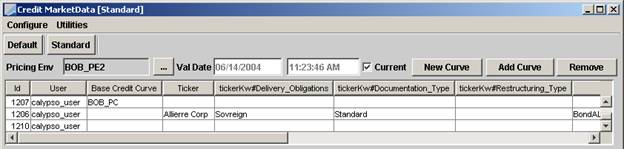
Credit Market Data Window
7.2 Adding Ticker Keywords
You can add ticker keywords to the ticker keyword domain.
From the Tickers window, click Domain to open the Ticker Keyword Domain window.
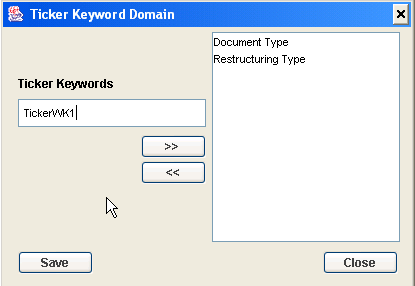
| » | Enter a new value into the Ticker Keyword field and click the >> button to add it to the domain. When it appears in the list on the right click Save. |
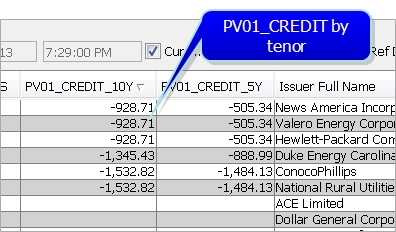
8. PV01_Credit Basis Spread
You can compute and trade PV01_Credit basis values from the CMD window. Add the basis measures to the window using Configure > Configure Columns and add the desired basis spread.
8.1 Calculate PV01_Credit on a Tenor
You can compute the value by selecting a tenor row and right-clicking, then choosing "Compute PV01_Credit". Only one row can be computed at a time.
8.2 Trade a Basis Spread
To trade on a basis spread, right-click on a basis spread, for example 5Y_10Y_BASIS, and use "Buy Protection" or "Sell Protection". This will open a Pricing Sheet (if configured) with a "buy" or "sell" protection trade on the longer tenor and the opposite trade on the shorter tenor. You will be prompted to select a basis trading strategy for weighing the notionals on the two legs.
Trading on a basis spread in the Pricing Sheet is only available for CDS SNAC and CDS Index strategies.
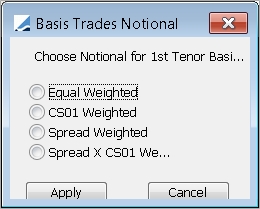
| • | Equal Weighted - equal notional on both legs. |
| • | CS01 Weighted - PV01_CREDIT (of longer tenor) * default notional/PV01_CREDIT (of shorter notional). |
| • | Spread Weighted - notional of shorter tenor = spread of longer tenor * default notional/spread of shorter tenor. |
| • | Spread X CS01 Weighted - notional on shorter tenor = PV01_CREDIT (of longer tenor) * spread of longer tenor * default notional/(PV01_CREDIT of shorter tenor * spread of shorter tenor). |