Capturing Transfer Agent Trades
From the Calypso Navigator, navigate to Processing
> Accounting Operations > Transfer Agent to configure transfer agent
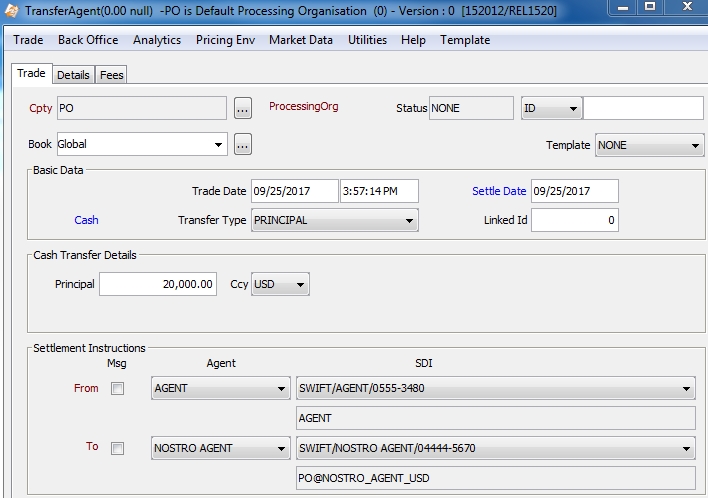
trades as shown below for a Cash transfer (menu action trading.TradeTransferAgentWindow).
A Transfer Agent trade is used to transfer Security or Cash from one Agent’s account to another. It is always carried out from the perspective of the Processing Organization.
|
Transfer Agent Quick Reference
- Enter agent transfer details in the Trade panel - Hit F5 to save the trade |
1. Sample Transfer Agent Trade

| » | Select the Processing Organization in the Cpty field and the book. |
| » | Select the Transfer Type. |
| » | Enter the Principal amount and the currency. |
| » | Select the From and To agents. The corresponding SDIs will be displayed, along with the debited account (From) and the credited account (To). |
For SECURITY Transfer Agent trades, you can use a specific SDI for the external side.
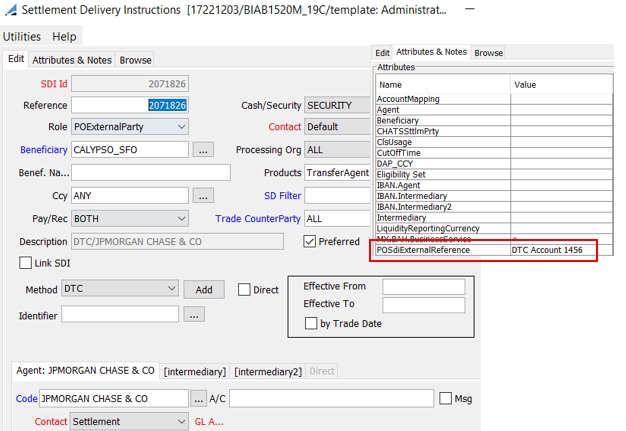
You need to add the role POExternalParty to the PO.
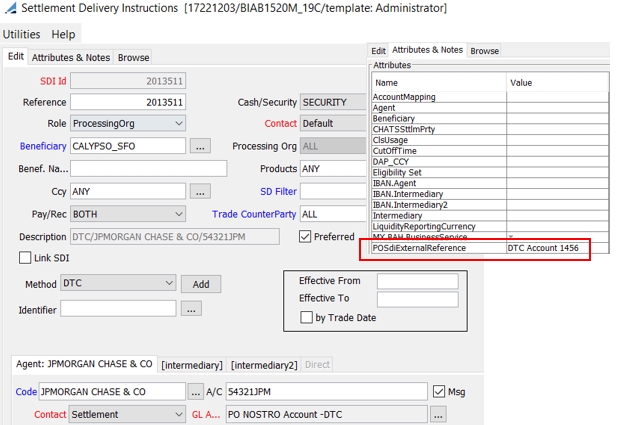
On the PO SDI, set the SDI attribute POSdiExternalReference.
When SDI attribute POSdiExternalReference is set on the PO SDI, the system looks for an SDI with role POExternalParty for the same PO and the same value of SDI attribute POSdiExternalReference for the external side SDI.
Example:
PO SDI

As POSdiExternalReference is set, the system looks for an SDI with role POExternalParty for the same PO and the same value of SDI attribute POSdiExternalReference.
POExternalParty SDI


1.1 BO Browser
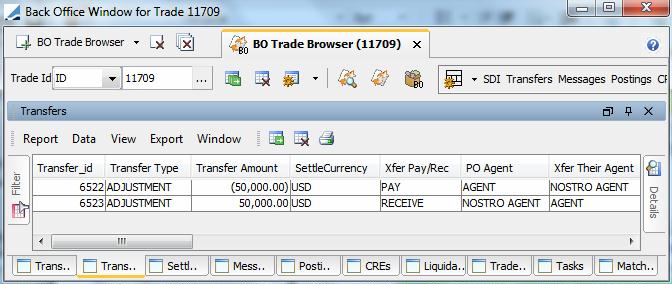
Once the Transfer Agent trade is entered and saved, you can view the transfers in the BO Browser by clicking Back Office in the Details panel. You can also choose Back Office > BO Browser.
Select the Transfers panel to view the transfers.
Ⓘ [NOTE: The Transfer engine should be running]

1.2 Trade Details
| Fields | Description |
|---|---|
|
Cpty |
Displays the trading counterparty. The counterparty is a legal entity. The default role appears next to the Cpty field. The default role is specified using Utilities > Set Default Role. However, you can change it as applicable. Double-click the role to change it. You can select a legal entity of specified role from the Cpty field provided you have setup favorite counterparties. You can also type in a character to display the favorite counterparties that start with that character. Favorite counterparties are specified using Utilities > Configure Favorite Counterparties. You can also double-click the Cpty label. Otherwise, click ... to select a counterparty of specified role from the Legal Entity Chooser. You can also type [Ctrl-F] to invoke the Legal Entity Chooser. |
|
Status |
Current status of the trade. The status is automatically assigned by the system based on the workflow configuration. The status changes over the lifetime of the trade according to the workflow configuration and the actions performed on the trade. |
|
Id Ext Ref Int Ref |
Unique identification number of the trade. The trade id is automatically assigned by the system when the trade is saved. You can load a specific trade by entering the trade id in this field and pressing [Enter]. You can also load a specific trade by the external or internal reference. Select Ext Ref or Int Ref, respectively, from the drop-down menu. Enter the reference in the adjacent field and press [Enter] to load the trade. |
|
Book |
Trading book to which the trade belongs. Defaults to the book selected in the User Defaults. You can modify as applicable. You can also select a book provided you have setup favorite books. Favorite books are specified using Utilities > Configure Favorite Books. The processing org of the book identifies the processing org of the trade. |
|
Template |
You can select a template from the Template field to populate the worksheet with default values. Then modify the fields as applicable. |
|
Cash / Security |
Double-click the Cash label to change to Security as applicable. The fields are different for a cash transfer and for a security transfer. See Cash Transfer Details and Security Transfer Details below. |
|
Trade Date |
Enter the trade date and time. It defaults to today. |
|
Settle Date |
The settle date defaults to the spot date (number of spot days specified in the currency defaults applied to the trade date). You can modify the settle date as applicable. Double-click the Settle Date label to adjust the settle date if the trade date is modified. |
|
Transfer Type |
For a cash transfer, you can select the transfer type. For a security transfer, it is set to SECURITY. You can limit the list of transfer types by adding the transfer types you want to display to the domain “TransferAgent.subtype”. |
|
Linked Id |
Enter a trade id to which you want to link the agent transfer as applicable. |
Cash Transfer Details
|
Principal |
Enter the cash amount you want to transfer. |
|
Ccy |
Select the currency of the cash amount. |
Security Transfer Details
|
Security |
Click ... to select the security. |
||||||
|
Nominal |
Enter the nominal of transferred security, and the quantity will be computed accordingly. Or enter the quantity. |
||||||
|
SecCode |
Defaults to the product code selected in the user defaults. You can select another product code as applicable. Product Codes are defined using Static Data > Reference Data > Product Code from the Calypso Navigator. |
||||||
|
Quantity |
Enter the quantity of transferred security, and the nominal will be computed accordingly. Or enter the nominal. |
||||||
| DAP |
Check the DAP checkbox if you want to associate a cash amount with the security transfer. In that, case you can enter the following additional fields.
The transfer will be DAP only if the SDI handles DAP transfers for the selected settlement currency (DAP_CCY attribute must be set to a comma-separated list of currencies, or ANY). |
Settlement Instructions
|
From To |
Select the From and To agents. The corresponding SDIs will be displayed, along with the debited account (From) and the credited account (To). You can modify the SDIs as applicable. You can check the From or To "Msg" checkbox to send a message to the agent provided the corresponding message setup is configured. If From or To "Msg" checkbox is checked, a payment message can be generated for Role = Addressee, provided the corresponding message setup is configured. |
1.3 Payment Message
The message template MT103XferAgent allows producing MT103 messages with tag 53B (Sender's Correspondent) when “Msg” is checked in the SDIs.
You can use the message templates "Payment.selector” or "PaymentCOV.selector" otherwise.
 Please refer to Calypso Settlements documentation for details.
2. Template Menu
The menu items of the Template menu are described below.
|
Menu Items |
Description |
|
Save As Template |
To save the trade as a template. You are prompted to enter a template name and specify whether the template is private or public. Other users will not be able to use private templates. |
|
Delete Template |
To delete a template. You will be prompted to select a template. Only the user who created a template (whether it is public or private) can delete it. You can also delete templates using Utilities > Maintenance > monitoring > Clean-up > Clean-up Database, Products panel.
|

